7
An ASSA ABLOY Group brand
80-8420-0900 Rev. B (05-08)
SECTION
INSTALL THE TRIM
III-A
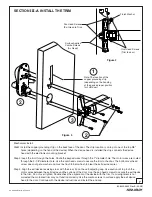
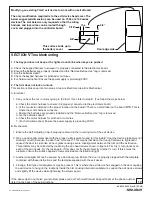
Step1 Install the copper grounding strip on the back face of the door. The strip location is on top of one of the top 3/8"
holes (depending on the hand of the device).When the device head is installed the strip connects the device
head with the electronics mounting bracket.
Step 2 Insert the trim through the holes. Route the keypad wires through the 1" diameter hole. The motor wires are routed
through the 2-1/8" diameter hole. Use the oval head screws to secure the trim to the door. The bottom oval head
screw does not get a washer and must be flush to below flush to clear the exit device carrier.
Step 3 Align the exit device receiving cross with the cross tip on the self-adjusting cap. Use caution not to pinch the
motor wires between the exit device and the surface of the door. Use the pan head screws to secure the exit device
to the trim. Do not over tighten. Double check the alignment of the device with the trim. If a misalignment is not
corrected the motorized trim may not function correctly. Use the combo screws to surface apply the exit device
head to the door. Continue with the device instructions and install the end cap.
Mechanical Install
Oval Head Screws
(Trim to door)
Surface Applied
Combo Screws
(As Reqd)
Pan Head Screws
(Exit Head to Trim)
Figure 4
Finish Washer
Note: The location of the
copper grounding strip
(depending on the handing
of the device proper position
for LHR door)
1
2
2
3
Figure 5


