


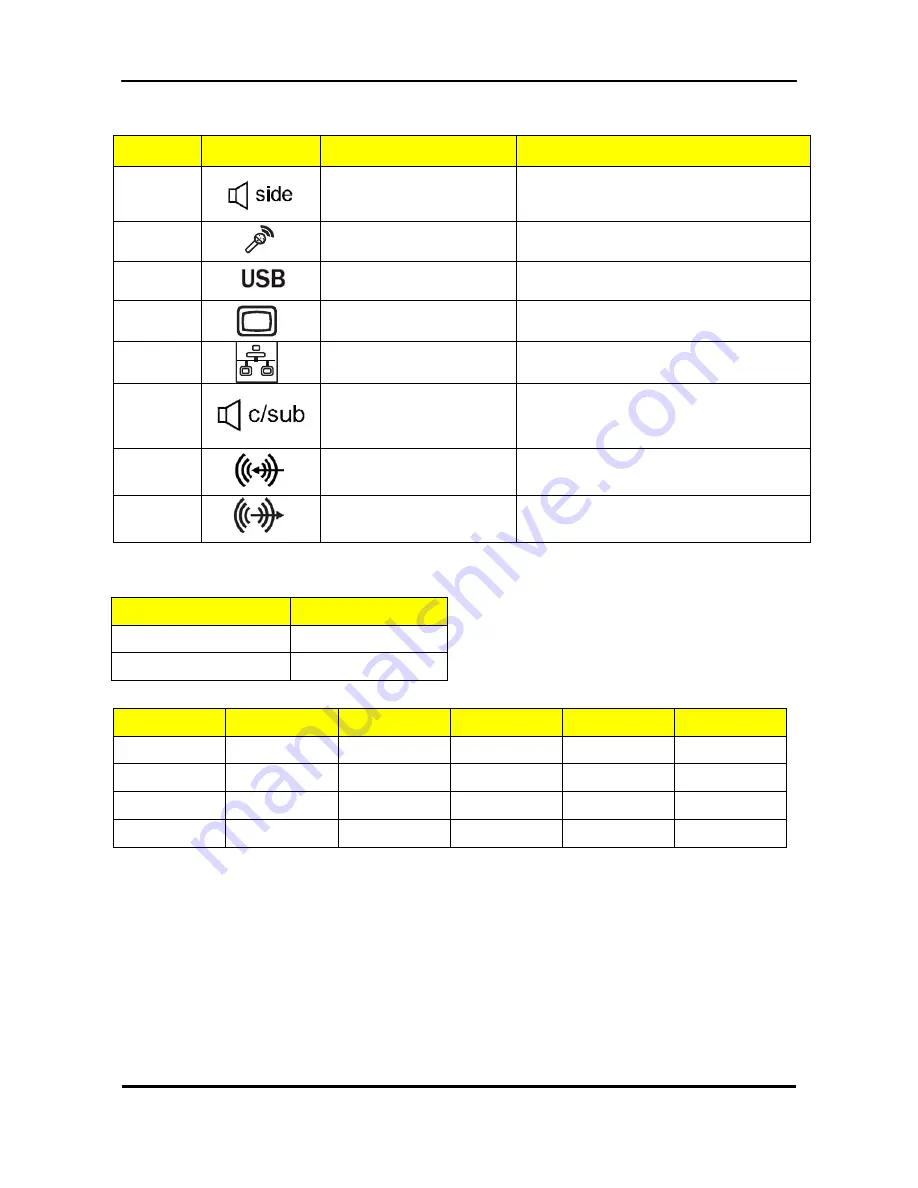
10
No
Icon
Component
Description
7
Side Speaker Out Jack(Gray)
Accepts side speakers in a 7.1-channel audio
configuration devices
8
Microphone jack(Pink)
Accepts input from external microphones.
9
USB 2.0 ports.
connects to USB 2.0&3.0 devices
(e. g. USB mouse, keyboard, camera, Disk).
10
Monitor VGA(D-SUB) port
Connects to a display devices
(e. g. external monitor, LCD projector).
11
Network port.
Lights to indicate the status of wireless LAN
communications.
12
Center/Subwoofer Speaker
-Out Jack(Orange)
Accepts center/subwoofer speakers in a
5.1/7.1-channel audio configuration devices
13
Line-In Jack(Blue)
Accepts audio line-in devices. Use this audio
jack a for line in devices such as an optical
device, Walkman, etc.
14
Line-Out Jack(Green)
Accepts audio line-out devices; This jack can
be used to connect front speakers in a
4/5.1/7.1-channel audio configuration
Audio Jack Function Table
Color/Audio Use
Function
Blue
Line-in
Pink
Mic-in
Color/CH Use
Headphone
2CH
4CH
5.1CH
7.1CH
Green
Headphone
Speaker
Front Speaker
Front speaker
Front speaker
Gray
/
/
/
/
Side Speaker
Orange
/
/
/
Center & bass
Center & bass
Black
/
/
Rear Speaker
Rear Speaker
Rear Speaker
Содержание TC-651
Страница 13: ...7 Block Diagram...
Страница 28: ...22 Press F12 Key Boot Menu Page...
Страница 29: ...23 Press ALT F10 Key Copy Main BIOS to Backup BIOS Non Acer Recovery Function Page1 Page2...
Страница 32: ...26 Press F1 Key Page General Help...
Страница 33: ...27 Press F5 Key Page Previous Values...
Страница 34: ...28 Press F7 Key Page Optimized Default...
Страница 35: ...29 Press F9 Key Page System Information...
Страница 36: ...30 Press F10 Key Page Save Exit...
Страница 37: ...31 Press ESC Key Right Click Mouse Exit...
Страница 46: ...40 Page1...
Страница 50: ...44 Page...
Страница 64: ...58 2 Setting the Motherboard 2 1 Motherboard view 2 2 Install the CPU...
Страница 71: ...65 8 Install the front bezel 8 1 Install the bezel 8 2 Link the HDD LED power cable 9 Cable ties position...
Страница 72: ...66 10 Overview...
Страница 114: ...108...
Страница 115: ...109 FRU List The FRU list will be updated later...


