ASENWARE LTD.
35
Step 2 :
It is presumed that user already assign addresses to the devices using the suitable
method, here in column
Step 3 :
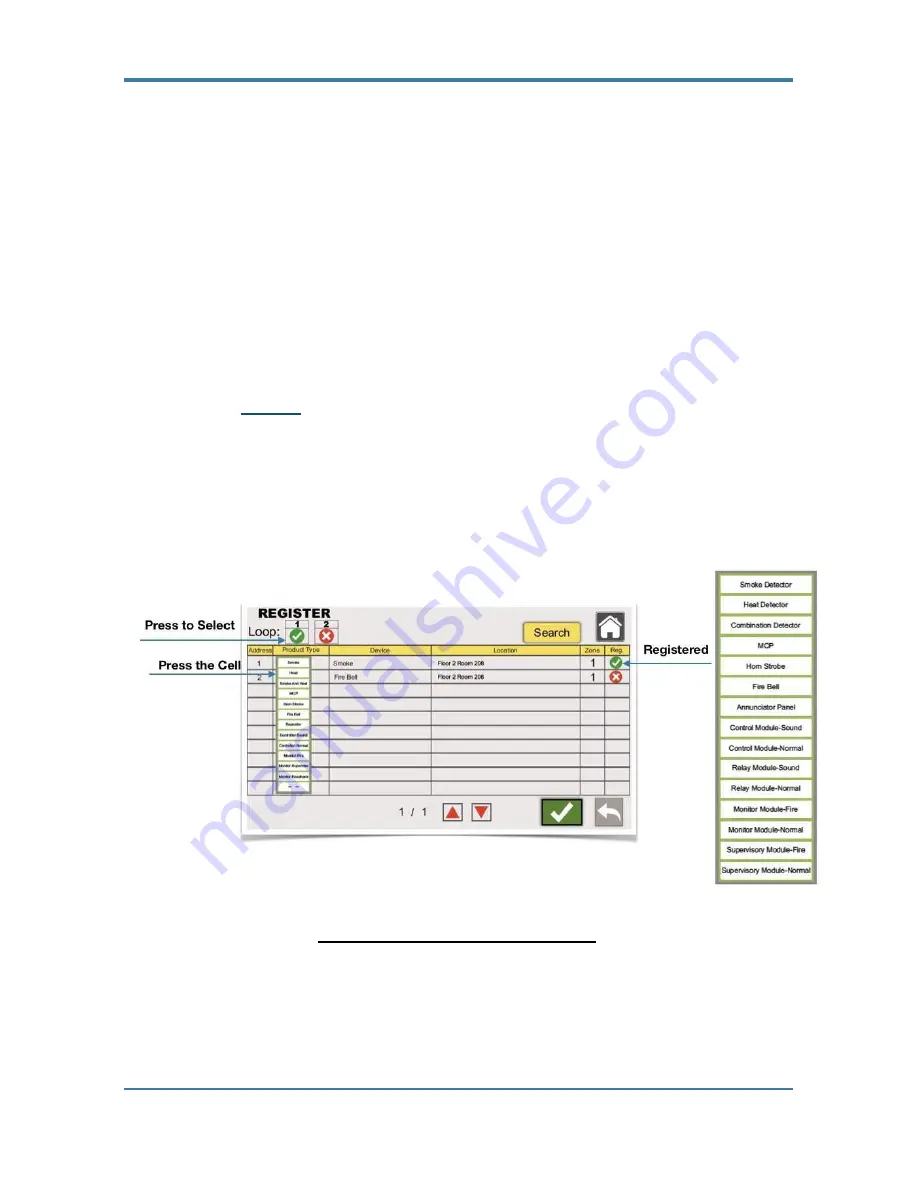
When address is assigned to specific device, in the second column Product Type
can be selected from the drop down list as shown in Figure 3.15 after clicking anywhere in the
cell. Type of product , like smoke, heat or combination etc. can be assigned depends on the
device type which is Step 4.
Step 4 :
In the Device column, device name can be selected after clicking anywhere in the
cell, refer Figure 3.15. It will give you the list of the Device Names, which you already provided in
Device Settings (
3.3.1.2.4
). It will automatically show its zone number.
Step 5 :
When all data for the particular address is filled in the specific fields, from the last
column (Re
g.), user can register the device by clicking the ‘Red Cross Click’. It will become
‘Green Right Click’ which represent that specific device is registered and it is online now.
Figure 3.15 Selection of Product Type
Note:
Refer Appendix C for assigning the addresses to the devices
.
Содержание Addressable Fire Alarm Control Panel
Страница 32: ...ASENWARE LTD 32 Figure 3 10 TCP IP Address Window Screen Figure 3 11 CAN Window Screen ...
Страница 37: ...37 Figure 3 17 User List Figure 3 18 User Access Chart ...
Страница 50: ...50 ASENWARE LTD All dimensions are in mm ...
Страница 52: ...52 ASENWARE LTD All dimensions are in mm Same size of box is supplied for all type of modules ...
Страница 54: ...54 ASENWARE LTD Wiring Connection ...
Страница 56: ...56 ASENWARE LTD Wiring Connection ...
Страница 58: ...58 ASENWARE LTD Wiring Connection ...
Страница 62: ...62 ASENWARE LTD All dimensions are in mm ...
Страница 66: ......


