40
Aruba 8325 Switch Installation and Getting Started Guide
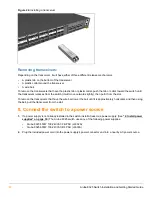
Figure 24:
Installing a transceiver
Removing transceivers:
Depending on the transceiver, it will have either of three different release mechanisms:
•
A plastic tab on the bottom of the transceiver
•
A plastic collar around the transceiver
•
A wire bail
To remove the transceivers that have the plastic tab or plastic collar, push the tab or collar toward the switch until
the transceiver releases from the switch (it will move outward slightly), then pull it from the slot.
To remove the transceivers that have the wire bail, lower the bail until it is approximately horizontal, and then using
the bail, pull the transceiver from the slot.
8. Connect the switch to a power source
1.
If a power supply is not already installed in the switch, install at least one power supply. (See
“2. Install power
supplies” on page 30
.) The Aruba 8325 switch uses any of the following power supplies:
•
Aruba 8325 650W 100-240VAC FB PSU (JL632A)
•
Aruba 8325 650W 100-240VAC BF PSU (JL633A)
2.
Plug the included power cord into the power supply’s power connector and into a nearby AC power source.
Содержание 8325 Series
Страница 6: ...6 Aruba 8325 Switch Installation and Getting Started Guide...
Страница 48: ...48 Aruba 8325 Switch Installation and Getting Started Guide...
Страница 58: ...58 Aruba 8325 Switch Installation and Getting Started Guide...
Страница 62: ...62 Aruba 8325 Switch Installation and Getting Started Guide...

