background image

Operating Your Video Editor

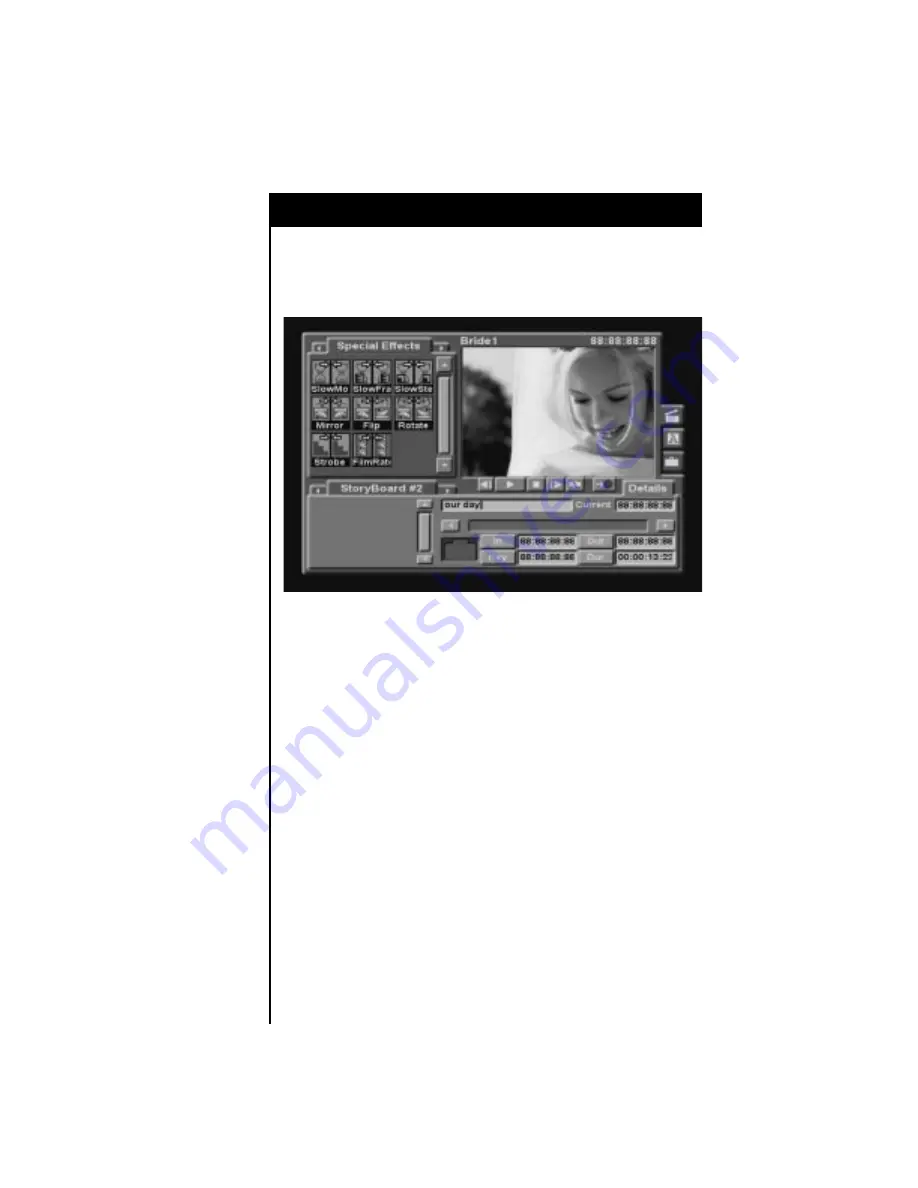
To Rename a StoryBoard

To change the name of a StoryBoard, right click in the middle of the
StoryBoard tab, and then select Details from the pop-up. In the Details screen,
replace the old name with your desired StoryBoard name.

Clearing a StoryBoard

After you have completed a project, you will want to clear the StoryBoard to
begin a new project.

1. Highlight a clip on the StoryBoard then press the Select All key on the

keyboard (or right click on the StoryBoard and choose Select All). 

2. Press the Delete key (or right click and select Delete).

Deleting a StoryBoard

To delete an existing StoryBoard, you must:

1. Delete all Clips, Effects, Transitions, and other items from the StoryBoard

(see “Clearing a StoryBoard” above).

2. Right click on the StoryBoard tab, and select Delete StoryBoard from 

the pop-up.

Merging Items on the StoryBoard

Sometimes you may want to apply more than one effect to a video clip. To do
so, you must merge the first effect to the video clip, and then apply the
second effect.

1. Place the video clip and the first effect on the StoryBoard.

2. Select the clip (to which the effect has been applied).

49

Содержание ScreenPlay

Страница 1: ...are code only as sold with ScreenPlay and Sequel Any modifications copying reverse engineering or other use not authorized by law this license or the express written consent of Applied Magic is strictly prohibited Unauthorized reproduction or distribution of copyrighted material in the United States is subject to civil and criminal remedies pursuant to Title 17 of the United States Code ScreenPlay...

Страница 2: ...ith Standard Output 19 Connection to a VCR with S Video Output 20 Connection to a Camcorder with Standard Output 20 Connection to a Camcorder with S Video Output 21 Connection to a Camcorder with DV 1394 ScreenPlay only 21 System Basics 22 Keyboard 22 Mouse 26 Identifying Parts of the Screen 27 Operating Your Video Editor 31 Powering Up 31 Powering Down 31 Capturing Recording Material 32 Starting ...

Страница 3: ...y with the limits for a Class A digital device pursuant to part 15 of the FCC rules These limits are designed to provide reasonable protection against harmful interference in a residential installation This equipment generates uses and can radiate radio frequency energy and if not installed and used in accordance with instructions may cause harmful interference to radio communications However ther...

Страница 4: ...8 U S A Manufacturer SMS 9877 Waples Court San Diego CA 92121 U S A Declares that the products ScreenPlay a nonlinear video editor Sequel a nonlinear video editor Declaration of Conformity Statement Per 47 CFR Section 2 906 as amended Complies with the requirements of 47 CFR Part 15 for Class A equipment 15 107 a Conducted Limits 0 15 30 MHz 15 109 a Radiated Emission Limit 30 1000MHz Additional I...

Страница 5: ...MHz Disturbance Power Tests Clause 3 5 30 MHz 300 MHz EN50082 1 1992 IEC801 2 1984 IEC 801 3 1984 IEC 801 4 1988 EMC immunity tests per the Essential Protection Clause of the EMC Directive as follows Electrostatic Discharge 8 kV Air discharge RF Immunity 3 V m 27 500 MHz CW Fast Transient immunity 1 kV AC line 0 5 kV I O lines 3m EN 60950 1993 IEC 950 1993 Safety of Information Technology Equipmen...

Страница 6: ... and maintenance service instructions in the literature accompanying the product Caution To reduce the risk of electrical shock do not remove cover or front Refer servicing to qualified service personnel This installation should be made by a qualified service person The lightning flash with the arrowhead symbol within an equilateral triangle is intended to alert the user to the presence of non ins...

Страница 7: ...et unless the blades can be fully inserted to prevent blade exposure Do not overload power outlets and extension cords This can result in a fire risk or electrical shock Cables connected to the unit should not exceed two meters in length Make sure nothing rests on the cables and make sure they cannot be stepped on or tripped over Use a surge suppressor or line conditioner to protect your electroni...

Страница 8: ...h a good back support and sit erect with feet on the floor arms hanging naturally at your sides and forearms horizontal with wrists in a neutral position while using the keyboard Vary your work activities and take breaks so that you do not work for extended periods of time Repairs and Service For assistance on return or repair refer to the sections entitled Limited Warranty and Obtaining Service D...

Страница 9: ...st SECAM Jamaica NTSC Japan NTSC Jordan PAL Kenya PAL Korea North PAL Korea South NTSC Kuwait PAL Laos PAL Lebanon SECAM Liberia PAL Libya SECAM Luxembourg PAL Madagascar SECAM Madeira PAL Malaysia PAL Malta PAL Martinique SECAM Mauritius SECAM Mexico NTSC Monaco PAL Mongolia SECAM Morocco SECAM Mozambique PAL Namibia PAL Netherlands PAL New Zealand PAL Nicaragua NTSC Nigeria PAL Norway PAL Oman P...

Страница 10: ...rmat necessary for the ScreenPlay system Rapid Transits are designed for use by Wedding and Event videographers and can be purchased on line at rapidtransits v share com Video SpiceRack PRO transitions produced by Pixélan Software are a wide variety of top rated fresh super softenable spice transitions which allow you to form terrific directional dissolves and other beautifully subtle effects as w...

Страница 11: ...you have purchased the Sequel video editing unit you may notice that your unit varies slightly from these illustrations Front Panel CD ROM drive Accepts CD ROM disks INFRARED IR lens Transmits receives signals to from optional cordless keyboard POWER INDICATOR Glows green when unit is powered on HARD DISK INDICATOR Glows red when hard disk reads or writes data IR FEEDBACK INDICATOR Glows amber whe...

Страница 12: ...ar on screen indicating that the system has recognized the card If your PC Card contains many files it may take slightly longer for this message to appear Receives composite signal video and audio L R input from standard camcorder Accepts S Video input from S VHS camcorder or VCR ScreenPlay only optional for Sequel DV 1394 I O that connects to a digital camcorder Provides headphone audio adjustabl...

Страница 13: ...outputs to TV monitor Top output is for video middle for left audio bottom for right audio Video and audio outputs to VCR Top output is for video middle for left audio bottom for right audio Video and audio inputs from VCR Top input is for video middle for left audio bottom for right audio Audio inputs from external CD or tape audio source top is left audio bottom is right audio ...

Страница 14: ...ion to external storage devices Use shielded SCSI cables For connection to mouse For connection to keyboard Other serial connections for optional MIDI Turns power on and off is off is on Power supply fuse Do not remove Plug appropriate power cord here and plug other end into wall outlet Connecting Your Video Editing Unit 14 ...

Страница 15: ...ECTING TO A STANDARD TV OR BROADCAST MONITOR This section describes the connection between your unit and your TV or broadcast monitor Page 17 CONNECTION TO AN S VIDEO TV OR BROADCAST MONITOR This section describes a higher quality connection between your unit and your TV or broadcast monitor Page 17 CONNECTION TO A VGA COMPUTER MONITOR This section describes how to connect your unit to a VGA monit...

Страница 16: ...r VCR Page 19 CONNECTION TO A VCR WITH S VIDEO OUTPUT This section describes a higher quality connection between your unit and your VCR Page 20 CONNECTION TO A CAMCORDER WITH STANDARD OUTPUT This section describes the connection between your unit and your camcorder Page 20 CONNECTION TO A CAMCORDER WITH S VIDEO OUTPUT This section describes a higher quality connection between your unit and your ca...

Страница 17: ... a standard TV or broadcast monitor on the rear panel to the composite input on the TV monitor on the rear panel to the left and right audio input on the TV monitor Connection to an S Video TV or Broadcast Monitor Your video editing unit can be connected to an S Video TV or a broadcast monitor to obtain better picture quality for editing purposes on the rear panel to the S Video input on the TV mo...

Страница 18: ...e input on a VGA monitor NOTE For audio connections refer to the section entitled Connection to an Audio System below Connection to a SCART TV or Monitor Your video editing unit can be connected to a European SCART TV or monitor on the rear panel to the SCART input on the TV monitor for video and audio Connection to an Audio System on the rear panel to audio left and right out on the audio system ...

Страница 19: ...to a tape make the following connections For capturing recording on the rear panel to the composite output on the VCR on the rear panel to the left and right audio outputs on the VCR For mastering on the rear panel to the composite input on the VCR on the rear panel to the left and right audio inputs on the VCR Connecting Your Video Editing Unit 19 ...

Страница 20: ...nel to the S Video output on the VCR on the rear panel to the left and right audio outputs on the VCR For mastering on the rear panel to the S Video input on the VCR on the rear panel to the left and right audio inputs on the VCR Connection to a Camcorder with Standard Output From camcorders with composite connections on the front panel to the composite video output on the camcorder on the front p...

Страница 21: ...tional for Sequel To capture record video from camcorders with DV 1394 digital output into the video editing unit make the following connection From camcorder with DV 1394 connection on the front panel to the DV 1394 output on the camcorder External Storage Devices Additional storage devices such as removable media or external hard drives can be connected to your video editing system through the S...

Страница 22: ...System Basics 22 SYSTEM BASICS Keyboard A custom keyboard is supplied as a standard feature of the unit Turn off the unit before you connect or disconnect the keyboard ...

Страница 23: ...in the Editor screen Transitions A short cut key to display the Transitions bin in the Editor screen Graphics A short cut key to display the Graphics bin in the Editor screen Effects Color Special A short cut key to display the Special and Color Effects bins in the Editor screen The first time you press this button the Special Effects bin will appear On the second press the Color Effects bin appea...

Страница 24: ... Stop play of video Play selected Clip or StoryBoard from the beginning Rewind one frame Use the Break Split key to stop recording the current Clip and immediately begin recording a new clip Advance one frame Play selected Clip StoryBoard or StoryBoard part from current cursor pointer position Set Key Frame Selects the video frame to be used as a thumbnail to represent that video When playing a vi...

Страница 25: ... Frame Tab Aligns the beginning of the selected audio clip or title with the current StoryBoard Cursor Bar position the audio clip or title must be highlighted Control Tab Aligns the end of the selected audio clip of title with the current StoryBoard Cursor Bar position the audio clip or title must be highlighted Shift Jump to the last video clip on the StoryBoard Shift Jump to the beginning of th...

Страница 26: ...e to perform an action on that item Most of the time you will be asked to select the item This means that you should click the left mouse button quickly press and release it once To select an item by double clicking click the left button twice If you right click on an item a pop up screen will appear with choices that are related to the object you have clicked The pop up screen disappears when you...

Страница 27: ...s you work with the system when a selection is not available it may appear dark gray or when an item is selected its appearance will vary slightly Bin A bin is a type of screen that contains the resource material for building your project Examples include video and audio Clips Graphics Transitions Special Effects etc There are various types of bins depending upon what they contain Bins also contai...

Страница 28: ...by dragging the Clips to the new location and you can move the Clips from one drawer or sub drawer to another see Drawers on page 29 As you begin to create a project you will drag these Clips from the bin to the StoryBoard Cursor and Pointer When you are typing in a text area the pointer appears as a cursor You can move this cursor anyplace within the text area and type the appropriate symbols whe...

Страница 29: ...Bars Scroll bars allow you to move new information into view if the amount of information contained by the screen is too large to view at a single glance Click on the arrows to reveal different portions of a screen or click and drag on the center portion of the scroll bar to quickly move to a different portion of the screen Sliders A slider is a control that you can select and move to gradually ch...

Страница 30: ...o editing unit holds many types of information on its various on screen areas and some of these screens have a tab located at the screen s edge to help you keep track of the different types of information you are using Like tabs in a file drawer you can gain access to more information by selecting a tab ...

Страница 31: ...minute or so the Editor Screen will appear indicating that you can begin using your unit Powering Down To power off your unit 1 Press the key on the keyboard This will allow the system to save your current settings 2 Move the power switch on the rear panel of the unit to the off position NOTE Another way to prepare for shutdown is to right click within the viewing screen and select shutdown from t...

Страница 32: ...rse if you ve chosen to capture Audio Only you will not need to make a video source selection Next you will select the source of your audio Click on the box next to the phrase which best describes where you ve connected your audio source whatever you are recording audio material from i e a stereo Of course if you ve chosen to capture Video Only you will not need to make an audio source selection N...

Страница 33: ...OTE The video adjustment control is not available for video captured through Digital I O Timecode In indicates the current timecode of the incoming clip if the clip has associated VITC or DV timecoding Record Duration indicates the total duration of the current clip being recorded Remaining Time indicates the approximate number of minutes remaining on all system drives NOTE When you change the qua...

Страница 34: ...ou have purchased the ScreenPlay video editing system or Sequel with the DV option you can capture digital audio or video using your DV connection To do so you must select DV as your source in the capture screen If you have set up drawers within the Clips bin make sure you enter the capturing screen from the bin or drawer where you want your incoming Clips to be saved You can also organize your Cl...

Страница 35: ...tallation will take approximately 75 of real time a one minute file will be installed in 45 seconds 7 After installation the audio Clips will appear in the Clips bin NOTES Material cannot be imported from CDs or any removable media while the capture screen is displayed JPEGs bitmaps and TrueType fonts can also be imported from CD or any removable media to your system Files must be named with the j...

Страница 36: ...ected item The current time of the preview item in hours minutes seconds and frames Note Once you have begun working on a project this time represents the current position of the cursor bar within your project Control buttons allows you to move back one frame allows you to play a selected item from the Clips bin or the StoryBoard stops the video or audio playback allows you to move forward one fra...

Страница 37: ...ns including adding a new StoryBoard Your video editing system allows you to work on up to six projects at one time Select Details from the pop up when you want to name a StoryBoard The StoryBoard area is a StoryBoard timeline which includes a video clips track graphics track and two audio tracks a Details tab and a cursor to help you navigate through your StoryBoards To scroll quickly through you...

Страница 38: ...als bin screen to display a pop up list showing all five selections Select the right or left arrow button on the top line of the Materials bin screen to scroll through the five bins one after the other Press the corresponding key on the keyboard Clips Transitions Graphics Effects Color Special Bins can also contain sub sections called drawers and even sub drawers within drawers You can use these d...

Страница 39: ...drawer within 2 Right click on any clip within the bin then select New Drawer from the options displayed in the pop up or simply press the New Drawer key on the keyboard The new drawer will appear 3 If you would like to rename your drawer right click on the new drawer then select Details from the options displayed in the pop up The drawer Details screen will appear 39 ...

Страница 40: ... that clip will appear above the viewing area You can drag video and audio Clips to new locations within the Clips bin or onto the StoryBoard for use in a project You can select two or more Clips at once by selecting the first clip pressing the Shift key and keeping it depressed as you select additional Clips This allows you to move cut copy or delete multiple Clips at once You can duplicate cut c...

Страница 41: ...cannot delete factory installed transitions from the bin if there is no duplicate However the system does allow you to delete user installed transitions Using the Graphics Bin The Graphics bin contains all of the graphics created within the Graphics screen see Using the Graphics Screen on page 57 You can use the scroll bar at the right side of the Graphics bin to navigate to additional graphics NO...

Страница 42: ...ES You can drag special effects to a new location within the bin or for placement on video Clips on your StoryBoard You can create custom special effects based on some of the special effects provided on your system To do so duplicate a special effect that already exists in your system Next select the duplicate special effect and click on the Details tab Within the Details screen you can change man...

Страница 43: ...ins four tracks The first track is where video Clips Transitions Color Effects and Special Effects can be placed The second track is the graphics track Graphics and Titles can be placed in this area The final two tracks are where audio Clips can be placed Adding a video clip To add a video clip to the StoryBoard drag and drop the clip from the Clips bin onto the video Clips track at the location w...

Страница 44: ...ave the same start and stop time as the video clip Once you place an audio clip in the track you can move it by dragging it to a new location in the track You can also drag the beginning or end of the track to extend the length of time it will play up to the maximum length of the audio clip If you want an audio clip to begin at a particular point within your video move your cursor bar to the appro...

Страница 45: ...time However many users find transitions often look smoother when merged Adding a graphic First you will need to create the graphic using the Graphics screen see Using the Graphics Screen on page 57 Once the graphic has been created in the Graphics screen it will appear in the Graphics bin To add a graphic to the StoryBoard drag and drop the graphic from the Graphics bin onto the Graphics track in...

Страница 46: ...it will be displayed in either direction There is no limit to the length of time you can display a graphic Once a graphic has been placed it can be previewed instantly in the viewing area ScreenPlay only Only one graphic can be displayed at any given time unless you merge the graphic with the video see Merging Items on the StoryBoard on page 49 Adding a color effect To add a color effect to the St...

Страница 47: ...the bin onto the desired video clip in the video Clips track The special effect will replace the transition on both sides of the video clip NOTE Once you achieve the Special Effect look that you want you can add transitions after using the Merge feature see Merging items on a StoryBoard on page 49 To replace an existing special effect with a new one drag and drop the special effect onto the video ...

Страница 48: ...rated above Using the Cursor Bar You can drag the cursor bar back and forth on the StoryBoard to observe the video and audio at your own pace This is often referred to as scrubbing Using the keys on the keyboard moves the cursor one frame at a time Opening a New StoryBoard To open a new StoryBoard right click in the middle of the StoryBoard tab and then select New StoryBoard Your video editing sys...

Страница 49: ...ick on the StoryBoard and choose Select All 2 Press the Delete key or right click and select Delete Deleting a StoryBoard To delete an existing StoryBoard you must 1 Delete all Clips Effects Transitions and other items from the StoryBoard see Clearing a StoryBoard above 2 Right click on the StoryBoard tab and select Delete StoryBoard from the pop up Merging Items on the StoryBoard Sometimes you ma...

Страница 50: ...he pop up or simply press the Merge key on the keyboard After the Merge is complete the transition will appear with a green star like symbol on it indicating the item has been merged If you enter the Details screen and modify some aspect of the transition the symbol will disappear indicating that the item is no longer merged Of course you can apply the merge again once you ve achieved the look you...

Страница 51: ...ips synchronized 1 Place a video clip on the StoryBoard 2 Extract the audio from the clip by right clicking on the clip and selecting Extract Audio 3 Split the clip into two Clips by selecting the video again then placing the cursor bar in the video clip and selecting the command 4 Select the two video Clips and the audio clip and press Sync on the keyboard Notice that an S appears on each item in...

Страница 52: ...e This area displays the current time code for the position of the cursor bar within the timeline of the selected item You can move the cursor bar scrub to any position along the timeline of the selected item in order to precisely line up your in or out point This is a timeline of the item you have selected In addition to the cursor the timeline shows an in marker and an out marker indicated as tw...

Страница 53: ...rsor bar to the position along the timeline where you would like to set your key frame then select the Key button to set that key frame The Dur button indicates the duration of the selected item You can change the duration time in two ways 1 Select the time code area type in the desired duration and press Enter on the keyboard this will cause the out marker to move the time you ve indicated or 2 P...

Страница 54: ...h as ducking or pulling down sound On the right side of the audio details area you can also scrub audio and set in and out times When you are working with an audio clip in the Details area the preview screen will appear black Special Details for Transitions When you are viewing details for a transition the left side of the screen will vary based on which transition you have selected Some of the de...

Страница 55: ...r fading into and out of a graphic Automatically Adjusting the White Balance You can instantly correct the color balance of any clip 1 Select the clip to which you would like to make color adjustment 2 Click on the Details tab The Details screen will appear 3 Scroll through the options at the left side of the screen until you see White Magic 4 Click on the Pick White button 5 Click on the part of ...

Страница 56: ...mpt the system to carry out the backup The system will tell you how much hard drive space is required for this backup If you select Optimized you are asked to enter additional information First you must enter a Handle Length this is the number of frames before your In point and after your Out point that you would like to have saved with each clip Next you can enter a StoryBoard name and then you c...

Страница 57: ...n you would like to work on a graphic which has already been saved to your Graphics bin You can also open a graphic from the Graphics bin by double clicking on it This tool is used to select an item within the drawing area First select this tool then point and click on the item you would like to select You will notice four handles appearing around the item indicating that it is currently selected ...

Страница 58: ...t an item which is placed on the back layer of the drawing area simply select the item on the top layer and then press Tab on the keyboard Use this tool to select a color for the fill of your text or graphic Use this tool to select a color for the outline of your text or graphic You can right click on the Graphics screen background to change the background color when the icon is selected Adjusting...

Страница 59: ...Text Below the drawing area are tools which will help you to create your desired style of text First you can select from a number of different fonts within the text pop up Your current font setting is displayed at the bottom of the Graphics screen You can also set a specific point size for the text Then you can designate that the text appear as bold italic or underlined By selecting the you can ac...

Страница 60: ...c key 201 É Magic key 202 Ê Magic key 203 Ë Magic key 204 Ì Magic key 205 Í Magic key 206 Î Magic key 207 Ï Magic key 209 Ñ Magic key 210 Ò Magic key 211 Ó Magic key 212 Ô Magic key 213 Õ Magic key 214 Ö Magic key 217 Ù Magic key 218 Ú Magic key 219 Û Magic key 220 Ü Magic key 221 Y Magic key 223 ß Magic key 224 à Magic key 225 á Magic key 226 â Magic key 227 ã Magic key 228 ä Magic key 229 å Magi...

Страница 61: ...ct Open to open a current graphic The graphic you are currently working on will be saved to the Graphics bin and a pop up will appear allowing you to select another graphic to work on 3 When you exit the Graphics screen the graphic you are currently working on will automatically be saved to the Graphics bin When you have finished creating your graphics you can select the tab to return to your work...

Страница 62: ... the Editor screen press the key on the keyboard 2 Press the Master key on the keyboard The video will begin to play through from the beginning in full screen The video signal is output simultaneously to all video outputs The system will automatically insert five seconds of black video before the video begins and after the video is complete 3 Press the Record key on the recording device you are us...

Страница 63: ...ab on screen You can move through the setup screens by 1 Selecting the right and left arrow buttons at the top of the screen or 2 Selecting the screen name will cause a drop down menu to appear This drop down menu allows you to navigate to the other setup screens Changing your Language Settings In the Language Settings screen you can choose to display on screen text in a different language To impl...

Страница 64: ...essages allows you to turn on or off the help that pops up when your pointer rests on an object 4 Show warning when deleting unused material prompts the system to warn you whenever you are about to delete materials which have not been used on a StoryBoard The system will automatically warn you when you attempt to delete materials which have been used on a StoryBoard 5 Auto merge transitions when m...

Страница 65: ...o The top slider control allows you to adjust the headphone volume The next slider control allows you to adjust the left right balance of the headphone output The bottom two slider controls allow you to adjust the bass and treble levels of the headphone output Changing your Drive Settings Within the Drive Settings screen you can change your disk usage to save data to an external disk and you can r...

Страница 66: ... source is selected Within the capturing screen ensure that the system is set to capture Video and Audio Also ensure that the correct video source is selected To implement a transition you must first merge the effect and the video clip Right click on the items then select Fast Merge The two items will be merged together as one item The system will ask you if you want the new clip to replace the ex...

Страница 67: ...NTSC 525 60 Hz or PAL 625 50 Hz Sampling Resolution ITU BT 601 CCIR 601 720 x 480 NTSC 720 x 576 PAL Internal Video Transfer Rate 20 MB sec Peak Compressed Video Rate 4 MB sec Processor Power PC Microprocessor Gamma Correction Real time 24 bit Audio Format 16 bit Stereo Audio Mixer 4 Stereo 8 Mono Playback Mixer Editing Control Data Entry Custom wired Keyboard Optional Infrared Keyboard Mouse MECH...

Страница 68: ...rmat NTSC 525 60 Hz or PAL 625 50 Hz Sampling Resolution ITU BT 601 CCIR 601 720 x 480 NTSC 720 x 576 PAL Internal Video Transfer Rate 20 MB sec Peak Compressed Video Rate 2 5 MB sec Processor Power PC Microprocessor Gamma Correction Real time 24 bit Audio Format 16 bit Stereo Audio Mixer 4 Stereo 8 Mono Playback Mixer Editing Control Data Entry Custom wired Keyboard Optional Infrared Keyboard Mou...

Страница 69: ... to a Company factory service center or dealer This warranty extends only to you the original purchaser It is not transferable to anyone who subsequently purchases the Product from you We suggest that you retain the dealer s dated bill of sale or Purchase Order as evidence of the date of purchase REPAIR OR REPLACEMENT AS PROVIDED UNDER THIS WARRANTY IS YOUR EXCLUSIVE REMEDY THE COMPANY SHALL NOT B...

Страница 70: ...PECIFIC LEGAL RIGHTS AND THEY MAY ALSO HAVE OTHER RIGHTS WHICH VARY FROM STATE TO STATE OR JURISDICTION THE COMPANY DOES NOT ACCEPT LIABILITY BEYOND THE REMEDIES SET FORTH IN THIS LIMITED WARRANTY STATEMENT OR LIABILITY FOR INCIDENTAL OR CONSEQUENTIAL DAMAGES INCLUDING WITHOUT LIMITATION THE LOSS OF ANTICIPATED BENEFITS OR PROFITS RESULTING FROM THE PURCHASE OR USE OF THE PRODUCT ANY LIABILITY FOR...

Страница 71: ...dio 12 65 Hover help 64 I In 51 53 80 81 Insert Editing 51 J JPEGs 35 L Language 63 M Master 19 20 62 64 Maximize 34 Merge 23 50 51 64 Minimize 34 Monitor 8 13 14 15 17 18 67 68 Materials Bin 38 N Normal Effect 46 O Out 24 52 53 80 Outline Style 58 P Paste 23 PC Card Slot 12 67 68 PCMCIA SLOT 12 67 68 Pointer 26 28 64 Power 11 14 17 31 R Record 19 20 21 32 33 34 61 62 72 74 82 Record Duration 33 R...

Страница 72: ... may need to change some settings within the Capture Control Panel On the left side of the screen are several settings You can navigate through these settings using the scroll bar located to the right of the settings 1 The first selection you ll make is what you d like to capture If you want to capture only audio or only video from an external source select Video Only or Audio Only If you want to ...

Страница 73: ... from Demo lowest quality to Corporate The capture quality you ve selected will not be evident in the video you view in the Capture screen 5 ScreenPlay only If you have purchased the ScreenPlay video editing unit you can now choose a capture rate for your video The options to choose from are 60 fields sec and 30 fields sec As soon as you ve made these settings you are ready to begin capturing mate...

Страница 74: ...pressing the button You can also move the Record screen around the screen using the four Arrow keys on your keyboard To return to the larger Record screen press the button When you re finished capturing click on the button to return to the main editing screen Creating a Graphic On the right side of the Editor screen you should see three tabs Click on the middle tab to switch to the Graphics screen...

Страница 75: ...rogram Click on the button in the upper left corner of the screen then click on the word you just typed The four little squares at the corners of the title confirm that it is selected Once you ve selected a text element you can use the tools along the bottom of the Graphics screen to change typeface size and other attributes While white lettering works in many situations color can be used to reall...

Страница 76: ... a color that complements your fill color choice then click OK If your lettering doesn t show the outline color it s because outlines are turned off You ll find the Outline Enable Control at the top of the group of three effects buttons on the left side of the screen Click on the button to enable outlines for the selected title element The strength of the outline effect is controlled by the four b...

Страница 77: ...he bottom group of controls on the Effects Controls screen contains the controls for this effect These settings allow you to select the color of the extrusion the depth of the extrusion and the direction in which the extrusion emerges Go ahead and experiment with different settings and watch the results in the preview region above the Cancel button Click OK when you re satisfied with the extrusion...

Страница 78: ... pointer over the StoryBoard tab and click with the right mouse button and select Details In the very middle of the Details screen right at the top is the name field Click within the name field and use your keyboard to change the name to Exercise Press the Enter key after you ve changed the name and the tab that was labeled StoryBoard 1 now reads Exercise Click on the StoryBoard tab now labeled Ex...

Страница 79: ...rams are usually composed of many elements video Clips Transitions Titles Effects and audio Clips Master editors fine tune each of these elements in the programs that they produce so it is important for an editing system to facilitate these adjustments With your Applied Magic video editing unit you simply click on an element then press the Details key on the right side of the keyboard or the Detai...

Страница 80: ...as the beginning for our video Pick a spot that s at least one second into the actual clip When you find a spot you like press the Set In key on your keyboard The real power of this system is that you re free to experiment with your edits without waiting for a machine to catch up As soon as you make your changes you can see them Click on the StoryBoard tab which is labeled Exercise if you ve been ...

Страница 81: ...ntal line across the top of the region indicating that the title will be shown with constant maximum opaqueness Use your mouse to drag the left side of the horizontal line down to the lower left corner of the envelope region so that you have a straight sloping line Select the fade in point by dragging the larger inverted triangle under the clip s title Move it so that the displayed value in the Cu...

Страница 82: ... First you connect a videotape recorder to the video editing unit s outputs if you haven t already done so Second you put a tape into your recorder and start recording The third step is pressing the Master button on the keyboard which inserts five seconds of black video and plays your complete project in Full Screen mode to all outputs The final step is watching your program so that when it ends y...

Отзывы: