background image

• ANALOG OUTPUTS

Connector: 

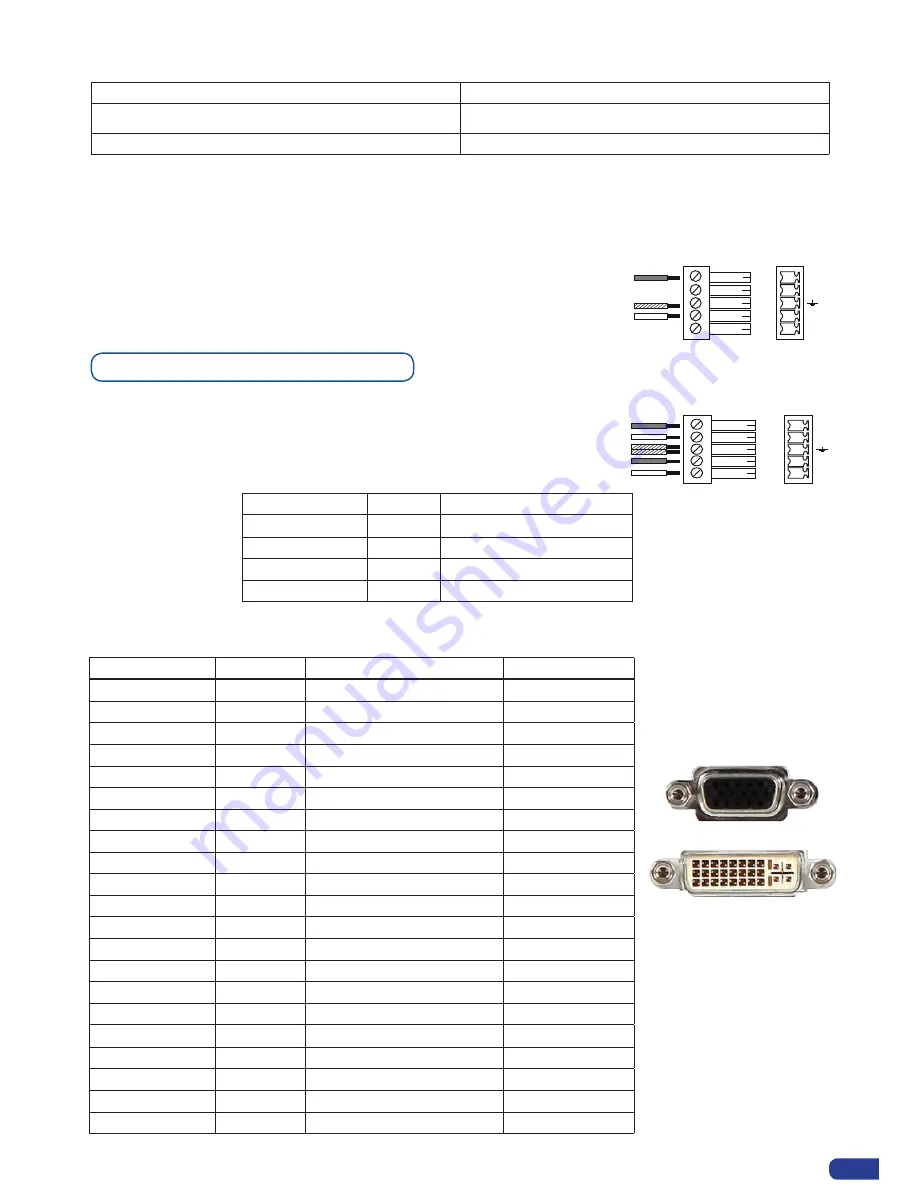
Outputs #1 (

Main

) & #2 (

Preview

): 


female HD15, DVI-I (analog pins).

HDTV Resolutions:

Resolutions:

Output specifications

Format

Ratio

Available Refresh Rates Reduced Blanking

640 x 480

4 : 3

50Hz 60Hz 72Hz 75Hz

800 x 600

4 : 3

50Hz 60Hz 72Hz 75Hz

848 x 480

16 : 9

50Hz 60Hz 72Hz 75Hz

1024 x 768

4 : 3

50Hz 60Hz 72Hz 75Hz

1280 x 720

16 : 9

50Hz 60Hz

1280 x 768

15 : 9

50Hz 60Hz 72Hz 75Hz

1280 x 800

16 : 10

50Hz 60Hz 72Hz 75Hz

1280 x 1024

5 : 4

50Hz 60Hz 72Hz 75Hz

1360 x 768

16 : 9

50Hz 60Hz 72Hz 75Hz

1366 x 768

16 : 9

50Hz 60Hz 72Hz 75Hz

1366 x 800

15 : 9

50Hz 60Hz 72Hz 75Hz

1400 x 1050

4 : 3

50Hz 60Hz 72Hz 75Hz

1440 x 900

16 : 10

50Hz 60Hz 72Hz 75Hz

1600 x 1200

4 : 3

50Hz 60Hz

1680 x 1050

16 : 10

50Hz 60Hz

1920 x 1080

16 : 9

50Hz 60Hz 72Hz 75Hz

YES

1920 x 1080 B

16 : 9

50Hz 60Hz

YES

1920x 1080 C

16 : 9

50Hz 60Hz

YES

1920 x 1080 HD

16 : 9

50Hz 60Hz

YES

1920 x 1200

16 : 10

50Hz 60Hz

YES

2048 x 1080

19 : 10

50Hz 60Hz

YES

or

• Connector:


Balanced or unbalanced mono/stereo inputs


(all pin MCO male connector).


8 audio stereo 1 auxiliary


(all balanced / unbalanced).


Vi = +15dBV max.


Zi = 40 Kohms (Balanced).

L+
L-

R+
R-

UNBALANCED

LEFT

RIGHT

GROUND

4

MCO male connectors

Inputs #1 to #6: Balanced & unbalanced connection

Inputs DVI #1 to DVI #2: Balanced & unbalanced 

connection

Input AUX: Balanced & unbalanced connection

AUDIO SETTINGS

Settings

Availability

GAIN

YES: from -

∞ 

to + 18dB

Balanced Audio

YES: Left and Right

17

4

L+
L-

R+
R-

BALANCED

L+

R+

L-

R-

GROUND(S)

Outputs #1 to #2: Balanced & unbalanced connection

Format

Ratio

Available Refresh Rates

720p

16 : 9

50Hz 59.94Hz 60Hz

1035i

16 : 10

59.94Hz 60Hz

1080i

16 : 9

50Hz 59.94Hz 60Hz

1080p

16 : 9

30 Hz 50Hz 59.94Hz 60Hz

Содержание Eikos LE

Страница 1: ...version 4 00 USER MANUAL Eikos LE...

Страница 2: ......

Страница 3: ...Y INSTRUCTION 2 2 UNPACKING AND INSPECTION 2 3 RACKMOUNT INFORMATION 2 4 CABLE ADAPTOR INFORMATION 2 5 HARDWARE SPECIFICATIONS 7 12 12 12 13 CONNECTING THE EIKOS LE 3 1 CONNECTING THE EIKOS LE 3 2 THE...

Страница 4: ...s Opening transitions closing Live Layers How to use the Mosaic Preview Feature Working with Layers Working with Layers Functions Working with PIPs PIP adjustment menu PIP configuration PIP as Layers...

Страница 5: ...trix Mode Working with Mirror Mode Source Output selection Working with Layers Working with Cut Fade or Transitions Working with PIP Working with Frames Logos RCS presentation How to use the RCS Softw...

Страница 6: ...84 CONTACT INFORMATION 84 84 WARRANTY AND SERVICES INFORMATION 83 8 1 ANALOG WAY LIMITED WARRANTY 8 2 SERVICES AND RMA 83 83 APPLICATION NOTES AND TIPS 7 1 ABOUT APPLICATION NOTES 7 2 APPLICATION NOT...

Страница 7: ...MODE Before you start setting up your Eikos LE for the first time be sure you know what you actually want to do with it The Eikos LE offers a choice of two operating modes which results in a versatile...

Страница 8: ...of the sequence vertically or horizontally A flying PIP is also possible over the screen with vertical horizontal or diagonal animation A PIP is considered as a live layer FRAME a Frame is a full scre...

Страница 9: ...g guidelines The equipment connected to the network must have a release system easily accessible and located outside the unit Unplug the power cord do not pull on the power cord but always on the plug...

Страница 10: ...ranch de la prise murale Appliquer les consignes suivantes Le mat riel reli demeure au r seau doit avoir un dispositif de sectionnement facilement accessible qui doit tre incorpor l ext rieur de l app...

Страница 11: ...one Per assicurarsi che totalemente l apparecchio non pi collegato il cavo deve essere disconesso della presa murale Seguire le instruzioni seguenti Il materiale collegato a residenza alla rete deve a...

Страница 12: ...ss dieses Kabel aus der Netzsteckdose ausgesteckt werden Bitte beachten Sie die folgenden Hinweise Wenn Ger te dauerhaft am Netz bleiben m ssen sie ber eine leicht zug ngliche Trennvorrichtung verf ge...

Страница 13: ...be de ser desconectado de la toma de corriente Aplicar las siguientes consignas El material conectado a residencia a la red inform tica debe de tener un dispositivo de seccionamiento f cilmente accesi...

Страница 14: ...ndles as rests for your Eikos LE they are designed for manipulation purposes only If required front handles of the device can be dismantled but with caution The original screws removed must not be rei...

Страница 15: ...96M 1035i 1920x1035 59 94Hz 60Hz SMPTE 260M 1080i 1920x1080 50Hz 59 94Hz 60Hz SMPTE 274M 1080p 1920x1080 23 97Hz 24Hz 25Hz 29 97Hz 30Hz SMPTE 274M 1080sF 1920x1080 50Hz 59 94Hz 60Hz SMPTE 274M 1080p 1...

Страница 16: ...vanced settings YES YES YES YES YES YES NO NO NO NO NO NO 2 2 Pulldown YES3 YES3 YES3 YES3 YES3 YES3 YES3 YES3 YES3 YES3 YES3 YES3 3 2 Pulldown YES4 YES4 YES4 YES4 YES4 YES4 YES4 YES4 YES4 YES4 YES4 Y...

Страница 17: ...ale DVI I analog pins Frequency 15 625 kHz 50 Hz 625 lines 15 734 kHz 60 Hz 525 lines Levels R G B 0 7 Vp p SYNC 0 3 Vp p or TTL negative Impedance RGB 75 ohms SYNC 75 ohms or Hi Z COMPONENT Connector...

Страница 18: ...ls Y 1 Vp p 0 7 V Luma 0 3 V Sync C 0 3 Vp p Chroma Burst Impedance 75 ohms COMPOSITE VIDEO Connectors Inputs 1 to 4 female HD15 Inputs 5 6 female DVI I analog pins RCA Standard PAL SECAM 15 625 kHz 5...

Страница 19: ...1080 16 9 50Hz 60Hz 72Hz 75Hz YES 1920 x 1080 B 16 9 50Hz 60Hz YES 1920x 1080 C 16 9 50Hz 60Hz YES 1920 x 1080 HD 16 9 50Hz 60Hz YES 1920 x 1200 16 10 50Hz 60Hz YES 2048 x 1080 19 10 50Hz 60Hz YES or...

Страница 20: ...72Hz 75Hz 1366 x 768 16 9 50Hz 60Hz 72Hz 75Hz 1366 x 800 15 9 50Hz 60Hz 72Hz 75Hz 1400 x 1050 4 3 50Hz 60Hz 72Hz 75Hz 1440 x 900 16 10 50Hz 60Hz 72Hz 75Hz 1600 x 1200 4 3 50Hz 60Hz 1680 x 1050 16 10...

Страница 21: ...RTS needed for upgrade LAN Connector RJ45 Protocol TCP Transmission Control Protocol or UDP User Datagram Protocol Ethernet Base 10 100 Communication specifications 19 AUDIO OUTPUT Connector Output 1...

Страница 22: ...to 158 F Operating humidity 10 to 80 non condensing Input voltage range 100 240 VAC 50 60 Hz Typical consumption 90 W CE Compliancy test following EN 55022 2006 A1 2007 EN 55024 1998 A1 2001 A2 2003 E...

Страница 23: ...TMDS Data 0 24 TMDS Clock C1 Analog Red Video or Cr Pr or C C2 Analog Green Video or Y or Composite Video C3 Analog Blue Video or Cb Pb C4 Analog Horizontal Sync or Composite Sync C5 Analog Common Gro...

Страница 24: ...the DVI inputs a specific feature allows enable disable the HDCP receiver for the input chosen It can be very useful especially using a Mac Input Menu DVI HDCP detection The output status can provide...

Страница 25: ...ces and 8 analog computer video sources simultaneously The versatility of the Eikos LE will allow for almost any event configuration and cater for all your projection needs The intuitive rear panel of...

Страница 26: ...ecifications in this chapter The extra Video Out card installed on the Eikos LE can be used for recording broadcasting or previewing purposes in a wide range of formats for maximum compatibility with...

Страница 27: ...his signal can be NTSC PAL or SECAM The signal is transmitted on a single coaxial cable and is connected to the video equipment with an HD15 connector For inputs 1 to 4 connect a 1x BNC from your comp...

Страница 28: ...e and your Component source G B R Component YUV Source COMPUTER SOURCES The device accepts the following computer signals RGBHV RGB S and RGsB on inputs 1 to 6 RGBS VIDEO SOURCES This signal is widely...

Страница 29: ...Inputs 1 2 on the Eikos LE accept up to 2 live sources in Digital format DVI I 1x digital DVI and 1 x analog input on female DVI I universal connector For analog sources please use the breakout cable...

Страница 30: ...Eikos LE Modes p 5 AUDIO SWITCHER Audio Stereo Switcher card features 12 inputs and 2 outputs An additional auxiliary input can be mixed with any other input Master Volume and individual input level c...

Страница 31: ...er leaving room for what is most important to our users concentrating on their event TheEikosLEfrontpaneliscomprisedofseveralsections eachcarefullylabelledandselfexplanatory corresponding to all the m...

Страница 32: ...knob allows users to quickly scroll through menu items and increase or decrease any modifiable value in the Eikos LE menu Simply scroll to the desired menu item and press the ENTER button to confirm...

Страница 33: ...your preview screen will be transitioned to the Main output display The Eikos LE EFFECT SELECTION button selects the assigned Effect to the active layer Preset selection button The Eikos LE PRESET SE...

Страница 34: ...yer is selected LAYER select to adjust layer size position border transparency or transitions LOGO FRAME select to store record use and manage logos and frames into the Eikos LE AUDIO select to access...

Страница 35: ...ress the ENTER button to enter the Control sub menu Select Default Values by rotating the scroll knob and press the ENTER button to enter your choice to restart your Eikos LE with its factory settings...

Страница 36: ...tton with an available source or function will cause that button to blink green on the preview or red once it is on the Main output TAKE button reacts as follows If take function is available the butt...

Страница 37: ...re allows enable disable the HDCP receiver for the input chosen It can be very useful especially using a Mac Input menu DVI HDCP detection NOTE The input status is available at any time in status inpu...

Страница 38: ...und colour add a background color space in place of the default black one Test pattern use test pattern on Main or Preview screen to configure your projectors and or your softedge All changes have to...

Страница 39: ...or still layer The others are only identified by their colorful frame and their number Blinking of the Frame of the Preview allows to display the selected layer 37 Preview Id The function disables al...

Страница 40: ...he Mosaic Preview button is activated Red light solid button One live source mode Select your Layer and the source you want to put on it The input selected will be displayed at full frame rate on your...

Страница 41: ...ttings in the Layer menu or directly by pressing the layer button The settings available depend on the layer selected Layer adjusts set up layer size and position Layer zoom set up layer zoom size and...

Страница 42: ...on how many scalers are in use the Eikos LE TAKE function will act in one of 3 different ways when transitioning the Next Preset Preview to the Current Preset Main Take 1 shot Case 1 There are enough...

Страница 43: ...s Take to view the result on the main screen To adjust PIPs there is a shortcut on a front panel too Press PIP button Press Pos size zoom button PIPs as Layers PIP configuration All the settings and s...

Страница 44: ...Concerning the User 1 and User 2 button they have to be set up before in the Control menu Prog Keys Fade Wipe Slide Numerous wipes can be selected horizontal and vertical from the center or outside in...

Страница 45: ...WIPE DOWN HARD WIPE UP HARD WIPE RIGHT HARD WIPE LEFT HARD WIPE CURTAIN IN HARD WIPE CENTER OUT HARD WIPE CENTER IN HARD WIPE ANGLE TOP LEFT CORNER HARD WIPE ANGLE BOTTOM LEFT CORNER HARD WIPE ANGLE T...

Страница 46: ...CORNER HARD SLIDE ANGLE BOTTOM RIGHT CORNER HARD A A A A B B B B Border The border has to be setting up in the Layer menu Press PIP button go in border menu select and set your border with colour and...

Страница 47: ...e pixels beneath the white border Working with Frames It is possible to store up to 8 frames in the Eikos LE non volatile memory Frames are mainly used as backgrounds in a typical show or event setup...

Страница 48: ...ess status bar on the VFD screen Your frame is stored when the menu reappears on the VFD screen 5 Press the BACKGROUND FRAME button select the frame number 1 to 8 you just recorded and press the TAKE...

Страница 49: ...LE offers a wide variety of transitions between the scenes you create for your shows and events It allows for live recall of 4 user presets each of which you can edit at any given time 1 Whether cate...

Страница 50: ...t be recalled using the same output resolution Resizing or other image manipulation of the captured logo is not possible The capture zone is outlined by a white rectangle and includes the pixels benea...

Страница 51: ...utton first Press Logo1 Layer button Press Shift button Press Input for logo 7 or 8 use Shift then Input button You can change logos or delete logos on the preview screen using the same way the layers...

Страница 52: ...rmine audio output delay Select Manual Adjust to determine audio delay manually NOTE selecting Manual Adjust will give access to audio delay value in milliseconds of the main and Prelist audio output...

Страница 53: ...fit the source image borders Black Stripe Automatic adjustment of the PIP Ratio to fit the source image borders during a transition PIP 51 Smooth Move effect Smooth Move PIP control the acceleration o...

Страница 54: ...nt Background Transparent Background allows you to remove the black band on sources in the background live layer in order to display behind a background frame or background color Background Frame Imag...

Страница 55: ...nd keep everything in between or invert to key only things that are of a medium intensity The black and white levels define where to begin the keying In the range 0 to 255 0 repre sents no luminance o...

Страница 56: ...f 255 will select nearly all hues Black Level This option permits adjustment of the luminance levels of the keyed hue The Black Level is the luminance lower bound Colors in the selected hue range with...

Страница 57: ...iant screens or projectors If it s not the case the output image could be disabled B SETTINGS IN MATRIX MODE Working with Layers Same as MIXER Mode Settings Background Live Output 1 Output 2 PIP 1 PIP...

Страница 58: ...ut 2 Synch w Out 1 NOTE The output status can provide you all information about the output in real time This fea ture is particularly needed when HDCP is used thanks to the HDCP status All changes hav...

Страница 59: ...s LE has 4 scalers to understand how your effect will be performed you need to know how many scalers are used on your outputs Don t forget that you always need one free scaler to perform clean transit...

Страница 60: ...ror Mode 2 Clone mode The output 1 and 2 will be the same All changes on the output 1 will be affected to the output 2 Layers will have the same position and size For the modes Mirror Mode activated o...

Страница 61: ...ame as the output 1 except the fact that the selected layer will have its H position flipped standard Mirror Mode 4 Copy H Flip all modes the output 2 will be exactly the same as the output 1 except t...

Страница 62: ...ogo1 Logo 1 Logo 7 Pip2 SDI 1 SDI 4 Pip1 DVI 1 DVI 2 Live Input 1 Input 8 Frame Frame 1 Frame 8 MATRIX MODE OUT 1 OUT 2 Format 1920 x 1080 Format 1920 x 1080 Rate 50Hz Rate 50Hz Lock internal Lock int...

Страница 63: ...HD RGBS i11 Input 3 Audio Input 2 SD ED HD RGsB i11 Input 4 Audio Input 3 SD ED HD YUV i11 Input 5 Audio Input 4 Computer SOG i11 Input 6 Audio Input 5 Computer HV C i11 Audio Input 6 Computer RW i11...

Страница 64: ...50 Hz o2 1280x1024 5 4 60 Hz o2 H V RGB HV 1366x800 15 9 75 Hz o2 H V RGsB SOG RGB 16 235 Disabled Predefined color Saturation Main 1440x900 16 10 1680x1050 16 10 1920x1080 HD 1920x1080 C 1920x1200 1...

Страница 65: ...z o2 H Pos 60 Hz o2 V Size 50 Hz o2 V Pos 24 Hz o2 29 97 Hz o2 59 94 Hz o2 H Size PRESET Step Back Save Preset Load Preset Save from Save from Save to Save to Memory 1 Memory 1 Memory 5 Main Main Prev...

Страница 66: ...Key or LumaKey Titling t2 only displayed for Type Chroma Key or ChromaKey Titling t3 only displayed for Type LumaKey Titling or ChromaKey Titling t4 only displayed for Type different from A3 displayed...

Страница 67: ...ottom to Top b4 Bottom from Top b4 HV to Center b6 To Top Right Corner b7 HV from Center b6 From Top Right Corner b7 Wipe Vertical to Center b5 To Bottom Right corner b7 b1 Not available for Backgroun...

Страница 68: ...f2 V Size Logo 4 empty lf2 Level white Color grabber Manual setting Logo 6 empty lf2 Cut out white Logo 8 LOGOS FRAMES Record Frames Frame 1 Frame 3 Frame 5 Empty lf1 Frame 2 Empty lf1 Frame 4 Frame 6...

Страница 69: ...4 Input 6 Input 6 DVI 2 DVI 2 SDI 2 SDI 2 Master Volume SDI 4 SDI 4 Audio Delay Source Level Balance Balance Balance m1 Available only on Mixer Mode m2 Available only on Matrix Mode Level Mode Source...

Страница 70: ...4 DVI 1 L4 Input 2 L4 DVI 2 L4 Input 3 L4 SDI 1 L4 Input 4 L4 SDI 2 L4 Input 5 L4 SDI 3 L4 Input 6 L4 SDI 4 L4 Input freeze Baud rate All Fade Set message OFF Freeze all Set message ON Menus User 1 Us...

Страница 71: ...l take the hand quickly with it You have to install the software on a Computer and have a LAN board or RS 232 link to use the RCS After the installation launch the program and proceed to the network e...

Страница 72: ...er sources frames layers and logos directly by clicking on the corresponding button then navigating through the different available tabs The red window of the RCS represents your Main window and can a...

Страница 73: ...een Ethernet connection 1 Connect a crossed RJ45 cable between the Eikos LE and your PC then power on your devices Use straight RJ45 if connecting through a network switcher 2 Click on the RCS program...

Страница 74: ...field 3 Activate the input in the Enabled column if it is not 4 In the scroll down menu of the Type column select the signal type connected to that plug 5 Repeat steps 2 to 4 for all sources connecte...

Страница 75: ...8 frames in the Eikos LE non volatile memory Frames are mainly used as backgrounds in a typical show or event setup and can be recorded from any of the 8 Eikos LE sources and called back at the click...

Страница 76: ...ogo number 1 to 8 you wish to use Your logo will appear on the preview screen above any existing layer on screen 6 Click on the TAKE button Your logo will appear on the main display The Eikos LE offer...

Страница 77: ...hich screen you want to memorize the preset from 3 By clicking one of the two options the RCS will automatically load and preview the selected Preset 4 Click on the Take button to view your preset on...

Страница 78: ...of the device To configure audio settings of the Eikos LE plug all audio inputs into the device and click on the Audio tab of the RCS home page 1 Set the Main audio output level and delay accessible...

Страница 79: ...display configuration NOTE for further information concerning our optional remote controllers please connect to our website on www analogway com 6 1 Axion2 76 USA Canada South America and The Carribe...

Страница 80: ...OTE for further information concerning our optional remote controllers please connect to our website on www analogway com 6 2 ORCHESTRA 76 USA Canada South America and The Carribeans ANALOG WAY Inc Te...

Страница 81: ...212 269 1943 Email salesusa analogway com Europe Middle East and Africa ANALOG WAY SAS Tel 331 64 47 16 03 Fax 331 64 47 14 73 Email saleseuro analogway com Asia Pacific ANALOG WAY Pte Ltd Tel 65 62...

Страница 82: ...ad RK 300 Remote Control Keypad designed to control Analog Way s new Seamless Switcher Very User friendly Remote Control Keypad Controls different Switchers Mini Joystick for easy element control Ethe...

Страница 83: ...an effort to make the use of our machines the most pleasant experience possible the Analog Way team is constantly aiming to create easy to follow examples update information and furnish our website wi...

Страница 84: ...e and the Eikos LE in order to setup the LAN parameters of the product 2 In the Control Eikos LE LAN Setup menu configure the connection of the Eikos LE product in UDP mode and setup the Local and Rem...

Страница 85: ...ance center Customer Service and ask to receive a Return Material Authorization number RMA Three regional maintenance centers are available depending on your location See map below for information on...

Страница 86: ...analogway com Before calling your regional maintenance center please gather the following information Serial number of the unit Firmware version look in CONTROL MENU VERSIONS Model reference EKS400 D...

Страница 87: ......

Страница 88: ...he illustrations and screens described in this manual may be exaggerated or simplified for easy recognition and may be slightly different from the actual unit ANALOG WAY SAS 33 rue du Saule Trapu Parc...

Отзывы: