background image

SCAN 1600 / DIGI SCAN 1600 


PAGE 19 

Chapter 5 : REMOTE CONTROL SOFTWARE 

Your device is shipped with a Windows compatible 

Remote Control Software

. This software allows you to control and make 

all adjustments by a simple mouse click. 

NOTE:

 The latest Remote Control Software is available on our web site: 

www.analogway.com 

5-1. CONNECTIONS 

-Connect the serial port of your control device to the 

RS-232

 port (DB9 Female connector) of the device with a 

straight

 cable (DB9 Female / DB9 Male). 

-

Speed transmission:

 9600 bauds, 8 data bits, 1 stop bit, no parity bit, no flow control. 

-

Pin-out:


PIN # 

FUNCTIONS 

2 TRANSMIT 

DATA 

(Tx)


3 RECEIVE 

DATA 

(Rx)


5 GROUND 

(Gnd)


5-2. SOFTWARE INSTALLATION 

c

  Turn your computer ON and wait for Windows to completely start. 

d

  Insert the CD-ROM into your drive: the ANALOG WAY home window will open automatically. 

e

  Select the language of the CD-ROM menus, then click on "Install a Remote Control Software" and select the name 

of your device. 

IMPORTANT:

  If the Autorun is not enabled: From the Windows desktop, open My Computer and select the CD-

ROM drive. Select the Autorun folder, and then select the autorun.exe file. 

f

  Follow the Windows installation instructions.  


5-3. COMMUNICATION SETUP 

c

  Connect the RS-232 cable between the DSV1600/SSV1600 and the control device as indicated in the section 5-1.  

d

  Then only power ON all of the devices. 

e

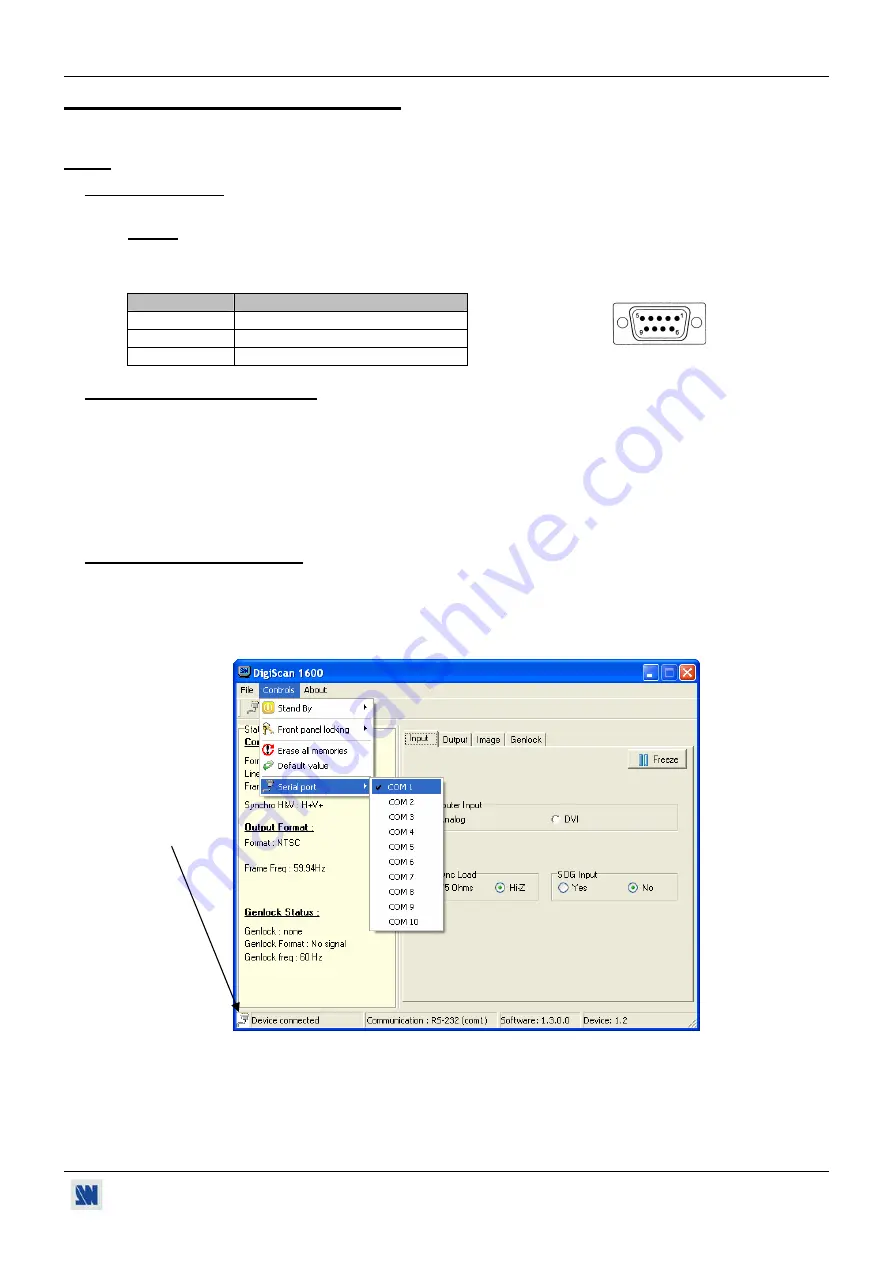
  Click on the program files SCAN1600 in 

Start>program>ANALOGWAY>SCAN1600

 to run the software. 

f

 Click on 

Controls 

menu and select 

Serial Port, 

and then select the 

COM

 port number corresponding to the 

connection of the device. 


DB9 female (Rear panel of the device) 

When the 
communication 
is established, 
the message 
"

Device 

connected

" is 

displayed. 

Содержание Digi Scan 1600

Страница 1: ...ANALOG WAY SCAN 1600 DIGI SCAN 1600 EDITION 06 07 User s Manual MODEL DSV1600 MODEL SSV1600...

Страница 2: ...nplugged from wall outlet In both cases please follow these instructions The power cord of the device should be unplugged from the outlet when left unused for several days To unplug the device do not...

Страница 3: ...mais obstruer ses ouvertures Si un liquide ou un objet p n tre l int rieur de l appareil d branchez imm diatement l appareil et faites le contr ler par un personnel qualifi avant de le remettre en ser...

Страница 4: ...amos que lea cuidadosamente todas las consignas de seguridad y de funcionamiento del aparato antes de usarlo Conserve las instrucciones de seguridad y de funcionamiento para que pueda consultarlas pos...

Страница 5: ...ANEL DESCRIPTION 11 1 10 SCAN 1600 REAR PANEL DESCRIPTION 11 Chapter 2 STARTING 12 2 1 DIGI SCAN 1600 CONNECTIONS 12 2 2 SCAN 1600 CONNECTIONS 13 2 3 SETTINGS 13 2 4 IMAGE ADJUSTMENTS 13 Chapter 3 FRO...

Страница 6: ...devices DIGI SCAN 1600 connection diagram 2 6 3 4 5 5 RGB COMPONENT output connection SETTINGS c We recommend resetting the DIGI SCAN 1600 to all of its default values with the front panel display men...

Страница 7: ...input sources and then your display devices SCAN 1600 connection diagram 2 3 4 5 RGB COMPONENT output connection SETTINGS c We recommend resetting the SCAN 1600 to all of its default values with the...

Страница 8: ...2 meeting SMPTE 259 timing specifications Digi Scan 1600 comes with High performance Genlock to overlay graphics onto incoming Video with external switcher All of the Line Subcarrier phase parameters...

Страница 9: ...be downloaded from Analog Way website Scan 1600 is very easy to use and provides a high quality Video signal 1 5 DEVICES OPTIONS REFERENCES REFERENCE DESIGNATION DSV1600 DIGI SCAN 1600 SSV1600 SCAN 1...

Страница 10: ...ON ON OFF AC power switch O OFF I ON POWER Standard IEC connector 100 250 VAC 0 5A 50 60Hz automatic RS 232 RS 232 communication port on a DB9 female connector INPUT MONITOR COMPUTER INPUT Analog comp...

Страница 11: ...ng push FREEZE Freezes the displayed output short push 1 10 SCAN 1600 REAR PANEL DESCRIPTION RS 232 RS 232 communication port on a DB9 female connector INPUT MONITOR COMPUTER INPUT Analog computer inp...

Страница 12: ...s required connect a control monitor on the MONITOR OUT HD15 connector NOTE Set the RGB Hi Z 75 button on Hi Z if you connect a monitor on the MONITOR OUT connector If not set it on 75 NOTE The MONITO...

Страница 13: ...turn ON your input source and then your display devices SCAN 1600 connection diagram 2 3 4 5 RGB COMPONENT output connection 2 3 SETTINGS c We recommend resetting the device to all of its default val...

Страница 14: ...tton to enter in the CONTROL MODE From the CONTROL MODE press this button to confirm a selected item EXIT MENU button From the STATUS MODE press this button to enter in the CONTROL MODE From the CONTR...

Страница 15: ...4 5 6 7 1 NTSC 59 94 Hz 2 PAL 50 Hz 3 NTSC J 59 94 Hz 8 Preset 7 Zoom status 3 SOG input 4 H sync load 5 Genlock load 1 6 Genlock H ph 1 7 Genlock Sc ph 1 2 Output 1 Output status 2 Output std 3 Outp...

Страница 16: ...SV1600 only This function allows to adjust the genlock Subcarrier phase Adjust with ENTER 2 OUTPUT ENTER 2 1 Output status ENTER Displays the output status 2 2 Output std ENTER Select one of the follo...

Страница 17: ...ER Displays the image zoom status 3 8 Preset ENTER This function allows to set all the image parameters flicker filter Black level RGB level under overscan position size to the factory settings FUNCTI...

Страница 18: ...exe in Start Program ANALOGWAY SCAN1600 updater f In the Port menu select the Com port connected to the device g Click on START on the software h Press and hold the ENTER front panel button and simult...

Страница 19: ...D ROM into your drive the ANALOG WAY home window will open automatically e Select the language of the CD ROM menus then click on Install a Remote Control Software and select the name of your device IM...

Страница 20: ...OFTWARE continued SCAN 1600 DIGI SCAN 1600 PAGE 20 5 4 USING THE SOFTWARE c Click on the Input tab and select the Computer input type d Click on the Output tab and then select the needed adjustment ou...

Страница 21: ...1600 Chapter 5 REMOTE CONTROL SOFTWARE continued PAGE 21 5 4 USING THE SOFTWARE continued e Click on the Image tab and adjust your input f For the DSV1600 only click on the Genlock tab and make the g...

Страница 22: ...120 Hz 800 x 600 60Hz up to 120 Hz 1024 x 768 60Hz up to 120 Hz 1280 x 1024 60Hz up to 75 Hz 1600 x 1200 60Hz RB Reduced Blanking 6 2 VIDEO OUTPUTS RGB S VIDEO Connectors 4 BNC female Frequency 15 62...

Страница 23: ...NTSC Impedance 75 Ohm or Hi Z Output Passive loop through 6 4 REMOTE PORT Connector DB9 female Level RS 232 Data Rate 9600 bauds 8 bits data 1 bit stop no parity bit no flow control 6 5 ENVIRONMENTAL...

Страница 24: ...ni avant ni apr s Il n est pas n cessaire d appuyer sur ENTER du clavier Une commande peut tre pr c d e d une valeur voir chapitre A 2 STRUCTURE D UNE COMMANDE Lorsque l appareil re oit une commande...

Страница 25: ...no 1 yes l LOAD H sync load selection Rd Wr 0 1 0 Hi Z 1 75 ohms OUTPUT COMMANDS COMMANDES DE SORTIE F OFMT Output standard selection Rd Wr 0 2 0 NTSC 1 PAL 2 NTSCj GR REFR Synchronization mode select...

Страница 26: ...no sync detected 1 sync detected ih IHP Sign of the horizontal input sync Rd 0 1 0 negative 1 positive iv IVP Sign of the vertical input sync Rd 0 1 0 negative 1 positive ii IIN Interlaced signal det...

Страница 27: ...8 104 29 41 I 49 73 i 69 105 2A 42 J 4A 74 j 6A 106 2B 43 K 4B 75 k 6B 107 2C 44 L 4C 76 l 6C 108 2D 45 M 4D 77 m 6D 109 2E 46 N 4E 78 n 6E 110 2 F 47 O 4F 79 o 6F 111 0 30 48 P 50 80 p 70 112 1 31 49...

Страница 28: ...s including free materials and labor This warranty does not apply if the product has been improperly installed or abused handled with improper care used or stocked in abnormal conditions modified open...

Отзывы: