USER MANUAL
DCP-MTX
100m 4K HDBaseT Daisy-Chain Presentation Switcher
Страница 1: ...USER MANUAL DCP MTX 100m 4K HDBaseT Daisy Chain Presentation Switcher...
Страница 2: ...l 09 5 EDID SWITCH 10 6 APPLICATION INSTALLATION 11 6 1 Typical Application 11 6 2 Installation Connection 13 7 CEC RS232 AUTO CONTROL 17 8 SET UP CONTROL 20 8 1 MYTURN 20 8 2 Web UI 22 8 2 1 Log Into...
Страница 3: ...ventilation openings with newspapers tablecloths curtains and similar items Do not install near any heat sources such as radiators heat registers stoves or other apparatus including amplifiers that p...
Страница 4: ...For users with different level of A V switching experience DCP MTX offers various control options through the physical MYTURN button on the front panel the intuitive Web UI or Telnet control for adva...
Страница 5: ...R MANUAL DCP MTX 2 PACKING LIST 1 x DCP MTX 1 x Power Supply 12 DVC 3A 3 x Phoenix Male Connectors 3 5 mm 3 pins 2 x Phoenix Male Connectors 3 5 mm 4 pins 2 x Mounting Brackets 1 x User Manual this ma...
Страница 6: ...050 60Hz 1920 x 1080 60Hz 1920 x 1200 60Hz 1280 x 720P 50Hz 1280 x 720P 60Hz 1920 x 1080P 50Hz 1920 x 1080P 60Hz Output Connectors 1 x HDMI OUT 1 x HDBaseT OUT Output Signal Type DMI 2 0 HDBaseT Outpu...
Страница 7: ...audio or Stereo audio output Control Control Methods MYTURN Contact Closure Telnet Web UI General Operating Temperature RH 32 F 113 F 0 C 45 C 10 90 non condensing Storage Temperature RH 4 F 158 F 20...
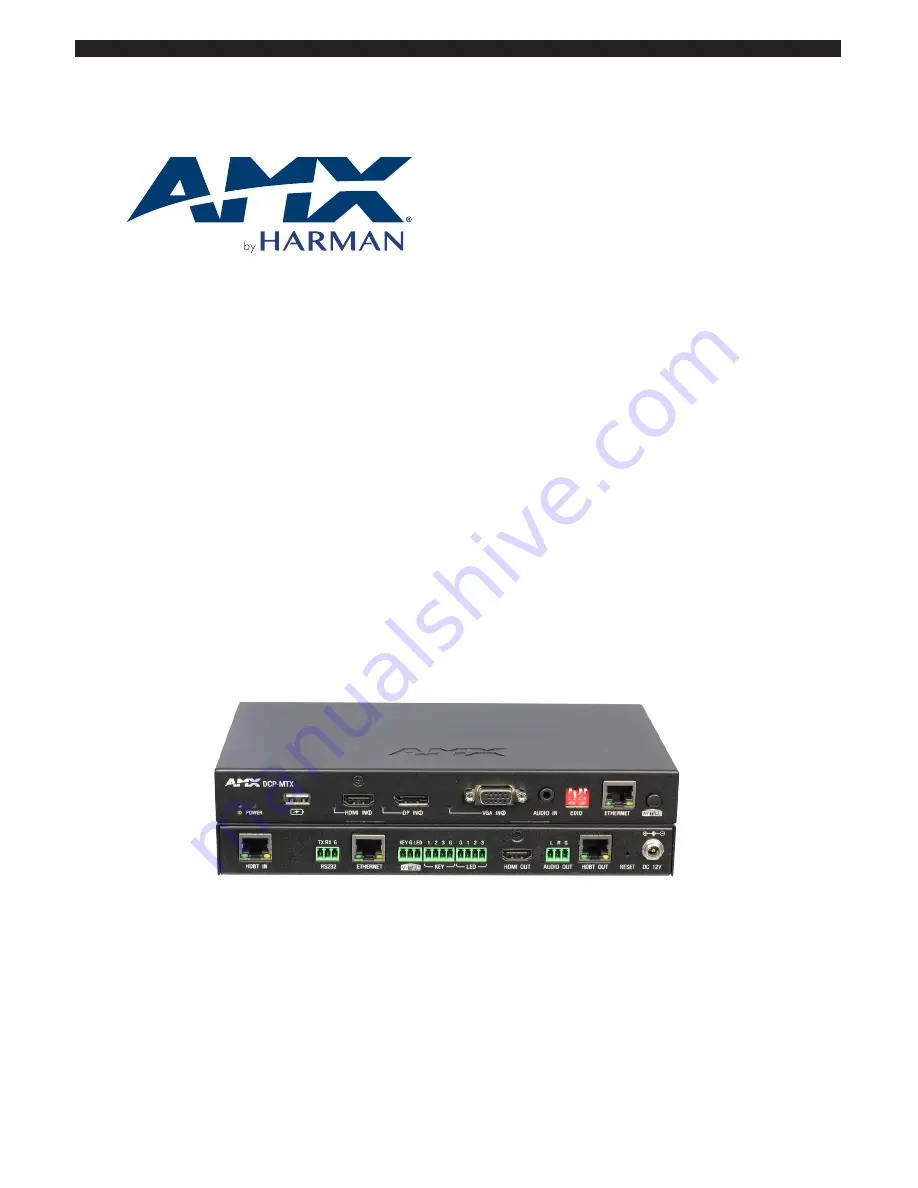
Страница 8: ...s selected as input source 5 HDMI IN Connects to an HDMI source device 6 DP IN LED Illuminates when DP IN is selected as input source 7 DP IN Connects to a DisplayPort source device 8 VGA IN LED Illum...
Страница 9: ...input sources 5 KEY Connects to a controller e g keypad for direct selection of input sources Pin 1 HDMI IN Pin 2 DP IN Pin 3 VGA IN Pin G Ground 6 LED Connects to a controller e g keypad for indicat...
Страница 10: ...efault 1920 x 1080 60Hz 2CH Should any device communication or compatibility issues be encountered during installation please refer to the table below and set up the DIP switches manually DIP SWITCH S...
Страница 11: ...ctivate any of the transmitter DCP MTXs MYTURN button displays connected to receiver DCP MTXs will display the activated device s active signal Example if DCP MTX 3 s MYTURN is activated Display x y a...
Страница 12: ...URCE 1 SOURCE 2 DCP MTX 3 SOURCE 3 DISPLAY x DISPLAY y HDBaseT HDBaseT HDBaseT HDBaseT DCP MTX z DISPLAY z HDBaseT DISPLAY 1 DISPLAY 2 DISPLAY 3 SOURCE x SOURCE y Application 4 Group Mode DCP MTX in C...
Страница 13: ...t 1 Connect DCP MTXs through HDBT 1 Connect HDBT OUT of the first DCP MTX to HDBT IN of the next e g DCP MTX 1 to DCP MTX 2 2 Connect the rest DCP MTXs through HDBT likewise 3 If Ring Mode connection...
Страница 14: ...me network segment as DCP MTX e g 192 168 1 x For information about accessing and operating Web UI please refer to 8 2 WEB UI To avoid IP addressing conflicts please repeat Step 2 if any DCP MTX is re...
Страница 15: ...L IO KEY PAD DCP MTX 3 HDMI LAPTOP VGA AUDIO LAPTOP DP LAPTOP HDMI MONITOR ETHERNET TOUCH PANEL IO KEY PAD DCP MTX N HDMI LAPTOP VGA AUDIO LAPTOP DP LAPTOP HDMI MONITOR ETHERNET TOUCH PANEL IO KEY PAD...
Страница 16: ...APTOP VGA AUDIO LAPTOP DP LAPTOP HDMI MONITOR ETHERNET TOUCH PANEL IO KEY PAD DCP MTX N HDMI LAPTOP VGA AUDIO LAPTOP DP LAPTOP HDMI MONITOR ETHERNET TOUCH PANEL IO KEY PAD HDBT HDBT HDBT SYSTEM WIRING...
Страница 17: ...o charts below 1 If active input signal is present DCP MTX will send a CEC RS232 command to power on the display connected to HDMI OUT RS232 port immediately MYTURN Activated Detect for active input s...
Страница 18: ...erted 3 The display connected will shutdown 3 30 Display DCP MTX HDMI DP VGA HDBaseT HDBaseT Display DCP MTX HDMI DP VGA HDBaseT HDBaseT Display DCP MTX HDMI DP VGA HDBaseT HDBaseT 30 0 MYTURN De acti...
Страница 19: ...a MYTURN activated DCP MTX with no input signal even if a display sink is connected To realize CEC RS232 Auto Control of DCP MTX please connect a display device which accepts CEC RS232 command For in...
Страница 20: ...uencing 1 Long press MYTURN button of the first DCP MTX or DCP MTX 1 in the chart below in the connection system for 10 seconds 2 The input LEDs HDMI IN DP IN VGA IN of DCP MTX 1 will flash twice 3 Th...
Страница 21: ...is in Manual Mode short press its MYTURN button again to toggle among its active signals from HDMI IN DP IN and VGA IN ports Input Signal in active use First active signal of DCP MTX y will be in use...
Страница 22: ...can be accessed through a modern browser e g Chrome Safari Firefox etc DCP MTX ships with a default IP address of 192 168 1 121 and default login password for Wen UI of admin 8 2 1 Log Into WEB UI To...
Страница 23: ...he device using the RESET button For more information please go to 9 RESET 8 2 2 Control through WEB UI Web UI of DCP MTX is comprised by four sections Status Configuration Advanced and Device List Th...
Страница 24: ...d Rate Parity Bits Data Bits Stop Bits Hex String ON OFF End Flag Command Baud Rate Parity Bits Data Bits Stop Bits Hex String ON OFF End Flag RS232 Auto Control Delay Time RS232 Wakeup Command RS232...
Страница 25: ...Red gradient The DCP device is not connected Moving your mouse up onto a DCP device informaiton of the device will be displayed in a pop up window DCP MTX will show such information as Name IP Address...
Страница 26: ...he one accessed through Web UI 2 Device Name The Device Name allows you to redefine the name of DCP MTX or a DCP device in case multiple DCP devices are connected NOTE The Device Name must be 1 20 cha...
Страница 27: ...is keyed in 3 the above connection status will appear after reloading 2 If any DCP MTX or DCP device is reset removed from or added to the connection please repeat the above steps to reset IP sequenc...
Страница 28: ...MYTURN Sort Protection is to enable or disable IP sequencing through MYTURN button When the button is switch ON users will not be able to trigger IP sequencing using the MYTURN button on the front pa...
Страница 29: ...ection enables or disable Auto Switch of the DCP MTX If Auto Switch is turned ON If a new input source signal is detected DCP MTX will automatically switch to use the new input signal If an active sou...
Страница 30: ...setting of DCP MTX is in 1920 x 1080 60Hz 2CH mode the EDID DIP switch is set to 0 0 1 0 To adjust EDID settings of DCP MTX through Web UI please manually set the EDID switch on the front panel to 1...
Страница 31: ...t receives CEC command from DCP MTX The time is 0 30 minutes CEC Manual Control Click to turn on or off the display manually 2 RS232 Controller DCP MTX incorporates a built in RS232 controller and is...
Страница 32: ...RS232 command from DCP MTX The time is 0 30 minutes RS232 Wakeup Command Key in a user defined command for waking up the device connected then click the SAVE button RS232 Standby Command Key in a user...
Страница 33: ...reset or reboot the DCP MTX settings enable disable automatic logout from Web UI and upgrade firmware of your DCP MTX device Welcome Menu The Welcome Menu section is for you to customize your own logo...
Страница 34: ...stem The System sub section is used for restoring the DCP MTX to factory default settings or rebooting the system Factory Default Click to reset the device to factory default settings Reboot Click to...
Страница 35: ...lease follow the instructions below Step 1 Click MCU Update button then the following window will pop up Step 2 Click Browse to search for the update file Then click Next to start uploading the update...
Страница 36: ...ing Step 4 The MCU updating will take about two minutes Step 5 When completed the following window will appear After completion please reboot the device manually 2 To upgrade ARM To upgrade ARM please...
Страница 37: ...USER MANUAL DCP MTX Step 2 Click Browse to search for the update file Then click Next to start uploading the update files Step 3 When uploading is done the following appears Click Next to start updati...
Страница 38: ...d the following window will appear After completion please click to refresh 8 2 2 4 Device List The Device List section lists out all the connected DCP devices by showing their model name and IP addre...
Страница 39: ...Telnet connection between the controlling device e g PC and DCP MTX has been configured correctely For Telnet control the two network parameters of DCP MTX are required IP Address DCP MTX comes with a...
Страница 40: ...ET button on its rear panel and will restore the device settings and login password To reset DCP MTX 1 Hold down the RESET button rear panel for at least 5 seconds using a paper clip 2 The input LEDS...
Страница 41: ...0 1 0 1 off on Description Get Auto Switch mode is in active status or inactive status Command SASWT Return SASWT 1 Description Auto Switch is in active status 3 Switch selected input to all outputs...
Страница 42: ...iption Current order sequence number is 1 7 Set MYTURN Sign Command CSHME T Return CSHME T Parameter SHME 0 1 0 1 false true Description Set MYTURN signal Command CSHME1T Return CSHME1T Description Se...
Страница 43: ...ROT Return SGROT 1 Description Current Device is Subgroup 12 Set Sort Ungrouping Command CSOR T Return CSOR T Parameter SOR 0 1 0 1 off on Description Set Sort Ungrouping off is by default Command CSO...
Страница 44: ...n Command CLED1T Return CLED1T Description Set ID on 17 Get ID Status Command SLEDT Return SLEDT value Parameter value 0 1 0 1 off on Description Get ID status Command SLEDT Return SLEDT 1 Description...
Страница 45: ...rn CD SPT Parameter D 0 1 30 Description Set CEC Power Delay Time Command CD2SPT Return CD2SPT Description CEC Power Delay Time is 2 min 22 Get CEC POWER Delay Time Status Command SDSPT Return SDSPT v...
Страница 46: ...ption UART Stop bit is 1 26 Set UART Parity bit Command CUPA T Return CUPA T Parameter UPA 0 1 2 0 1 2 null odd even Description Set UART Parity bit Command CUPA1T Return CUPA1T Description UART Parit...
Страница 47: ...lnet pass through 29 Set UART Power On Off Command CUPW T Return CUPW T Parameter UPW 0 1 0 1 off on Description Set UART Power On Off Command CUPW0T Return CUPW0T Description Set UART Power Off 30 Se...
Страница 48: ...Status Command SPWDT Return SPWDT value Parameter value 0 1 30 Description Get UART POWER Delay Time Status Command SPWDT Return SPWDT 2 Description Get UART POWER Delay Time Status is 2 min 34 Set I...
Страница 49: ...0001 HDMI DP HDBT 1920x1200 60Hz 2CH VGA 1920x 1200 60Hz 0010 HDMI DP HDBT 1920x1080 60Hz 2CH VGA 1920x 1080 60Hz 0011 HDMI DP HDBT 1680x1050 60Hz 2CH VGA 1680x 1050 60Hz 0100 HDMI DP HDBT 1600x900 6...
Страница 50: ...z 0100 HDMI DP HDBT 1600x900 60Hz 2CH VGA 1600x 900 60Hz 0101 HDMI DP HDBT 1440x900 60Hz 2CH VGA 1440x 900 60Hz 0110 HDMI DP HDBT 1360x768 60Hz 2CH VGA 1360x 768 60Hz 0111 HDMI DP HDBT 1280x768 60Hz 2...
Страница 51: ...xx xx xx xx mask Command CIP192 168 1 122MASK255 255 2 55 0gw192 168 1 1T Return CIP192 168 2 122MASK255 255 2 55 0gw192 168 1 1T Description Set static IP address to 192 168 2 122 mask to 255 255 255...
Страница 52: ...arks registered trademarks of their respective companies AMX does not assume responsibility for errors or omissions AMX also reserves the right to alter specifications without prior notice at any time...