14
2019-04-12
123943
08
When setting up the calibrator, you must…(see fig. 1)
Place the calibrator on an even horizontal surface in the spot
you intend to use it.
Caution…
Do not use the instrument if the fan is out of
order
.
Ensure a free supply of air to the fan.
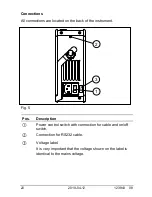
Check that the voltage shown on the label above the power
control switch is identical to the mains voltage (ETC-400 A/R
only). If not, the instrument should be returned to AMETEK
Denmark A/S or the distributor for replacement.
Check that the earth connection for the instrument is present
and attach the cable.
Select an insertion tube with the correct bore diameter and
place it in the largest bore of the instrument (ETC-125 A only)
or use one of the bores in the well that best suits your needs.
See section 3.3 for information on how to select the insertion
tube/ correct bore in the well.
The calibrator is now ready for use.
Section 3.3 and 3.4 are for ETC-125 / 400 A only
3.3
Choice of insertion tube / correct bore in
well.
Caution…
To get the best results out of your calibrator, the insertion
tube dimensions, tolerance and material are critical. We
highly advise using the JOFRA insertion tubes, as they
guarantee trouble free operation. Use of other insertion
tubes may reduce performance of the calibrator and cause
the insertion tube to get stuck.
Содержание Jofra ETC-125 A
Страница 1: ...Reference manual Temperature Calibrator Jofra ETC 125 A 400 A 400 R ...
Страница 3: ......
Страница 5: ...2019 04 12 123943 08 List of contents User manual English Reference manual English ...
Страница 7: ......
Страница 8: ...2019 04 12 ON 115 V 1 5 3 4 2 FIG 1 ...
Страница 10: ...2019 04 12 C C AUTO STEP ESC MENU ESC MENU FIG 3 ...
Страница 11: ...2019 04 12 FIG 4 AUTO STEP AUTO STEP ...
Страница 12: ...2019 04 12 FIG 5 ESC MENU ESC MENU ESC MENU ESC MENU ESC MENU ESC MENU ESC MENU ...
Страница 29: ...2 2019 04 12 123943 08 ...


