


pg
8
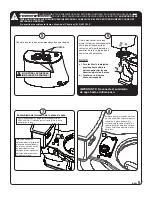
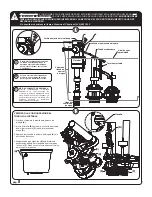
Approximate
Water Level
Water Level Adjustment Knob
Overflow Tube
Trip Lever Rod
Float Cup
Adjust water level to level
indicated on tank by turning
water level adjustment knob
to move float cup up or down.
A
Prime the system by flushing the
product 5 times before use to
achieve optimal performance.
B
C
Fill Valve
Or Water
Control
Water Supply Line
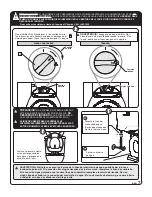
Adjustable Screw
VERIFY ADJUSTABLE SCREW SETUP
1. Depress trip lever handle all the way
(A).
2. Adjust screw on the teeter bar
(B) so rear frame (C)
touches the frame stop
(D).
3. Return trip lever handle
(A) to rest position.
4. Make sure hook
(E) is fully engaged under tab on
valve body
(F), if not, slightly adjust screw to make
sure hook is engaged.
PROPER FLUSHING METHOD:
Be sure to fully depress the trip lever
on each flush. Do not hold the trip
lever down for extended periods of
time as this could allow air to enter
the system which will slightly degrade
performance for a few flushes.
(E)
(F)
(C)
(D)
(B)
Hook
(A)
16
17
!
CAUTION
:
IF A VORMAX PLUS FRESHINFUSER IS NOT SECURELY INSERTED INTO THE SPUD OPENING,
DO
NOT FLUSH THE TOILET
AS THIS MAY RESULT IN WATER LEAKING FROM THE TOILET.
TOILET MUST HAVE A
VORMAX PLUS FRESHINFUSER INSERTED IN THE SPUD OPENING AT ALL TIMES WHEN FLUSHING THE TOILET.
For further assistance please call Customer Care at: (800) 442-1902
Содержание VorMax Plus 708AA Series
Страница 12: ...pg12 Notes pg12...
Страница 24: ...pg12 Notas p g 12...


