background image

pág. 

2

TABLA DE CONTENIDO

Dentro de la caja.....................................................................................................................................................página 3

Antes de empezar...................................................................................................................................................página 3

Información del video de la instalación....................................................................................................................página 3

Si debe retirar un inodoro viejo................................................................................................................................página 3

Instalación en oposición..........................................................................................................................................página 4

Instrucciones de instalación....................................................................................................................................página 4

Cómo funciona........................................................................................................................................................página 9

VorMax Plus FreshInfuser.......................................................................................................................................página 9

Guía de resolución de problemas del FreshInfuser VorMax Plus...........................................................................página 10

Guía de resolución de problemas del inodoro VorMax

®

 Plus.................................................................................página 10

Cuidado y limpieza................................................................................................................................................página 10

Garantía................................................................................................................................................................página 11

Содержание VorMax Plus 708AA Series

Страница 1: ...erican Standard and Lysol have teamed up to bring you the solution to effortless toilet bowl cleaning Introducing the self cleaning toilet VorMax Plus The VorMax Plus toilet features a self cleaning s...

Страница 2: ...Removing An Existing Toilet page 3 Back to Back Installation page 4 Installation Instructions page 4 How It Works page 9 VorMax Plus FreshInfuser page 9 Troubleshooting Guide for VorMax Plus FreshInf...

Страница 3: ...ank sponge remaining water from bowl before removing toilet Clean Flange Inside The Box Wax Ring Attachment Handle Nuts 3 Nuts 2 Bolt Caps 2 Bowl To Floor Knobs 2 T Bolts with Retainer 2 If Removing A...

Страница 4: ...nd venting conditions the flow from this toilet in a back to back installation may create a vacuum on the system and draw water from the opposing bowl The National Standards Plumbing Code prohibits th...

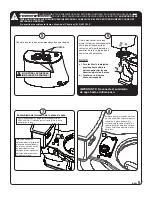
Страница 5: ...o china contact Confirm gaskets are fully seated on tank GASKETS DO NOT REMOVE FACTORY INSTALLED NUTS 5 6 2 1 Check that rubber gasket is firmly attached to the underside of the base plate 1 and place...

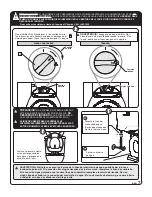
Страница 6: ...e installing line up the marked notches on the Base Plate Housing and the VorMax Plus FreshInfuser Insert the VorMax Plus FreshInfuser into the spud opening aligning the marked notch on the VorMax Plu...

Страница 7: ...RMAX PLUS FRESHINFUSER INSERTED IN THE SPUD OPENING AT ALL TIMES WHEN FLUSHING THE TOILET 15 WARNING Overtightening of water supply line nuts could result in breakage and potential flooding If the con...

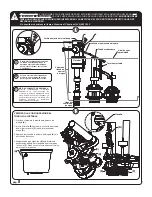
Страница 8: ...le A to rest position 4 Make sure hook E is fully engaged under tab on valve body F if not slightly adjust screw to make sure hook is engaged PROPER FLUSHING METHOD Be sure to fully depress the trip l...

Страница 9: ...us FreshInfuser lasts 30 days and exudes an ocean fresh scent Daily use of the VorMax Plus toilet offers continuous freshness flush after flush Two VorMax Plus FreshInfuser packs included with the pur...

Страница 10: ...reinstall f Replace gaskets g Clean debris from seal surface Replace flapper seal as needed and adjust settings according to adjustable screw setup in Step 17 h Clean debris from seal surface Replace...

Страница 11: ...ified in a manner inconsistent with the product as shipped by American Standard WARNING This warranty DOES NOT COVER any damages caused by the use of in tank cleaners These products can seriously corr...

Страница 12: ...pg12 Notes pg12...

Страница 13: ...orde Por eso American Standard y Lysol se unieron para traerle la soluci n para la limpieza sin esfuerzo de la taza del inodoro Presentamos el inodoro autolimpiante VorMax Plus El inodoro VorMax Plus...

Страница 14: ...r un inodoro viejo p gina 3 Instalaci n en oposici n p gina 4 Instrucciones de instalaci n p gina 4 C mo funciona p gina 9 VorMax Plus FreshInfuser p gina 9 Gu a de resoluci n de problemas del FreshIn...

Страница 15: ...ueda en la taza usando una esponja antes de retirar el inodoro Limpiar brida Dentro de la caja Anillo de cera Manija de fijaci n Tuercas 3 Nuts 2 Tapas de pernos 2 Perillas de la taza al piso 2 Tornil...

Страница 16: ...n Seg n las condiciones de plomer a y ventilaci n el flujo de este inodoro en una instalaci n en oposici n puede crear un vac o en el sistema y atraer agua de la otra taza El C digo de Normas Nacional...

Страница 17: ...elantera y posterior de la taza logrando un contacto entre cer micas Confirme que las juntas est n bien apoyadas en el tanque JUNTAS NO RETIRE LAS TUERCAS INSTALADAS DE F BRICA 5 6 2 1 Verifique que l...

Страница 18: ...laca de base Antes de realizar la instalaci n alinee las marcas de punz n en el armaz n de la placa de base y el VorMax Plus FreshInfuser Inserte el VorMax Plus FreshInfuser en la abertura del spud al...

Страница 19: ...e suministro reemplace la v lvula de llenado No use ning n tipo de sellador en la conexi n del suministro de agua El uso de masilla de plomero grasa para tuber a o cualquier otro tipo de sellador anul...

Страница 20: ...se la manija de la palanca de disparo A a la posici n de descanso 4 Aseg rese de que el gancho E est totalmente enganchado debajo de la leng eta en el cuerpo de la v lvula F De no ser as ajuste apenas...

Страница 21: ...s FreshInfuser dura 30 d as y emana una fragancia fresca de mar El uso diario del inodoro VorMax Plus ofrece frescura continua en cada descarga Se incluyen dos paquetes de VorMax Plus FreshInfuser con...

Страница 22: ...n la configuraci n para el tornillo ajustable en el paso 17 h Limpie los desechos en la superficie del empaque Reemplace el empaque del tap n como sea necesario y ajuste los par metros seg n la config...

Страница 23: ...rrecto accidente u otros da os si no se instal de acuerdo con las instrucciones de American Standard o si se lo modific de una manera incongruente con el producto tal como fue enviado por American Sta...

Страница 24: ...pg12 Notas p g 12...

Отзывы: