


pg
5
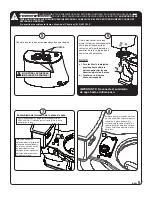
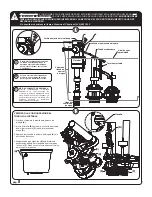
Assembly of Housing Base Plate
Read carefully then remove CAUTION sticker (1) next
to spud (2) from rear of bowl.
3
2
1
Insert rubber grommets
(3) (narrow end first) up
underneath the bowl and
into each seat mounting
hole. Ensure grommets
stay in place in bowl.
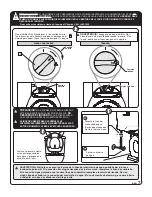
NOTES:
a) To ease installation, push
down on the top of the tank
while tightening the nuts.
b) Tighten all three nuts
adequately.
Using the provided handle,
tighten the nuts alternately
until the tank contacts the front
and back of the bowl achieving
china-to-china contact.
Confirm gaskets are fully seated on tank.
GASKETS
DO NOT REMOVE FACTORY
INSTALLED NUTS
!
5
6
2
1
Check that rubber gasket is firmly
attached to the underside of the
base plate (1) and place plate
over Spud (2) and rear of bowl
while aligning the two mounting
holes through the bowl.
8
7
IMPORTANT: Please do not connect the
water supply line until the last step
!
CAUTION
:
IF A VORMAX PLUS FRESHINFUSER IS NOT SECURELY INSERTED INTO THE SPUD OPENING,
DO
NOT FLUSH THE TOILET
AS THIS MAY RESULT IN WATER LEAKING FROM THE TOILET.
TOILET MUST HAVE A
VORMAX PLUS FRESHINFUSER INSERTED IN THE SPUD OPENING AT ALL TIMES WHEN FLUSHING THE TOILET.
For further assistance please call Customer Care at: (800) 442-1902
Содержание VorMax Plus 708AA Series
Страница 12: ...pg12 Notes pg12...
Страница 24: ...pg12 Notas p g 12...


