background image

GENERAL FEATURES (Cont.)

American DJ

®

AUDIO • DCD-PRO300™ INSTRUCTIONS MANUAL • PAGE 6

7

8

9

1

2

3

10

4

5

6

12

11

13

14

15

16

17

18

19

21

20

22

23

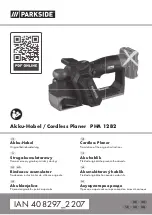
A. REMOTE UNIT FRONT
1.

RECALL This button allow you to cue up any of

the 10 memory points that have been memorized. Press
RECALL button then any of the 10 number buttons. the
player will cue up the selected point and pause.

2.

MEMORY This button allows you to program up to

10 points on the CD. Press the MEMORY button during
play or pause, the memory LED lights up. Use frame
search to reach desired point, then press a number button
to memorize that starting point. Repeat above steps to
memorize all 10 starting points if desired.  

3. NUMBER buttons (1 to 10)  These buttons are
used to select a particular track number starting point.
They are also used in MEMORY and RECALL modes.

4.

PROGRAM- Depress this button to stop the CD an

enter the program mode. Note the word “PROGRAM” is
indicated on the display. Select each track to be pro-
grammed with the f. skip and b.skip buttons (13 & 14). and
press the PROGRAM button between selections. You can
program up to 30 tracks. Press PLAY to start the program.
To exit and erase program hold the program button down
for more than 2 seconds while the unit is stopped, open
the disc tray, or turn off the power.

5. REPEAT This button allows you to select between 

REPEAT 1
REPEAT ALL CONTINUOUS PLAY

6.

SGL/CTN  You can choose between a single track

to play or all tracks in order by pressing once or twice.

7.

OPEN/CLOSE (Disc Tray Open/Close)- Press to

load or eject the disc. Each press will open or close the
disc tray on the transport. NOTE: Tray will not open unless
the disc has been paused.

8.

LCD DISPLAY- Indicates all the functions, as they

are occurring, with the CD.  These functions are explained
in the next section.

9.

PITCH BEND +/- 16% (Pitch Bend Button)-When

each of the two CD players is playing a CD, the pitch bend
function allows the positioning of the bass beats to be
matched after the pitch of each disc is matched. Either
player can “catch up” or “fall back” to match the other play-
er. The pitch will automatically rise while the + button is
pressed (allowing “catch up”) and return to the original
pitch when the button is released. The pitch will automati-
cally drop while the - button is pressed (allowing “fall
back”) and return to the original pitch when the button is
released. By changing the pitch of one disc with respect to
the other in this way the beats can be matched.

10.

PITCH (Pitch Button)- This button activates the

Pitch Slider (14).

11.

SHUTTLE WHEEL (OUTER RING)- This wheel

has 4 forward and 4 reverse speed positions for searching
through songs. The more you turn the wheel in either
direction the faster you search through the music.

12.

JOG WHEEL (INNER RING)- This jog wheel

serves 2 functions depending on the mode you are work-
ing in.

a. The jog wheel will act as a slow frame search

control when the CD is not playing but either paused or set
to a cue point. To set a new frame cue point, spin the
wheel then press play when you have determined the
proper position. Press CUE to return to the “CUE POINT”.

Содержание DCD-PRO300

Страница 1: ... American DJ AUDIO Los Angeles CA 90058 USA www americandj com PROformer plus ...

Страница 2: ...jects or spill liquid inside the CD player Electric shock or malfunction may occur Please record and retain the model name and serial number from your rating label Model No ______________________________ Serial No ______________________________ Line Voltage Selection for multiple voltage model only The desired voltage may be set with the VOLTAGE SELECTOR switch on the rear panel using a screwdrive...

Страница 3: ...ppliance 9 Grounding or Polarization Precautions should be taken so that the grounding or polarization means of an appliance is not defeated 10 Power Cord Protection Power supply cords should be routed so that they are not likely to be walked on or pinched by items placed upon or against them paying particular attention to cords at plugs convenience receptacles and the point where they exit from t...

Страница 4: ...ay not be loaded or unloaded properly Figure 1 3 Connections 1 Turn off the POWER switch 2 Connect the RCA pin cables to the inputs on your mixer 3 Connect the control cables to the REMOTE connector on the main unit CAUTION Be sure to use the supplied control cables Using another type of cable may result in damage Be sure the power is off when connecting the control cables Otherwise the units may ...

Страница 5: ... disassemble or modify the set in any way 1 8 times over sampling 1 bit D A converter 2 Beat counter 3 Auto cue 4 Frame search 5 Realtime cue 6 4 different speed scan 7 Pitch display 8 10 number buttons for direct track access 9 30 programmable tracks 10 Ten cue points can be memorized 11 Digital output RCA coaxial 12 Fader Start Fader Stop back cue Relay playback using the control jack 13 Large b...

Страница 6: ...in order by pressing once or twice 7 OPEN CLOSE Disc Tray Open Close Press to load or eject the disc Each press will open or close the disc tray on the transport NOTE Tray will not open unless the disc has been paused 8 LCD DISPLAY Indicates all the functions as they are occurring with the CD These functions are explained in the next section 9 PITCH BEND 16 Pitch Bend Button When each of the two C...

Страница 7: ...American DJ AUDIO DCD PRO300 INSTRUCTIONS MANUAL PAGE 7 23 RELOOP BUTTON If a loop has been made and you have hit the exit button press this but ton to enter the loop again to exit loop press OUT EXIT button B LCD 26 PLAY Indicators The PLAY indicators light during playback 27 PAUSE Indicators The PAUSE indicators light during pause or cue mode 28 A B Indicators These light when player performs re...

Страница 8: ... Figure 9 CAUTION Do not place any foreign objects in the disc tray and do not place more than one disc in the disc tray at a time Doing so may result in malfunction Do not push the disc tray in manually when the power is off as this may result in malfunction and damage the player 3 Selecting Tracks Select desired track using NUMBER Button or Press the TRACK Buttons once to move to one higher or l...

Страница 9: ...aded the cue point is set to the first source of music If track is changed before pressing play the cue point is changed to the new starting point If you pause during playback this also sets the new cue point 9 Frame search This is done by first pausing then using the jog wheel to set the starting point When you use the jog wheel the monitor function allows you to here what is playing Once you hav...

Страница 10: ...example if the PITCH BEND button is held in continuously the speed increases continuously The pitch changes within a range of 16 The jog wheel will temporarily bend the pitch of the music if the song is already playing by rotating the wheel clockwise to speed up or counterclockwise to slow down The speed that you rotate the JOG Wheel determines the percent of pitch bend 1 Find the BPM of the song ...

Страница 11: ... or returning it Do not bend the disc Do not apply heat Do not enlarge the hole in the center of the disc Do not write on the label printed side with a hard tipped implement such as a pencil or ball point pen Condensation will form if a disc is brought into a warm area from a colder one such as outdoors in winter Do not attempt to dry the disc with a hair dryer etc 2 Precaution on storage After pl...

Страница 12: ... to 60 C 4 to 14 F Accessories Connecting cord 2 sets for left and right channels Control cord 1 8m 6 feet AUDIO SECTION Quantization 16 bit linear per channel Sampling rate 44 1 kHz at normal pitch Over sampling rate 8 times D A conversion 16 bit Frequency response 10 to 20000 Hz Total harmonic distortion 0 01 Signal to noise ratio 94 dB Channel separation 86 dB Output level 2 OV 1dB Load impedan...

Отзывы: