background image


ENGLISH 

IMPORTANT SAFEGUARDS 


When using electrical appliances, basic safety precautions should be followed: 
 

1. Read all instructions carefully.   
2. Make sure the power supply corresponds to one on the rating label. 
3. To avoid electrical shock, do not immerse electrical parts in water or other liquid.   
4. Do not allow children to operate or play with the appliance. 
5. Unplug from outlet when not in use, or before putting on/taking off parts.   
6. Do not use with damaged electrical cord or plug. 
7. If damaged or malfunction occurs, refer to an authorized service center only. 
8. Do not place on or near hot surfaces. 
9. Never pull the appliance by the power cord. 
10. Do not use the appliance for other than intended household use. 

 
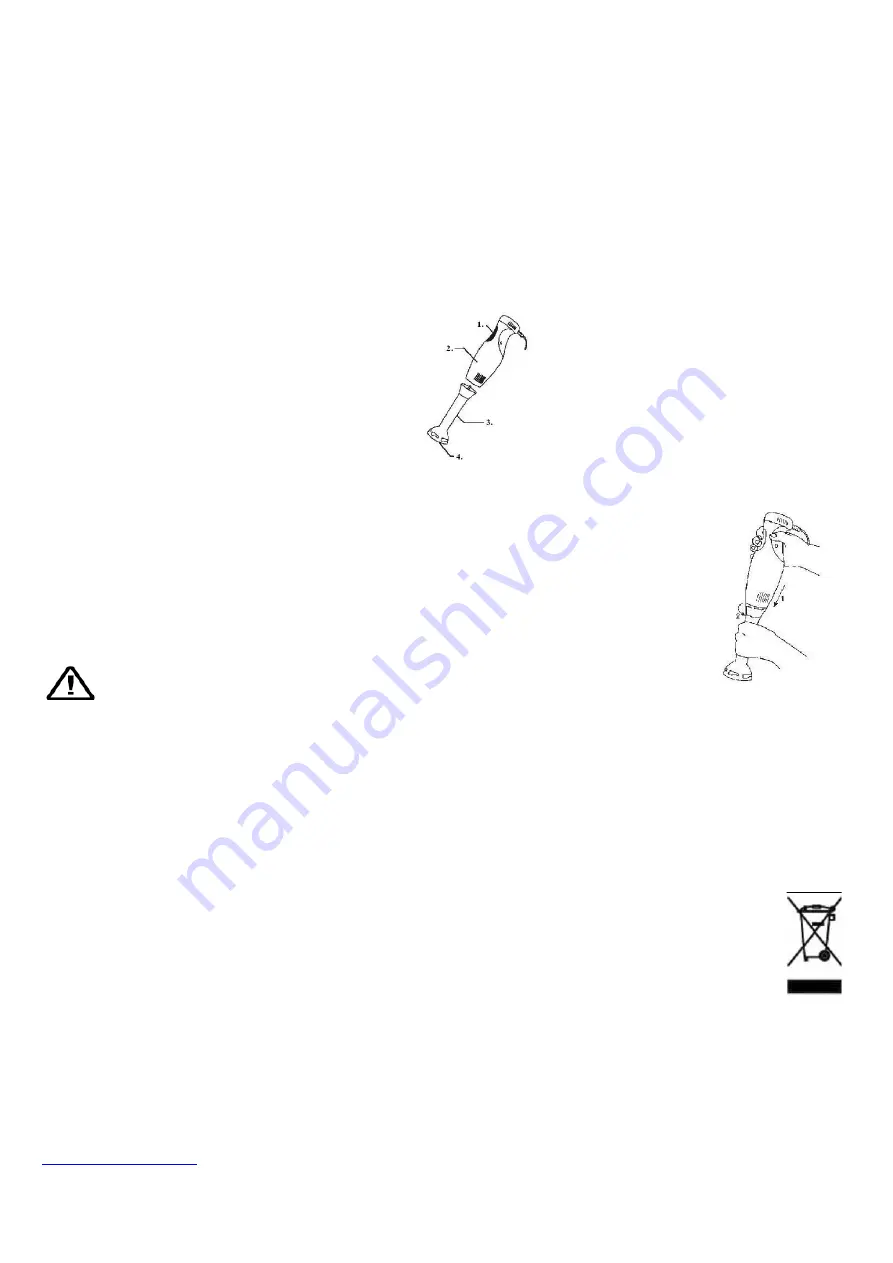
PARTS OF DESCRIPTIONS 


1. Speed buttons 
2. Motor housing 
3. Blending stick 
4. Blade


Instruction for use: 

The hand blender is perfectly suited for preparing dips, sauces, soups, mayonnaise and baby foods as well as for mixing and 

milkshakes. 
 
1. Before using, make sure the machine is clean, use damp clothe for cleaning. 
2. Assemble machine by twisting the body clockwise rotation. Make it sure it is properly locked.   
3. Connect the power cord to the outlet and place the machine in the measuring cup. 
4. Make sure all ingredients are cut into small pieces with suitable amount of liquid inside of the measuring 

cup. 

5. Press the speed button to the desire speed needed. 
6. Don’t operate the machine in more than 2 minutes. Let it the machine cool at least 5 minutes before start 

using again.   


  Warning: 


This appliance is equipped with a grounded, Type G, 3-pin power supply cord. This is a safety feature. Do not attempt to defeat 
the safety purpose of this plug. 
 

Cleaning & Maintenance: 
 

1. Clean the motor unit with a damp cloth, do not immerse in water. 

2. When processing food with color, the plastic parts of the appliance may become discolored, wipe these parts with vegetable oil 

before placing them in the dishwasher. 

3. All other parts can be clean in dishwasher, wash & dry thoroughly before storing. 


DISPOSAL OF YOUR OLD APPLIANCE 

1. 

When this crossed-out wheeled bin symbol is attached to a product it means the product is covered by the European 

Directive 2002/96/EC. 

2. All electrical and electronic products should be disposed of separately from the municipal waste stream via designated 

collection facilities appointed by the government or the local authorities. 

3. The correct disposal of your old appliance will help prevent potential negative consequences for the environment and 

human health. 

4. For more detailed information about disposal of your old appliance, please contact your city office, waste disposal 

service or the shop where you purchase the product.


Specification: 
 

Model No.: 

SF-3913 

Voltage: 

230V ~ 50Hz 

Wattage: 

180W 


E-mail Service address: 


[email protected]


Note: If any discrepancy appears in other languages, the ENGLISH version shall prevail.


Содержание SF-3913

Страница 1: ...otre propre s curit lisez attentivement le pr sent manuel avant d utiliser l appareil IT Per motivi di sicurezza importante leggere attentamente queste istruzioni prima di utilizzare gli apparecchi ES...

Страница 2: ...the speed button to the desire speed needed 6 Don t operate the machine in more than 2 minutes Let it the machine cool at least 5 minutes before start using again Warning This appliance is equipped wi...

Страница 3: ...sdrehung zusammen Achten Sie darauf dass sie einrasten 3 Stecken Sie den Stecker in die Steckdose und halten Sie den P rierstab in den Mixbecher 4 Alle Zutaten m ssen kleingeschnitten sein im Mixbeche...

Страница 4: ...rg ervoor dat alle ingredi nten in kleine stukjes zijn gesneden en plaats deze met een geschikte hoeveelheid vloeistof in de maatbeker 5 Gebruik de snelheidstoets om de gewenste snelheid in te stellen...

Страница 5: ...du e 4 Veillez ce que tous les ingr dients soient coup s en petits morceaux et qu une quantit appropri e de liquide soit vers e dans la tasse gradu e 5 Positionnez le commutateur de vitesse sur la vit...

Страница 6: ...gli ingredienti siano tagliati in piccoli pezzi e che il bicchiere graduato contenga una quantit adeguata di liquido 5 Premere il pulsante di selezione della velocit per scegliere la velocit desidera...

Страница 7: ...a jarra medidora 5 Pulse el bot n de velocidad a la velocidad que desee 6 No utilice la m quina durante m s de 2 minutos seguidos Deje enfriar la m quina durante 5 minutos al menos antes de utilizarla...

Страница 8: ...zyn w kubku odmierzania 4 Sprawdzi czy sk adniki s drobno pokrojone i maja odpowiedni dodatek cieczy w kubku odmierzania 5 Ustawi przycisk pr dko ci na po dan pr dko 6 Nie u ywa maszyny d u ej ni prze...

Страница 9: ...A fordulatsz m ll t gombbal ll thatja k zben a mixel si fordulatsz mot 6 Egyfolyt ban legfeljebb 2 percig haszn lja a g pet Ut na legal bb 5 percig hagyja h lni miel tt ism t haszn ln Figyelmeztet s...

Страница 10: ...gredientes est o cortados em pequenos peda os e que existe l quido suficiente no copo medidor 5 Prima o bot o de velocidade para regular a velocidade desejada 6 N o utilize o aparelho por mais de 2 mi...

Страница 11: ...11 1 2 3 4 5 6 7 8 9 10 PARTS OF DESCRIPTIONS 1 2 3 4 1 2 3 4 5 6 2 5 G 1 2 3 1 2002 96 2 3 4 Model No SF 3913 Voltage 230V 50Hz Wattage 180W E mail address info alpinaeuropa com...

Страница 12: ...12 1 2 3 4 5 6 7 8 9 10 1 2 3 4 1 2 3 4 5 6 2 5 3 G 1 2 3 SF 3913 230 B 50 180 info alpinaeuropa com 1 2002 96 EC 2 3 4...

Страница 13: ...te do odm rky 4 Ujist te se e v echny p sady jsou nasek ny na mal kousky a v odm rce je dostate n mno stv tekutiny 5 Stiskem tla tka rychlosti zvolte po adovanou rychlost 6 Spot ebi neprovozujte d le...

Страница 14: ...pr sady narezan na mal k sky a vlo en s vhodn m mno stvom do n doby 5 Stla te tla idlo pod a po adovanej r chlosti 6 Nepou vajte pr stroj dlh ie ne 2 min ty Pred op tovn m spusten m nechajte pr stroj...

Страница 15: ...e n buc i mici cu o cantitate suficient de lichid n interiorul paharului de m surat 5 Ap sa i butonul de reglare a vitezei la viteza dorit 6 Nu l sa i aparatul s func ioneze mai mult de 2 minute L sa...

Страница 16: ...posudu 4 Uvjerite se da su svi sastojci narezani na male komade s dovoljnom koli inom teku ine unutar mjerne posude 5 Pritisnite gumb za brzinu za eljenu brzinu 6 Ne koristite ure aj vi e od 2 minute...

Страница 17: ...u mericu 4 Proverite da li su svi sastojci iseckani na komadi e i da se u merici nalazi dovoljna koli ina te nosti 5 Izaberite eljenu brzinu pitiskom na dugme za regulaciju brzine 6 Ne dozvolite da a...

Страница 18: ...n tamam n n k k par alara kesildi inden emin olun 5 H z d mesine basarak istedi iniz h za getirin 6 Cihaz 2 dakikadan uzun s re al t rmay n Tekrar kullanmaya ba lamadan nce cihaz en az 5 dakika dinle...

Страница 19: ...19 1 2 3 4 5 6 7 8 9 10 1 2 3 4 1 2 3 4 5 6 5 G 1 2 3 1 2002 96 EC 2 3 4 SF 3913 230 50 180 info alpinaeuropa com...

Отзывы: