background image

21

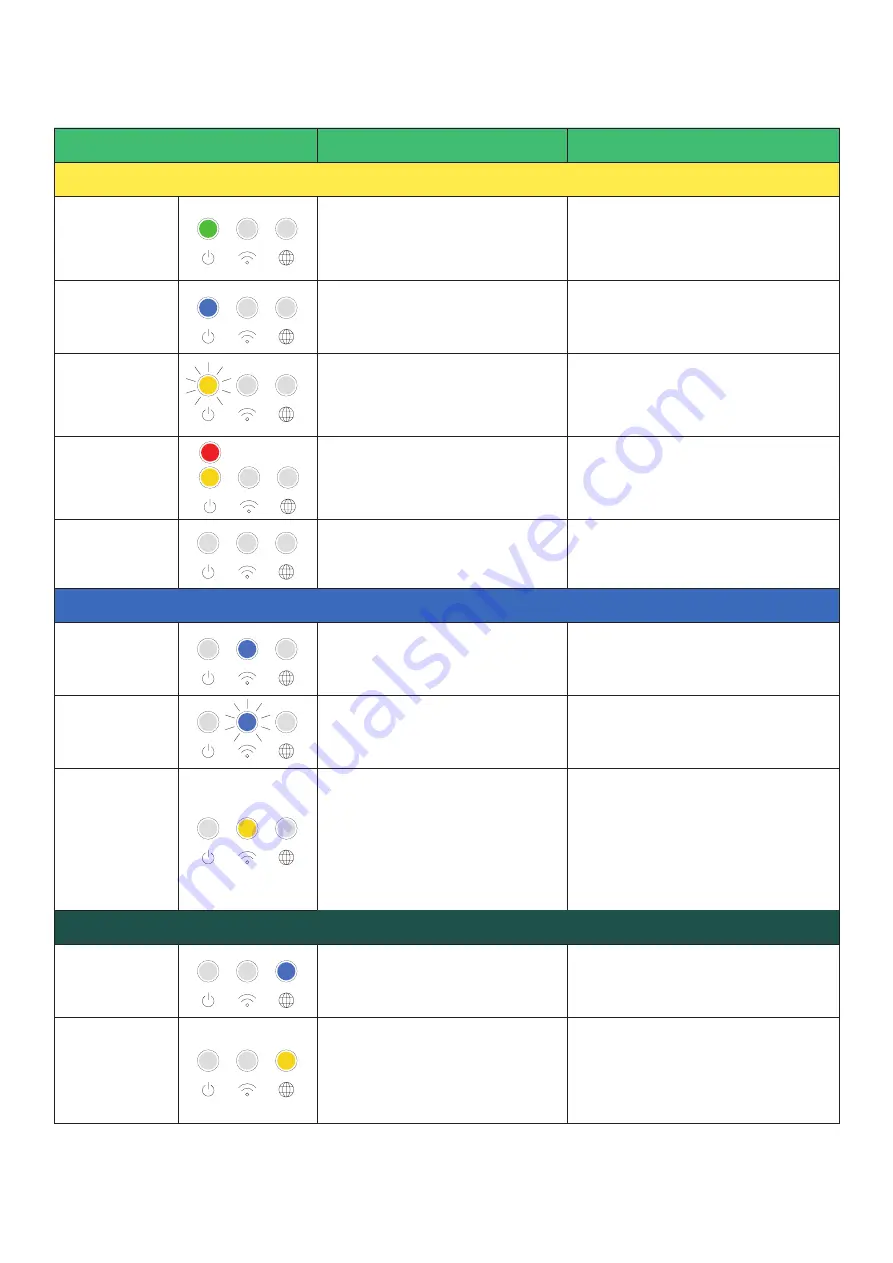
Appendix A: SolShare LED States

LED Status


Meaning

Notes / Actions

Power LED

Green

The SolShare is powered on, has 

been commissioned successfully, 

and the SolShare is distributing 

solar normally.

Blue

The SolShare is powered on and  

is performing a firmware update.

Do not power off the SolShare while 

it is performing a firmware update. 

Yellow flashing

The SolShare is powered  

on and has not yet completed  

the commissioning process.

Yellow or Red

The SolShare is powered on and 

is experiencing a fault and/or the 

SolShare is not distributing solar. 

Consult the SolShare Commissioning 

App. It is normal to see the yellow 

light during non-sunlight hours.

No lights on

The SolShare is not powered on. 

Check SolShare Maintenance Isolators 

(Grid) and Tenancy Main Switches 

(Inverter Supply) are not switched off.

Wi-Fi LED

Blue

The SolShare is connected  

to a Wi-Fi network.

Blue flashing

The SolShare is in Wi-Fi access 

point mode.

Follow the steps in Section IV 

Commissioning / Part A to connect 

the SolShare to a Wi-Fi network.

Yellow

The SolShare is not connected  

to a Wi-Fi network and is not  

in Wi-Fi access point mode.

Ensure the Wi-Fi router is powered 

on and within range of the SolShare. 

Check the Wi-Fi SSID and password 

and re-enter the credentials if they 

were incorrect by following the steps 

in Section IV Commissioning / Part 

A to connect the SolShare to a Wi-Fi 

network.

Internet LED

Blue

The SolShare has a strong internet 

connection.

Yellow

The SolShare does not have  

a strong internet connection,  

or cannot communicate with 

Allume’s servers.

Ensure the router has an internet 

connection.

Ensure all required ports are open 

(consult the Troubleshooting section 

of Allume’s How to set-up/change  

Wi-Fi credentials document).

Содержание SolShare

Страница 1: ...1 SolShare Installation Manual US VERSION...

Страница 2: ...endment of Wi Fi and Internet LED colors Copyright Allume Energy All rights reserved This manual accompanies our equipment for use by the end users The technical instructions and illustrations contain...

Страница 3: ...selection B Installation III Electrical connection A Input output connections B Running current transformer tails C Labeling IV Commissioning A Preparing the SolShare for commissioning B Commissionin...

Страница 4: ...ed to meet all US codes and standards This guide provides the general instruction of the installation procedure of the SolShare If you have questions or feedback on the product or this manual please c...

Страница 5: ...missioning App Installer name Company SolShare Connection Unit Connected eg Apt 1 Unit B Common light power No connection Unit number 1 L1 2 L2 3 L1 4 L2 5 L1 6 L2 7 L1 8 L2 9 L1 10 L2 Unit Connection...

Страница 6: ...ears at grounding points within the SolShare equipment This symbol is also used in the manual Handling and Safety Instructions SAFETY SYMBOLS INFORMATION The following safety symbols are used in this...

Страница 7: ...on could result in personal death or injury or damage to the device Installation is only to be conducted by a qualified person This guide is provided to help the installer understand the standard SolS...

Страница 8: ...em is installed with 10 units connected then each unit will receive solar energy allocation equivalent to a dedicated 1 6kW solar system If a unit has received more solar energy than their total energ...

Страница 9: ...nable commissioning and ongoing monitoring Do not mount the SolShare on flammable wall material 90 Mounted Vertically Do not mount the SolShare near flammable material or gases 90 Mounted Vertically E...

Страница 10: ...ener 2 Lift the SolShare onto the mounting brackets as directed in the diagram Check both top and bottom brackets are secure 3 Insert the locking bolt through the SolShare top mounting bracket as show...

Страница 11: ...slide down back into place Caution Risk of crush hazard if cover dislodged while in service position A Input Output Connections 1 Lift up cover into the Connection Position to reveal the lower sectio...

Страница 12: ...ia PV AC Disconnect 4 Run output conduits from out glands to Unit PV Breakers Inverter Supply TO METER PANEL FROM INVERTER PRE EXISTING GROUND CONNECTIONS TO ENCLOSURE Important The Unit PV Breakers I...

Страница 13: ...5 Tightening torque 30 lb in 3 4Nm Ground Connection Please refer to Appendix B for Conductor Specification options 1 Run input ground from inverter and connect to the SolShare s ground bar as shown a...

Страница 14: ...nect to the SolShare s neutral input connector as shown above 2 Run output neutral cable from neutral point in meter panel and connect to the SolShare s neutral output connector as shown above Output...

Страница 15: ...utputs of the PV Breakers must be interconnected on the load side of the unit s Main Breaker Ensure each output is labelled as per the figure below This will help later on in the installation when wir...

Страница 16: ...d logically Warning Only one neutral shall be wired out of the SolShare as shown in the diagram on page 13 Output neutral and ground must be wired to main neutral bar and main earth bar respectively l...

Страница 17: ...the SolShare Important Make sure colors and orientation of connectors are identical to the image above To ensure you are positioning them correctly check that the orange tabs are above your plugged in...

Страница 18: ...ip CT over service supply cable Important Make sure that each CT is clipped to the corresponding unit Important The CT must be connected on the service side of the point of connection of solar supply...

Страница 19: ...ect your device to the SolShare s Wi Fi network this will appear as SolShare 2P_100_XXXX where XXXX is the last 4 digits of the SolShare serial number You will have 30 minutes to complete the Wi Fi co...

Страница 20: ...oning process has been completed successfully the Power LED will be green and the Wi Fi LED and Internet LED will be blue as shown in the graphic to the right Consult the table about the SolShare s LE...

Страница 21: ...hes Inverter Supply are not switched off Wi Fi LED Blue The SolShare is connected to a Wi Fi network Blue flashing The SolShare is in Wi Fi access point mode Follow the steps in Section IV Commissioni...

Страница 22: ...ended for installations in The US Specifications are subject to changes without advanced notification For the most up to date documentation vist www allumeenergy com Allume Energy info allumeenergy co...

Отзывы: