background image

18 

AT-AR256E v3 - 4 Ports ADSL2/2+ Router - User Manual 

Chapter 4: Advanced Menu 

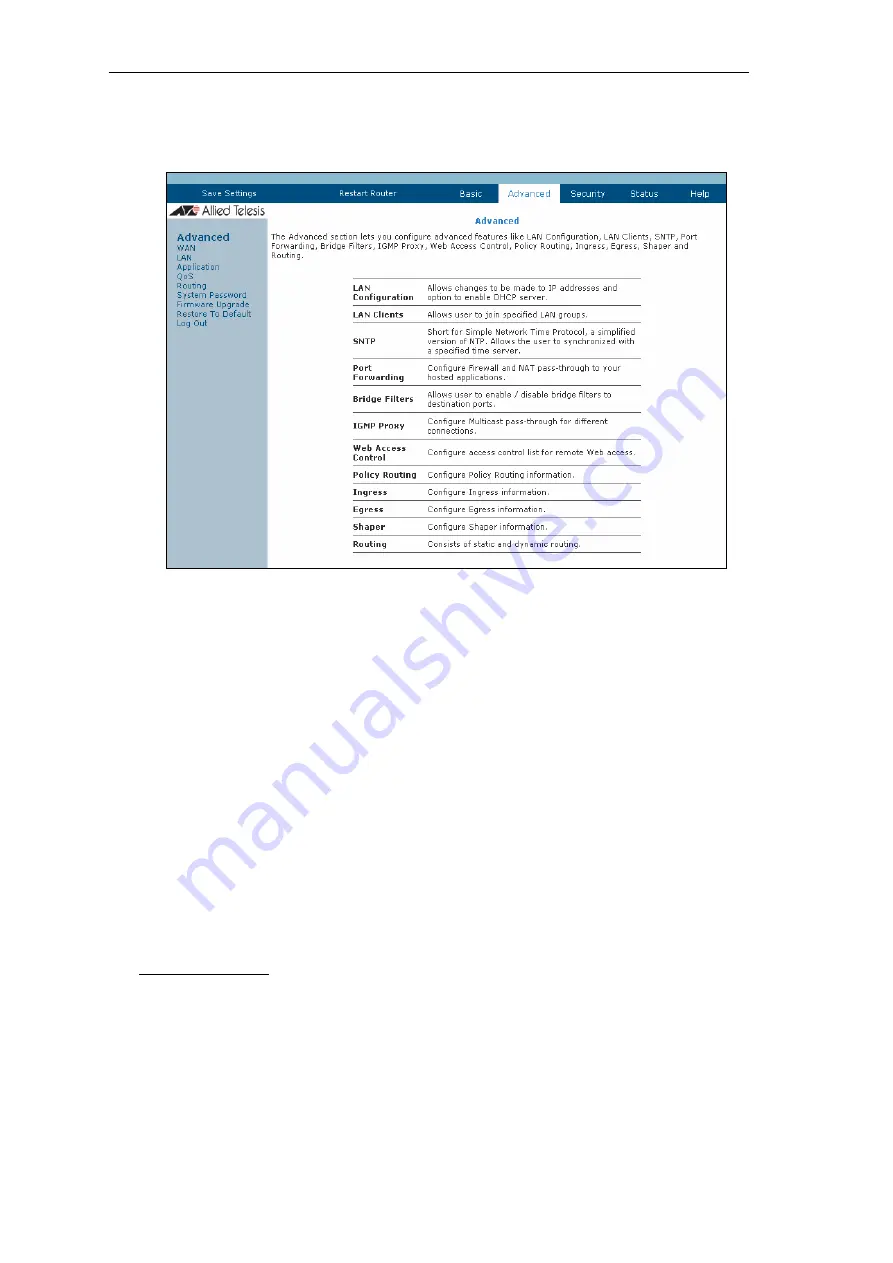
This menu allows advanced configuration options for your router. 


Figure 7: Advanced menu 

WAN 

Wide Area Network refers to the configurations you perform to establish an Internet connection. There 
are several types of WAN connections that require different settings. Wide Area Network (WAN) is also 
referred to as the broadband connection. Connection settings differ for every service provider. Most of the 
configuration you perform is for the WAN connection. 

New Connection 

Your router supports the creation of new connections. If you have multiple virtual connections, you may 
need to utilize the static routing capabilities of the modem to pass data correctly. 
WAN connections types include: 


PPPoE Connection 


PPPoA Connection 


Static Connection 


DHCP Connection 


Bridge Connection 

PPPoE Connection 

PPP or Point-to-Point Protocol, is a method of establishing a network connection/session between network 
hosts. PPPoE is a protocol for encapsulating PPP frames in Ethernet frames and is described in RFC 2516. 
PPPoE provides the ability to connect to a network of hosts over a simple bridging access device to a remote 
access concentrator. With this model, each router uses its own PPP stack. Access control, billing and type 
of service control can all be done on a per-user rather than per-site basis. 
 

All manuals and user guides at all-guides.com

Содержание AT-AR256E

Страница 1: ...PN 613 000984 Rev A AT AR256E v3 4 Ports ADSL2 2 Router User Manual All manuals and user guides at all guides com a l l g u i d e s c o m...

Страница 2: ...ogos or other designations mentioned herein are trademarks or registered trademarks of their respective owners Allied Telesis Inc reserves the right to make changes in specifications and other informa...

Страница 3: ...R LOSS INCLUDING BUT NOT LIMITED TO DIRECT INDIRECT SPECIAL WILFUL PUNITIVE INCIDENTAL EXEMPLARY OR CONSEQUENTIAL DAMAGES DAMAGES FOR LOSS OF BUSINESS PROFITS OR DAMAGES FOR LOSS OF BUSINESS OF ANY CU...

Страница 4: ...Important Appendix A contains translated safety statements for installing this equipment When you see the go to Appendix A for the translated safety statement in your language Wichtig Anhang A enth l...

Страница 5: ...ice Design 11 Back Panel 11 Front Panel 12 Chapter 2 About the Web User Interface 13 Accessing the Web User Interface 13 Web User Interface Components 13 Buttons 13 Menus 14 Chapter 3 Basic Menu 15 Ho...

Страница 6: ...48 Changing the System Password 48 Changing the Timeout Settings 49 Firmware Upgrade 49 Restoring the Default Settings 49 Chapter 5 Security Menu 50 IP Filters 50 LAN Isolation 51 Chapter 6 Status Men...

Страница 7: ...Configuration 24 Figure 16 LAN Group Configuration 25 Figure 17 LAN Clients 27 Figure 18 UPnP 28 Figure 19 SNTP 28 Figure 20 IGMP Proxy 29 Figure 21 Enable WAN Access Update 30 Figure 22 DNS Proxy 31...

Страница 8: ...0 Figure 43 LAN Isolation 51 Figure 44 Status menu 52 Figure 45 Connection Status 53 Figure 46 System Log 53 Figure 47 Remote Log Settings 54 Figure 48 Network Statistics Ethernet 55 Figure 49 Network...

Страница 9: ...the Web User Interface introduces the web user interface general settings how to select options and how to move among menus Chapters 3 7 Explain the usage of the various menus Document Conventions Th...

Страница 10: ...rn or repair must first be assigned a return materials authorization RMA number A product sent to Allied Telesis without an RMA number will be returned to the sender at the sender s expense To obtain...

Страница 11: ...Operating System Any operating system can be used Browser Internet Explorer 6 0 7 0 Netscape Navigator 3 02 Hardware 233MHz processor CD ROM Drive Ethernet network adapter Package Contents Package con...

Страница 12: ...iption POWER Off No power is supplied to the device Steady light Connected to a AC power supply ETHERNET Off No Ethernet connection Steady light Connected to an Ethernet port Blinking light Transmitti...

Страница 13: ...thentication is enabled default the Log In page will appear On the Log In page enter the Username and Password The default Username is manager and Password is friend 4 Click Log In Web User Interface...

Страница 14: ...Home Quick Start LAN Configuration and Diagnostics links Advanced Menu The Advanced menu provides advanced configuration settings for existing connections At least one WAN connection must be configur...

Страница 15: ...ves you an idea about the status of your Internet connection This page includes a Connect Disconnect button When clicked the router makes an attempt to connect to the Internet using the parameters sav...

Страница 16: ...LAN Configuration LAN Configuration displays the current IP address assigned to the router When you want to access the router use the stated IP Address Figure 5 LAN Configuration All manuals and user...

Страница 17: ...nnected to the WAN This test may take a few seconds to complete To perform the test select your connection from the list then press the Test button Before running this test make sure you have a valid...

Страница 18: ...have multiple virtual connections you may need to utilize the static routing capabilities of the modem to pass data correctly WAN connections types include PPPoE Connection PPPoA Connection Static Con...

Страница 19: ...to Point Protocol is a method of establishing a network connection session between network hosts It usually provides a mechanism for authenticating users Logical Link Control LLC and Virtual Circuit V...

Страница 20: ...dentified These servers resolve the name of the computer to the IP address mapped to it and thus enable you to access other web servers by typing the symbolic name host name Figure 10 New Static Conne...

Страница 21: ...n any IP address to the WAN interface NAT and firewall rules are not enabled This connection method makes the router act as a bridge for passing packets between the WAN interface and the LAN interface...

Страница 22: ...on allows you to select any combination of DSL training modes Leave the default values if you are unsure or the service provider did not provide this information In most cases this page should not be...

Страница 23: ...Before the router can begin scanning the connection the telephone line has to be plugged into the router Figure 14 Connection Scan To perform connections scan 1 Select the Basic menu 2 Select Automat...

Страница 24: ...nfiguration must reside within the same subnet The default gateway is the routing device used to forward all traffic that is not addressed to a station within the local subnet Your ISP will provide yo...

Страница 25: ...lly Netmask The subnet mask of your router Enables disables PPP unnumbered feature PPP IP Address IP Address The IP address should be different but within the same subnet as the WAN side IP address Th...

Страница 26: ...words if the IP address of the router is 192 168 1 1 default and you change the DHCP start end IP addresses to be 192 168 1 2 192 168 1 100 you cannot communicate with the router if your host has DHCP...

Страница 27: ...vanced menu 2 Select LAN LAN Clients This opens the LAN Clients page 3 Select a LAN Connection and enter IP Address Hostname and MAC Address 4 Click Apply 5 You can convert the dynamic into a static e...

Страница 28: ...o enable UPnP check the enable UPNP checkbox then Apply Simple Network Time Protocol Simple Network Time Protocol SNTP is a protocol used to synchronize the system time to the public SNTP servers It u...

Страница 29: ...tocol IGMP to report their multicast group memberships to neighboring routers Similarly multicast routers use IGMP to discover which of their hosts belong to multicast groups Your router supports IGMP...

Страница 30: ...terface Configure one or more LAN interface as the upstream interface To configure the IGMP Proxy 1 Select Advanced 2 Select Application IGMP Proxy 3 Configure the following interfaces Quickstart LAN...

Страница 31: ...Advanced 2 Select Application DNS Proxy 3 Select the DNS Server Priority Only Auto Discovered DNS Servers Only User Configured DNS Servers Auto Discovered then User Configured User Configured then Au...

Страница 32: ...make changes permanent click Save Settings Figure 23 Dynamic DNS Client Port Forwarding Port forwarding or virtual server allows you to direct incoming traffic to specific LAN hosts based on a protoc...

Страница 33: ...Name Protocol Port Start Port End and Port Map then click Apply 6 Continue to add rules as they apply from each category 7 Click Apply to temporarily activate the settings 8 To make changes permanent...

Страница 34: ...d with bridge filtering Figure 25 Bridge Filters To configure Bridge Filters 1 Select Advanced 2 Select Application Bridge Filters This opens the Bridge Filters page 3 Select Enable Bridge Filters 4 T...

Страница 35: ...vanced menu 2 Select Application Web Access Control 3 Select Enable 4 Select the connection used in Choose a connection 5 Configure the following fields Remote Host IP Remote Netmask Redirect Port 6 C...

Страница 36: ...as absolute priority and is used for Expedited Forwarding EF traffic This is always serviced till completion 2 CoS2 CoS5 is used for Assured Forwarding AF classes They are serviced in a strict round r...

Страница 37: ...are untouched Figure 27 Egress Layer 2 Egress The Egress Layer 2 page allows you to map the CoS of an outgoing packet to user priority bits which is honored by the VLAN network Again this feature is o...

Страница 38: ...bles you to map CoS to ToS so that the priority marking of outgoing packets can be carried over to the IP network Figure 29 Layer 3 Egress Field Description Interface Select the WAN interface to confi...

Страница 39: ...d mode Layer 2 Layer 3 Static Untrusted Mode Untrusted is the default Ingress page setting for all interfaces In this mode no domain mapping is honored in the router All packets are treated as CoS6 be...

Страница 40: ...ct QoS Ingress 3 Select the quickstart interface 4 Select Layer 2 5 Select CoS1 in Class of Service and enter 5 in Priority Bits Any packet with priority marking 5 is mapped to CoS1 the highest priori...

Страница 41: ...s CoS1 recommended To configure Ingress Layer 3 11 Select Advanced menu 12 Select QoS Ingress 13 Select the quickstart interface 14 Select Layer 3 15 Select CoS1 in Class of Service and enter 22 in Ty...

Страница 42: ...ring QoS on this interface only Any WAN LAN interface that is not configured has the default Untrusted mode 6 Select CoS1 in Class of Service All incoming traffic from the ETHERNET interface receives...

Страница 43: ...specific rate to which data will be shaped For example If CoS1 is configured to 100Kbits then even if 300Kbits of CoS1 data is being transmitted to the interface only 100Kbits will be sent out Low La...

Страница 44: ...second example Low Latency Queue Discipline is enabled CoS1 is not rate controlled hence the field is disabled CoS2 takes 100Kbits when there is no CoS1 packet CoS6 has 300Kbits when there is no CoS1...

Страница 45: ...h has 10 and CoS6 has 70 This is similarly to the Low Latency Queue discipline except that one is packet based and the other is rate based Figure 37 PRIOWRR enabled Policy Routing Configuration The Po...

Страница 46: ...e Specify you need to enter the protocol number in the box next to the Protocol field This field cannot be configured alone additional fields like IP Source MAC and or Ingress Interface should be conf...

Страница 47: ...o access the Internet through the router Figure 39 Static Routing The New Destination IP is the address of the remote LAN or host to which you want to assign a static route Enter the IP address of the...

Страница 48: ...LAN Configuration page Changing the System Password To change the System Password 1 Click the Advanced menu 2 Click System Password This opens the System Password page 3 Select Enable Authentication 4...

Страница 49: ...ou will need to log back into the router after the firmware upgrade is completed To update the firmware 1 Click the Advanced menu then click Firmware Upgrade This opens the Firmware Upgrade page 2 Cli...

Страница 50: ...page you can block specific traffic for example block web access or any traffic from a host on your local network A database of predefined IP filters allows you to apply one or more filtering rules to...

Страница 51: ...The Rule Management page opens for you to create new rules Enter Rule Name Protocol Port Start Port End and Port Map then click Apply The rules you create will appear in the Available Rules pane in t...

Страница 52: ...toring the router status and viewing product information Your router allows you to view the following status and product information Connection Status System Log Remote Log Network Statistics DHCP Cli...

Страница 53: ...ew the Connection Status go to the Status menu then click Connection Status Figure 45 Connection Status System Log System Log displays the router log Depending on the severity level the information lo...

Страница 54: ...the router to stop functioning Alert Conditions that require immediate correction such as a corrupted system database Critical Critical conditions such as hard drive errors Error Error conditions tha...

Страница 55: ...temporarily implement the changes click Apply 3 To make changes permanent click Save Settings Network Statistics The Ethernet and DSL statuses are displayed in this page To view the Network Statistic...

Страница 56: ...ime To view the DHCP Clients go to the Status menu then click DHCP Clients Figure 50 DHCP Clients QoS Status This page displays the Quality of Service and the packet statistics To view the QoS Status...

Страница 57: ...atus go to the Status menu then click Modem Status Figure 52 Modem Status Product Information This page displays the product information and software versions To view the Product Information go to the...

Страница 58: ...for various topics like Firewall Bridge Filters LAN Clients LAN Group Configuration PPP Configuration IP QoS and Routing Information Protocol To access Help click the Help menu Figure 54 Help menu In...

Отзывы: