©
A
ir
B
orne
W
ind
S
ports
P
ty.
L
td.
SECTION 4
Aircraft Operating Instructions Edge XT 912
NORMAL PROCEDURES
January 2014
Issue 2.4
Page 51
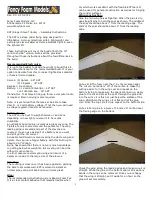
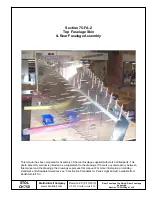
4.2.4
Stand The Wing Up
Rotate the control frame to the vertical position so that the wing is resting
on the control bar. Do not attempt to connect the nose catch now. Remove
the glider bag and unclip all the wing straps.
Figure 3 Section 4. Stand the Wing Up
4.2.5
Spread Leading Edges
Carefully spread both leading edges out half way then spread them both out to the approximate flying
position. It is essential that the keel and the leading edges are kept in the same plane or damage will
result. Each wing should be kept low to the ground whilst moving forward.
4.2.6
Arrow K and Merlin Only - Insert King Post
Remove kingpost base padding and plug the kingpost into the socket
on the rear most hole of the keel. Make sure that the cross bar wires are
not twisted and are on either side of the king post.
Figure 4 Section 4. Insert King Post
4.2.7
Arrow Only - Connect Control Frame To Wing Struts
Place the right hand strut so that it is in line with the right hand downtube. Ensure the strut has the airfoil
facing forward, and note there is a left hand and a right hand strut that ensures correct angle of attack.
Insert the bolt from the front and secure the wingnut using the safety pin. Repeat for the other side.
Figure 5 Section 4. Connect Control Frame To Wing Struts