


62
E5505A Installation Guide
5
Recovery
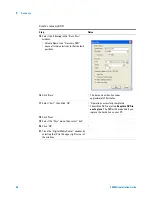
Re-image a New Hard Drive Using the Recovery DVD
In the event of a hard drive crash in which the hard drive is replaced, the
image must be copied from the recovery DVD that you created earlier to
create an image on the new hard drive.
After completing the following procedure, Agilent strongly recommends
that you continue through the next two procedures to create a recovery
partition on the new hard drive and finally to create an image on the
recovery partition.
This will enable faster recovery in the event of a minor system crash,
where the hard drive is still functional.
N O T E
Prior to re-imaging a new hard drive using the Recovery DVD, verify the system boot order.
Reimage a new hard drive using the recovery DVD
Step
Notes
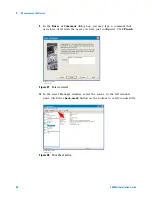
1
Have the bootable CD in-hand.
•
The bootable CD part number is
E5500-10010 and the content is
Revision A.00.01.
2
Turn the computer ON.
•
3
Quickly put the bootable CD into
the drive and press the red RESET
button.
•
The system boots up and the
“Backup Menu” appears.
4
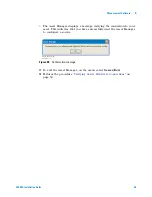
Press (C) to “Recover from DVD”
•
The backup screen prompts you to
“Please replace Bootable CD with
Recovery DVD”.
5
Replace the bootable CD with the
recovery DVD.
•
A DOS
®
prompt appears,”Press any
key”
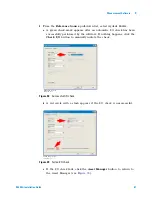
6
Press any key.
•
The “Backup Menu” appears.
7
Press (C) to continue.
•
Symantec Ghost® takes over to
complete the imaging of the new
drive from the recovery DVD. This
process takes about 17 minutes.
When finished, the “Backup Menu”
displays “Remove CD/DVD media
and then press RESET to launch
Windows
®
.
8
Remove the recovery DVD and
press the red RESET button to boot
up in Windows
®
.
Содержание E5505A
Страница 18: ...18 E5505A Installation Guide 1 General Information ...
Страница 22: ...22 E5505A Installation Guide 2 Flat Panel Display ...
Страница 30: ...30 E5505A Installation Guide 3 System Interconnections ...
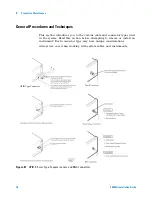
Страница 70: ...70 E5505A Installation Guide 5 Recovery Figure 39 Ejector Lever Pulled Up Figure 40 Ejector Lever Pushed Down ...
Страница 84: ...84 E5505A Installation Guide 6 Preventive Maintenance ...
Страница 96: ...96 E5505A Installation Guide A Service Support and Safety Information ...


