
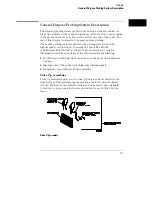


Run/Rep Key
The Run key starts a data acquisition in any run mode you specify. After the
acquisition, the analyzer (state or timing) is automatically forced into the last
display menu accessed.
To start a single run, press the Run/Rep key. To start a Repetitive run, press
the blue shift key, then press the Run/Rep key.
Stop key
The Stop key allows you to stop data acquisition or printing. After the
acquisition is stopped, the data displayed onscreen depends on which run
mode (single or repetitive) was used to acquire the data. In the repetitive
mode, Stop halts acquisition after the last completed single acquisition cycle.
In single mode, Stop causes the single data acquisition to be aborted and
partial data is displayed. If you print a hard copy, the Stop key stops the print.
Print/All Key
The Print/All key starts a hard copy print of the screen and any data that
appears on that screen. To print all data that is offscreen, press the blue shift
key prior to pressing the Print/All key.
Don’t Care Key
The Don’t Care key allows you to enter don’t cares (Xs) in binary, octal, and
hexadecimal pattern assignment fields. In Alpha Entry fields, this key enters
a space and moves the underscore marker to the next space.
Clear Entry Key
The Clear entry key allows you to clear assignment fields of alpha entries,
channel assignments, and numeric entries. When you press the Clear entry
key in an alpha assignment field, a cursor appears that indicates the start
point for new alpha entry.
±
Key
The
±
key allows you to change the sign (
±
) of numeric variables.
.
(period) Key
The period key allows you to enter a period in a numeric entry, turn off a
channel assignment, or enter a period in an alpha assignment.
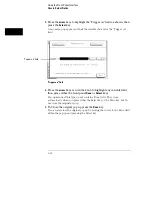
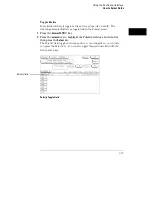
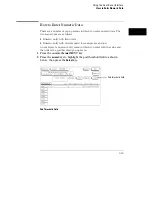
Using the Front-Panel Interface
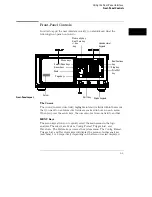
Front-Panel Controls
3–6
Содержание 1660A Series
Страница 5: ...vi...
Страница 14: ...1 Introduction...
Страница 24: ...2 Probing...
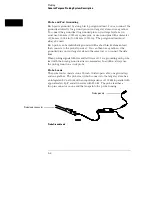
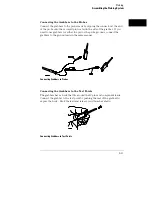
Страница 35: ...Probing Assembling the Probing System 2 12...
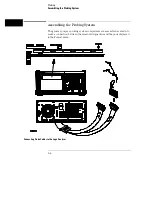
Страница 36: ...3 Using the Front Panel Interface...
Страница 65: ...3 30...
Страница 66: ...4 Using the Mouse and the Optional Keyboard...
Страница 74: ...5 Connecting a Printer...
Страница 91: ...5 18...
Страница 92: ...6 Disk Drive Operations...
Страница 118: ...7 The RS 232C GPIB and Centronix Interface...
Страница 121: ...RS 232 GPIB Menu Map Cont The RS 232C GPIB and Centronix Interface 7 4...
Страница 123: ...Printer Controller Menu Map Cont The RS 232C GPIB and Centronix Interface 7 6...
Страница 132: ...8 The System Utilities...
Страница 137: ...9 The Common Menu Fields...
Страница 150: ...9 14...
Страница 151: ...10 The Configuration Menu...
Страница 159: ...11 The Format Menu...
Страница 161: ...Format Menu Map The Format Menu 11 3...
Страница 194: ...11 36...
Страница 195: ...12 The Trigger Menu...
Страница 198: ...Trigger Menu Map The Trigger Menu 12 4...
Страница 199: ...Trigger Menu Map Continued The Trigger Menu 12 5...
Страница 235: ...13 The Listing Menu...
Страница 237: ...Listing Menu Map The Listing Menu 13 3...
Страница 260: ...13 26...
Страница 261: ...14 The Waveform Menu...
Страница 263: ...Waveform Menu Map The Waveform Menu 14 3...
Страница 264: ...Waveform Menu Map cont The Waveform Menu 14 4...
Страница 300: ...14 40...
Страница 301: ...15 The Mixed Display Menu...
Страница 306: ...15 6...
Страница 307: ...16 The Chart Menu...
Страница 310: ...Chart Menu Map The Chart Menu 16 4...
Страница 311: ...Chart Menu Map cont The Chart Menu 16 5...
Страница 336: ...16 30...
Страница 337: ...17 The Compare Menu...
Страница 340: ...Compare Menu Map The Compare Menu 17 4...
Страница 355: ...18 Error Messages...
Страница 363: ...19 Specifications and Characteristics...
Страница 377: ...20 Operator s Service...
Страница 386: ...Troubleshooting Flowchart 1 Operator s Service To use the flowcharts 20 10...
Страница 387: ...Troubleshooting Flowchart 2 Operator s Service To use the flowcharts 20 11...


