P a g e
|
38
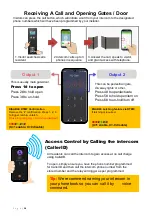
Receiving A Call and Opening Gates / Door
Visitors can press the call button, which will initiate a call from your intercom to the designated
phone numbers which will have been programmed by your installer.
1.Visitor searches/calls
resident
2.Intercom calls up to 3
phones in sequence
3.Answer the call, speak to visitor,
and grant access with telephone.
Access Control by Calling the intercom
(CallerID)
Output 1
Output 2
All residents can call the intercom to gain access at no call charge
using CallerID.
To open, simply ensure you have the phone number programmed
for CallerID and then call the intercom phone number from the
stored number and the relay will trigger as per programmed.
This is usually main gate/door.
Press 1# to open
Press 2# to hold open
Press 3# to un-hold
This can be pedestrian gate,
driveway lights or other.
Press 4# to open/activate
Press 5# to hold open/turn on
Press 6# to un-hold/turn off
Output 1
Output 2
DISABLE DTMF Confirmation
Remove the ‘#’ confirmation. Press 1, 2, 3
to trigger, latch & unlatch.
(
False triggering may occur when disabled
)
9999
#
34
#
X
#
(X=1 enable; X=0 disable)
ENABLE Latching feature via DTMF.
If latching is required.
9999
#
36
#
X
#
(X=1 enable, X=-0 disable)
Tip:
We recommend naming your intercom in
your phonebook so you can call it by voice
command.
Содержание MultiCOM Cellular Series
Страница 3: ...P a g e 3 PHASE 1 Site Survey...
Страница 5: ...P a g e 5 PHASE 2 Product Overview...
Страница 6: ...P a g e 6 Overview of Intercoms Imperial Design Antenna Separate...
Страница 7: ...P a g e 7 Overview of Intercoms Pedestal Design Antenna Integrated...
Страница 8: ...P a g e 8 Overview of Intercoms Flush Design Antenna Separate...
Страница 9: ...P a g e 9 Overview of Intercoms Modular Pre Set Design Antenna Separate...
Страница 22: ...P a g e 22 PHASE 3a Setup Programming To be done before installing the intercom...
Страница 29: ...P a g e 29 PHASE 3b PC Programming Windows Compatible Only...
Страница 36: ...P a g e 36 PHASE 4 Using the Intercom Only to be done after the unit is successfully programmed...
Страница 40: ...P a g e 40 PHASE 5 Installation...
Страница 46: ...P a g e 46 PHASE 7 Aftercare...
Страница 54: ...P a g e 54...
Страница 55: ...P a g e 55...

