34
PCA-6176 User's Manual
3.4
BIOS Features Setup
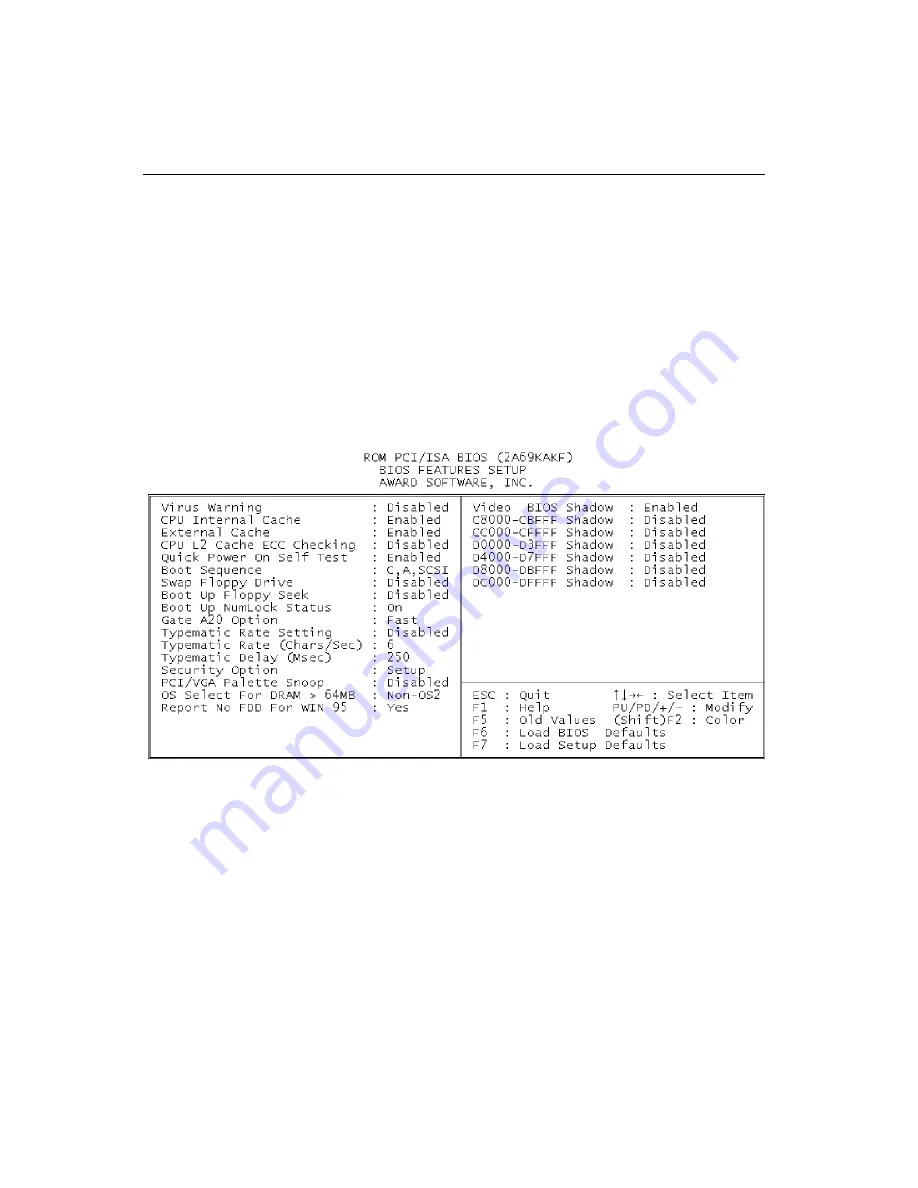
The “BIOS FEATURES SETUP” screen appears when choosing the
"BIOS FEATURES SETUP" item from the "CMOS SETUP
UTILITY" menu. It allows the user to configure the PCA-6176
according to his particular requirements.
Below are some major items that are provided in the BIOS
FEATURES SETUP screen.
A quick booting function is provided for your convenience. Simply
enable the Quick Booting item to save yourself valuable time.
Figure 3-2: BIOS features setup screen
3.4.1 Virus Warning
While the system is booting up, and after boot-up, any attempt to
write to the boot sector or partition table of the hard disk drive will
halt the system. In this case, a warning message will be displayed.
You can run the anti-virus program to locate the problem.
If Virus Warning is disabled, no warning message will appear if
anything attempts to access the boot sector or hard disk partition.
Содержание PCA-6176 Series
Страница 1: ...PCA 6176 Series Full size Pentium II III processor based PCI ISA bus CPU card ...
Страница 31: ...Chapter 1 Hardware Configuration 19 Figure 1 5 SECC II CPU installation step 1 ...
Страница 32: ...20 PCA 6176 User s Manual Figure 1 6 SECC II CPU installation step 2 ...
Страница 43: ...Award BIOS Setup This chapter describes how to set the card s BIOS configuration data CHAPTER 3 ...
Страница 63: ...Chapter 4 AGP VGA Setup 51 5 Insert disk 1 and select Have Disk 6 Click OK ...
Страница 64: ...52 PCA 6176 User s Manual 8 Select RAGE PRO TURBO AGP English and click OK 7 Select macxw4 inf and click OK ...
Страница 65: ...Chapter 4 AGP VGA Setup 53 9 Click Next 10 Insert disk 2 and click OK ...
Страница 66: ...54 PCA 6176 User s Manual 12 Click Finish to complete the setup procedure 11 Insert disk 3 and click OK ...
Страница 68: ...56 PCA 6176 User s Manual 4 Click Browse to look for the driver program 3 Click Have Disk ...
Страница 69: ...Chapter 4 AGP VGA Setup 57 5 Select atirage and click Open 6 Select ATIRAGE PRO TURBO AGP 2X and click OK ...
Страница 75: ...Chapter 5 LAN Configuration 63 3 Click Next 4 Click Next ...
Страница 76: ...64 PCA 6176 User s Manual 6 Click Browse 5 Follow the instructions on the screen and click Have Disk ...
Страница 77: ...Chapter 5 LAN Configuration 65 7 Select net82557 inf and click OK 8 Click OK ...
Страница 78: ...66 PCA 6176 User s Manual 10 Click Next 9 Click OK ...
Страница 79: ...Chapter 5 LAN Configuration 67 11 Click Finish 12 Click Yes ...
Страница 82: ...70 PCA 6176 User s Manual 6 Select Intel R PRO Adapter and click OK 5 Click OK ...
Страница 84: ...72 PCA 6176 User s Manual ...
Страница 102: ...90 PCA 6176 User s Manual Figure 7 3 Restarting Windows ...
Страница 104: ...92 PCA 6176 User s Manual 4 Complete the setup Figure 7 5 Hardware Doctor setup completion screen ...
Страница 110: ...98 PCA 6176 User s Manual ...
Страница 114: ...102 PCA 6176 User s Manual ...


