background image


28 

4. Turn Off Battery Monitoring (EN54!) 

The battery monitoring may be disabled for applications where this is appropriate such as non fire alarm use or 
where no battery backup is required. Note: No remote PSU fault input is available on the QuickZone XL 


With the zone 4 FIRE LED lit, the amber, fault / disabled / test LEDs will show the current setting. 


LED 1 OFF = monitored batteries (default). LED 1 ON = batteries un-monitored. 


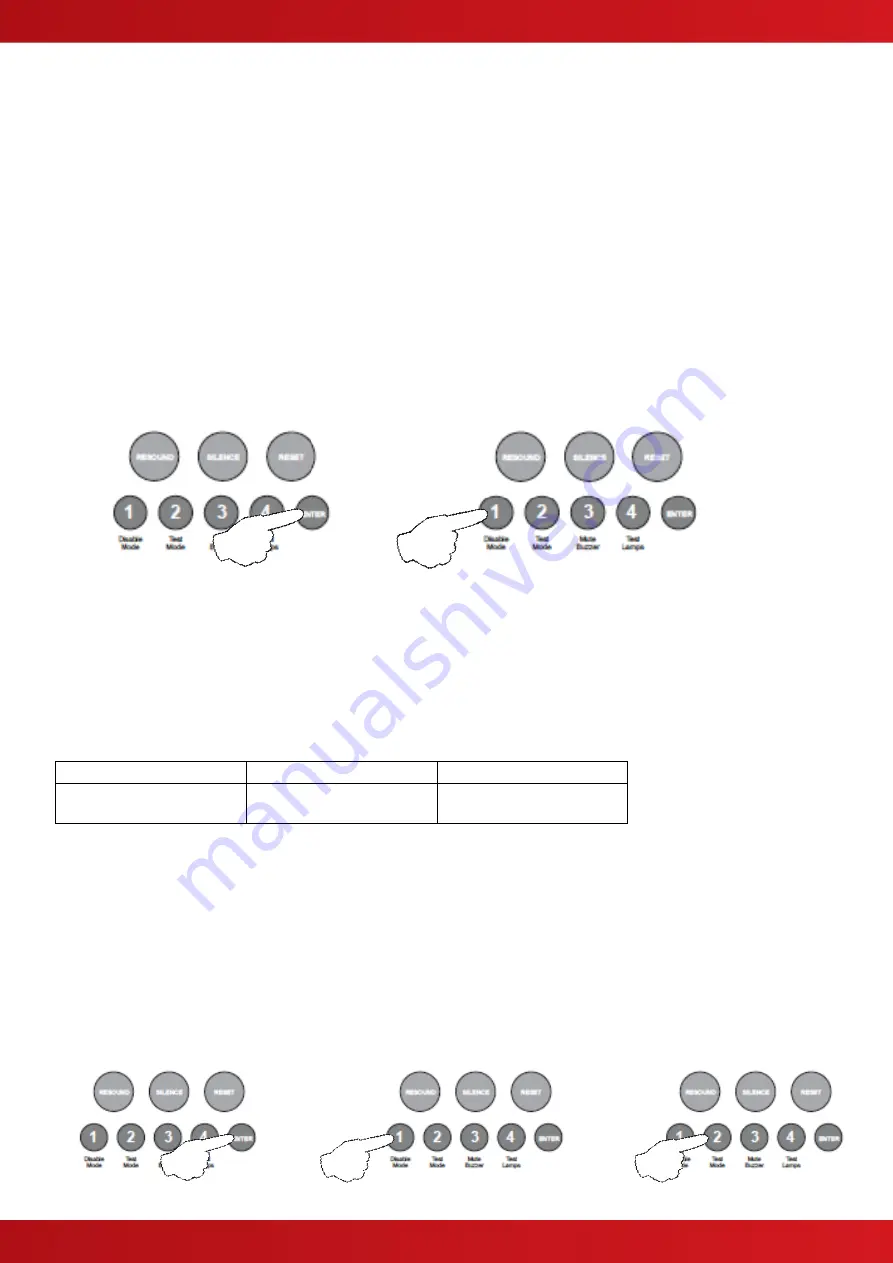
Press the 

ENTER button, zone 4 fire LED will pulse to indicate ‘edit mode’. 


Now use button 1 to change the setting (LED 1 ON or OFF). 

 
When finished press the ENTER button again and the zone 4 fire LED will return to steady ‘view mode’. 
 

Press button 1 to move to next option or press and hold button 1 for 3 seconds to exit programming mode 
2-1-2-3. 


5. Setup Internal PCB Configuration 

The control panel monitors all internal PCBs for correct function. If adding or removing any of the additional 
internal PCBs such as extension zone cards or a repeater comms PCB, the panel must be programmed for the 
new configuration. 


With the zone 5 fire LED lit, the amber, fault / disabled / test LEDs will show the current configuration setting. 
Each of the 3 possible additional internal PCBs are represented by LEDs 1 - 3 as per table below. 


LED 1 (ON) 

LED 2 (ON) 

LED 3 (ON) 

Extension zone card 1 
(zones 5 - 8) 

Extension zone card 2 
(zones 9 - 12) 

Repeater Comms PCB 


Press the ENTER button, zone 1 fire LED will pulse to indicate editing of 1st additional PCB as per table above. 
Use button 1 to move to the fire LED for the relevant PCB as per table.  


Now use button 2 to change the setting (Amber LED ON = PCB included, OFF = not included). 

 
When finished press the ENTER button again and the zone 5 fire LED will return to steady ‘view mode’, with the 
amber, fault / disabled / test LEDs showing the new configuration. 


Press button 1 to move to next option or press and hold button 1 for 3 seconds to exit programming mode 
2-1-2-3. 

www.acornfiresecurity.com

www.acornfiresecurity.com

Содержание Quick Zone XL

Страница 1: ...XL 4 12 Zone Conventional Control Panel Installation Commissioning Operating www acornfiresecurity com www acornfiresecurity com...

Страница 2: ...ed to do so There is no need to open the panel s enclosure except to carry out commissioning maintenance and remedial work This work must only be carried out by competent service personnel who are ful...

Страница 3: ...IONS 18 3 6 CONNECTING THE BATTERIES 19 3 7 BATTERY CHARGING VOLTAGE CHECKS 19 4 SETUP PROGRAMMING 20 4 1 TWIN WIRE MODE 20 4 2 ZONE INTERFACE FUNCTION 21 4 3 LEVEL 3 ENGINEERING OPTIONS 22 4 4 OPTION...

Страница 4: ...reduce false alarms Local fire authorities are demanding this type of functionality to reduce unwanted callouts from alarm receiving centres As standard all QuickZone XL panels provide two monitored s...

Страница 5: ...5 1 2 CABINET DETAILS www acornfiresecurity com www acornfiresecurity com...

Страница 6: ...CIRCUIT BOARDS QuickZone XL panels comprise of two main circuit boards plus optional ancillary boards TPCA01 X4 Master PCB TPCA03 LED Display Controls PCB www acornfiresecurity com www acornfiresecuri...

Страница 7: ...entional or Twin Wire zone circuits 4 x conventional or Twin Wire zone circuits 2 x switched ve outputs 1 x Aux relay output 2 x monitored sounder circuits Piggy backs on Main PCB for connection to re...

Страница 8: ...8 1 4 MAIN PCB TERMINALS www acornfiresecurity com www acornfiresecurity com...

Страница 9: ...LS Drawing shows the high spec version of the zone extension PCB CZXL HSZEC The std version does not contain the additional outputs or sounder circuits shown at the bottom www acornfiresecurity com ww...

Страница 10: ...A each per circuit Ensure 2 4A is not exceeded Electrical Specification Inputs Outputs TPCA01 X2 X4 Main PCB Terminal capacity 0 5mm2 to 2 5mm2 solid or stranded wire Zone A D Fire alarm zone circuits...

Страница 11: ...el example 4 Zone I min 85mA 12 Zone I min 188mA Maximum ripple 120 mV p p Supply and charger fault monitored Min max battery size and type 2 x 7 0Ahr 12volt VRLA Use Yuasa NP range batteries Other eq...

Страница 12: ...s However these radii must overlap to ensure there are no blind spots Therefore individual coverage can be represented by a square measuring 7 5m x 7 5m giving an actual coverage of 56 3m 2 per device...

Страница 13: ...with that cable The screen or drain wire of circuits should be bonded to earth at one location only and should be continuous throughout the circuit Drain wires should be terminated in the cabinet usi...

Страница 14: ...14 2 2 GENERAL CONVENTIONAL SYSTEM SCHEMATIC www acornfiresecurity com www acornfiresecurity com...

Страница 15: ...15 2 3 GENERAL TWIN WIRE SYSTEM SCHEMATIC www acornfiresecurity com www acornfiresecurity com...

Страница 16: ...that any appropriate information about this product is made available by you to anyone concerned with its use This equipment is designed to be operated from 230VAC 50 60 Hz mains supplies and is of C...

Страница 17: ...CABINET The site chosen for the location of the panel should be clean dry and not subject to shock or vibration Damp salt air or environments where water ingress or extremes of temperature may affect...

Страница 18: ...ure of the supply permitted The incoming mains supply should be brought into the panel via one of the knockouts provided A suitable cable gland must be used to secure the outer sheath of the cable use...

Страница 19: ...7 3VDC 0 2V 20oC This should not normally require adjustment Where battery problems are experienced the following information should be considered a If a battery is disconnected from the charger no vo...

Страница 20: ...ive terminals but sounder and beacon negative terminals Twin Wire systems require special sav wire detector bases and polarised call points but standard sounders Most modern non addressable low curren...

Страница 21: ...5 in the ON position the last zone becomes 1 Non latching 2 Non aux operating Note If the interface zone is also set to Twin Wire mode and sounders are connected to the zone circuit the following soun...

Страница 22: ...st LEDs indicate the status of these settings Generally button 1 is used to scroll the indications button 3 can also be used to scroll backwards Pressing and holding button 1 for 3 seconds at any time...

Страница 23: ...ne Turn off detector removal monitoring for zone Set detector removal monitoring type for zone Schottky or Zener diode detector bases 3121 30 31 Dependency Mode Set panel zones to dependency mode A B...

Страница 24: ...ly Sounder circuit faults If a sounder circuit fault is displayed pressing and holding the ENTER button will reveal which sounder circuit was at fault This is indicated by the fire LEDs 1 6 as per the...

Страница 25: ...conds Any disabled zone sounder circuit output or delay will now be enabled The panel will bleep to acknowledge the reset When finished enter the next programming code or disable the controls and retu...

Страница 26: ...t Disabled Test LEDs will start to rapidly pulse in sequence to show the currently set code The sequence will be repeated twice after which time the panel will automatically drop out of the set keypad...

Страница 27: ...The delay time for all outputs is set here To actually apply the delay to the desired outputs see programming code 2 3 2 3 The default setting is 3 minutes but can be changed from 1 10 minutes With th...

Страница 28: ...removing any of the additional internal PCBs such as extension zone cards or a repeater comms PCB the panel must be programmed for the new configuration With the zone 5 fire LED lit the amber fault d...

Страница 29: ...D lit the amber fault disabled test LEDs will show the current setting LED 1 OFF fault tolerant monitoring default LED 1 ON legacy radial circuit monitoring Press the ENTER button zone 6 fire LED will...

Страница 30: ...provides a visual audible alarm at the panel with no sounder operation Priority alarm EN54 Normally a 220R call point will override delays or dependency alarms This option allows turning off the prio...

Страница 31: ...6 LED 7 Attribute Fire latching Short circuit as fire Intrinsically safe operation Silent mode Priority alarm Detector removal monitoring Zener diode detector bases Amber fault LED default setting ON...

Страница 32: ...in the dependency delay sequence Dependency B will apply the following sequence 1 The first detector alarm will indicate at the control panel but not activate the sounders 2 The panel resets and re ch...

Страница 33: ...will change back to a slow pulse Press and hold button 1 for 3 seconds to save the settings and exit the programming mode Set Timings for Dependency Mode B There are two programmable timings for depen...

Страница 34: ...ress ENTER Zone 1 fire LED will light Use button 1 to move the fire LED to zone 3 Press the ENTER button to enter edit mode and zone 3 fire LED will pulse Now use button 2 to switch on compatibility m...

Страница 35: ...ge the status Pressing the ENTER button again will toggle the status indicated by a rapid or slow pulsing LED see below Then use Button 1 to move to the next zone If the zone has been set to not resou...

Страница 36: ...D ON use button 3 to select which outputs are to be delayed The choice toggles between all sounder circuits all aux outputs or all sounder circuits and all aux outputs The selection is indicated by th...

Страница 37: ...TER The zone 1 fire LED will illuminate This indicates setting the function of the CC input Use button 1 to move to zone 2 fire LED for setting the function of the PUL input and then back to zone 1 ag...

Страница 38: ...when a fault occurs for fail safe operation To set either of the two miscellaneous options above or to make outputs programmable enter the above code and press ENTER The fire zone 1 LED will now pulse...

Страница 39: ...the output that requires editing indicated by a pulsing fire LED 1 10 as per table below The setting of the output is indicated by the amber fault disabled test LED ON OFF or PULSING LED 1 LED 2 LED...

Страница 40: ...e sounder circuit that requires editing indicated by a pulsing fire LED 1 6 as per table below The setting of the sounder circuit is indicated by the amber fault disabled test LED ON OFF or PULSING LE...

Страница 41: ...sounder circuits The process is exactly the same as with the other outputs and sounder circuits but using the above code I e Use button 1 to select the zone first indicated by a steady fire zone LED p...

Страница 42: ...OPB Zone ext card 2 Zones 9 12 Aux Relay Zone ext card 2 Zones 9 12 Use button 1 to move the fire LED to the output that requires editing With the required output for editing LED lit press the ENTER...

Страница 43: ...zone fire LED When finished press and hold Button 1 for 3 seconds to save setting and exit programming mode Conventional Sounder Circuit Functional Options To programme each of the conventional sound...

Страница 44: ...the ENTER button to enter editing mode The fire zone 1 LED will now pulse to indicate setting the selected output s response to the first function Resets on Silence Alarms Use button 1 to scroll to t...

Страница 45: ...up The red fire LEDs show which PCBs or repeater panels the control panel thinks it should have according to the programming set up and the amber fault disabled test LEDs show the actual PCBs and repe...

Страница 46: ...d on the top of the Comms PCB to re connect the display board ribbon cable Once the Comms PCB has been fitted the control panel will need to be programmed for the additional circuit board See panel wi...

Страница 47: ...Outputs 1 6 activate on common fire Outputs 1 6 activate zonally for zones 1 6 Outputs 1 6 activate zonally for zones 7 12 Change inputs CC PUL to power supply fault inputs It is also possible in thi...

Страница 48: ...r button 2 to initialise the code entry mode The Access Level indicator will pulse rapidly After 30 seconds if the code has not been entered the panel will return to standby mode With the Access Level...

Страница 49: ...re sound the alarms after they have been silenced Can also be used to invoke a full evacuation SILENCE blue Use to silence the sounders during an alarm condition RESET green Resets the panel back to...

Страница 50: ...d by the Aux Output Status LED and finally to the Delay LED Pressing the button once more will move the selection back to Zone 1 again When the desired circuit or output to be disabled is indicated by...

Страница 51: ...sounders will ring during test Pressing the button once more will move the selection back to Zone 1 again When the desired zone to be tested is indicated by a slow pulsing LED use the ENTER button to...

Страница 52: ...1 short circuit Sounder circuit 1 open circuit OK Main PCB SNDR 1 Zone 2 Fire LED off Sounder circuit 2 short circuit Sounder circuit 2 open circuit OK Main PCB SNDR 2 Zone 3 Fire LED off Sounder cir...

Страница 53: ...LED pulsing along with a pulsed buzzer fault tone a system fault has occurred and the affected board has recovered The indication will remain until the panel is reset 5 6 USER INSTRUCTIONS If an alarm...

Страница 54: ...THE RESPONSIBLE PERSON The system user needs to appoint a single named member of the premises management to supervise all matters pertaining to the fire detection and fire alarm system The role of thi...

Страница 55: ...bed above If not please refer to your service and maintenance company for instructions Note Before testing the fire alarm system it may be necessary to isolate ancillary outputs It is essential that a...

Страница 56: ...each device can be split between periodic visits but with a minimum of one detector or call point tested on each circuit per visit On each visit the Competent Person should check the record of false...

Страница 57: ...ESTING LOG BOOK This Section is to be used to record ALL Weekly Tests of The Fire Alarm System DATE DEVICE TESTED LOCATION COMMENTS IF ANY INITIALS OF TESTER TIME OF TEST www acornfiresecurity com www...

Страница 58: ...TESTING This Section is to be used to record ALL Weekly Tests of The Fire Alarm System DATE DEVICE TESTED LOCATION COMMENTS IF ANY INITIALS OF TESTER TIME OF TEST www acornfiresecurity com www acornfi...

Страница 59: ...TESTING This Section is to be used to record ALL Weekly Tests of The Fire Alarm System DATE DEVICE TESTED LOCATION COMMENTS IF ANY INITIALS OF TESTER TIME OF TEST www acornfiresecurity com www acornfi...

Страница 60: ...TESTING This Section is to be used to record ALL Weekly Tests of The Fire Alarm System DATE DEVICE TESTED LOCATION COMMENTS IF ANY INITIALS OF TESTER TIME OF TEST www acornfiresecurity com www acornfi...

Страница 61: ...61 6 4 2 FALSE ALARMS FAULTS ENGINEER VISIT LOG BOOK Fault Reason for Call Out Action taken Date Work Completed Engineers Details www acornfiresecurity com www acornfiresecurity com...

Страница 62: ...62 FALSE ALARMS FAULTS ENGINEER VISITS Fault Reason for Call Out Action taken Date Work Completed Engineers Details www acornfiresecurity com www acornfiresecurity com...

Страница 63: ...63 FALSE ALARMS FAULTS ENGINEER VISITS Fault Reason for Call Out Action taken Date Work Completed Engineers Details www acornfiresecurity com www acornfiresecurity com...

Страница 64: ...64 FALSE ALARMS FAULTS ENGINEER VISITS Fault Reason for Call Out Action taken Date Work Completed Engineers Details www acornfiresecurity com www acornfiresecurity com...

Страница 65: ...alarm look for the device that has caused the alarm A detector will have a red LED lit or check to see if a call point glass is broken if so replace the glass or call an engineer 5 When fully satisfi...

Страница 66: ...66 This page is intentionally left blank www acornfiresecurity com www acornfiresecurity com...

Страница 67: ...USER NOTES www acornfiresecurity com www acornfiresecurity com...

Страница 68: ...www acornfiresecurity com www acornfiresecurity com...

Отзывы: