Page 17
Operation Manual
LC7 Wall Controller
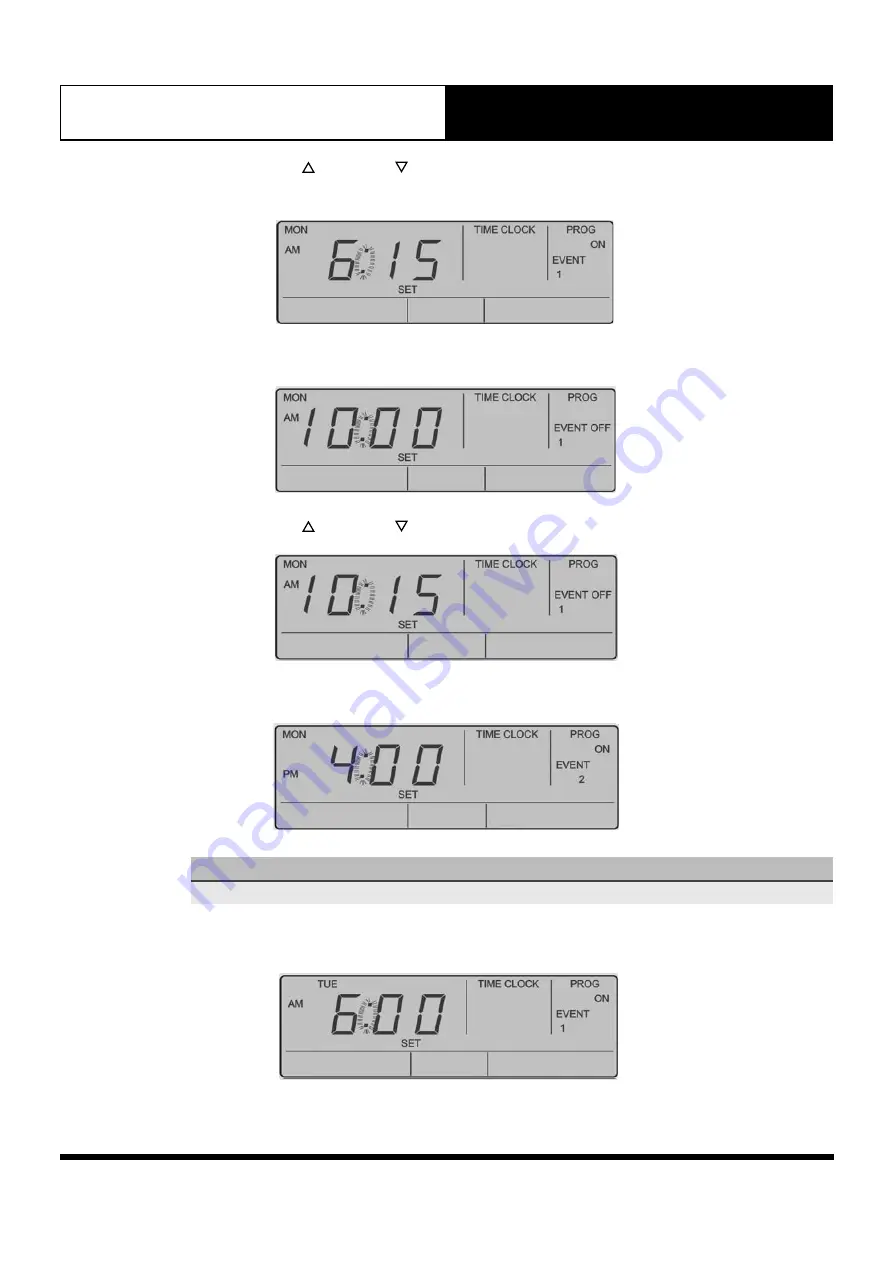
4. Press the “
SELECT
” or “
SELECT
” Button to adjust the time in 15 minutes increments.
AM
and
PM
will toggle after the 12th Hour
Press
"PROGRAM"
button
to
enter
the
Time
Clock.
Press
"PROGRAM"
(ON
is
selected)
to
program
timeclock.
Screen
will
show
"TIMECLOCK",
"PROG",
"ON",
"EVENT
1",
"MON"
&
"SET"
indicators
and
"Time
Fields".
You
can
now
set
the
"EVENT
1
ON"
time
for
Monday.
Press
“Select
˄
or
˅
“
button
to
adjust
the
ON
TIME
in
15
minutes
increments.
NOTE:
AM
and
PM
will
toggle
after
the
12th
Hour
Press
“PROGRAM“
button
to
move
to
Event
1
OFF
time.
5. Press the “
PROGRAM
” Button to move to Event 1 OFF time.
Press
"PROGRAM"
button
to
enter
the
Time
Clock.
Press
"PROGRAM"
(ON
is
selected)
to
program
timeclock.
Screen
will
show
"TIMECLOCK",
"PROG",
"ON",
"EVENT
1",
"MON"
&
"SET"
indicators
and
"Time
Fields".
You
can
now
set
the
"EVENT
1
ON"
time
for
Monday.
Press
“Select
˄
or
˅
“
button
to
adjust
the
ON
TIME
in
15
minutes
increments.
NOTE:
AM
and
PM
will
toggle
after
the
12th
Hour
Press
“PROGRAM“
button
to
move
to
Event
1
OFF
time.
6. Press the “
SELECT
” or “
SELECT
” Button to adjust the time in 15 minutes increments.
Press “
Select
or
“ button to adjust the OFF
TIME in 15 minutes increments.
Press “
PROGRAM
“ button to move to Event 2 ON
time.
Repeat above to enter event 2 ON and OFF time.
Note: Press "
EXIT
" button at any time if no
further changes to later Days/Events are
required.
Press “
PROGRAM
“ button to move onto Event 1
ON TIME of following day (TUE).
Repeat the above steps until you have
programmed all the events you require.
Otherwise, press "
EXIT
" to exit Program Menu.
"TIMECLOCK" display will show on the screen to
indicate that it is active.
Note: During a power failure, the controller will
retain the clock/timeclock.
REPEAT
FUNCTION
(E.g.
Copying
Monday's
Events
on
Tuesday)
7.
Press the “
PROGRAM
” Button to move to Event 2 ON time.
Repeat Steps 4-6 to program event 2 ON and OFF time.
Press “
Select
or
“ button to adjust the OFF
TIME in 15 minutes increments.
Press “
PROGRAM
“ button to move to Event 2 ON
time.
Repeat above to enter event 2 ON and OFF time.
Note: Press "
EXIT
" button at any time if no
further changes to later Days/Events are
required.
Press “
PROGRAM
“ button to move onto Event 1
ON TIME of following day (TUE).
Repeat the above steps until you have
programmed all the events you require.
Otherwise, press "
EXIT
" to exit Program Menu.
"TIMECLOCK" display will show on the screen to
indicate that it is active.
Note: During a power failure, the controller will
retain the clock/timeclock.
REPEAT
FUNCTION
(E.g.
Copying
Monday's
Events
on
Tuesday)
NOTE
Press the “
EXIT
” Button at any time if no further changes to later Days/Events are required.
8. Press the “
PROGRAM
” Button to move onto Event 1 ON TIME of following day (TUE).
Press “
Select
or
“ button to adjust the OFF
TIME in 15 minutes increments.
Press “
PROGRAM
“ button to move to Event 2 ON
time.
Repeat above to enter event 2 ON and OFF time.
Note: Press "
EXIT
" button at any time if no
further changes to later Days/Events are
required.
Press “
PROGRAM
“ button to move onto Event 1
ON TIME of following day (TUE).
Repeat the above steps until you have
programmed all the events you require.
Otherwise, press "
EXIT
" to exit Program Menu.
"TIMECLOCK" display will show on the screen to
indicate that it is active.
Note: During a power failure, the controller will
retain the clock/timeclock.
REPEAT
FUNCTION
(E.g.
Copying
Monday's
Events
on
Tuesday)
Содержание LC7
Страница 37: ...Page 37 THIS PAGE WAS INTENTIONALLY LEFT BLANK ...
Страница 38: ...Page 38 THIS PAGE WAS INTENTIONALLY LEFT BLANK ...
Страница 39: ...Page 39 THIS PAGE WAS INTENTIONALLY LEFT BLANK ...


