

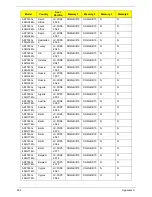


276
Appendix B
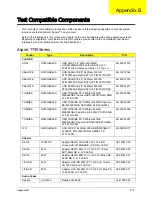
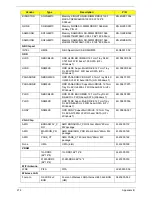
KINGSTON
SO2GBIII13
Memory KINGSTON SO-DIMM DDRIII 1333
2GB ACR256X64D3S1333C9 LF 128*8
0.065um
KN.2GB07.004
NONE
SO4GBIII10
Memory NONE SO-DIMM DDRIII 1066 4GB
dummy P/N LF
KN.4GB00.001
SAMSUNG
SO1GBIII10
Memory SAMSUNG SO-DIMM DDRIII 1066
1GB M471B2873EH1-CF8 LF 64*16 0.055um
KN.1GB0B.028
SAMSUNG
SO2GBIII10
Memory SAMSUNG SO-DIMM DDRIII 1066
2GB M471B5673EH1-CF8 LF 128*8 0.055um
KN.2GB0B.012
NB Chipset
INTEL
HM55
NB Chipset Intel CS BD82HM55
KI.G5501.002
ODD
HLDS
NBDCB4XS
ODD HLDS BD COMBO 12.7mm Tray DL 4X
CT21N LF W/O bezel 1.00 SATA (HF +
Windows 7)
KO.0040D.004
HLDS
NSM8XS
ODD HLDS Super-Multi DRIVE 12.7mm Tray
DL 8X GT30N LF W/O bezel SATA (HF +
Windows 7)
KU.0080D.048
PANASONIC
NBDRW4XS
ODD PANASONIC BD RW 12.7mm Tray DL 4X
UJ240A LF W/O bezel SATA (HF+Windows 7)
KU.00407.015
PANASONIC
NSM8XS
ODD PANASONIC Super-Multi DRIVE 12.7mm
Tray DL 8X UJ890A LF W/O bezel SATA (HF +
Windows 7)
KU.00807.070
PLDS
NBDCB4XS
ODD PLDS BD COMBO 12.7mm Tray DL 4X
DS-4E1S LF W/O bezel SATA (Windows 7)
KO.0040F.003
PLDS
NSM8XS
ODD PLDS Super-Multi DRIVE 12.7mm Tray
DL 8X DS-8A4SH LF W/O bezel SATA (HF +
Windows 7)
KU.0080F.006
SONY
NSM8XS
ODD SONY Super-Multi DRIVE 12.7mm Tray
DL 8X AD-7585H LF W/O bezel SATA (HF +
Windows 7)
KU.0080E.027
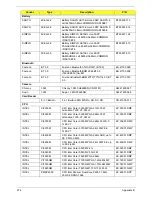
VGA Chip
AMD
BROADWAY_P
RO
AMD BROADWAY_PRO 40nm 29mm*29mm
M2 package
KI.23200.172
AMD
MADISON_PR
O
AMD MADISON_PRO 40nm 29mm*29mm M2
package
KI.23200.169
AMD
PARK_XT
AMD PARK_XT 40nm 29mm*29mm M2
package
KI.23200.162
None
UMA
UMA (Intel)
KI.23200.038
VRAM
1G-DDR3
(64*16*8)
1G-DDR3 64*16*8
KI.23300.018
512M-DDR3
(64*16*4)
512M-DDR3 64*16*4
KI.23300.019
WiFi Antenna
WNC
PIFA
PIFA
LZ.23500.006
Wireless LAN
Foxconn
3rd WiFi 2x2
BGN
Foxconn Wireless LAN Atheros HB93 2x2 BGN
(HM)
NI.23600.062
Vendor
Type
Description
P/N
Содержание ASPIRE 7745
Страница 6: ...VI ...
Страница 10: ...X Table of Contents ...
Страница 40: ...30 Chapter 1 ...
Страница 56: ...46 Chapter 2 ...
Страница 68: ...58 Chapter 3 5 Pull the WLAN module out and away ...
Страница 73: ...Chapter 3 63 5 Remove the ODD bracket 6 Pry the ODD bezel off of the ODD module ...
Страница 83: ...Chapter 3 73 5 Detach the Bluetooth module cable from the module ...
Страница 91: ...Chapter 3 81 4 Lift the thermal module away from the main board ...
Страница 96: ...86 Chapter 3 4 Unlock and disconnect the switch board FFC ...
Страница 101: ...Chapter 3 91 4 Remove the bezel from the LCD module ...
Страница 108: ...98 Chapter 3 5 Pry the right antenna from the casing ...
Страница 111: ...Chapter 3 101 3 Lay the cables around the module edge ...
Страница 115: ...Chapter 3 105 10 Place the LVDS cable into cable guides ...
Страница 118: ...108 Chapter 3 4 Replace the two 2 bezel screws ...
Страница 121: ...Chapter 3 111 2 Using a flat bladed screw driver rotate the CPU locking screw 180 clockwise to secure the CPU in place ...
Страница 123: ...Chapter 3 113 Replacing the RTC Battery 1 Push the RTC battery into the cradle on the mainboard plus side up ...
Страница 129: ...Chapter 3 119 4 Connect the Bluetooth module cable to the main board ...
Страница 131: ...Chapter 3 121 4 Connect the LVDC cable 5 Lay the LVDS cable across the assembly as shown and press down firmly ...
Страница 136: ...126 Chapter 3 6 Connect and lock the Power board FFC ...
Страница 143: ...Chapter 3 133 4 Grasp the tab and slide the HDD firmly into the docking connector ...
Страница 145: ...Chapter 3 135 4 Push the ODD completely into the bay until flush with the lower cover ...
Страница 148: ...138 Chapter 3 ...
Страница 166: ...156 Chapter 4 ...
Страница 288: ...278 Appendix B ...
Страница 290: ...280 ...