Chapter 4
159
NOTE:
The color bar items indicate 3rd party related functions that are platorm dependent.
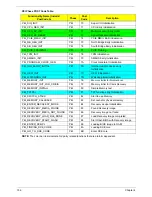
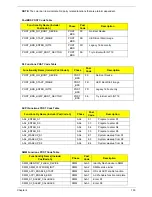
PostBDS POST Code Table
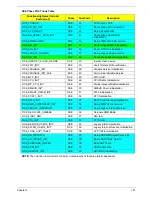
S3 Functions POST Code Table
ACPI Functions POST Code Table
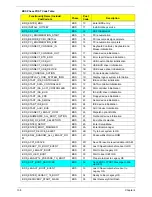
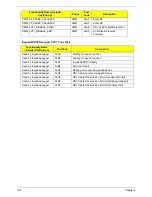
SMM Functions POST Code Table
Functionality Name (Include\
PostCode.h)
Phase
Post
Code
Description
POST_BDS_NO_BOOT_DEVICE
POST
_BDS
F9
No Boot Device
POST_BDS_START_IMAGE
POST
_BDS
FB
UEFI Boot Start Image
POST_BDS_ENTER_INT19
POST
_BDS
FD
Legacy 16 boot entry
POST_BDS_JUMP_BOOT_SECTOR
POST
_BDS
FE
Try to Boot with INT 19
Functionality Name (Include\ PostCode.h)
Phase
Post
Code
Description
POST_BDS_NO_BOOT_DEVICE
POST
_BDS
F9
No Boot Device
POST_BDS_START_IMAGE
POST
_BDS
FB
UEFI Boot Start Image
POST_BDS_ENTER_INT19
POST
_BDS
FD
Legacy 16 boot entry
POST_BDS_JUMP_BOOT_SECTOR
POST
_BDS
FE
Try to Boot with INT 19
Functionality Name (Include\ PostCode.h)
Phase
Post
Code
Description
ASL_ENTER_S1
ASL
51
Prepare to enter S1
ASL_ENTER_S3
ASL
53
Prepare to enter S3
ASL_ENTER_S4
ASL
54
Prepare to enter S4
ASL_ENTER_S5
ASL
55
Prepare to enter S5
ASL_WAKEUP_S1
ASL
E1
System wakeup from S1
ASL_WAKEUP_S3
ASL
E3
System wakeup from S3
ASL_WAKEUP_S4
ASL
E4
System wakeup from S4
Functionality Name (Include\
PostCode.h)
Phase
Post
Code
Description
SMM_IDENTIFY_FLASH_DEVICE
SMM
0xA0
Identify Flash device in SMM
SMM_SMM_PLATFORM_INIT
SMM
0xA2
SMM service initial
SMM_ACPI_ENABLE_START
SMM
0xA6
OS call ACPI enable function
SMM_ACPI_ENABLE_END
SMM
0xA7
ACPI enable function complete
SMM_S1_SLEEP_CALLBACK
SMM
0xA1
Enter S1
SMM_S3_SLEEP_CALLBACK
SMM
0xA3
Enter S3
Содержание Aspire 4740G
Страница 6: ...VI ...
Страница 10: ...X Table of Contents ...
Страница 56: ...46 Chapter 2 ...
Страница 63: ...Chapter 3 53 5 Carefully open the HDD Cover ...
Страница 65: ...Chapter 3 55 5 Remove two 2 screws from the WLAN bracket and lift it clear of the device ...
Страница 90: ...80 Chapter 3 5 Remove the TouchPad Bracket from the Upper Cover ...
Страница 92: ...82 Chapter 3 Step Size Quantity Screw Type Media Board M2 5 3 2 ...
Страница 94: ...84 Chapter 3 5 Lift the FFC to detach the adhesive from the casing 6 Lift the USB Board clear of the casing ...
Страница 97: ...Chapter 3 87 Step Size Quantity Screw Type Bluetooth Module M2 5 3 1 ...
Страница 99: ...Chapter 3 89 7 Lift one edge of the mainboard as shown to remove it from the base ...
Страница 107: ...Chapter 3 97 4 Lift the bezel away from the panel ...
Страница 110: ...100 Chapter 3 4 Lift the LCD Panel out of the casing as shown ...
Страница 117: ...Chapter 3 107 13 Ensure that the securing pin is properly located ...
Страница 129: ...Chapter 3 119 ...
Страница 134: ...124 Chapter 3 4 Turn the computer over Replace the fifteen screws on the bottom panel ...
Страница 141: ...Chapter 3 131 4 Turn the computer over and replace the six 6 securing screws as shown ...
Страница 186: ...176 Chapter 6 ...
Страница 187: ...Chapter 6 177 ...
Страница 208: ...Appendix A 198 ...
Страница 214: ...204 Appendix B ...
Страница 216: ...206 Appendix C ...


