background image

62

English

Safety advice

1.

Mains supply: Power supply 110 - 250VAC, 50/60Hz / 12VDC, 1,5A (included in package content)
Operate this product only from the type of power supply indicated on the marking label. If you are not sure 
of the type of power supplied to your home, consult your local power company. Disconnect the product 
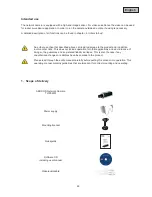
from the mains before you start any maintenance or installation procedures.

2.

Overloading
Do not overload a wall outlet, extension cord or adapter as this may result in electric fire or shock.

3.

Cleaning
Disconnect the product from the wall outlet before cleaning. Use a light damp cloth (no solvents) to dust 
the product.

Warnings

Follow all safety and operating advises before starting-up the device!

1.

Follow these directions in order to avoid damage of the power cord or plug:

x

Do not modify or process the power cord or plug arbitrarily.

x

Do not bend or twist the power cord.

x

Make sure to disconnect the power cord holding the plug.

x

Keep heating appliances as far as possible from the power cord in order to prevent the cover 
vinyl from melting.

2.

Follow these directions. Failure to follow any of them may cause electrical shock:

x

Do not open the main body, except for installing the HDD.
Disconnect the product from the mains before you start.

x

Do not insert metal or inflammable objects inside the product.

x

In order to avoid any damage during lighting use a surge protection.

3.

Do not use the product when it is out of order. If you continue to use the product when defective, serious 
damage can be caused to it. Make sure to contact your local product distributor if the product is out of 
order.

During the installation into an existing video surveillance system make sure that all devices are 
disconnected from the low and supply voltage circuit.

If in doubt allow a professional electrician to mount, install and wire-up your device. Improper 
electrical connection to the mains does not only represent at threat to you but also to other 
persons.
Wire-up the entire system making sure that the mains and low voltage circuit remain separated 
and cannot come into contact with each other in normal use or due to any malfunctioning.

Unpacking


While you are unpacking the device please handle it with utmost care.

If you notice any damage of the original packaging, please check at first the device.
If the device shows damages, please contact your local dealer.

Содержание TVIP40000

Страница 1: ...59 TVIP52501 User Manual Version 02 2011 Original English user manual Keep for future use...

Страница 2: ...cument are registered trademarks All rights reserved If you have any questions please contact your installer or your local dealer Disclaimer This user manual was prepared with greatest care If you sho...

Страница 3: ...l onto the image sensor of the device Please follow the installation instructions in the corresponding chapter of this user manual Avoid using the device under the following unfavorable ambient condit...

Страница 4: ...tions Failure to follow any of them may cause electrical shock x Do not open the main body except for installing the HDD Disconnect the product from the mains before you start x Do not insert metal or...

Страница 5: ...in 71 4 4 Adjusting the security settings 71 4 5 Password authentication 71 4 6 Connecting to the camera by using a RTSP player 72 4 7 Connecting to the network camera by using a mobile phone 72 4 8...

Страница 6: ...ontrol 98 13 Application 98 13 1 Trigger settings 99 13 2 Server configuration 100 13 3 Media settings 101 13 4 Action 103 13 5 Application overview 104 14 Recording 104 15 Local memory 106 16 Log fil...

Страница 7: ...in addition involve other risks This does not include operation for other applications and would in case of doing so the guarantee and any related liability will lapse This is also the case if any una...

Страница 8: ...You can also use a manual lens The camera will automatically recognize the type of lens For the best possible picture quality an AI lens is recommended The content of delivery for this network camera...

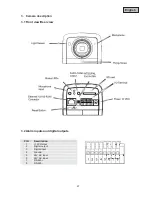
Страница 9: ...ophone switch internal external Power supply Mi Mi M Mi i M Mi Mi Mi i icrop o ho h h h h h h h ho ho h h h h h h h h h ne s s swi i itc tc tch in i te e e e e e e e e e e te e te e te te te t te e e...

Страница 10: ...Gate input output and status display Status LED description In order to reboot the camera or restore the factory settings press the reset button Use an appropriate small tool Camera reboot Press the r...

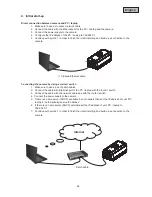
Страница 11: ...a router switch 1 Make sure to use a pair of patch cables 2 Connect the cable with Ethernet port of the PC laptop with the router switch 3 Connect the cable with the network cable and with the router...

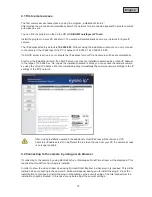
Страница 12: ...169 254 0 xx As long as the installation wizard is active you can access the network camera by using the virtual IP address We recommend adjusting immediately the cameras network settings to the IP se...

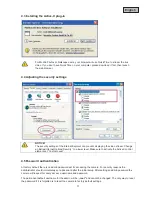
Страница 13: ...ternet Options Security to a lower level Make sure to activate the ActiveX control elements at Custom Level 4 5Password authentication At factory default there is no admin password set for accessing t...

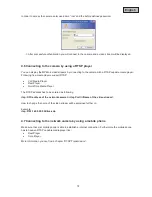
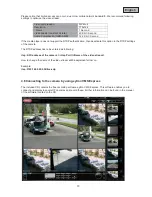
Страница 14: ...x VLC Media Player x Real Player x QuickTime Media Player The RTSP address has to be entered as following rtsp IP address of the network camera rtsp Port Name of the video stream How to change the nam...

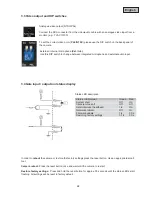
Страница 15: ...ivate this option in the RTSP settings of the camera The RTSP address has to be entered as following rtsp IP address of the camera rtsp Port Name of the video stream How to change the name of the vide...

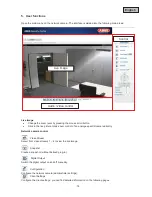
Страница 16: ...an analogue pan tilt camera directly Network camera control Video Stream Select from video streams 1 4 to view the live image Snapshot Create a snapshot without ActiveX plug in Digital Output Switch...

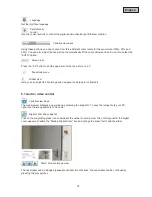
Страница 17: ...re to 4 3 Show hide menu Global view Here you can adjust the live image and navigate to single point of interests 5 1 Audio video control Variable view sizes The web browser displays a new window cont...

Страница 18: ...col to be selected between the client and the server The following protocol options are available for optimising the application UDP TCP HTTP The UDP protocol gives you a larger number of audio and vi...

Страница 19: ...trator has access to the system configuration The following sections explain each of the elements in the left hand column Specific tasks on the Options page are printed in bold The administrator can e...

Страница 20: ...c Synchronises the date and time with the NTP server via the Internet every time the network camera is switched on This is not possible if the respective time server cannot be reached NTP server Assig...

Страница 21: ...for encryption and for authenticating communication between the web server network camera and browser client PC on the Internet All data transmitted between the network camera and client PC is encrypt...

Страница 22: ...printers computers etc from a central station Here the Protocol controls the communication between the monitored devices and the monitoring station Enable this function if you are using an SNMP manage...

Страница 23: ...DNS Server of the secondary domain name for generating a reserve copy of the primary DNS Use UPnP This enables Universal Plug and Play If your operating system supports UPnP the network camera can be...

Страница 24: ...s displayed in a separate window If the IPv6 settings are correct you can read all the settings in the lower window 6 5 2 IEEE 802 1x Activate this function if your network environment uses the standa...

Страница 25: ...efox Netscape which cannot process ActiveX plug ins to access the video stream directly Access name for stream 1 Access name for the MJPEG stream 1 Access name for stream 2 Access name for the MJPEG s...

Страница 26: ...Two way audio Two way audio This is the port for the two way audio function This port can be different from the standard port 5060 5060 or 1025 65535 To be able to use the two way audio function you...

Страница 27: ...from a client The codec type must be MPEG4 Use rtsp IP address RTSP port access name 2 to establish a connection Access name for stream 3 This is the access name 3 for establishing a connection from a...

Страница 28: ...g to this group Multicast video port This port can be different from the default port 5560 The port number must always be even Multicast RTCP video port This port must be the Multicast video port plus...

Страница 29: ...the DDNS server User name email The user name and the email address must be entered in this field to set up a connection to the DDNS server or to inform users about the new IP address Note If you ente...

Страница 30: ...e network camera Depending on the bandwidth available for the network camera it may make sense to limit the access Enable access list filtering Enables the IP address filters listed defined under Filt...

Страница 31: ...ask can be defined Example The IP address range from 192 168 0 1 to 192 255 255 255 should be permitted The following IP addresses should be blocked 192 168 1 0 to 192 168 255 255 Result Access is onl...

Страница 32: ...ion via the network camera Select caching stream The selected video stream is used for recording the pre and post alarm video data see Application section Flip Rotates the video horizontally Select th...

Страница 33: ...t of an image or video to improve its sharpness Enter a value from 1 to 128 to set the degree of enhancement desired Enable Noise Reduction Noise reduction is the process of removing noise from a sign...

Страница 34: ...window simply modify it with the mouse Add exclusive window The camera ignores this window for exposure settings To change the format of window simply modify it with the mouse BLC A predefined window...

Страница 35: ...available for flexible application Settings for streams 1 2 3 and 4 You can configure streams 1 4 in the respective menus The quality settings for stream 4 is determined on QCIF Use stream 4 for stre...

Страница 36: ...omatic switching from colour to b w below 2 Lux x Schedule mode Automatic switching from color to b w at fixed times x Day mode Manual activating of the day mode The IR filter is switched to block all...

Страница 37: ...in the network camera or ROI 320x240 640x480 800x600 or 1024x768 This may involve cropping the periphery of the live image After setting up a ROI only this area will be displayed at live display as w...

Страница 38: ...ndow or move the title bar click the window frame keep the mouse button pressed and drag the window to the required size Close the window by clicking the x in the top right corner Click Save to save t...

Страница 39: ...The Percentage value describes the percentage of the alarm pixels in relation to the total number of pixels in the selected area If the specified percentage of alarm pixels is reached or exceeded an a...

Страница 40: ...eps 1 to 3 to add further preset positions 4 To add presets to a tour mark these in the preset list and press Select 5 Adjust the dwell time if necessary 6 Save the settings If you are using the digit...

Страница 41: ...ter a power failure Recording notify If the destination storage medium is full or if a cyclic recording is overwritten an alarm is triggered Camera tampering detection An alarm is triggered if the sys...

Страница 42: ...igured and defines the SD card unit as the destination for saving data You can configure the following server types x Email enter the access data here x FTP enter the access data here Address conventi...

Страница 43: ...create can only be linked with one event Assigning a medium twice results in the incorrect functioning of the network camera If you wish to use the same media type for two events you must create two...

Страница 44: ...for year YYYY 2009 x M placeholder for month MM 11 x D placeholder for day DD 15 x H placeholder for hours HH 16 x M placeholder for minutes MM 45 x S placeholder for seconds SS 01 Video clip Source T...

Страница 45: ...m is sent on a particular server e g an email is sent with a snapshot Create folders automatically Folders are automatically created in the directory of the network drives Customized folder The unique...

Страница 46: ...add the different settings here You can also check the different parameters such as name status trigger address 14 Recording The recording section allows you to set up recordings with the option of s...

Страница 47: ...ng times are restricted Destination SD card or network folder Entire free space The maximum amount of space on the destination storage medium is used Reserved space Defines how many MB of free memory...

Страница 48: ...the card in the network camera for the first time Select the Enable cyclic storage option if the oldest data should be overwritten when the storage capacity of the SD card is full If you select Enabl...

Страница 49: ...unlock to remove this attribute Remove The selected recording is deleted You can also evaluate the data stored on the SD card using the SD card reader on your PC The recorded data is displayed accord...

Страница 50: ...twork camera on a weekly basis if you experience problems Restore Click to restore the factory settings All previous settings are discarded Export files Press to export your network camera settings in...

Страница 51: ...or x the device has been subject to stress during transportation This product is maintenance free for you There are no components to service or anything inside the product to check Never open it 19 2...

Страница 52: ...Integrated White balance Yes Alert message E mail FTP HTTP notification relay output NAS drive SD card Supported browsers Mozilla Firefox or Internet Explorer 6 x and higher Software supported eytron...

Страница 53: ...ILED REVERSE ENGINEERED OR COPIED EXCEPT REGARD TO PC SOFTWARE YOU MAY MAKE SINGLE COPIES FOR ARCHIVAL PURPOSES FOR MORE INFORMATION PLEASE REFER TO HTTP WWW VIALICENSING COM H 264 MPEG 4 Visual Techn...

Страница 54: ...E PAT 819303 BR PAT 9604838 7 CA PAT 2216315 CH PAT 819303 CN PAT ZL96193827 7 DE PAT 819303 DE69611607T2 DK PAT 819303 ES PAT 819303 EP PAT 819303 FR PAT 819303 GB PAT 819303 IT PAT 819303 JP PAT APP...

Отзывы: