background image


User Operations Guide—Mira Instant Replay Server 

168 

Copyright ©2014, Abekas Incorporated 

Revised: 5 September 2014 

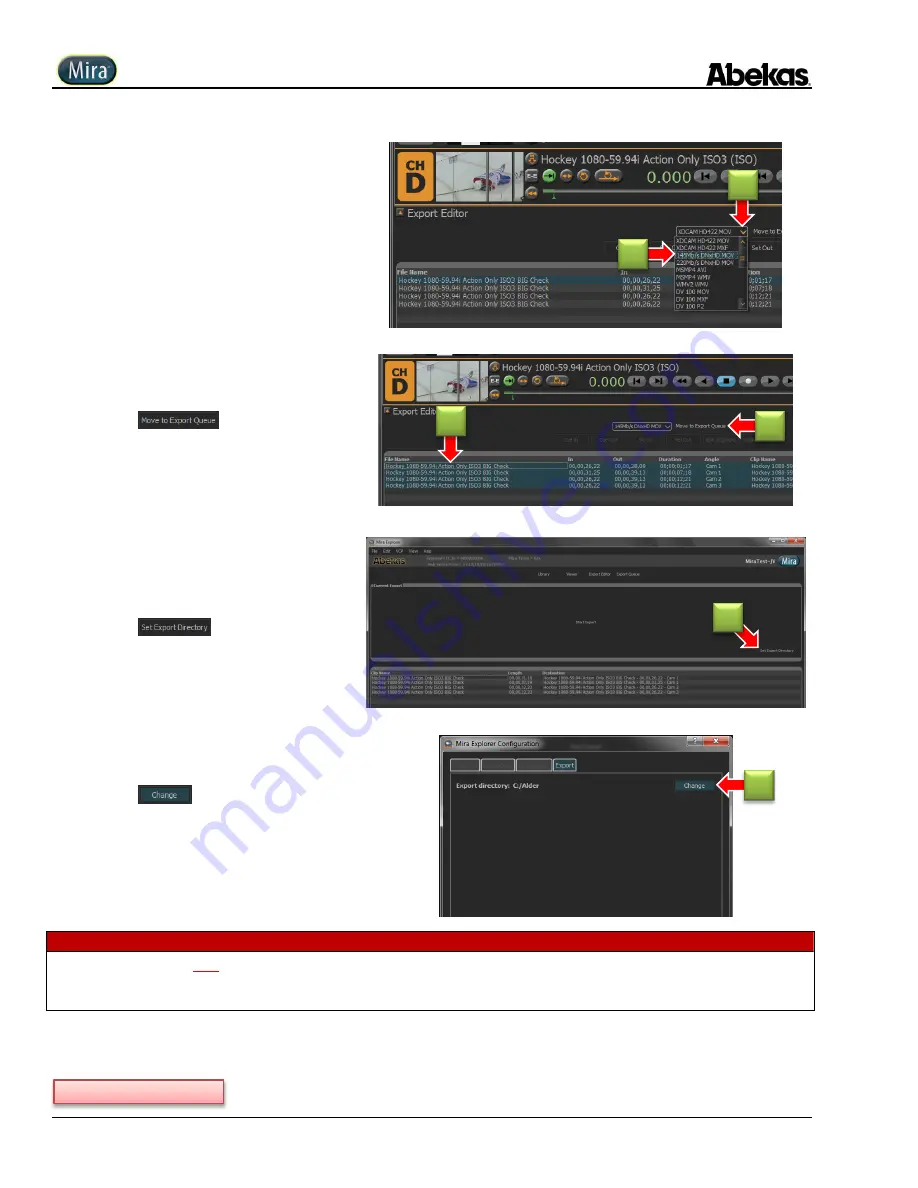
25.


Click 

File Format 

pull-down;  

26.


Click desired file export format. 


27.


Click and drag the mouse over all clip file 

names to highlight them all. 

28.


Click 

 to move items to 

export queue. 


The 

Export Queue 

is populated with the selected 

clips, as shown in next step below. 


If the 

Export Directory

 has been defined from a previous 

Export operation, you can skip ahead to step (39) below. 


29.


Click 

 to set export directory. 


Mira Explorer Configuration


window appears, 

as shown in next step below. 


30.


Click 

 to specify new directory. 


Select Export Directory


window appears, as 

shown in next step below. 


W A R N I N G !  


Do NOT 

export media files to the system “

C:

” volume or media “

H:

” volume inside

 Mira! 

Exporting to either of these drive volumes will cause interruption to the server system, and/or 

cause video stuttering and corruption of real-time video recording and playback within the Mira server!


26 

25 

28 

29 

27 

30 

Continued on next page… 

Содержание Mira

Страница 1: ...top of the page plus everything in this PDF is cross linked making it VERY easy to find what you re looking for So make good use of it and save some trees And thank you for considering Mira Now please consider the environment User Operations Guide Mira Instant Replay Server Applicable to Mira Software V5 0 0 and Higher 5 September 2014 ...

Страница 2: ...Get ready to learn about a rather resourceful product But first that stuff you tend to skip over Please pay attention it could perhaps save your life ...

Страница 3: ...adio frequency energy and if not installed and used in accordance with the instruction manual may cause harmful interference to radio communications Operation of this equipment in a residential area is likely to cause harmful interference in which case the user is required to correct the interference at the user s own expense Important Modifications Shielded Cables Changes or modifications to this...

Страница 4: ... those areas where a North American style cord can be used A second power cord set is provided for use outside the United States use The so called international cord has a female receptacle on one end for fitting to the Abekas hardware and three pre stripped wires on the remaining end ready for installation of the proper localized plug which is to be supplied by the customer It is the responsibili...

Страница 5: ...See Notes below Relative Humidity 8 to 90 non condensing 8 to 90 non condensing Maximum Wet Bulb Temperature 29 5 C non condensing 85 F non condensing Maximum Temperature Gradient 15 C Hour 59 F Hour Altitude Range 300 m to 3 048 m 984 ft to 10 000 ft Non Operating Conditions Metric English Temperature 40 C to 65 C 40 F to 149 F Relative Humidity 5 to 95 non condensing 5 to 95 non condensing Maxim...

Страница 6: ...ng power supplies Ensure your AC power source is within the correct operating range of voltage and frequency as required by the system Each chassis in this system must be electrically grounded by connecting the input power cord s to a correctly wired and grounded power outlet The input AC power cord s supplied with this system must be wired as follows Live Brown Neutral Blue Earth Green Completely...

Страница 7: ...User Operations Guide Mira Instant Replay Server Revised 5 September 2014 Copyright 2014 Abekas Incorporated Page v of xii Safety Warnings Danish Dutch Finnish French ...

Страница 8: ...User Operations Guide Mira Instant Replay Server Page vi of xii Copyright 2014 Abekas Incorporated Revised 5 September 2014 Safety Warnings Greek German Hebrew ...

Страница 9: ...User Operations Guide Mira Instant Replay Server Revised 5 September 2014 Copyright 2014 Abekas Incorporated Page vii of xii Safety Warnings Hindi Icelandic Italian ...

Страница 10: ...User Operations Guide Mira Instant Replay Server Page viii of xii Copyright 2014 Abekas Incorporated Revised 5 September 2014 Safety Warnings Japanese Norwegian ...

Страница 11: ...User Operations Guide Mira Instant Replay Server Revised 5 September 2014 Copyright 2014 Abekas Incorporated Page ix of xii Safety Warnings Korean Portuguese Russian ...

Страница 12: ...User Operations Guide Mira Instant Replay Server Page x of xii Copyright 2014 Abekas Incorporated Revised 5 September 2014 Safety Warnings Spanish Swedish Thai ...

Страница 13: ...User Operations Guide Mira Instant Replay Server Revised 5 September 2014 Copyright 2014 Abekas Incorporated Page xi of xii Safety Warnings Turkish Vietnamese ...

Страница 14: ...User Operations Guide Mira Instant Replay Server Page xii of xii Copyright 2014 Abekas Incorporated Revised 5 September 2014 Most of this page is intentionally blank ...

Страница 15: ...5cm deep including rack mount flanges 19 0 48 3cm wide 1 Rack Slide Mount Kit for standard 19 0 48 3cm width racks 1 USB Mouse 1 USB QWERTY Keyboard 2 AC Power Cords 4 Male RJ45 to Female DB9 Adaptors for RS422 Serial Control Mira 4 Channel Server only 8 Male RJ45 to Female DB9 Adaptors for RS422 Serial Control Mira 8 Channel Server only Required Support Equipment The following support equipment i...

Страница 16: ...User Operations Guide Mira Instant Replay Server 14 Copyright 2014 Abekas Incorporated Revised 5 September 2014 Most of this page is intentionally blank ...

Страница 17: ...y Clips in Clip Library 43 Transport Controls in Mira Explorer 44 Record Clips 48 Immediate Record Shortcut 60 Customize Clip Library 61 Clip Metadata Modify 63 Clip Metadata Descriptions 68 Trim Clips 74 Parent Child Clips 78 Find Clips 80 List Play 82 Delete Clips 106 Desktop Viewer 107 Lock Unlock Clips 113 Administrator Options 116 Mira Explorer on Remote PC 121 Download Install Mira Explorer ...

Страница 18: ...ers Two Mira Control Panels Two Events 233 Mira 8 Channel Instant Replay Servers Two Mira Control Panels One Event234 Mira Control Panel Communications with Mira Server 237 Mira Control Panel Power Booting 237 Configure Mira Server for Number of Cameras 238 Assign Replay Channel s to Mira Control Panel 239 Ergonomic Aspects of Mira Control Surface 241 Create Open New Instant Replay Event on Contro...

Страница 19: ...ode Naming Clips Free Form 304 CLIP PLAY Mode Naming Clips from Preset Labels 306 Instant Replay Operation PLAY LIST Mode 308 Create New AUX Audio List 311 Play List Library 313 Play List Trash Can 315 Naming Playlists 317 PLAY LIST EDIT Mode Modifying Content in Playlist 320 PLAY LIST AIR Mode Presenting Playlist Content 345 PLAY LIST AIR Mode Exit 352 Instant Replay Operation VUE MARKS Mode 353 ...

Страница 20: ...to the motherboard Therefore if you own a four channel Mira there are two possible rear panel configurations In addition an eight channel Mira was first shipped into the marketplace in June 2010 so the eight channel Mira will have a third possible rear panel configuration Choose the rear panel illustration below which best matches your Mira Original Mira 4 Channel Server Rear Panel shipped before ...

Страница 21: ...to sensing with an input AC voltage range of 100VAC to 240VAC at 47Hz to 63Hz If only one mains power cord is plugged in the power supply alarm will sound when Mira is powered on Either plug in the second AC power cord or press the POWER SUPPLY ALARM MUTE button located to the immediate right of the PSU s to silence the alarm NOTE Some versions of the Mira power supply do not offer an Alarm Mute b...

Страница 22: ...T connector must be employed in order to double terminate the Tri Level reference signal feeding Mira J Quad Viewer Output This BNC connector provides an HD SDI serial digital video output of the built in quad split viewer which is used to monitor the second group of four video channels ChA ChD This HD SDI output can only connect to an external picture monitor capable of accepting 1 5Gb s HD SDI d...

Страница 23: ...monitor the audio output from any of the other three video channels in the group refer to the section Engineering Setup Audio on page 208 below P HD SDI SD SDI Digital Video In Out These eight BNC connectors provide the serial digital video SDI inputs and outputs for the second group of four video channels labeled ChA ChD Each BNC pair provides the IN and OUT for one video channel When operating t...

Страница 24: ...nel of the latest Mira servers which shipped after June 2010 Descriptions for each connection follow the illustrations Mira 4CH Servers with EMBEDDED DIGITAL AUDIO ONLY NO AES DIGITAL AUDIO only shipped AFTER June 2010 Figure 2 Mira 4 Channel Server Rear Panel with Embedded Digital Audio ONLY NO AES Digital Audio Mira 8CH Servers with EMBEDDED DIGITAL AUDIO ONLY NO AES DIGITAL AUDIO only shipped A...

Страница 25: ...ember 2014 Copyright 2014 Abekas Incorporated 23 Mira 4CH 8CH Servers with EMBEDDED DIGITAL AUDIO and AES DIGITAL AUDIO OPTION only shipped AFTER June 2010 Figure 4 Mira 4 Channel 8 Channel Server Rear Panel with Embedded Digital Audio and AES Digital Audio Option ...

Страница 26: ... or Louth VDCP protocols Each video channel in Mira features an RS422 serial control port located through a break out cable on the rear panel of the Mira Server At the end of the breakout cable are Ethernet type RJ45 connectors Mira includes adapters for each RS422 serial port to convert the RJ45 cable to 9D so you can just plug a standard male 9D serial cable into the adapter These RJ45 cables fo...

Страница 27: ...ewer Output for ChE ChH Mira 8 Channel Servers Only This BNC connector provides an HD SDI serial digital video output of the built in quad split viewer which is used to monitor the second group of four video channels ChE ChH This HD SDI output can only connect to an external picture monitor capable of accepting 1 5Gb s HD SDI digital video input Each of the four panes in the quad split viewer also...

Страница 28: ...will not be synchronized with external video audio equipment If Tri Level reference is used then an external 75 ohm terminator with a BNC T connector must be employed in order to double terminate the Tri Level reference signal feeding Mira P Disk RAID 6 Maintenance Only This 100 T Ethernet port is only used for a dedicated maintenance terminal for the internal media RAID 6 disk array This port sho...

Страница 29: ...If only one mains power cord is plugged in the power supply alarm will sound when Mira is powered on Either plug in the second AC power cord or press the POWER SUPPLY ALARM MUTE button located to the immediate right of the PSU s to silence the alarm NOTE Some versions of the Mira power supply do not offer an Alarm Mute button You must plug in the second power cord to silence the alarm B AC Power 2...

Страница 30: ...thout the need for a POE power injector brick Connect a Mira Instant Replay Control Surface to this port using a standard CAT5 or CAT6 Ethernet cable Refer to section Connections to Mira Server on page 230 E Analog Time of Day LTC IN This XLR connector provides input for an analog longitudinal timecode LTC signal which is typically used as time of day or house timecode When recording clips into Mi...

Страница 31: ...ther three video channels in the group refer to the section Engineering Setup Audio on page 208 below R HD SDI SD SDI Digital Video IN OUT for ChA ChD These eight BNC connectors provide the serial digital video SDI inputs and outputs for the second group of four video channels labeled ChA ChD Each BNC pair provides the IN and OUT for one video channel When operating the Mira server in standard def...

Страница 32: ...t channels W Quad Viewer Output for ChE ChH Mira 8 Channel Servers Only This BNC connector provides an HD SDI serial digital video output of the built in quad split viewer which is used to monitor the second group of four video channels ChE ChH This HD SDI output can only connect to an external picture monitor capable of accepting 1 5Gb s HD SDI digital video input Each of the four panes in the qu...

Страница 33: ...gin procedure located on page 33 below Power ON Procedure Alternative Use this procedure if the gray plastic front panel is missing from the front of the Mira server chassis 1 Locate center post at front of Mira chassis with small black rocker switch USB port 2 Press and release RIGHT side of this spring loaded black rocker switch You will see the row of 12 blue lights located at the top edge of t...

Страница 34: ... will turn OFF indicating Mira server is powered OFF Power OFF Procedure Alternative 2 Use this procedure only in extreme cases when the Windows O S has crashed or if the terminal is otherwise unavailable and when the gray plastic front panel is missing from the front of the Mira server chassis 1 Locate center post at front of Mira chassis with small black rocker switch USB port 2 HOLD DOWN for fo...

Страница 35: ...e password may be different if the system administrator for Mira within your organization has changed it If the password was changed and then forgotten please contact Abekas technical support 2 Click blue arrow button to right of password entry field to accept the password or press on QWERTY keyboard You will now be logged into Mira Server NOTE After a successful login into Windows the video chann...

Страница 36: ... video channels a Clip Library used to organize the media clips stored in the Mira server including clip metadata editing facilities and an advance Find utility a built in Multi Viewer to display the video outputs of the server and an Export utility which can export clips stored in Mira into media files using the most popular wrappers and codecs The Mira Explorer application can be installed and r...

Страница 37: ...factory default requires NO password 4 Click The Mira Explorer window appears as shown in Figure 4 below If your Mira Server is new there may be only one Clip Name listed NOTE When logging in as Privileged User or Guest you have limited access to all of the features of Mira Explorer The number of features available to these two user levels is dictated by settings available to the System Administra...

Страница 38: ... Select a Video Channel 1 Click near top center of Mira Explorer screen to display Clip Library The next step applies only to 8 Channel Mira servers skip ahead to step 3 below for 4 Channel Mira 2 Click desired tab near top of screen to select desired group of video channels LEFT TAB ChA ChB ChC ChD RIGHT TAB ChE ChF ChG ChH 3 Click anywhere in horizontal transport control area for desired channel...

Страница 39: ...hlight a clip in Clip Library listing 2 Click clip load button in desired channel transport A Clip unloaded from ChB indicated by color bars loaded into ChB B Transport control buttons are active for ChB or M E T H O D 2 1 Click anywhere in transport to highlight it 2 Double Click desired clip in Clip Library A Clip unloaded from ChB indicated by color bars loaded into ChB B Transport control butt...

Страница 40: ...B indicated by color bars loaded into ChB B Transport control buttons are active for ChB 3 Click desired transport control button Here Play Forward was clicked or Press SPACEBAR on QWERTY keyboard A Clip playback appears in video window at left of transport control area unless Mira Explorer GUI is running on remote computer in which case video window is not available 4 Repeat steps 1 through 3 abo...

Страница 41: ...y video channel transport first select active video channel transport 1 HOLD DOWN on QWERTY keyboard 2 Click clip load button in desired channel transport HOLD DOWN on QWERTY keyboard or or 1 HOLD DOWN on QWERTY keyboard 2 Press on QWERTY keyboard on QWERTY keyboard A Clip unloaded from ChB indicated by color bars loaded into ChB B The ChB transport control buttons are de activated 1 2 A B ...

Страница 42: ... clip immediately after it is loaded into any channel transport 1 Click VCP in the top left corner of Mira Explorer window 2 Select Enable Auto Play from the drop down menu IMPORTANT NOTE Currently this feature only functions when clips are loaded and played locally on the Mira server from the Mira Explorer applications Auto Play does not yet function when loading clips via RS422 serial control 1 ...

Страница 43: ...nly GUI control This feature prevents unintended interruption and or clip loading in video channels that are otherwise in use To LOCK a video channel 1 Position mouse cursor anywhere within transport control area for channel you wish to lock In this example the mouse cursor is positioned over the ChD transport area 2 HOLD DOWN on QWERTY keyboard 3 Click LEFT mouse button HOLD DOWN A The icon appea...

Страница 44: ...this simply changes the size of the clip library listing When the clip library listing is expanded the transport controls for only the currently active video channel remain in view To EXPAND the Clip Library Listing 1 Click Clip Library expand button A Clip Library is expanded with transport controls only for currently active video channel ChB in view Other transport controls are hidden from view ...

Страница 45: ...tly operating in the 1080 59 94i video format then clips stored in the local Mira server that are 525 625 720 1080 23 98p 1080 24p and 1080 50i video formats are displayed in the Clip Library but these clips cannot be loaded into any video channel Only clips recorded in 1080 59 94i can be loaded into video channels Remote Displays only those clips stored in remote Mira servers and displays all cli...

Страница 46: ...e horizontal transport control area NOTE Only one video channel can be selected and controlled at any given time within Mira Explorer B Inactive Channel Indicator Gray When a given set of transport controls are not active the channel label for that video channel will turn gray in color C Channel Group Select tab Click the LEFT tab to display transport controls for the first set of four video chann...

Страница 47: ... 1X play speed the currently loaded clip in the active video channel K Stop button When clicked halts playback of the currently loaded clip in the active video channel L Record button Clicking this button presents the Clip Record Setup dialog window which is used to define the type of recording New Clip Append or Overwrite and the parameters for this recording Refer to the section Recording Clips ...

Страница 48: ...t i e only one of the buttons in this group of four buttons can be active at any given time U Loop play repeat button When this button is clicked and activated with an orange color the Loop play repeat mode is active The loaded clip will play between the marked IN and OUT points stored within the clip metadata see description Clip Metadata on page 63 below During playback whenever the OUT point is...

Страница 49: ...keyboard shortcut for this function is Y Clip Position slider bar This horizontal bar shows the timeline duration of the currently loaded clip The color of this slider bar changes from gray to green while the clip is played indicating the playback position of the currently loaded clip Z Clip Position slider handle This icon denotes the current position within the clip with respect the clip s progr...

Страница 50: ...l ChB is selected in this illustration as indicated by the orange highlight on ChB 2 Click Record button This presents the Clip Record Setup dialog window shown in the next step 3 Click New Clip radio button A The New Clip data field section is active B NOTE If you re not recording an alpha matte Key signal then uncheck this checkbox less media disk space will be used 4 Type desired Clip Name for ...

Страница 51: ...ase Clip Name use Auto Name feature As each new clip is recorded data within Auto Name are appended to end of each new clip The Auto Name choices are Numeric Append a numeric digit is added and increments by one with each new clip recording Time of Day The current date and time is appended to each new clip name LTC In timecode data from the LTC IN connector are appended to each new clip name See a...

Страница 52: ...eek response from external controllers will work much faster than when timecode is recorded over the entire length of the ISO clip Entire Clip Length The external timecode signal is recorded over the entire length of the clip so if there is a break in timecode then that break will be recorded too 9 Click to finish or Press on QWERTY keyboard Clip Record Setup dialog window closes The following wil...

Страница 53: ...oses in the video channel transport while that channel is under remote RS422 serial control New Clip Record into Sub Folder New clips can be recorded directly into a defined sub folder but only when the folder already exists To create a new sub folder in the main Clip Library directory you must use the Window Explorer program creating a new folder in the root of the main Clip Library cannot yet be...

Страница 54: ...porated Revised 5 September 2014 3 Click in right hand list Windows Explorer window opens as shown in next step 4 Double Click Media Data H volume Volume opens as shown in next step 5 Double Click Video folder Video folder opens as shown in next step Continued on next page 5 3 4 A ...

Страница 55: ...yright 2014 Abekas Incorporated 53 6 Click button New folder is created as shown in next step 7 On QWERTY keyboard type desired name for new folder finish with Folder is named as shown in next step 8 Click Close window Windows Explorer window closes Continued on next page 6 7 8 ...

Страница 56: ...a matte Key signal then uncheck this checkbox less media disk space will be used 11 Using QWERTY keyboard type desired Folder Clip Name for destination folder and name of new clip 12 OPTIONAL Define an 8 character Clip ID for new clip NOTE If you type more than eight characters for the Clip ID only the first eight are used NOTE If the Clip ID field is kept empty then external control machines via ...

Страница 57: ...ollowing will happen in the transport A Video window displays live input video B button turns ON C Record button blinks on off to indicate recording is armed and ready recording has not yet started 14 Click Record button to start recording The following will happen in the transport A Folder and New Clip Name are displayed B button turns OFF C indicator appears 13 A B C B C A 14 ...

Страница 58: ...transport control area for desired channel ChB is selected in this illustration as indicated by the orange highlight on ChB 2 Load clip into selected video channel into which you want to Append If you don t know how to load a clip into the selected video channel please refer to Selecting Video Channels Loading Clips on page 36 above 3 Click Record button This presents Clip Record Setup dialog wind...

Страница 59: ...ick Record button to start recording The following will happen in the transport A button turns OFF B indicator appears C Clip position indicator seeks to END of clip 7 Click Stop button to halt recording 8 Click Seek to Start button to seek to first frame of clip 9 Click Play Forward button to play clip B A C 6 7 9 8 ...

Страница 60: ...as indicated by the orange highlight on ChB 2 Load clip into selected video channel into which you want to Overwrite If you don t know how to load a clip into the selected video channel please refer to Selecting Video Channels Loading Clips on page 36 above 3 Use clip slider or any transport control to position clip where insert recording will begin Use video window to view clip along with the tim...

Страница 61: ...on off to indicate recording is armed and ready recording has not yet started 8 Click Record button to start recording Overwrite recording will always start from the current position inside existing clip Following will happen in transport A button turns OFF B indicator appears 9 Click Stop button to halt recording 10 Click Seek to Start button to seek to first frame of clip 11 Click Play Forward b...

Страница 62: ...ession and avoid both the Record Setup dialog window and the record arm operation then use the following shortcut procedure 1 HOLD DOWN on QWERTY keyboard 2 Click Record button Recording will begin immediately without the Record Setup dialog window and without arming of record Whichever record function that was last selected will be performed again NEW CLIP APPEND or OVERWRITE HOLD DOWN 2 1 ...

Страница 63: ...ng which columns of data are displayed within Mira Explorer is determined only by the Administrator user please refer to Selecting Columns displayed in Mira Explorer on page 120 below which requires logging into Mira Explorer as Administrator user Change Column Width In this example some of the Comments aren t fully visible so we need to expand this column 1 Position mouse cursor at RIGHT edge of ...

Страница 64: ...lumn label 2 and drag Project column label to left positioning it between Length and Standard columns 3 Release mouse button Sort on Columns In this example the clip list is sorted in ascending order on the Clip ID column we will change this sorting order 1 Click mouse cursor anywhere within the Clip ID column label shaded here Notice the Clip ID sorting arrow has changed direction and the list of...

Страница 65: ...e clip you are attempting to modify is locked locked icon is visible then it is not possible to modify that clip Please refer to the procedure to unlock the clip found starting on page 113 below Modify Clip Metadata Clip Modify Dialog The clip modify menu provides additional metadata that can be modified for each stored clip There are three methods available to open the Clip Modify window M E T H ...

Страница 66: ...tab from which you can modify the following Output Mode Play Repeat Mode Refer to explanation on page 70 for further information on these metadata 6 Click to accept changes and close dialog window or Click to accept changes without closing dialog window 7 Click Timecode tab from which you can modify the following TC Source Refer to explanation on page 72 for further information on these metadata 8...

Страница 67: ...corporated 65 9 Click Trim tab from which you can modify the following Trim In Trim Out Refer to explanation on page 73 for further information on these metadata 10 Click to accept changes and close dialog window or Click button to accept changes without closing dialog window Trim TAB selected 9 10 ...

Страница 68: ...ting to modify is locked locked icon is visible then it is not possible to modify that clip Please refer to the procedure to unlock the clip found starting on page 113 below Modify text entry data fields 1 Click mouse once on Comments field for one of the clips in clip directory listing 2 Click mouse twice on Comments field for one of the clips in clip directory listing this provides data entry fo...

Страница 69: ...ield for one of the clips in clip directory listing 2 Click mouse twice on Playback field for one of the clips in clip directory listing this provides a pull down widget for that field 3 Click pull down widget once and select desired parameter from list in this example Frame mode is highlighted 4 Click mouse on that desired parameter and it s changed to that value 2 1 3 4 ...

Страница 70: ...utput Mode o Frame o Field VI Vertical Interpolation o Field Play Repeat Mode o OFF o Loop o Loop To o Ping Pong o Ping Pong To Timecode Playback Source o Recorded Timecode o Zero based o Striped Trim In Trim Out Figure 8 Clip Metadata List NOTE In order to change any clip attribute parameter the operator must be logged into Mira Explorer at the level of either Administrator or Privileged User To ...

Страница 71: ...Library in Mira Explorer please see Modifying Clip Metadata Direct Method on page 66 above Comments This field is used to enter text comments for the clip You may enter text up to 255 characters long Project Name This field is used to enter the project name for the clip You may enter text up to 255 characters long Creator This field is used to enter the name of the person who created the clip You ...

Страница 72: ...o a play channel OFF any time the given clip is loaded into a play channel the play repeat mode is turned OFF by default and the Normal Play button is activated This flag is used if play repeat cycling is not desired or if play repeat cycling is to be controlled from an external control device such as third party hardware control panels or vision mixer switcher controllers Loop any time the given ...

Страница 73: ...matically and seamlessly reverses play directions and plays backward to the Play Repeat IN point The clip then plays forward from there again This cycle will repeat as long as the clip is playing This Ping Pong To play repeat mode is typically used when playing animated graphics which have a lead in portion at the beginning of the clip then has a cycling component somewhere within the middle of th...

Страница 74: ...es the clip to use the external timecode that was originally recorded along with the clip when it was first recorded from the digital video input HD SDI or SD SDI The timecode over the entire length of the clip is used Use this setting if you wish to maintain all breaks or interruptions in the timecode stream that had occurred during recording for example if the source video consisted of several s...

Страница 75: ...m the beginning of the clip For example if the Record Start is 00 00 00 00 timecode and you enter a value of 00 00 07 15 into the Trim In entry field then you will trim off 7 15 seven seconds and fifteen frames from the beginning of the clip Trim Out Trims off the Tail from the end of the clip By default the value in the Trim Out entry field is set to the Recording End value shown below it When th...

Страница 76: ...wish to trim into any available transport 1 Click channel you want to use The selected channel is highlighted in orange 2 Double Click clip you want to trim A The clip is loaded into the selected channel Skip ahead to step 1 on page 75 below if you want to trim off only the tail from the clip 3 Use clip slider or any transport control to locate desired IN point for clip There are two methods avail...

Страница 77: ...clip slider or any transport control to locate desired OUT point for clip There are two methods to trim Tail off from clip M E T H O D 1 2 Click VCP menu 3 Select Trim menu item 4 Click Trim Head Off item or use QWERTY keyboard shortcut 2 2 HOLD DOWN and press then HOLD DOWN then A Clip tail is trimmed off play head slider automatically seeks to new END of clip 5 Click Seek to Start button to seek...

Страница 78: ...this procedure to restore the original head to any clip that had the head trimmed off Load the clip in which you wish to restore the head 1 Click video channel you want to use The selected channel is highlighted in orange 2 Double Click clip you want to restore A The clip is loaded into the selected channel 3 Click VCP menu 4 Select Trim menu item 5 Click Restore Head item A The clip s head is res...

Страница 79: ...this procedure to restore the original tail to any clip that had the tail trimmed off Load the clip in which you wish to restore the tail 1 Click video channel you want to use The selected channel is highlighted in orange 2 Double Click clip you want to restore The clip is loaded into the selected channel 3 Click VCP menu 4 Select Trim menu item 5 Click Restore Tail item A The clip s tail is resto...

Страница 80: ...rary while the Child clip or any other Child clips from that Parent clip is still in existence a clip delete error message will appear If you wish to delete a given Parent clip then all Child clips created from that Parent clip must first be deleted once this is done then that Parent clip can be deleted from the Mira Clip Library Create a Child Clip Begin by first selecting then Parent clip from w...

Страница 81: ...ly labeled as Child within the Clip Name field OPTIONAL 4 If desired click into the Clip Name field for the new Child clip and rename the clip to something meaningful OPTIONAL 5 Press on QWERTY keyboard The clip is renamed 6 Double Click Child clip to load it into currently active video channel ChD is the active video channel in the illustration A The Child clip is loaded into ChD 7 Trim Head and ...

Страница 82: ...he Find dialog window M E T H O D 1 1 Click Clip Library menu 2 Select Find menu item or use QWERTY keyboard shortcut 2 1 HOLD DOWN and press HOLD DOWN The Find window appears as shown 3 Use pull down fields to define find criteria In this example Project Name is selected 4 Type desired find criteria in fields provided You may change the find field and operators by using pull down items 5 Click to...

Страница 83: ...wn here Only the matching clips are now displayed in Mira Explorer 6 To view all clips on all servers again click Clip Library menu item 7 Click Find All item or HOLD DOWN then press on QWERTY keyboard The list of clips is updated in Mira Explorer as shown below All clips are now displayed in Mira Explorer Matched search criteria Number of matching clips Total number of clips on server 7 6 ...

Страница 84: ...e Mira Clip Library Create a new playlist within Mira Explorer 1 Click List Play menu 2 In pop up menu that appears click New playlist item A Item Untitled Playlist appears in Clip Library as shown in lower portion of illustration B Playlists are denoted by blue icon in Clip Library listing 3 Type desired name of new playlist into QWERTY keyboard 4 Press on QWERTY keyboard to finish A Renamed play...

Страница 85: ...ira Explorer Add single clip to playlist 1 Double Click desired playlist in Clip Library A Playlists are denoted by blue icon in Clip Library listing B List Play Editor pane opens with desired playlist in view 2 Click Hold and Drag desired clip from Clip Library into Play List Editor 3 Release mouse button A The clip appears in playlist 2 1 3 A B A ...

Страница 86: ...September 2014 Add range of clips to playlist 1 Click and Drag blue highlighter over several clips in Clip Library to select a range of clips 2 Click Hold and Drag highlighted range of clips from Clip Library into List Play Editor 3 Release mouse button A Range of clips appears in playlist 2 1 3 A ...

Страница 87: ...ekas Incorporated 85 Edit an existing playlist Insert clip into middle of playlist 1 Click and Drag desired clip into desired position within playlist A White horizontal line marks insertion point within playlist 2 Release mouse button A Clip appears at insertion point within playlist 2 1 A A ...

Страница 88: ...September 2014 Edit an existing playlist Move clip to new position within playlist 1 Click Hold and Drag desired clip into desired position within playlist A White horizontal line marks insertion point within playlist 2 Release mouse button A Clip appears at insertion point within playlist 1 A A 2 ...

Страница 89: ...sed 5 September 2014 Copyright 2014 Abekas Incorporated 87 Edit an existing playlist Delete item from playlist 1 Click item you want to delete A The item is highlighted 2 Press on QWERTY keyboard to remove item A The item is removed from playlist 1 A 2 A ...

Страница 90: ...5 September 2014 Cancel changes made to a playlist If you made unintended changes to playlist you may cancel these changes 1 Click Cancel in List Play Editor A Save changes dialog pop up appears as shown below 2 Click Discard in dialog A List Play Editor is closed and changes are canceled 1 2 A A ...

Страница 91: ...ed 5 September 2014 Copyright 2014 Abekas Incorporated 89 Save a Modified playlist When satisfied with changes made to playlist you must save the changes 1 Click Save in List Play Editor A Save button disappears indicating changes to playlist was saved A 1 ...

Страница 92: ...t play out 2 Double Click desired playlist Playlists are denoted by blue icon in Clip Library listing A List Play Editor pane opens with desired playlist in view 3 Click AIR List button A First item in playlist is loaded into active PGM video channel ChD 4 Click Close button B List Play Editor window closes as shown in next illustration below 5 Click Play Forward button in ChD PGM channel The play...

Страница 93: ... September 2014 Copyright 2014 Abekas Incorporated 91 C Next item RED cuts into PGM channel D Third item GREEN is readied for air Playlist continues to play advancing through playlist automatically To STOP playlist play out click button in PGM channel ChD C D ...

Страница 94: ...ue icon in Clip Library listing A List Play Editor pane opens with desired playlist in view 3 Click AIR List button A First item in playlist is loaded into active PGM video channel ChD 4 Click Close button B List Play Editor window closes as shown in next illustration below 5 Click the ChC ChD checkbox NOTE If ChB was selected for PGM click ChA ChB checkbox If ChF was selected for PGM click ChE Ch...

Страница 95: ...playlist C PGM item is highlighted RED PVW item is highlighted GREEN 7 Click Play Forward button in ChD PGM channel The playlist is now playing A Play head slider advances in PGM video channel ChD B When there are less than 3 15 seconds remaining in PGM clip play time PVW highlighter turns YELLOW This indicates PVW item is about to dissolve to PGM channel B C A 7 A B Continued on next page ...

Страница 96: ...pyright 2014 Abekas Incorporated Revised 5 September 2014 C PVW item RED dissolves into PGM D Third item GREEN loads into PVW Playlist continues to play advancing through playlist automatically To STOP playlist play out click button in PGM channel ChD C D ...

Страница 97: ...in playlist A White horizontal line marks insertion point within playlist 2 Release mouse button A New clip appears at insertion point within playlist You may insert clip anywhere in playlist except at RED highlighted item If GREEN highlighted item turns YELLOW you may not insert clip above YELLOW highlighter 3 Click Hold and Drag desired clip into desired position within playlist A White horizont...

Страница 98: ...p item from active playlist IMPORTANT Changes made to playlist cannot be saved while list is ON AIR 1 Click item you want to delete from playlist A The item is highlighted If GREEN highlighted item turns YELLOW you cannot select that item 2 Press on QWERTY keyboard to remove item A The item is removed from playlist 2 1 A A ...

Страница 99: ...tive playlist IMPORTANT Changes made to playlist cannot be saved while list is ON AIR 1 Click Hold and Drag item you want to move in playlist A White horizontal line marks insertion point within playlist If GREEN highlighted item turns YELLOW you cannot select that item 2 Release mouse button A The item is moved within playlist 1 A 2 A ...

Страница 100: ...ically 1 RIGHT Click desired segment in playlist that must play next A Segment is highlighted B Pop up menu appears 2 Click Play this segment next item in pop up menu list or 1 Click desired segment in playlist that must play next A Segment is highlighted 2 Press on QWERTY keyboard D GREEN highlighter moves to highlight this segment in playlist C Segment is immediately loaded into PVW video channe...

Страница 101: ...sed 5 September 2014 Copyright 2014 Abekas Incorporated 99 G PVW item RED dissolves into PGM H Next item GREEN loads into PVW Playlist continues to play advancing through playlist automatically To STOP playlist play out click button in PGM channel ChD G H ...

Страница 102: ...red segment in playlist that must play next A Segment is highlighted B Pop up menu appears 2 Click Cue this segment next item in pop up menu list or 1 Click desired segment in playlist that must play next A Segment is highlighted 2 Press on QWERTY keyboard C GREEN highlighter moves to highlight this segment in playlist D Segment is immediately loaded into PVW channel only for PVW PGM playlist play...

Страница 103: ...olves into PGM H Next item GREEN loads into PVW Playlist play out STOPS 3 Click Play Forward button in ChD PGM channel The playlist is now playing A Play head slider advances in PGM video channel ChD Playlist continues to play advancing through playlist automatically To STOP playlist play out click button in PGM channel ChD G H 3 A ...

Страница 104: ...OW A Segment is highlighted B Pop up menu appears 2 Click Play this segment immediately item in pop up menu list or 1 Click desired segment in playlist that must play RIGHT NOW A Segment is highlighted 2 Press on QWERTY keyboard C RED highlighter moves to highlight this segment in playlist D segment is immediately loaded into PGM video channel E Following segment is immediately loaded into PVW vid...

Страница 105: ...ediately item in pop up menu list or 1 Click desired segment in the playlist that must cue up RIGHT NOW A Segment is highlighted 2 Press on QWERTY keyboard C RED highlighter moves to highlight this segment in playlist D Segment is immediately loaded into PGM video channel E Following segment is immediately loaded into PVW video channel only for PVW PGM playlist play out Playlist play out STOPS 3 C...

Страница 106: ...iately item in pop up menu list or 1 Click anywhere within playlist A Segment is highlighted 2 Press on QWERTY keyboard C RED highlighter moves to highlight FIRST segment in playlist D FIRST segment is immediately loaded into PGM video channel E SECOND segment is immediately loaded into PVW video channel only for PVW PGM playlist play out Playlist play out STOPS 3 Click Play Forward button in ChD ...

Страница 107: ...e sure to exit the list play function 1 If PGM transport is not yet stopped click button in PGM channel A Stop button illuminates 2 Click EXIT button in List Play B List Play window closes this indicates List Play function is now turned off for this video channel If List Play is running in other video channels then you will need to select those channels and repeat this procedure 1 A 2 B ...

Страница 108: ... clip delete operation cannot be undone IMPORTANT NOTE When a clip is marked with the locked symbol within the Lock column it s not possible to delete that clip Please refer to the Locking Unlocking Clips instructions provided on page 113 below to unlock any locked clip before attempting to delete that clip To delete a clip from within Mira Explorer 1 Click on clip you wish to delete so it is sele...

Страница 109: ... the button near the top center of the Mira Explorer display Figure 9 Mira Explorer with Viewer Selected The desktop Viewer will take on a different appearance than that shown above depending on whether Mira is fitted with 4 or 8 video channels and the configuration in which the video channels are currently operating Here are some possibilities Desktop Viewer for Mira 8 Channel Server VVVV VVVV Mo...

Страница 110: ...condary monitor to the VGA DVI connector and then start up Mira the Win7 operating system will usually auto detect the second monitor and create an extended desktop on this second monitor If the second computer monitor is connected while the Mira server is running then you ll need to manually detect the monitor and extend the desktop onto that monitor Manually Extend Win7 Desktop onto second compu...

Страница 111: ...014 Copyright 2014 Abekas Incorporated 109 4 Click Multiple Displays pull down and select Extend these displays 5 Click button A Display Settings pop up appears as shown below 6 Click button 7 Click button Screen Resolution window closes Continued on next page A 6 4 7 5 A ...

Страница 112: ...reveal Windows taskbar 9 Click Mira Explorer icon A Mira Explorer Login dialog window appears as shown below 10 Click Privileged User radio button The factory default requires NO password 11 Click or press on QWERTY keyboard A Mira Explorer window appears on MAIN monitor Continue with the procedure on the following page if you want to undock the Viewer and position it on the extended desktop monit...

Страница 113: ...orer and positions the Viewer on the extended desktop monitor 1 In Mira Explorer menu click View 2 In menu list click Undock Viewer A Viewer undocks and appears on the MAIN monitor 3 Click and Hold mouse on title bar at very top of Viewer window Drag Viewer window onto second monitor 4 Release mouse button 5 Click Maximize window button in Viewer window A Viewer is maximized on extended desktop mo...

Страница 114: ...rom extended desktop monitor back into Mira Explorer There are two methods for docking the Viewer back into Mira Explorer M E T H O D 1 1 In Mira Explorer menu click View 2 In menu list click Dock Viewer or M E T H O D 2 1 Click Close window button in Viewer window A Viewer docks back into Mira Explorer on MAIN monitor 1 2 1 A ...

Страница 115: ...f any clip stored in the Mira server one must use the Windows Vista File Explorer program to change the read only flag for the desired clips Figure 10 Mira Explorer showing the Clip Locked icon IMPORTANT NOTE When a clip is marked with a locked icon it s not possible to delete record into or modify any of the clip metadata for that particular clip To lock or unlock a clip in the Mira Server 1 Move...

Страница 116: ...nd navigate to following directory Computer Video H Video This directory is where clip files are stored inside Mira Server 6 RIGHT Click on clip file you want to lock or unlock In this example the Bee Movie clip is selected 7 Select Properties item in pop up menu that appears Properties window opens as shown below Continued on next page 4 5 6 7 ...

Страница 117: ...eckbox to change its status In this example it s shown as checked which means the clip will be locked 10 Click to finish Properties window closes 11 Click Close window button to close window The Windows Explorer window closes Mira Explorer clip library will now display the locked icon for this particular clip LOCKED Icon 8 10 9 Click button to close 11 ...

Страница 118: ...ers Administrator Privileged User and Guest as well as to change the passwords required for the two higher levels of users Administrator and Privileged User The Guest level of login never requires a password This section of the document is divided into several operational procedures please find the procedure you re interested in from the list below and then go to that page in the document Login as...

Страница 119: ...d to step 2 below 1 Click Close window button in upper right corner to close Mira Explorer 2 Move mouse cursor to lower edge of screen to reveal Windows taskbar 3 Click Mira Explorer icon A Mira Explorer Login dialog window appears as shown below 4 Click Administrator radio button 5 In space provided type password multiflex Be sure to enter this password exactly as shown observing upper case and l...

Страница 120: ...to four Virtual channels by using provided pull down items Click and select desired items NOTE There are eight Virtual channels provided CH A thru CH H but only four are actually usable If you assign any physical channels to virtual channels CH E through CH H they will not operate within Mira Explorer 4 Click Passwords tab to change password for either Administrator or Privileged User access 5 Typ...

Страница 121: ...e available for the three different levels of login Administrator Privileged User Guest 7 Click each checkbox for any feature you want to allow or deny within Mira Explorer for the given user level login Blue Feature Allowed Black Feature Denied The Guest User account cannot be allowed the Set Passwords or Set User Permissions items for reasons of security 8 Click to finish 6 7 8 ...

Страница 122: ...m Refer to the procedure Login as Administrator into Mira Explorer on page 117 above to properly log in as Administrator 1 Click Clip Library menu item 2 Click Select Columns item The Select Columns window appears as shown below 3 Click each checkbox for any column you want to display or hide within Mira Explorer Clip Library Blue Column Displayed Black Column Hidden The Keywords checkbox cannot b...

Страница 123: ...e of Mira Explorer This section of the manual includes these procedures Download Install Mira Explorer on Remote PC Page 121 Disabling Abekas Mira Services on Remote PC Page 122 Assigning Mira Video Channels to Remote PC Page 124 Download Install Mira Explorer on Remote PC Use this procedure to download and install the executable file for the Mira Explorer application on a remote WinVista or Win7 ...

Страница 124: ... Remote PC On Remote PC 1 RIGHT Click on Computer icon on desktop 2 Click Manage item in pop up menu that appears A Computer Management window appears as shown in next step below Access to Computer Management may need to be granted in another pop up window not shown depending on how the Remote PC is configured In LEFT pane of Computer Management window 3 Expand Services and Applications item 4 Cli...

Страница 125: ...tion 9 Click to finish In RIGHT pane of Computer Management window 10 Verify service is now set to Disabled In RIGHT pane of Computer Management window 11 Repeat steps 5 through 9 above for two other Abekas services 12 Verify all three Abekas services are set to Disabled as shown here 13 Click Close window button to quit Computer Management 14 Restart Windows for changes to take effect 8 7 9 10 11...

Страница 126: ...r edge of screen to reveal Windows taskbar 2 Click Mira Explorer icon A Mira Explorer Login dialog window appears as shown below 3 Select Administrator Login Type 4 Enter password multiflex observing the all lower case spelling 5 Click to launch Mira Explorer A Mira Explorer application window appears as shown in the next step below If your Mira server is administered by a systems administrator wh...

Страница 127: ...a Explorer icon A Mira Explorer Login dialog window appears as shown below 14 Select Privileged User Login Type 15 By default there is no password required 16 Click to launch Mira Explorer A Mira Explorer application window appears as shown in the next step below If your Mira server is administered by a systems administrator whom has changed the default password you may need to obtain the new pass...

Страница 128: ...k to launch Mira Explorer A Mira Explorer application window appears as shown in the next step below If your Mira server is administered by a systems administrator whom has changed the default password you may need to obtain the new password from that person In the Mira Explorer window 6 Click Clip Library menu item 7 Click Configure item in drop down list that appears The Mira Explorer Configurat...

Страница 129: ...ew password from that person The Mira Explorer application window appears as shown in the next step below In the Mira Explorer window 17 Verify only ChC and ChD are present in Mira Explorer NOTE The small video windows in ChC and ChD will be absent on the Remote PC the instance of the Mira Explorer GUI running on the Remote PC will not have live video windows in the transport controls in the Libra...

Страница 130: ...tput channels then all imported media files are converted to 1080 59 94i video format even if the media files are in a different video format say 720 59 94p or 525 59 94i This section of the document is divided into several operational procedures please find the procedure you re interested in from the list below and then go to that page in the document Supported Media Files for Import Page 129 Imp...

Страница 131: ...Windows Only mxf XDCam EX mxf HDV mxf DV25 DVCPro 1 Calibrated Q MXF Import Windows Only mxf DV50 DVCPro50 1 Calibrated Q MXF Import Windows Only 2 Calibrated Q DV50 Decode Windows Only mxf DV100 DVCProHD 5 Calibrated Q DV100 Decode MXF Import Bundle 2 Windows Only mxf AVC100 AVC50 AVC Intra 8 Calibrated MXF Import AVCI Decode Bundle Windows Only Only needed on Mira Servers with JPEG 2000 or DVCPr...

Страница 132: ...HD essence within MOV files 4 Calibrated XD Decode MXF Import Bundle 1 Windows Only http www calibratedsoftware com store WindowsBundleStore asp select Bundle 1 from list This codec from Calibrated Software enables import of XDCam HD essence within MXF and P2 files 5 Calibrated DV100 Decode MXF Import Bundle 2 Windows Only http www calibratedsoftware com store WindowsBundleStore asp select Bundle ...

Страница 133: ... audio tracks IMPORTANT NOTE When launched and activated the Mira Media import utility will take over control of one of the hardware for video channels Therefore before starting your import operation be sure the video channel you assign for file Importing is not in use by anyone else 1 Move mouse cursor to lower edge of screen to reveal Windows taskbar 2 Click Mira Import icon A Importer Activatio...

Страница 134: ...of that remote directory Please refer to procedure Map Network Disk for Media File Import on page 147 below 8 Click to finish Select source directory for imports window closes A Import From directory appears in the Mira Import window to right of button as shown below 9 The Destination directory should be set to the H Video folder If it s not then click button and select this folder NOTE You may se...

Страница 135: ...elected file s to import queue A Selected file s are added to work queue and importing immediately begins on the first file as shown in Figure 11 below 13 You may click Add File button at any time while file import is active to add additional file s to import queue Figure 11 Mira Media File Import window Active file import video window Speed of import relative to 1 0X where 1 0X equals real time N...

Страница 136: ...ou wish to remove from queue Notice filename is highlighted in blue and Remove File button becomes available HOLD DOWN while clicking on file names to select multiple files HOLD DOWN while clicking on file names to select a range of files 2 Click Remove File button A Selected file s are removed from import queue without interrupting importing of current file as shown below This file removal operat...

Страница 137: ... HOLD DOWN while clicking on file names to select multiple files HOLD DOWN while clicking on file names to select a range of files 2 Click Move File Up button or Move File Down button to change position of selected file s within import queue Notice highlighted file s are moved within queue list In this example Move File Up button was clicked four times M E T H O D 2 1 Click hold and Drag file you ...

Страница 138: ...o pick up where the operation left off or to begin a brand new import queue 1 Click Close window button to quit media file Import application Mira Import window closes immediately and Video Channel is released for Mira Explorer Later when you wish to resume Media File importing 2 Move mouse cursor to lower edge of screen to reveal Windows taskbar 3 Click Mira Import icon A Importer Warning window ...

Страница 139: ...nce you had earlier closed the Media File Import application while it was working on an import queue 7 Click to restore former work queue and to launch Media File Importer A Mira Import window appears as shown below B The original list of import files is restored and the file that was being actively imported when the Import application was halted is imported again from its beginning 6 A A 7 B ...

Страница 140: ...s 3 times wider than a normal HD animation 5 760 X 1080 Mira s Multi Screen import capabilities allow for such graphics to be imported into the Mira Clip Library and handled as one file containing video audio and key tracks if clip to be imported includes an alpha track i e RGBA or Millions of Colors To import a multi screen clip 1 Move mouse cursor to lower edge of screen to reveal Windows taskba...

Страница 141: ...de animation that measures 5 760x1080 pixels select 3 horizontal monitors and 1 vertical monitor shown to the right 8 Click This configuration will be applied to any future multi screen imports To import a file of a different size repeat steps 6 and 7 9 The Destination directory should be set to the H Video folder If it s not then click button and select this folder NOTE You may select any sub fol...

Страница 142: ...es 12 Click Open button to add selected file s to import queue Selected file s are added to work queue and importing immediately begins on the first file as shown in Figure 11 above Important Note In order to play a multi screen video clip the proper ISO channel configuration is required Refer to section Instant Replay for Normal 2D Cameras for more information on how to configure ISO channels to ...

Страница 143: ... may enable or disable the watch function NOTE Physical media file s in the Watch Folder are not deleted after they are imported using the Watch Folder function Add Watch Folder s Enable Watch Folder Function 1 Move mouse cursor to lower edge of screen to reveal Windows taskbar 2 Click Mira Import icon A Import Warning window appears as shown in next step 3 Click to launch Importer Select channel ...

Страница 144: ...into remote computers on network 8 Click to highlight the desired watch folder 9 Click button Select Watch Folder window closes B The selected watch folder is listed 10 Repeat steps 6 through 9 above for any additional watch folders you d like to add 11 Click to finish Watch Folder window closes C Enable Watch Folder checkbox is now present in the Mira Import window 12 Click checkbox With this che...

Страница 145: ...edia files into the watch folder that was selected in step 8 above not shown D The first media file dropped into the watch folder is currently importing E Additional items dropped into the watch folder are listed in the import queue NOTE Physical media file s in the Watch Folder are not deleted after they are imported E D ...

Страница 146: ...iminating the programmed watch folders This allows you to use the same Watch Folder s again at a later time 1 Click checkbox With this checkbox is UNCHECKED the Watch Folder function is INACTIVE A Enable Watch Folder checkbox is now disabled in the Mira Import window The Watch Folder function is now disabled 2 Click button to quit Importer Mira Import window closes Offline import channel transport...

Страница 147: ... 4 below 1 Move mouse cursor to lower edge of screen to reveal Windows taskbar 2 Click Mira Import icon A Import Warning window appears as shown in next step 3 Click to launch Importer Select import channel to be taken offline Mira Import window appears as shown in next step 4 Click File menu The File menu list appears 5 Click Watch Folders item Watch Folder window appears as shown in next step 6 ...

Страница 148: ...ed 5 September 2014 8 Click to highlight any additional watch folder you want to remove from the list You may highlight only ONE folder at a time 9 Click button B The highlighted folder is removed from the list as shown in next step 10 Click to finish The Watch Folders window closes 8 A B 10 9 ...

Страница 149: ...e network directory to the local Mira Server so Mira Media File Import utility can access it NOTE You may need to obtain an access password from your in house network system administrator in order to map the remote directory 1 Move mouse pointer to lower edge of screen to reveal Windows taskbar 2 Click Windows START icon A Windows Start menu appears as shown below 3 Click Computer item A Windows E...

Страница 150: ...ish to map to local Mira Server In the example here the remote directory named Watch Folder is selected NOTE You may need to obtain an access password from your in house network system administrator in order to map the remote directory 8 Click to select folder A Browse For Folder window closes and you re returned to the Map Network Drive window as shown below 9 Click to finish Map Network Drive wi...

Страница 151: ...Replay Server Revised 5 September 2014 Copyright 2014 Abekas Incorporated 149 10 Verify networked drive is now listed in LEFT pane of Windows Explorer 11 Click Close window button to quit Windows Explorer 10 Click the button to close 11 ...

Страница 152: ...e if the Mira server has recorded and stored clips in the 1080 59 94i video format then clips exported from Mira using the Export utility are will be in the 1080 59 94i video format This section of the document is divided into several operational procedures please find the procedure you re interested in from the list below and then go to that page in the document Supported Media Files for Export P...

Страница 153: ... wrapper MXF XDCam HD422 Sony XDCam in MXF wrapper DV100 Panasonic DV100 in MXF wrapper AVI MSMP4 Microsoft MPEG 4 in Windows AVI wrapper WMV MSMP4 Microsoft MPEG 4 in Windows Media Video WMV wrapper WMV2 Microsoft MPEG 2 in Windows Media Video WMV wrapper P2 DV100 Panasonic DV100 in Panasonic P2 wrapper SD Video Formats File Type Codec Comments MOV DV25 Panasonic DV25 in QuickTime MOV wrapper DV5...

Страница 154: ...al area network LAN via Gigabit Ethernet or to a portable memory device or hard drive plugged into one of the USB 2 0 or eSATA ports on Mira W A R N I N G Do NOT export media files to the system C volume or media H volume inside Mira These two volumes are reserved for the Windows operating system and record play of real time media clips respectively Exporting to either of these drive volumes will ...

Страница 155: ...ow Right Click and select New item from pop up menu 5 Click Folder item in list The New Folder directory is created as shown in next step below 6 Type new name of folder then The New Folder directory is named 7 Press again to open folder Leave this window open in the background it will be accessed again after the export is finished 4 5 6 7 ...

Страница 156: ...Export Queue for final export Perform the procedure Preparing Target Volume for Export starting on page 152 above before performing the following procedure 1 Click near top center of Mira Explorer to display Clip Library 2 Click to highlight clip s you want to export Hint Press hold then click mouse on clip names to select multiple clips 3 On last clip highlighted Right Click on clip name and sele...

Страница 157: ...A The Mira Explorer Configuration window appears as shown in next step below 9 Click to specify new directory The Select Export Directory window appears as shown in next step below W A R N I N G Do NOT export media files to the system C volume or media H volume inside Mira Exporting to either of these drive volumes will cause interruption to the server system and or cause video stuttering and corr...

Страница 158: ...n export The Export Warning dialog appears as shown in the next step below 16 Click channel select pull down IMPORTANT NOTE When the following steps are performed Mira Export will take control over one of the video channels Before continuing be sure the video channel you select is not in use by anyone else 17 Select video channel to use for Export Continued on next page 13 14 15 16 17 ...

Страница 159: ...9 Optional you may click to cancel export operation at any time Items in queue will remain intact after abort so you can later resume exporting the same queue A The last clip is being imported from queue Export operation is finished A The queue is empty B The button is grayed out since no clips are in queue 20 Select Windows Explorer window containing the Export Directory from step 7 on page 153 a...

Страница 160: ...en move the clip segments into the Export Queue for final export Perform the procedure Preparing Target Volume for Export starting on page 152 above before performing following procedure 1 Click near top center of Mira Explorer to display Clip Library 2 Click to highlight clip s you want to export Hint Press hold then click mouse on clip names to select multiple clips 3 On last clip highlighted Ri...

Страница 161: ...channel Here ChD is selected 7 Click to highlight the first clip you want to edit for creating a segment 8 Click to load clip in channel transport 9 Use clip slider or any transport control to locate desired IN point for segment 10 Click to mark IN point 11 Use clip slider or any transport control to locate desired OUT point for segment Continued on next page 6 7 8 10 11 9 11 ...

Страница 162: ... In Out and Duration values are displayed as shown by the rectangle outline 13 Optional Click and or to seek to IN and or OUT points to review defined segment 14 Optional Click if you wish to create another segment from the same clip 15 Repeat steps 7 through 12 above for any additional segments you wish to create Continued on next page 12 13 13 14 15 ...

Страница 163: ... Mira Explorer Configuration window appears as shown in next step below 19 Click to specify new directory The Select Export Directory window appears as shown in next step below W A R N I N G Do NOT export media files to the system C volume or media H volume inside Mira Exporting to either of these drive volumes will cause interruption to the server system and or cause video stuttering and corrupti...

Страница 164: ...n export A The Export Warning dialog appears as shown in next step below 26 Click channel select pull down IMPORTANT NOTE When the following steps are performed Mira Export will take control over one of the video channels Before continuing be sure the video channel you select is not in use by anyone else 27 Select video channel to use for Export Continued on next page 23 24 A 25 26 27 ...

Страница 165: ...9 Optional you may click to cancel export operation at any time Items in queue will remain intact after abort so you can later resume exporting the same queue A The last clip is being imported from queue Export operation is finished A The queue is empty B The button is grayed out since no clips are in queue 30 Select Windows Explorer window containing the Export Directory from step 7 on page 153 a...

Страница 166: ...ally created when Mira is configured for live instant replay or multi camera recording applications Mira Export provides the ability to export segments from any camera angle contained within an ISO clip Perform the procedure Preparing Target Volume for Export starting on page 152 above before performing following procedure 1 Click near top center of Mira Explorer to display Clip Library 2 RIGHT Cl...

Страница 167: ...n channel transport The clip is loaded in the video channel 6 Use clip slider or any transport control to locate desired IN point for segment 7 Click to mark IN point 8 Use clip slider or any transport control to locate desired OUT point for segment 9 Click to mark OUT point 10 Optional Click and or to seek to IN and or OUT points to review defined segment Continued on next page 4 6 5 6 7 8 8 9 10...

Страница 168: ...me in File Name column 12 Optional Type new name of media file 13 Optional Press on QWERTY keyboard to complete re name The following steps are performed to duplicate the same defined segment for the other camera angles in the ISO clip 14 Click two or more times to create duplicate segments from same clip 15 Right Click on first duplicate segment under Angle column 16 Select Set angle item 17 Clic...

Страница 169: ...e segments to create two separate segments from the one segment This step is optional skip ahead to step 25 if you don t need to split the segment 21 Click to highlight desired segment 22 Click Clip Load button to load clip in channel transport The clip is loaded in the video channel 23 Use clip slider or any transport control to locate desired SPLIT point for segment 24 Click to split the segment...

Страница 170: ...efined from a previous Export operation you can skip ahead to step 39 below 29 Click to set export directory Mira Explorer Configuration window appears as shown in next step below 30 Click to specify new directory Select Export Directory window appears as shown in next step below W A R N I N G Do NOT export media files to the system C volume or media H volume inside Mira Exporting to either of the...

Страница 171: ...e volume 32 Click desired export folder 33 Click to select this folder The Select Export Directory window closes 34 Verify Export directory is correct 35 Click to finish Mira Explorer Configuration window closes 36 Click to begin export Export Warning dialog appears as shown in next step below Continued on next page 31 33 32 35 34 36 ...

Страница 172: ...he video channel you select is not in use by anyone else 38 Select video channel to use for Export 39 Click to begin Export A The export process begins with a progress bar and preview video window The entire list of clips in queue will be exported 40 Optional you may click to cancel export operation at any time Items in queue will remain intact after abort so you can later resume exporting the sam...

Страница 173: ...ht 2014 Abekas Incorporated 171 Export operation is finished A The queue is empty B The button is grayed out since no clips are in queue 41 Select Windows Explorer window containing the Export Directory from step 7 on page 153 above A You will see your exported media files B A 41 A ...

Страница 174: ...age 173 Engineering Setup Channels Page 174 Individual Video Channels Page 174 Video Key Channel Pairs Page 176 Stand Alone Stereoscopic 3D Channels Page 179 Stand Alone Super Slow Motion Camera Channels Page 186 Instant Replay for Normal 2D Cameras Page 189 Instant Replay for Stereoscopic 3D Cameras Page 195 Instant Replay for Super Slow Motion Cameras Page 198 Engineering Setup Video Page 202 En...

Страница 175: ...gineering Setup utility This utility is used to configure the engineering aspects of the Mira server 1 Move mouse pointer to lower edge of screen to reveal Windows taskbar 2 Click Windows START icon A Windows Start menu appears as shown below 3 Click Mira CONFIG icon User Account Control dialog window appears as shown below 4 Click button A Mira Engineering Setup window opens 1 2 A 3 A 4 ...

Страница 176: ... VTR and each video channel can operate as either a recorder or player a given video channel cannot record and play at the same time Mira 4 Channel Server Use this procedure to configure all video channels as four independent channels each channel with its own RS422 serial control port Each video channel can be used as either a recorder or player a given video channel cannot record and play at the...

Страница 177: ...ing Mira Engineering Setup Utility found on page 173 above 1 Click Channels tab 2 Click V V V V radio button for first group of four channels ChA ChD 3 Click V V V V radio button for second group of four channels ChE ChH 4 Click to accept changes Group for Channels A through D V V V V Four video channels Configures the first group of four video channels ChA ChD as four independent video I O channe...

Страница 178: ...video and key on the VK paired channels IMPORTANT NOTE The following tables detail the channel pairing for VK channel configuration with RS422 serial control No other VK channel pairing is possible The shading highlights channels that are paired together for VK operation Mira 4 Channel Mira 8 Channel Servers Configuration SD HD SDI Video IN OUT RS422 Control Port ChA ChC ChB ChD VK V V VIDEO KEY V...

Страница 179: ...edure Launching Mira Engineering Setup Utility found on page 173 above 1 Click Channels tab 2 Click radio button for desired VK channel pairing on ChA ChD group of video channels 3 Select radio button for desired output on Key channel when a video only clip clip without a key image is loaded into the VK channel pair Normally output white on the key output is selected so video clips without a key i...

Страница 180: ...desired VK channel pairing on ChA ChD group of video channels 3 Click radio button for desired VK channel pairing on ChE ChH group of video channels 4 Select radio button for desired output on the Key channel when a video only clip clip without a key image is loaded into the VK channel pair Normally output white on the key output is selected so video clips without a key image will be visible throu...

Страница 181: ... key on the multiple VK paired channels IMPORTANT NOTE See section Multi Screen Import for information on importing multi screen files IMPORTANT NOTE The following tables detail the channel pairing for multi screen VK channel configuration with RS422 serial control No other multi screen VK channel pairing is possible The shading highlights channels that are paired together for multi screen VK oper...

Страница 182: ...tember 2014 4X VK 4 wide video 4 key VIDEO KEY 4X VK Unused VIDEO KEY Unused Unused VIDEO KEY Unused Unused VIDEO KEY Unused Unused 2X VK 2X VK 2 wide video 2 key and 2 wide video 2 key VIDEO KEY 2X VK Unused VIDEO KEY Unused Unused VIDEO KEY 2X VK Unused VIDEO KEY Unused Unused Continued on next page ...

Страница 183: ...r To open the Mira Engineering Setup window shown below perform the procedure Launching Mira Engineering Setup Utility found on page 173 above 1 Click Channels tab 2 Click radio button for desired Multi Screen VK channel pairing on ChA ChD group of video channels 3 Select radio button for desired output on Key channel when a video only clip clip without a key image is loaded into the VK channel pa...

Страница 184: ...dio button for desired Multi Screen VK channel pairing on ChA ChD group of video channels 3 Click radio button for desired Multi Screen VK channel pairing on ChE ChH group of video channels 4 Select radio button for desired output on the Key channel when a video only clip clip without a key image is loaded into the VK channel pair Normally output white on the key output is selected so video clips ...

Страница 185: ...to use Mira for Sports Instant Replay with 3D cameras then please use the procedure Instant Replay for Stereoscopic 3D Cameras on page 195 below IMPORTANT NOTE The following tables detail the channel pairing for 3D channel configuration with RS422 serial control The shading highlights channels that are paired together for 3D operation Mira 4 Channel Mira 8 Channel Servers Configuration SD HD SDI V...

Страница 186: ...ther a recorder or player a given 3D channel cannot record and play at the same time NOTE If you want to use Mira for Sports Instant Replay with 3D cameras refer to Cameras on page 195 below Mira 4 Channel Server To open the Mira Engineering Setup window shown below perform the procedure Launching Mira Engineering Setup Utility found on page 173 above 1 Click Channels tab 2 Click radio button for ...

Страница 187: ...E If you want to use Mira for Sports Instant Replay with 3D cameras refer to Cameras on page 195 below Mira 8 Channel Server To open the Mira Engineering Setup window shown below perform the procedure Launching Mira Engineering Setup Utility found on page 173 above 1 Click Channels tab 2 Click radio button for VV VV channel pairing on ChA ChD group of video channels 3 Click radio button for VV VV ...

Страница 188: ...each SSM channel group acts as a single transport and can operate as either a recorder or player If you wish to use Mira for Sports Instant Replay with SSM cameras then please use the procedure Instant Replay for Super Slow Motion Cameras on page 198 below Mira 4 Channel Mira 8 Channel Servers Configuration SD HD SDI Video IN OUT RS422 Control Port ChA ChB ChC ChD 2X SSM CAM 1 LINK A CAM 1 LINK B ...

Страница 189: ...the ChA ChD group of video channels 3 Click to accept changes Group for Channels A through D 2X Super Slow Motion Camera ChA CAM 1 LINK A ChB CAM 1 LINK B RS422 ChA ChC CAM 2 LINK A ChD CAM 2 LINK B RS422 ChC 3X Super Slow Motion Camera ChA CAM LINK A ChB CAM LINK B ChC CAM LINK C RS422 ChA Output from 2X SSM high speed cameras operate at two times the frame rate of normal video 60fps instead of 3...

Страница 190: ...s 4 Click to accept changes Group for Channels A through D 2X Super Slow Motion Camera ChA CAM 1 LINK A ChB CAM 1 LINK B RS422 ChA ChC CAM 2 LINK A ChD CAM 2 LINK B RS422 ChC 3X Super Slow Motion Camera ChA CAM LINK A ChB CAM LINK B ChC CAM LINK C RS422 ChA Group for Channels E through H 2X Super Slow Motion Camera ChE CAM 1 LINK A ChF CAM 1 LINK B RS422 ChE ChG CAM 2 LINK A ChH CAM 2 LINK B RS422...

Страница 191: ...hree four five or six normal 2D cameras into a single clip ID with anywhere from two to six video tracks An external control panel such as the DNF Controls DMAT AB can switch between the input camera tracks on the replay video channels during live instant replay operations With Mira configured for any ISO record operation the set of two to six record channels act as a single transport ChA always c...

Страница 192: ... ChG ChH REGULAR Video Channels REC PLAY ChE ChF CAMERA 3 CAMERA 4 Unused Unused V REC PLAY V REC PLAY V REC PLAY V REC PLAY REPLAY P1 REPLAY P2 REPLAY P1 REPLAY P2 ISO4 4 Record 2 Replay and 1 VK Record or Play CAMERA 1 CAMERA 2 Unused Unused INSTANT REPLAY Channels RECORD ChA ChB ChC ChD REPLAY ChG ChH REGULAR Channels VIDEO KEY REC PLAY ChE ChF CAMERA 3 CAMERA 4 Unused Unused V REC PLAY K REC P...

Страница 193: ...n Master ISO Channel Transport When video channels are configured for any ISO or 3D operation the video windows for all channels included in the ISO and 3D group are now all displayed within the master channel transport in Mira Explorer Only the transport controls for the master channel are displayed all other transports for the remaining channels in the ISO or 3D group are not displayed Here is a...

Страница 194: ...he procedure Launching Mira Engineering Setup Utility found on page 173 above 1 Click Channels tab 2 Click radio button for desired channel grouping ISO2 or ISO3 highlighted in red outline below for ChA ChD 3 Click to accept changes ISO Group for Channels A D ISO2 2 Record 2 Replay ChA CAM 1 ChB CAM 2 ChC REPLAY P1 RS422 ChC to DMAT AB RS422 port 1 ChD REPLAY P2 RS422 ChD to DMAT AB RS422 port 3 D...

Страница 195: ...els E H ISO2 2 Record 2 Replay ChA CAM 1 ChB CAM 2 ChC REPLAY P1 RS422 ChC to DMAT AB RS422 port 1 ChD REPLAY P2 RS422 ChD to DMAT AB RS422 port 3 DMAT AB control panel operates in 2R 2P mode in MENU ISO3 3 Record 1 Replay ChA CAM 1 ChB CAM 2 ChC CAM 3 ChD REPLAY P1 RS422 ChD to DMAT AB RS422 port 1 DMAT AB control panel operates in 2R 2P mode in MENU ISO4 4 Record ChA CAM 1 ChB CAM 2 ChC CAM 3 Ch...

Страница 196: ...nel grouping ISO5 or ISO6 3 Click to accept the changes ISO Group for Channels A H ISO5 5 Record 2 Replay and 1 Record or Play ChA CAM 1 ChB CAM 2 ChC CAM 3 ChD CAM 4 ChE CAM 5 ChG REPLAY P1 RS422 ChG to DMAT AB RS422 port 1 ChH REPLAY P2 RS422 ChH to DMAT AB RS422 port 3 DMAT AB control panel operates in 5R 2P mode in MENU if mode not present use 6R 2P instead or get firmware update from DNF Cont...

Страница 197: ...stant replay playback If you wish to use Mira for Stand Alone 3D operation not instant replay then please use the procedure Stand Alone Stereoscopic 3D Channels on page 179 above IMPORTANT NOTE The following tables detail the channel pairing for 3D channel configuration with RS422 serial control The shading highlights channels that are paired together for 3D operation Mira 4 Channel Mira 8 Channel...

Страница 198: ...annot record and play at the same time IMPORTANT NOTE If you wish to use Mira for stand alone 3D operation then please use the procedure Stand Alone Stereoscopic 3D Channels on page 179 above Mira 4 Channel Server To open the Mira Engineering Setup window shown below perform the procedure Launching Mira Engineering Setup Utility found on page 173 above 1 Click Channels tab 2 Click radio button for...

Страница 199: ... Mira Engineering Setup Utility found on page 173 above 1 Click Channels tab 2 Click radio button for desired channel grouping VV VV or 3D ISO2 or 3D ISO3 3 Click to accept changes Group for Channels A through D VV VV ChA 3D LEFT 1 ChC 3D RIGHT 1 RS422 None ChB 3D LEFT P1 ChD 3D RIGHT P1 RS422 ChB to DMAT AB RS422 port 1 DMAT AB control panel operates in 1R 1P mode in MENU Group for Channels A thr...

Страница 200: ...D An external control panel such as the DNF Controls DMAT AB can then switch between the two or three SSM cameras on the replay channel s during live instant replay operations With Mira configured for any ISO record operation the group of record channels act as a single transport ChA always controls all record channels the ISO inputs continuously record the input cameras without interruption while...

Страница 201: ...1 LINK B Unused Unused 3 2X SSM Camera IN 1 2 2X SSM Replay OUT P1 P2 CAM 2 LINK A CAM 2 LINK B Unused Unused CAM 3 LINK A CAM 3 LINK B Unused Unused Replay P1 Replay P2 Replay P1 Replay P2 ChA ChB ChC ChD ChE ChF 3X SSM ISO2 CAM 1 LINK A CAM 1 LINK B Unused Unused 2 3X SSM Camera IN 1 2 2 3X SSM Replay OUT P1 P2 CAM 1 LINK C CAM 2 LINK A Unused Unused CAM 2 LINK B CAM 2 LINK C Unused Unused Repla...

Страница 202: ...and Alone Super Slow Motion Camera Channels on page 186 above Mira 4 Channel Server To open the Mira Engineering Setup window shown below perform the procedure Launching Mira Engineering Setup Utility found on page 173 above 1 Click Channels tab 2 Click radio button for desired channel group 3 Click to accept changes Group for Channels A through D 2X Super Slow Motion Camera ChA CAM 1 LINK A ChB C...

Страница 203: ...sired channel group 3 Click to accept changes Group for Channels A through D 2X Super Slow Motion Camera ChA CAM 1 LINK A ChB CAM 1 LINK B RS422 ChC to DMAT AB RS422 port 1 DMAT AB control panel operates in 1R 1P mode in MENU 3X Super Slow Motion Camera ChA CAM 1 LINK A ChB CAM 1 LINK B ChC CAM 1 LINK C RS422 ChD to DMAT AB RS422 port 1 DMAT AB control panel operates in 1R 1P mode in MENU Group fo...

Страница 204: ...e one or more video channels with a different video standard from the other video channels To open the Mira Engineering Setup window shown below perform the procedure Launching Mira Engineering Setup Utility found on page 173 above 1 Click Video tab 2 Click radio button s for desired video standard and reference in which Mira will operate 3 Click shown at right The Restart Mira window appears The ...

Страница 205: ...TANT NOTE Using the Free Run setting is recommended only for the Mira 4 Channel server and only when that Mira server is operating as a stand alone device with no video interconnect to any other external equipment IMPORTANT NOTE Failure to supply an external reference signal Bi Level or Tri Level to the Mira 8 Channel server will eventually result in corrupted video on all video outputs It is crit...

Страница 206: ...rial digital output video cables The media file Import tool can also be used to import 4K media files using any video codec supported by the media file importer In addition during 4K operation the ABCD Quad Viewer provides a down scaled HD SDI 1080i representation of the 4K recording and playback video Via the Mira Config utility on the Quad Viewer tab the user may turn OFF the overlay text and au...

Страница 207: ...e 4K radio button Do not select 3G radio button yet 5 Click button Wait for up to 15 seconds for button to disappear 6 Click the 3G Level B radio button 7 Click button Wait for up to 15 seconds for button to disappear 8 Click Quad Viewer tab 9 Click 0 Overlay OFF radio button 10 Click close window Engineering Setup window closes 3 4 5 6 7 8 9 10 ...

Страница 208: ...orer icon A Mira Explorer Login window appears 13 Click button B Mira Explorer opens 14 Connect 4K video source and monitoring as shown in the diagram below Please pay very close attention to Mira video channel IN OUT connections The QUAD ABCD output is the Quad Viewer OUT for channels A B C D this output displays an HD down scaled representation of the 4K video on a regular HD picture monitor 11 ...

Страница 209: ...User Operations Guide Mira Instant Replay Server Revised 5 September 2014 Copyright 2014 Abekas Incorporated 207 ...

Страница 210: ... the Analog Audio Monitor jack 5 Click to accept changes Audio Input Source AES Input Selects the AES input as the audio source when recording clips in Mira NOTE The AES Input may be grayed out and cannot be selected if this hardware option is not installed SDI Embedded Selects the SDI embedded digital video input as the audio source when recording clips in Mira Audio Tracks 2 track 4 track 8 trac...

Страница 211: ...dio tracks Mira will create when recording new clips into the server NOTE Applies only to new clips recorded in Mira All previously recorded clips retain and use the number of audio tracks with which they were originally created NOTE The 16 track audio requires a software option NOTE 16 track 8 track settings are not available when operating in Mira in SD 525 or 625 Analog Audio Monitor Channel A ...

Страница 212: ... option is fitted NOTE Depending on the vintage and the options fitted some Mira servers feature only Embedded Digital Audio while other Mira servers feature both Embedded and AES Digital Audio I O connectors Mira Instant Replay servers shipped after June 2014 feature two DB 25 TASCAM connectors on the rear panel which provide 16 track AES digital audio I O These TASCAM AES audio tracks are access...

Страница 213: ...udio hardware connectors on the Mira Server rear panel and when the Digital Audio Breakout Panels DABP option is installed This illustration applies to 8 Channel Mira Instant Replay servers If your Mira server has only 4 video channels then the ChE through ChH video I O connectors will be missing The center portion of the illustration labeled Mira Config Audio Router Control is the part of the Mir...

Страница 214: ... the RECORDER 10 Click to accept changes Available Audio Input Connector Assignments AES Input Selects the AES input connector as the audio source when recording media into Mira on the selected video channel transport NOTE The AES Input may be missing and or grayed out and cannot be selected if this hardware option is not installed AES Audio I O usually requires external 1RU Break out Panels conne...

Страница 215: ...tab for the desired channel transport output audio connectors on which you would like to change the audio routing 4 Use pull downs to assign the desired physical transport PLAYER output audio tracks to the selected channel s physical audio output connectors on the Mira server rear panel or on the AES breakout panel if that hardware option is installed 5 Click to accept changes Available Assignment...

Страница 216: ...utput audio tracks to the physical TASCAM audio output connectors on the Mira server rear panel 3 Click to accept changes Available Assignments ChA PLAYER ChD PLAYER 4 Channel Mira or ChA PLAYER ChH PLAYER 8 Channel Mira Selects which channel s transport media PLAYER is assigned to the physical TASCAM connector s audio Track Track Selects which audio track from the selected media PLAYER is assigne...

Страница 217: ...io Output Router each transport output connector group can have its set of output audio tracks normalized as an individual group independent of all other transport output connectors Mira 4 Channel 8 Channel Servers To open the Mira Engineering Setup window shown below perform the procedure Launching Mira Engineering Setup Utility found on page 173 above 1 Click Audio Router tab 2 Click desired Aud...

Страница 218: ...rlay is turned ON use these four controls to set character size and position on the screen 4 Click to accept changes Timecode Input Source Time of Day LTC In Selects the analog LTC input signal from the LTC IN XLR connector on the Mira rear panel as the timecode source when recording clips in Mira Channel A Channel H ATC In Selects the SDI embedded digital timecode as the timecode source when reco...

Страница 219: ...y recorded in Mira are unaffected by changes to this setting Mira 4 Channel Mira 8 Channel Servers To open the Mira Engineering Setup window shown below perform the procedure Launching Mira Engineering Setup Utility found on page 173 above 1 Click Compression tab 2 Click and drag slider to set desired compression bit rate 3 Click to accept changes Video Quality There are 20 compression settings Q1...

Страница 220: ...nfiguration pull down and select desired Room you wish to configure 3 Click radio button for desired RS422 protocol 4 Optional Adjust Edit Timing parameters see explanations on next page 5 Optional Adjust Protocol Configuration parameters see explanations on next page 6 Repeat steps 2 thru 5 above for any additional Rooms you wish to configure 7 Assign configured Room to desired RS422 serial contr...

Страница 221: ...oading Protocol Configuration This area will change according to the currently selected Protocol Disable field timecode reporting This parameter determines how often timecode is reported on the RS422 serial control port Some external controllers expect to see timecode once every field of video while others expect to see timecode once every frame of video Unchecked timecode reported every field of ...

Страница 222: ...imecode with respect to video audio that s reported on the RS422 serial control port when Mira is used as Player Source Machine while under control from an external edit controller Out Point Offset offsets the position of the edit OUT point that s reported on the RS422 serial control port when Mira is used as Recorder Record Machine while under from an external edit controller VDCP Restrict to Fol...

Страница 223: ...ight 2014 Abekas Incorporated 221 Engineering Setup Labels The Labels tab of the Engineering Setup Menu is simply used to assign custom names to any channel of Mira These custom channel names appear in the Mira Explorer window the Quad Viewer output and the Countdown Timer output ...

Страница 224: ...rlay Preset radio buttons Overlay Text Opacity This is a continuous adjustment slider bar ranging from 0 opacity to 100 opacity Opaque 100 Makes the text completely opaque the black background rectangles and or video in the background are not visible through the text Invisible 0 Makes the text completely transparent the black background rectangles and or video in the background are completely visi...

Страница 225: ...layed in Channel A This demo mode is for purposes of demonstrating the Live Instant Replay application in Mira with an external instant replay control panel This is useful if live cameras are not available a pre recorded multi camera demo clip may be used instead To ensure proper operation of the Live Instant Replay application when live cameras are available then be sure to disable the Demo mode ...

Страница 226: ... may or may not be present it is only present when the optional hardware for the Flipper option is fitted in the Mira server There is also a license key required to enable the feature and have the Flippers tab present in the Mira Engineering Setup menu If the Flippers tab is not present and you want this functionality then please contact your Abekas sales representative Mira 4 Channel Mira 8 Chann...

Страница 227: ...ise 90 or counter clockwise 90 and is automatically resized to fit vertically on monitor Channel D video output on vertically oriented widescreen monitor with Output Rotation Clockwise 5 Click hold and drag mouse Pan control in the Picture Pan Position section Adjust Pan control until source video is positioned as desired on vertically oriented widescreen monitor A The source video is moved LEFT o...

Страница 228: ... images are full motion low resolution images of the four video channel outputs Superimposed over each video channel is a status display which includes the following A Channel Label ChA ChB ChC ChD and ChE ChF ChG ChH for the Mira 8 Channel server B Calibrated Audio Metering 8 Track audio is standard 16 Track audio is optional C Play Speed RECORDING Indicator the illustration below shows ChA ChC w...

Страница 229: ...l Label assigned in Engineering Setup Labels B Calibrated Audio Metering for up to 4 audio tracks when operating in ISO channel configuration C Clip Time Remaining present in any mode of operation when an IN point and an OUT point are both set in a playback channel Counts down the time until the clip OUT point is reached D Clip Time Remaining Bar shrinks to illustrate the last five seconds remaini...

Страница 230: ... are used to control the video audio channels of the Mira server from external controllers capable of RS422 serial control and which support either Sony BVW 75 Odetics AMP over Ethernet or Louth VDCP protocols Select RS422 Protocol To select the desired protocol for the RS422 serial control ports please refer to the procedure Engineering Setup Protocol found on page 218 above Clip ID Support From ...

Страница 231: ...2014 Abekas Incorporated 229 Instant Replay Control Surface Operations The following sections of the user guide are intended for new users to quickly familiarize themselves with the primary operations of the Mira Digital Video Instant Replay Server and the optional Mira Control Surface ...

Страница 232: ...is power for the control panel is supplied to the Mira Control Panel either From a Power Over Ethernet POE external power supply which injects DC power into the same CAT 5 cable that provides control to from the Mira Control Panel From the Control Panel with ETHERNET POE RJ45 port on the Mira main chassis rear panel Only Control Panel ports labeled as ETHERNET POE can provide power for the Mira Co...

Страница 233: ...ontrol Surfaces to the Mira Instant Replay Server These illustrations assume the power supply for the Mira Control Panel is external to the Mira Server chassis Mira 4 Channel Instant Replay Servers One Mira Control Panel The interconnection shown in Figure 14 illustrates the Mira control panel and associated monitoring equipment is when the 4 Channel Mira Instant Replay Server is configured for in...

Страница 234: ...us VKA controlled by a switcher After the live Instant Replay Event is launched and the GUI is open on the primary desktop monitor the mouse is no longer necessary for live instant replay operations Figure 15 8 Channel Mira Instant Replay Server One User with 4 Record 2 Play Operation The interconnection shown in Figure 16 illustrates the Mira control panel and associated monitoring equipment is w...

Страница 235: ...is the primary desktop while the Win 7 desktop for User 2 is the extended secondary desktop To launch the two Live Instant Replay Event user interfaces 1 On User 1 Workstation Use keyboard mouse with Mira Explorer application to launch two Instant Replay Events see instructions on page 242 2 On User 1 Workstation Use mouse with Mira Explorer application to open the two Instant Replay Events on the...

Страница 236: ...n Use keyboard mouse with Mira Explorer application to launch one Instant Replay Event see instructions on page 242 2 On User 1 Workstation Use mouse with Mira Explorer application to open both control panels on the same replay event see instructions on page 244 3 On User 1 Workstation Use mouse to drag instant replay GUI window for User 2 onto secondary desktop monitor 4 After the live Instant Re...

Страница 237: ...4 Copyright 2014 Abekas Incorporated 235 5 Camera ISO 5 recording shared with DUAL USERs on 2 Mira Control Surfaces Mira Config Engineering Setup Menu Channels Tab Mira Config Engineering Setup Menu Control Panel Tab USER 1 Instant Replay Screen USER 2 Instant Replay Screen ...

Страница 238: ...as Incorporated Revised 5 September 2014 6 Camera ISO 6 recording shared with DUAL USERs on 2 Mira Control Surfaces Mira Config Engineering Setup Menu Channels Tab Mira Config Engineering Setup Menu Control Panel Tab USER 1 Instant Replay Screen USER 2 Instant Replay Screen ...

Страница 239: ...itch on the Mira Control Panel itself simply plug the CAT 5 or CAT 6 Ethernet cable with power POE into the RJ45 receptacle on the rear side of the Mira Control Panel and the computer inside will boot up It takes about 10 to 15 seconds for the Mira control panel to boot During this boot time all the buttons on the control panel will glow solidly with an amber color As soon as the control panel is ...

Страница 240: ...play Event project the video channels in the Mira server must be properly configured to match the number of cameras being recorded in the event If the Mira is always used with the same number of cameras for every event then this procedure needs to be performed only once See section Instant Replay for Normal 2D Cameras for more information on how to change the configuration of Mira s channels ...

Страница 241: ...dure to assign the replay video channels to Mira Control Panel s Mira 8 Channel Server ISO2 ISO3 ISO4 To open the Mira Engineering Setup window shown below perform the procedure Launching Mira Engineering Setup Utility found on page 173 above First make sure all Mira Control Panels are connected to Mira server via Ethernet control panels must be powered ON and booted with marching sequence on soft...

Страница 242: ...low 6 Click Control Panel Identifier pull down for Control Panel Config 2 C List of connected control panels appear 7 Click v6 Ethernet IP identifier for User 2 control panel The v6 Ethernet IP address for each panel is found on a label affixed to the bottom back side of the control panel 8 Click appropriate checkbox for desired replay channel in Playback channels section for Control Panel 2 Only ...

Страница 243: ...are the T Bar and the Rotary Dial they are positioned at the far left and right edges of the control panel These two control devices are therefore at roughly shoulder width for the average person allowing the user to have a much more relaxed posture during live instant replay operations as compared to all other live instant replay control panels in the marketplace This aspect of the Mira Control S...

Страница 244: ...tent along with all the highlights playlists created by the live replay operator during the course of the live instant replay Event Create New Live Replay Event 1 Position mouse cursor anywhere within an empty area within the Clip Library RIGHT click mouse A pop up menu appears as shown 2 Click on New Replay Event item The Create New Event dialog window appears as shown in the next step 3 Type Eve...

Страница 245: ...nique camera numbering for cameras in use You should designate unique camera numbers with no duplicate numbers These camera numbers are referenced in the Clip Register listing in the main Instant Replay user interface 7 Click Create Event button Create Event dialog appear as shown below 8 Click Start Recording button 9 Click Finish button to complete The Create New Event window closes The new even...

Страница 246: ...ally after a few seconds if Mira Control Panel firmware is found to be compatible If Mira Control Panel firmware is not compatible then Mira Explorer will automatically update firmware inside Mira Control Panel so that it is compatible a dialog to that effect will appear automatically change the firmware and then automatically close After Mira Control Panel firmware is verified Mira Instant Replay...

Страница 247: ...right 2014 Abekas Incorporated 245 4 Tap button 5 Tap button in LIVE EE group A is active on PGM 1 PGM 2 6 Mira is ready for live instant replay operation Skip ahead to Instant Replay Operation LIVE EE Mode on page 263 to begin learning instant replay operations in detail 5 4 A A ...

Страница 248: ...er the dial is turned while in LIVE EE PLAYBACK CLIP PLAY or PLAY LIST modes When the scroll button is activated turning the rotary dial will move the highlighting cursor through a menu or clip list without loading a clip or item into the PGM video output channel When the browse button is activated turning the rotary dial will move the highlighting cursor through a menu or clip list and will simul...

Страница 249: ...d clip While the SHIFT function is active pressing any of these buttons will activate the shifted function for that button As soon as the shifted function is activated the SHIFT function is automatically canceled Repeating a SHIFT Function You may also press and hold down the button to perform some shifted functions more than once For example if you wish to step the video more than one frame press...

Страница 250: ...can be placed directly in front of and against the front face of the Mira Control Panel with no worry of interference from this keyboard when the operator is activating the Buttons T Bar and Rotary Dial on the Mira Control Panel itself When only one Mira Control Panel is used with the Mira Instant Replay server this QWERTY keyboard is best plugged into one of the USB ports on the back side of the ...

Страница 251: ...behind and above the Mira Control Panel so the ten softkey labels at the bottom of the GUI line up with the corresponding ten softkey buttons located at the top edge of the Mira control panel as shown in the illustration below Here are the main functional areas of the heads up Mira Instant Replay GUI Figure 20 Mira Instant Replay GUI Main Areas with 2 Replay Channels Play List Menu Softkey Labels ...

Страница 252: ...Clip Registers are logically numbered and take into account the Bank clip register slot and camera angle the operator can quickly and easily load a clip from a numerically defined entry on the QWERTY keyboard The table below illustrates the possibilities If only one or two numerals are entered before the dash then the clip load command will remain inside the current Bank If the dash character and ...

Страница 253: ...s This User Setup menu is also where the hot key labels are defined for the clip naming softkeys softkeys 8 9 and 10 which are present during the and modes of operation of the PGM video output channels Activating User Setup Menu 1 Tap buttons at same time A USER SETUP Menu is activate and displayed where Play List normally appears 2 To select desired parameter Spin Dial in either direction Tap and...

Страница 254: ...on QWERTY keyboard A Numerals appear in ENTRY field 4 Tap softkey 5 Tap on QWERTY keyboard For Text style User Setup items 3 Type desired text into QWERTY keyboard A Text appears in ENTRY field 4 Tap softkey 5 Tap on QWERTY keyboard For Toggle style User Setup items 4 Tap softkey 5 Tap on QWERTY keyboard When finished changing parameter settings 6 Tap buttons at same time 7 Tap button 8 Tap button...

Страница 255: ...otation of the dial before engaging AUTO JOG this is a safety mechanism to avoid unintended engagement of the JOG function if the Rotary Dial happens to be accidentally bumped or slightly moved 3 FFWD REWIND Speed Numeric 1X Minimum Value 4X Default Value 99X Maximum Value Increment is 1X real time Assigns speed to Fast Forward and Rewind buttons 4 JOG Maximum Speed Numeric 1X Minimum Value 25X De...

Страница 256: ... this parameter Assigns maximum speed of VAR PLAY when the T BAR is positioned at the very TOP of travel 11 T BAR VAR 3 MIN Speed Numeric 0X Minimum Value 4X Default Value 99X Maximum Value Increment is 1X real time When the function VAR 3 on T BAR is active this parameter Assigns maximum speed of VAR PLAY when the T BAR is positioned at the very BOTTOM of travel If the MIN Speed is set to any neg...

Страница 257: ...MIX Default Value CUT Alternate Value When there are 2 replay output channels this parameter determines the transition type when the TAKE button is pressed or when items in the playlist are advanced during PL mode MIX Dissolve between two replay output channels CUT Immediately swap two replay output channels 16 MIX TRANSITION Duration Numeric 00 01 Minimum Value 00 05 Default Value 10 00 Maximum V...

Страница 258: ...CLIP PLAY mode Toggle ON Default Value OFF Alternate Value Determines whether or not a new clip is automatically loaded by moving the Clip Register highlighting cursor during mode ON Auto load clip upon cursor move OFF User must tap button to load clip after a clip is highlighted 25 Obey clip OUT point in CP Mode Toggle ON Default Value OFF Alternate Value Determines if playback stops or continues...

Страница 259: ...m where the panel is being used 30 Light contrast Numeric 0 Minimum Value 400 Default Value 900 Maximum Value Increment is 1 Determines the contrast for the 14 RGB lamps on the Mira Control Panel 5 Lowest Contrast 450 Half Contrast 900 Highest Contrast NOTE Set this value according to the ambient lighting in the room where the panel is being used 31 Replay P1 Channel Color 32 Replay P2 Channel Col...

Страница 260: ...oom where the panel is being used 36 Title new clips Toggle Not Reviewed Default Value IN Timecode Next Value POI Timecode Next Value Empty Next Value Sets automatic clip name that s applied to all camera angles when button is pressed The Timecode values will name the clip with the IN or POI timecode value stored within the clips 37 Initial name 1 Text empty Default Value 25 characters Maximum Val...

Страница 261: ... automatic clip name label for softkey as displayed on the softkey label at bottom of the Instant Replay screen 40 Name 1 Row 1 through 41 Name 9 Row 1 Text Empty Default Value 25 characters Maximum Value Determines the automatic clip name label for the bottom row of user defined clip naming softkeys through obtained AFTER either softkey or is pressed from the home menu These nine labels are displ...

Страница 262: ... Description 42 Name 1 Row 2 through 43 Name 9 Row 2 Text Empty Default Value 25 characters Maximum Value Determines the automatic clip name label for the top row of user defined clip naming softkeys through obtained AFTER either softkey or is pressed from the home menu These nine labels are displayed on the softkey labels at bottom of the Instant Replay screen 3 ...

Страница 263: ...User Operations Guide Mira Instant Replay Server Revised 5 September 2014 Copyright 2014 Abekas Incorporated 261 Parameter Name Style Parameter Settings Operational Description 3 ...

Страница 264: ...ng just recorded camera content is still not yet saved caution GREEN You ve clipped the content saved it and are now playing it safe PURPLE You ve placed clipped content into a highlight playlist your content is royal BLUE You re viewing a list of marked points in your recording you didn t miss it Don t sing the blues Mode PGM Video Output Channel Action Devices that Activate Mode Program video ou...

Страница 265: ...channel is highlighted in the display monitor 2 Tap button in LIVE EE group is active on PGM 1 3 Tap desired camera angle softkey Camera angle on currently highlighted PGM output video channel is changed PGM 1 in this example Depending on configuration of your Mira Server there may be two to six camera select softkeys 4 Tap desired OUTPUT CONTROL button for PGM channel you want to control The butt...

Страница 266: ...ontrol The button is tapped in this example Button glows green corresponding to the Green PGM 2 output video channel The frame surrounding the active PGM channel is highlighted in the display monitor Two red arrows at very top of PGM 2 window reminds you which PGM channel is affected by any subsequent camera angle change 2 Tap in OUTPUT CONTROL group Frames surrounding two PGM channels are both co...

Страница 267: ...d camera angle softkey Two red arrows at very top of PGM window reminds you which PGM channel is affected by any camera angle change Only camera angle on currently selected PGM output video channel is changed PGM 2 in this example Depending on configuration of your Mira Server there may be two to six camera select softkeys 4 ...

Страница 268: ...tion on the currently active PGM channel PLAYBACK Mode Instant Replay on one PGM Output no Marking This procedure activates mode which replays content from the record streams on the selected PGM video output channel 1 Tap desired OUTPUT CONTROL button for PGM channel you want to control The button is tapped in this example Button glows green corresponding to the Green PGM 2 output video channel Th...

Страница 269: ...this A Active PGM channel enters mode Tap GOTO IN Hold Down REVERSE Spin DIAL CCW PGM channels seek to AUTO MARK IN point calculated with respect to current live EE timecode The seek duration is determined in the USER SETUP Menu with the AUTO MARK IN parameter 5 If necessary fine tune exact start of action Tap Hold Down desired PLAY BACK button Spin DIAL either direction Tap Hold Down desired PLAY...

Страница 270: ...egin replay Move T Bar in either direction Tap VAR PLAY button Tap PLAY button HINT 1 While waiting for director press hold move T Bar to desired speed release At director s call tap VAR PLAY HINT 2 While waiting for director type desired VAR PLAY speed into QWERTY numeric keypad At director s call tap VAR PLAY Move T Bar Tap VAR PLAY Tap PLAY OR OR 7 7 7 OR OR ...

Страница 271: ...Outputs no Marking This procedure selects GANG output video channel control changing from to mode for a replay 1 Tap in OUTPUT CONTROL group Frames surrounding two PGM channels are both colored WHITE when GANG control is active 2 Tap button in LIVE EE group is activated on PGM 1 and PGM 2 3 Wait for action you d like to replay Continued on next page 1 2 ...

Страница 272: ...his A Active PGM channels enter mode Tap GOTO IN Hold Down REVERSE Spin DIAL CCW PGM channels seek to AUTO MARK IN point calculated with respect to current live EE timecode The seek duration is determined in the USER SETUP Menu with the AUTO MARK IN parameter 5 If necessary fine tune exact start of action Tap Hold Down desired PLAY BACK button Spin DIAL either direction Tap Hold Down desired PLAY ...

Страница 273: ...unding the active PGM channel is highlighted in the display monitor 7 Wait for director s request to start replay 8 Begin replay Move T Bar in either direction Tap VAR PLAY button Tap PLAY FORWARD button HINT 1 While waiting for director press hold move T Bar to desired speed release At director s call tap VAR PLAY HINT 2 While waiting for director type desired VAR PLAY speed into QWERTY numeric k...

Страница 274: ...g the active PGM channel is highlighted in the display monitor 10 Wait for director s request to start replay 11 Begin replay Move T Bar in either direction Tap VAR PLAY button Tap PLAY button HINT 1 While waiting for director press hold move T Bar to desired speed release At director s call tap VAR PLAY HINT 2 While waiting for director type desired VAR PLAY speed into QWERTY numeric keypad At di...

Страница 275: ...int in the recording The GOTO TC feature can also navigate the user to a specific timecode during any mode with the exception of PLAY LIST AIR mode 1 Using QWERTY keyboard enter a numerical timecode value A Value appears in ENTRY FIELD When typing notice that the numbers typed automatically fill into a timecode structure 00 00 00 00 From LEFT to RIGHT these numbers represent HOURS MINUTES SECONDS ...

Страница 276: ...atically move the highlighting cursor to a desired numbered item This GOTO ITEM feature works in the Clip Register list Vue Marks list Playlist AIR Playlist EDIT and in the Play List Library 1 In any list that contains numbered items in this example mode use QWERTY keyboard to enter the numerical value of the desired item A For example if you want to highlight the first item in this playlist type ...

Страница 277: ...t video channel s In order to use mode you must first define and save a clip in the Clip Register so we will first describe the four methods of defining and saving a clip The clip can then be loaded and played afterwards The four methods of marking saving a clip PROCEDURE STARTS ON AUTO Mark IN OUT Page 276 Manually Mark IN OUT Page 278 Manually Mark IN AUTO Mark OUT Page 281 Manually Mark OUT AUT...

Страница 278: ...o control The button is tapped in this example Button glows green corresponding to the Green PGM 2 output video channel The frame surrounding the active PGM channel is highlighted in the display monitor 2 Tap button in LIVE EE group is activated on PGM 2 3 Wait for action you d like to save replay 4 Tap button A ALL camera angles are saved at same time POI Point of Interest is marked at current EE...

Страница 279: ...pin DIAL either direction Tap Hold Down desired PLAY BACK button Spin DIAL 7 Tap button to trim IN point New IN point is set the button glows RED 8 Tap button Saves trim for currently selected camera only Tap then tap button Saves trim for ALL cameras 9 During mode softkey buttons at top edge of Mira Control Panel change camera angle of saved clip on currently active PGM channel OR OR 6 6 8 8 7 OR...

Страница 280: ...the video to the desired IN point then marks the IN point This is more time efficient when you want to manually mark both the IN and OUT points 1 Tap desired OUTPUT CONTROL button for PGM channel you want to control The button is tapped in this example Button glows green corresponding to the Green PGM 2 output video channel The frame surrounding the active PGM channel is highlighted in the display...

Страница 281: ...GOTO IN Hold Down REVERSE Spin DIAL CCW PGM channels seek to AUTO MARK IN point calculated with respect to current live EE timecode The seek duration is determined in the USER SETUP Menu with the AUTO MARK IN parameter 7 Tap button to mark IN point IN point is set button glows RED 8 Tap button to save clip B ALL camera angles are saved at same time POI Point of Interest marks automatically at mid ...

Страница 282: ... 2014 Abekas Incorporated Revised 5 September 2014 9 Tap button is activated on PGM 1 C Clip parks at IN the button glows RED 10 During mode softkey buttons at top edge of Mira Control Panel change camera angle of saved clip on currently active PGM channel 9 C 10 ...

Страница 283: ...open Clip Register of the current Bank with one additional button press The clip is then loaded ready for replay with a final button press 1 Tap desired OUTPUT CONTROL button for PGM channel you want to control The button is tapped in this example Button glows green corresponding to the Green PGM 2 output video channel The frame surrounding the active PGM channel is highlighted in the display moni...

Страница 284: ...ERSE Spin DIAL CCW PGM channels seek to AUTO MARK IN point calculated with respect to current live EE timecode The seek duration is determined in the USER SETUP Menu with the AUTO MARK IN parameter 5 Tap button to mark IN point IN point is set button glows RED 6 Tap button to save clip B ALL camera angles are saved at same time OUT point marks automatically as defined by AUTO MARK OUT in USER SETU...

Страница 285: ...ptember 2014 Copyright 2014 Abekas Incorporated 283 7 Tap button is activated on PGM 1 C Clip parks at IN the button glows RED 8 During mode softkey buttons at top edge of Mira Control Panel change camera angle of saved clip on currently active PGM channel 7 C 8 ...

Страница 286: ...he desired OUT point first then saves the clip letting the system automatically mark the IN point This process is more time efficient when you want to manually mark the OUT point 1 Tap desired OUTPUT CONTROL button for PGM channel you want to control The button is tapped in this example Button glows orange corresponding to the Orange PGM 1 output video channel The frame surrounding the active PGM ...

Страница 287: ...N point marks automatically as defined by AUTO MARK IN in USER SETUP Menu POI Point of Interest point marks automatically at mid point between IN and OUT 7 Tap button B is activated on PGM 1 C Clip parks at IN the button glows RED 8 During mode softkey buttons at top edge of Mira Control Panel change camera angle of saved clip on currently active PGM channel 6 7 C 8 A B ...

Страница 288: ...o the active PGM output video channel Navigating Clips in Current Bank from QWERTY The cursor buttons on the QWERTY keyboard are used to navigate the highlighting cursor in the currently active Clip Register Bank With any clip highlighted 1 Tap button A is activated on PGM 1 2 Use on QWERTY keyboard to highlight next clip you d like to load B Orange highlighter moves to desired clip register C As ...

Страница 289: ...g cursor in the currently active Clip Register Bank With any clip highlighted 1 Tap button A is activated on PGM 1 2 Tap and buttons on Mira Control Panel to highlight clip register you d like to load 3 Load a specific camera angle with camera angle softkeys B Orange highlighter moves to desired clip register C As each clip is highlighted it s loaded into the active PGM output video channel D Clip...

Страница 290: ... Bank There are 99 Clip Register Banks This procedure changes from one Bank to another 1 On QWERTY numeric keypad type number of desired bank 0 through 99 A Number 5 is typed in this example 2 Tap then buttons B Clip Register Bank changes to Bank 5 C Orange highlighter remains on same clip register 1 2 2 B A C Continued on next page ...

Страница 291: ... Revised 5 September 2014 Copyright 2014 Abekas Incorporated 289 3 Tap on QWERTY to scroll to register 0 in Bank 5 D Orange highlighter moves to clip register 0 4 Hold while tapping or on QWERTY keyboard to quickly navigate between clip banks D 3 OR ...

Страница 292: ...the possibilities If only one or two numerals are entered before the dash then the clip load command will remain inside the current Bank If the dash character and following numeral is not entered the currently selected camera angle is maintained with the clip load command Type into Numeric Keypad Then Tap Result 118 6 Selects Bank 1 Loads Clip 18 Camera Angle 6 2542 3 Selects Bank 25 Loads Clip 42...

Страница 293: ...nstant Replay Server Revised 5 September 2014 Copyright 2014 Abekas Incorporated 291 2 Tap button B Clip Register Bank changes to Bank 9 C Clip Register 6 with camera angle 3 highlighted and loaded into active PGM channel 2 B C C ...

Страница 294: ...era angle or to all camera angles Trim Clip IN This procedure trims the IN point within a stored clip register If not done already highlight desired clip and 1 Tap button A is activated on PGM 1 B Clip parks at IN the button glows RED 2 Find desired new IN point Tap Hold Down desired PLAY BACK button Spin DIAL either direction As a result of doing this A Active PGM channel displays video of new IN...

Страница 295: ... Revised 5 September 2014 Copyright 2014 Abekas Incorporated 293 3 Tap button to trim IN point New IN point is set the button glows RED 4 Tap button Saves trim for currently selected camera only Tap then tap button Saves trim for ALL cameras OR 4 3 4 ...

Страница 296: ...lready highlight desired clip and 1 Tap button A is activated on PGM 1 B Clip parks at IN the button glows RED 2 Tap button C Clip parks at POI the button glows RED 3 Find desired new POI Tap Hold Down desired PLAY BACK button Spin DIAL either direction As a result of doing this A Active PGM channel displays video of new POI Tap Hold Down desired PLAY BACK button Spin DIAL OR 1 B A Continued on ne...

Страница 297: ...erver Revised 5 September 2014 Copyright 2014 Abekas Incorporated 295 4 Tap button to trim POI New POI is set the button glows RED 5 Tap button Saves trim for currently selected camera only Tap then tap button Saves trim for ALL cameras OR 5 4 5 ...

Страница 298: ...ghlight desired clip and 1 Tap button A is activated on PGM 1 B Clip parks at IN the button glows RED 2 Tap button C Clip parks at OUT the button glows RED 3 Find desired new OUT point Tap Hold Down desired PLAY BACK button Spin DIAL either direction As a result of doing this A Active PGM channel displays video of new OUT Tap Hold Down desired PLAY BACK button Spin DIAL OR 1 B A Continued on next ...

Страница 299: ...er Revised 5 September 2014 Copyright 2014 Abekas Incorporated 297 4 Tap button to trim OUT point New OUT is set the button glows RED 5 Tap button Saves trim for currently selected camera only Tap then tap button Saves trim for ALL cameras OR 5 5 4 ...

Страница 300: ...ing clip metadata can also be applied in and modes If not done already highlight desired clip and 1 Tap button A is activated on PGM 1 B Clip parks at IN the button glows RED 2 Press and hold to trim IN point Press and hold to trim POI Press and hold to trim OUT point Use Rotary dial to navigate to desired new IN point POI OUT point 3 The IN point POI OUT point is dynamically trimmed following the...

Страница 301: ...bekas Incorporated 299 4 Release New IN point POI OUT point is set glows red 5 Tap button Saves trim for currently selected camera only Tap then tap button Saves trim for ALL cameras IMPORTANT NOTE Step 5 is not needed in order to save metadata modifications made during and or modes OR 4 5 5 ...

Страница 302: ...ll conform to the same folder structure of local cueable clips seen in the Clip Library section of the Mira Explorer window These clips can be played in mode added to playlists or saved and trimmed in BANK 0 Access Mira Clip Library From mode 1 Tap SK7 Mira Clip Library A Selected PGM channel enters mode B Mira Clip Library appears in place of the clip register while selected PGM channel is active...

Страница 303: ...ol to play highlighted clip out of selected PGM channel IMPORTANT NOTE Within this Mira Clip Library view the IN and OUT points of clips cannot be modified The only way to do this is to append a clip into a playlist or else to save a clip to Bank 0 which will be discussed in proceeding sections To Add Clips From Mira Clip Library To A Playlist 5 Repeat steps 1 and 2 6 Tap to append clip to bottom ...

Страница 304: ...ee section Change Clip Register Bank on page 288 and or section Load Clip Numerically on page 290 For more on Mira Clip Library see section CLIP PLAY Mode Mira Clip Library on page 300 To Add a Server Clip from Mira Clip Library to Bank 0 1 Tap SK 7 to enter Mira Clip Library A Mira Clip Library opens on selected PGM channel 2 Tap or use QWERTY arrow keys or spin rotary dial to navigate between cl...

Страница 305: ...ight 2014 Abekas Incorporated 303 6 Tap on desired server clip C Clip is loaded in mode in selected PGM channel Refer to section CLIP PLAY Mode Clip Trim for information on trimming clips Refer to section Create New Playlist for more information on adding clips to playlists B C 6 ...

Страница 306: ...that have already been captured and saved 1 Use on QWERTY keyboard to highlight clip you would like to name A Orange highlighter moves to desired clip register 2 Begin typing on QWERTY keyboard B Text appears in Entry Field Tap on QWERTY or tap on Mira Control Panel to clear all entered text if you wish clear the entry and start typing over again B 2 Continued on next page A 1 ...

Страница 307: ... Revised 5 September 2014 Copyright 2014 Abekas Incorporated 305 3 To title only highlighted camera tap on QWERTY keyboard To title all camera angles with same name hold down then tap on QWERTY keyboard C Clip is named D Entry Field is cleared D 3 C ...

Страница 308: ... Menu please refer to Activating User Setup Menu starting on page 251 above then please refer to Item 37 Initial name 1 on page 258 Item 38 38Initial name 2 on page 258 and items 40 and 43 in the table listing the setup parameters 1 Use on QWERTY keyboard to highlight clip you d like to name A Orange highlighter moves to desired clip register 2 Tap or softkey B Text appears in Entry Field from sof...

Страница 309: ...itional text using QWERTY keyboard during this process D Text appears in Entry Field from softkey label Tap on QWERTY or tap on Mira Control Panel to clear all entered text if you wish clear the entry and start typing over again 4 To title only highlighted camera tap on QWERTY keyboard To title all camera angles with same name hold down then tap on QWERTY keyboard E Clip is named F Entry Field is ...

Страница 310: ...d clip register on the currently active PGM channel During mode of operation the user can create an AUX Audio List which will play supplementary audio while a playlist is airing in mode During mode of operation you can air or play out the finished playlist on the PGM output video channel s While mode is active the camera angle select softkeys are not available Create New Playlist This procedure se...

Страница 311: ...s to desired clip register NOTE If you would like to view the clip before adding to playlilst tap button before next step 4 Tap button to append the highlighted angle into the playlist C Clip is added to current playlist Hold button to append all angles of a clip into a playlist 5 Repeat steps 3 and 4 above to add additional clips to playlist D Clips are added to end of list B 4 C D Continued on n...

Страница 312: ...items 6 Highlight clip in Clip Register list 7 Tap then tap button E Play List pane now has focus 8 Tap and buttons to move playlist cursor to desired location in list 9 Tap then tap button to insert the highlighted angle into playlist F Clip is inserted into playlist Tap then hold to insert all angles of a clip into a playlist E 7 7 8 9 F 9 OR 6 ...

Страница 313: ... that have been imported into the Mira server or the audio track of a video file that has been imported into the Mira server The user can also copy and paste clips from a playlist into an AUX Audio List in order to use audio recorded during the replay event 1 Tap to activate playlist mode A mode opens on selected PGM channel 2 Tap Audio Control B Audio Control softkeys appear shown in next step 3 ...

Страница 314: ...UX Audio List Tapping the APPEND button on the Control Surface will add the highlighted file to the active video playlist even if the highlighted file is an audio file NOTE When airing a playlist with an AUX Audio List the AUX Audio List will always play at 100 play speed No variations in play speed such as editing the SPEED column in mode or moving the T BAR during playlist air will affect the AU...

Страница 315: ...ay List Library Shortcut Method performed from any mode 1 Tap and then tap button 2 Play List Library appears A Shows playlist number B Shows playlist name C Shows number of clips in playlist D Shows playlist duration in 1 channel air E Shows playlist duration in 2 channel air 3 Tap and buttons to move highlighter to desired playlist or turn rotary dial or use QWERTY arrow keys 4 Tap to load desir...

Страница 316: ...e Play List Mode A mode opens on selected PGM channel 2 Tap MORE softkey B Extended softkeys appear shown in next step 3 Tap PLAY LIST Library C Play List Library opens shown in next step 4 Tap and buttons to move highlighter to desired playlist or turn rotary dial or use QWERTY arrow keys 5 Tap to load desired playlist Tap Tap LOAD PLAY LIST B 4 5 5 5 OR OR 2 1 A 3 3 C ...

Страница 317: ... List Edit CUT operation You may COPY items from the playlist Trash Can then later PASTE the copied item into an active playlist The total number of items contained in the Trash Can is 100 items NOTE The Playlist Trash Can list cannot be appended to nor can this playlist be aired Access Play List Trash Can 1 Tap button to activate Play List Mode A mode opens on selected PGM channel 2 Tap MORE soft...

Страница 318: ...ap and buttons to move highlighter to Trash Can or use QWERTY arrow keys 7 Tap Tap to open Trash Can Trash Can opens shown in next step 8 Tap and buttons to select desired clip or use QWERTY arrow keys 9 Using and SK7 CUT SK8 COPY SK9 Paste you can cut and copy items from the Trash Can in order to paste or insert these items into another playlist 4 4 8 OR 6 7 9 9 9 5 ...

Страница 319: ...e playlist you wish to open A Typed value appears in entry field 2 Tap to open the desired playlist B mode opens on selected PGM channel C Desired playlist opens in playlist pane 3 Tap MORE softkey D Extended softkey options appear shown in next step 4 Using QWERTY keyboard type desired playlist name into entry field 5 Tap NAME PLAY LIST softkey 6 Desired playlist name appears 1 2 B D 4 4 5 5 6 3 ...

Страница 320: ...er 2014 Naming a Previously Stored Playlist 1 Tap button to activate Play List Mode A mode opens on selected PGM channel 2 Tap MORE softkey B Extended softkeys appear shown in next step 3 Tap PLAY LIST Library Play List Library opens 4 Tap and then tap button 5 Play List Library opens B 2 1 A 3 3 4 4 OR 5 ...

Страница 321: ...2014 Abekas Incorporated 319 6 Tap and buttons to move highlighter to desired playlist or turn rotary dial or use QWERTY arrow keys 7 Using QWERTY keyboard type desired name into entry field 8 Tap to name highlighted playlist Tap NAME PLAY LIST to name highlighted playlist OR 6 7 7 8 8 ...

Страница 322: ...d Change Name of Item in Playlist NOTE When changing the name of a clip in a playlist the new name applies only to the clip in the playlist and not to the source clip in the clip register 1 Tap button A is activated on PGM channel 2 Tap and buttons to move highlighter between clips or use QWERTY arrow keys 3 Using QWERTY keyboard type a new name for highlighted clip B Text appears in Entry Field 4...

Страница 323: ...in the Clip Register listing If mode is already active on PGM channel you may skip first two steps 1 A playlist should already be present if not refer to procedure Create New Playlist on page 308 2 Tap button only once A is activated on PGM channel B Playlist pane has focus C button will flash during playlist edit 3 On Mira panel or QWERTY keyboard Tap and buttons to move playlist cursor to desire...

Страница 324: ... E The active PGM channel displays the video of the new IN point Tap Hold Down desired PLAY BACK button Spin DIAL CCW PGM channels seek to AUTO MARK IN point calculated with respect to current live EE timecode The seek duration is determined in the USER SETUP Menu with the AUTO MARK IN parameter 5 Tap button to mark IN point IN point is set button glows RED 6 Tap to seek to current OUT point OR 4 ...

Страница 325: ... The active PGM channel displays the video of the new OUT point Tap Hold Down desired PLAY BACK button Spin DIAL CCW PGM channels seek to AUTO MARK IN point calculated with respect to current live EE timecode The seek duration is determined in the USER SETUP Menu with the AUTO MARK IN parameter 8 Tap button OUT point is set button glows RED 9 Repeat steps 3 through 8 for any additional playlist it...

Страница 326: ...eady active on PGM channel you may skip first two steps 1 A playlist should already be present if not refer to procedure Create New Playlist on page 308 2 Tap button only once A is activated on PGM channel B Playlist pane has focus C button will flash during playlist edit 3 On Mira panel or QWERTY keyboard Tap and buttons to move playlist cursor to desired location in list D Orange cursor highligh...

Страница 327: ...era angle on currently highlighted PGM output video channel is changed PGM 1 in this example Depending on configuration of your Mira Server there may be two to six camera select softkeys E This will change the camera number in the currently highlighted playlist item 5 Repeat this procedure for any additional playlist items you would like to change 4 E ...

Страница 328: ... so it plays within a pre defined time with its play speed automatically calculated If mode is already active on PGM channel you may skip first two steps 1 A playlist should already be present if not refer to procedure Create New Playlist on page 308 2 Tap button only once A is activated on PGM channel B Playlist pane has focus C button will flash during playlist edit 3 On Mira panel or QWERTY key...

Страница 329: ...ED 5 On QWERTY numeric keypad type desired play speed where 200 2X real time 900 9X real time 2500 25X real time Etc then tap softkey SPEED To set playlist item RUN TIME 6 On QWERTY numeric keypad type desired play speed where 200 2 00 seconds 915 9 00 seconds 15 frames 2500 25 00 seconds Etc then tap softkey RUN TIME Repeat for additional items when finished 7 Tap softkey EXIT Tap button 4 6 E 5 ...

Страница 330: ...er the TRANS column in mode 1 Tap button to activate Play List Mode A mode opens on selected PGM channel 2 Tap MORE softkey B Extended softkeys appear 3 Tap and buttons to move highlighter between clips in the playlist or use QWERTY arrow keys 4 Tap SK5 TRANS to toggle between CUT and MIX transitions for the highlighted item in the playlist C The value in the TRANS column changes to show either CU...

Страница 331: ...de A mode opens on selected PGM channel 2 Tap MORE softkey B Extended softkeys appear 3 Tap and buttons to move highlighter between clips in the playlist or use QWERTY arrow keys 4 Using the QWERTY keyboard enter the desired length of the mix The minimum duration of a mix in a playlist is 1 frame 00 01 MIX and the maximum duration is five seconds 4 29 MIX 5 Tap SK6 MIX DUR C The duration of the mi...

Страница 332: ...lip item User must then tap button to continue playlist playback END Flag Settings Action during Playlist AIR Playout END TAKE default Automatically advances playlist to next clip item END PAUSE Pauses on last frame of clip item list does not automatically advance to next item in playlist User must tap button to continue playlist playout END LOOP Continuously loops playback of clip item list does ...

Страница 333: ...tton to activate Play List Mode A mode opens on selected PGM channel 2 Tap MORE softkey B Extended softkeys appear 3 Tap and buttons to move highlighter between clips in the playlist or use QWERTY arrow keys 4 Tap SK7 START to change play behavior at the in point Tap SK8 END to change play behavior at the out point C START and END flags change 2 1 A C 3 B 4 OR 4 C ...

Страница 334: ...rporated Revised 5 September 2014 Clip LOOP Button This function is currently only available in Play List Air mode 1 Tap button A mode opens on the selected PGM channel 2 Tap button B mode opens on selected PGM channel Tap button again to cue the first item in the playlist 1 A 2 B ...

Страница 335: ...t item in the playlist The clip will immediately transition to the next item in the playlist as soon as the button is tapped without playing to its out point IMPORTANT NOTE When the function is ON it will override the END flag that s programmed for the playlist item that s currently ON AIR item in PGM channel not PVW channel as shown in the table on the following page IMPORTANT NOTE When function ...

Страница 336: ...ts OUT point playback will PAUSE on last frame of this clip Playlist does not automatically advance to next item in playlist User must tap button to continue playlist playout END LOOP Since this END flag already programs the playlist item to loop clip playback button flashes GREEN LOOP ON as soon as the clip begins to play out of the PGM channel User may either tap button to immediately advance to...

Страница 337: ...GM channel IMPORTANT NOTE While LIST LOOP is active the START and END flags of individual clips in the playlist are still obeyed Before leaving mode and entering mode be sure to pay close attention to the START and END flags In the case of a LIST LOOP it is recommended that START be set to PLAY and END be set to TAKE default play behavior unless otherwise desired by the operator 2 Tap button B mod...

Страница 338: ...ate the LIST LOOP function is active You may enable or disable the LIST LOOP function while PLAY LIST AIR mode is active and while a clip in the playlist is already playing out 4 When is active a yellow LIST LOOP icon will appear in the top right corner of the playlist window of the Instant Replay GUI 5 Tap then tap to deactivate LIST LOOP function The button will stop flashing The yellow LIST LOO...

Страница 339: ...a playlist is played out during PLAY LIST AIR mode Play List AIR Operation with OFF and OFF LAST ITEM in Playlist Action END of LAST Item Options for continued Playlist Playout With END TAKE TAKES to BLACK TAP nothing With END PAUSE HALTS on LAST FRAME of ITEM TAP to immediately TAKE to BLACK With END LOOP button turns ON LOOPS PLAY of LAST ITEM TAP to immediately TAKE to BLACK or TAP OFF to TAKE ...

Страница 340: ...y TAKE to BLACK or TAP OFF to PLAY through ITEM OUT next time OUT point of LAST ITEM is reached PLAY continues forever Play List AIR Operation with ON and ON LAST ITEM in Playlist Action END of LAST Item Options for continued Playlist Playout With END TAKE LOOPS PLAY of LAST ITEM TAP to LOOP to 1 st ITEM in Playlist or TAP OFF to LOOP to 1 st ITEM in Playlist next time OUT point of LAST ITEM is re...

Страница 341: ... is already active on PGM channel you may skip first two steps 1 A playlist should already be present if not refer to procedure Create New Playlist on page 308 2 Tap button only once A is activated on PGM channel B Playlist pane has focus C button will flash during playlist edit 3 On Mira panel or QWERTY keyboard Tap and buttons to move playlist cursor to desired location in list D Orange cursor h...

Страница 342: ...operation 4 Tap button 5 Tap softkey E Playlist item is CUT and COPIED into buffer F Currently highlighted playlist item is removed the active PGM channel displays video of next item To COPY an Item from Playlist 6 Tap button 7 Tap softkey G Playlist item is COPIED into buffer H Active PGM channel displays video of copied item OR F 5 E H G OR 4 6 7 Continued on next page ...

Страница 343: ...uttons to move playlist cursor to desired location in list Orange cursor highlights desired playlist item 9 To PASTE copied item ABOVE highlighted playlist item Tap then tap softkey 10 To PASTE copied item BELOW highlighted playlist item Tap softkey I Item is pasted into playlist J Active PGM channel displays video of pasted playlist item OR 9 9 I 8 J 10 8 ...

Страница 344: ...hannel you may skip first two steps 1 A playlist should already be present if not refer to procedure Create New Playlist on page 308 2 Tap button only once A is activated on PGM channel B Playlist pane has focus C button will flash during playlist edit 3 On Mira panel or QWERTY keyboard Tap and buttons to move playlist cursor to desired location in list D Orange cursor highlights desired playlist ...

Страница 345: ...r Revised 5 September 2014 Copyright 2014 Abekas Incorporated 343 4 Tap softkey for CUT copy delete item Tap button for CUT copy delete item E Currently highlighted playlist item is removed F Active PGM channel displays video of next item OR E 4 F 4 ...

Страница 346: ...vised 5 September 2014 Delete ALL Content in Playlist You may remove all of the contents of a playlist using this procedure 1 Tap then button A Focus is returned to Clip Register pane B Content of currently displayed playlist is deleted Be careful There is no UNDO for this operation B 1 A 1 ...

Страница 347: ...nd B whether the ALWAYS use PVW PGM pair in PLAY LIST AIR user setup parameter has been activated or deactivated To ALWAYS air a 2 channel playlist in the default PVW PGM pair 1 Tap to enter User Setup Menu A User Setup Menu appears 2 Tap on QWERTY keyboard to toggle user setup parameter ALWAYS use PVW PGM pair in PLAY LIST AIR mode to ON If mode is already active on PGM channel you may skip next ...

Страница 348: ...ed on PGM 1 PGM 2 6 Tap button once more F Playlist highlighter cues to first playlist item 7 Tap to play list at 100 speed Move T Bar lever to play with VAR speed G Count Down Timer for PGM item is displayed H 1st item in playlist plays from PGM channel I 2nd item in playlist is cued on PVW channel Continued on next page 5 F 6 7 H 7 OR I G E E ...

Страница 349: ...hould already be present if not refer to procedure Create New Playlist on page 308 4 Tap or P2 P3 P4 depending on which single PGM channel is going to air the playlist IMPORTANT NOTE With user setup parameter ALWAYS use PVW PGM pair set to OFF GANG must be activated before proceeding to step 5 in order to air playlist in 2 channel PVW PGM To air playlist out of 1 channel proceed to step 5 while GA...

Страница 350: ...nel items in a playlist will only be available with CUT transitions even if a mix is set in the TRANS field during mode 8 Tap to play list at 100 speed Move T Bar lever to play with VAR speed G Count Down Timer for PGM item is displayed H 1st item in playlist plays from PGM channel I There is no PVW channel 9 In order to air multiple 1 channel playlists simultaneously out of individual PGM channel...

Страница 351: ...ore items in the list If mode is already active on PGM channel you may skip this step 1 Perform steps 3 through 6 in procedure PLAY LIST AIR Mode Presenting Playlist starting on page 345 2 Tap to play list at 100 speed Move T Bar lever to play with VAR speed A Count Down Timer for PGM item is displayed B 1st item in playlist plays from PGM channel C 2nd item in playlist is cued on PVW channel 2 B ...

Страница 352: ... playlist E The highlighted item is cued on PVW channel NOTE There must be at least 3 00 remaining in the PGM channel playout in order to select new PVW item in playlist If there s less than 3 00 remaining then original PVW item will transition to PGM not the newly highlighted item 4 When PGM item finishes playback playlist advances to newly highlighted item in PGM channel F The PVW cursor moves i...

Страница 353: ...4 Abekas Incorporated 351 5 You may repeat this procedure as many times as you like G You may even move the PVW cursor to a playlist item before the PGM item 6 When PGM item finishes playback playlist advances to newly highlighted item in PGM channel H The PVW cursor moves in playlist G H ...

Страница 354: ...nt in a playlist you may wish to try the list playout in AIR mode and then quickly switch back to Play List EDIT mode A While PLAY LIST AIR mode is active mode will appear on both PGM channels 1 Tap button B is activated on both PGM channels C button will flash during playlist edit When you re ready to re enter Play List AIR mode 2 Tap button A A 1 B B C 2 ...

Страница 355: ...live record stream while occupied with another task For example if the user is in the middle of editing or airing a playlist and something of interest happens in the live action of the event the user can instantly create a mark point thereby saving that live timecode point Then at a later time the user can recall the mark point for the purpose of creating and saving a new clip appending the mark p...

Страница 356: ...s button as soon as he sees the interesting action The mark is created and the content is saved 4 The operator continues to air the playlist Tapping does not affect video playout 5 The operator taps then when the playlist has finished playing and the PGM output video channel is no longer live on air Continued on next page 3 4 5 5 4 ...

Страница 357: ...ll camera angles E Name of the mark point Follows the parameter TITLE NEW CLIPS in the USER SETUP MENU F Upon entering mode the highlighter will automatically select the most recently saved mark point The highlighter will select the mark point that was opened last if no new mark points have been created since the last time that was activated 7 The replay operator can now manage the content that he...

Страница 358: ...or an item in a playlist can be given a name 1 Tap then tap A mode opens on selected PGM channel 2 Tap and buttons or use QWERTY arrow keys to move highlight cursor to desired mark point 3 Using QWERTY keyboard enter the desired name for the mark point B Text appears in ENTRY field Tap SK8 SK9 SK10 to name the desired mark point using the naming softkeys 4 Tap to apply name change to highlighted m...

Страница 359: ...out through mode Even though the VUE MARKS menu only displays one camera angle per mark point remember that ALL angles of the recording are saved for each mark point and will appear when saved into the clip register discussed in a later section 1 Tap then tap A mode opens on selected PGM channel 2 Tap and buttons or use QWERTY arrow keys to move highlight cursor to desired mark point 3 Tap etc Cam...

Страница 360: ...nu much the same way that an item in a playlist can be trimmed in mode 1 Tap then tap A mode opens on selected PGM channel 2 Tap and buttons or use QWERTY arrow keys to move highlight cursor to desired mark point 3 Spin ROTARY DIAL to new IN point Tap desired playback button to navigate to new IN point As a result B PGM channel shows new IN point of the mark point 1 1 2 A OR Continued on next page...

Страница 361: ...ed 359 4 Tap to set new IN point button glows RED New IN point is set There is no need to tap button to save new IN point 5 Tap button C PGM channel shows current OUT point of the mark point D button glows RED indicating that the PGM channel is parked on the current OUT point Continued on next page 4 5 C D ...

Страница 362: ...button glows RED New OUT point is set There is no need to tap button in order to save new OUT point 8 To trim more mark points repeat steps 2 through 7 as necessary IMPORTANT NOTE Even though only one angle per mark point is shown in the menu remember that a mark point saves the content of all camera angles when it is created Therefore when the IN and OUT points of a mark point are trimmed these c...

Страница 363: ... made into a clip in the clip register discussed in a section to follow this method should be considered an alternative live replay operation 1 Tap then tap A mode opens on selected PGM channel 2 Tap and buttons or use QWERTY arrow keys to move highlight cursor to desired mark point 3 See Change Camera Angle of Mark Point section for steps on how to change the camera angle of a mark point 4 Tap or...

Страница 364: ...cross all camera angles with any changes trimmed IN OUT points names applied in mode 1 Tap then tap A mode opens on selected PGM channel 2 Tap and buttons or use QWERTY arrow keys to move highlight cursor to desired mark point 3 Tap with desired mark point highlighted 4 Mark point is saved to the next available CLIP ID slot in the clip register across all camera angles Custom name and trimmed IN O...

Страница 365: ...t into the clip register upon being added to a playlist See Vue Marks AUTO Save to Clip Register when Append parameter explanation in section Listing of User Setup Parameters for more information 1 Tap then tap A mode opens on selected PGM channel 2 Tap and buttons or use QWERTY arrow keys to move highlight cursor to desired mark point 3 Tap to place the mark point at the bottom of the active play...

Страница 366: ...tton ALL angles of mark point are appended to active playlist 5 Tap then tap to insert place above highlighting cursor mark point into active playlist Only the camera angle listed in the CAMERA column of menu is inserted into playlist 6 Tap then hold Inserts ALL angles of mark point to active playlist OR OR 4 4 5 5 5 6 6 6 ...

Страница 367: ...ists c Export melt clips from selected playlists into separate media files Each item clip from each playlist included in the melt is exported into a separate media file in other words one media file is created for each clip Refer to the procedures outlined earlier in this manual to learn how to save clip content and to create playlists This section of the manual describes how to export the content...

Страница 368: ...er 2014 B The Melt Event dialog window appears All playlist data are collected C All playlists created in Event are presented By default all playlists are selected checked 4 Click to uncheck any Play List you do not want included in the Melt Export 5 Click button to continue B C 4 5 Continued on next page ...

Страница 369: ... inserted into the Export Editor 6 Click export File Format pull down 7 Click the desired file format from list E Format list closes and displays selected format 8 Click to select items you wish to export To select all items Press hold down button then press button F Selected items are highlighted in blue 9 Click button D 6 7 E 8 F 9 Continued on next page ...

Страница 370: ... into Export Queue 10 Click button H Mira Explorer Configuration window opens 11 Click button I Select Export Directory window opens 12 Navigate to the disk folder into which the media files are to be exported 13 If desired sub folder doesn t exist click the New Folder item to create a new folder J A New folder is created G 10 G H 11 13 J Continued on next page 12 I ...

Страница 371: ...ation folder Press button to finish naming 15 Click button to select folder The Select Export Directory window closes K Selected Export directory is displayed 16 Click button finish selection Mira Explorer Configuration window closes 17 Click button to continue Mira Explorer Configuration window closes 14 15 K 16 17 Continued on next page ...

Страница 372: ...lick desired channel to use for export It s best to choose a channel that s NOT currently recording input cameras N The selected Export Channel is displayed 20 Click button finish selection exporting begins immediately afterward Warning dialog window closes O File Export progress is shown P Export is finished when Export Queue is empty 21 Navigate to export folder verify media files are present L ...

Страница 373: ...irectory listing Expand the clip listing within the Clip ID column by clicking the small symbol before the server name Perform Find All search operation described in step 6 on page 81 Cannot see all of the information for a given column in the clip directory listing there is a symbol at end of the field Expand the width of the given column Refer to Changing Column Width on page 61 Cannot modify an...

Страница 374: ...was created with a non standard codec for example with Avid DNxHD codec then you will need to visit the web site of the codec creator and download and install that codec on the Mira Server To find out which codec was used to create the MOV file open the MOV file in the standard QuickTime player then choose the Window and then the Movie Inspector items shortcut CTRL i The codec will be listed withi...

Страница 375: ...cords are connected to the two modules of the power supply and you re sure there is full power on both power cords then check the small l e d on each of the two power supply modules from the chassis rear these lights should be solid green If either light is blinking or has changed to yellow or red then you may have a power module failure Remove the suspect module immediately the alarm should then ...

Страница 376: ... codec 129 B Background Opacity Quad Viewer 222 Bank 0 302 Banks Changing Clip Register 288 for Clip Registers 250 Best Quality video 217 Booting control panel 237 brightness panel lights User Setup 257 Button Activation press and hold 246 tap 246 Buttons description 246 BVW 75 protocol 219 C Calibrated codec 129 camera super slow motion stand alone186 187 188 camera angle change playlist item 324...

Страница 377: ...ort 132 139 Dial Rotary description 246 Dim for inactive clips and lists User Setup 257 Direct modify clip metadata 66 69 70 72 Disable services Abekas 122 T Bar 268 Watch Folder 144 Disable field timecode reporting RS422 protocol 219 Display Clips All Local 43 Clip Library 43 Cueable Local 43 Local Remote 43 Remote 43 DNxHD codec Avid 129 Dock viewer 108 Dropframe clip metadata 72 Dual Link video...

Страница 378: ... Maximum Speed User Setup 253 Jog Reverse Jog Forward 45 K Keywords clip metadata 69 display in Library 120 L Labels clip metadata 69 Launch Engineering Setup 173 List LOOP Button 335 List Play 82 exit 105 LIVE EE mode description 262 LIVE EE AUTO GANG User Setup 255 LIVE EE Mode operation 263 Load Clip 37 39 45 Numerically 250 Load Clip Numerically 290 Load Clips 36 Local Remote Display Clips 43 ...

Страница 379: ...y Operation 308 Play List Trash Can 315 play repeat 46 clip metadata 70 Play Repeat In clip metadata 71 Play Repeat Out clip metadata 71 Play Speed clip 45 set in playlist 326 PLAYBACK mode description 262 PLAYBACK Mode Instant Replay Operation 266 playlist add range of clips 84 advance on air 98 air90 air with mix 92 cancel changes 88 create 82 create new 308 cue segment immediately 103 cue to st...

Страница 380: ...ume for Export 152 T Bar description 246 T BAR VAR 2 MAX Speed User Setup 254 T BAR VAR 2 MIN Speed User Setup 254 T BAR VAR 3 MAX Speed User Setup 254 T BAR VAR 3 MIN Speed User Setup 254 text entry modify 66 Text Opacity Quad Viewer 222 Text style parameter User Setup 252 Time of Day clip auto naming 49 timecode 216 timecode clip metadata 72 Engineering Setup 216 Entire Clip Length 50 External T...

Страница 381: ...as Incorporated 379 Viewer Desktop 107 VUE MARKS Mode 353 W Warning Export volume 155 161 168 Watch Folder disable 144 Watch Folders Media File Import 138 141 remove 145 Whole Clips Export 154 Windows Login 33 WMV file export 151 work queue import 133 140 X XDCam file export 151 file import 129 ...

Страница 382: ......

Отзывы: