9
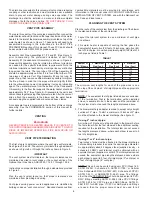
an incorporated reservoir may be used to pump the water to an
appropriate drain. To avoid condensate spillage, select a pump
with an overflow switch.
CAUTION MUST BE USED TO ENSURE THAT THE DRAIN IS
FREE AND CLEAR OF DEBRIS AND WILL NOT ALLOW
BACKFLOW THROUGH THE CONDENSATE HOSE.
CONSIDERATION MUST BE GIVEN TO AVOID FREEZING OF
THE CONDENSATE LINES WHICH COULD RESULT IN
EXCESSIVE BUILD UP OF CONDENSATE INSIDE THE WATER
HEATER. Waterproof heat tape may be required to prevent
freezing of the condensate lines. Please ensure that the outlet of
the condensate drain does not create a slippery condition which
could lead to personal injury.
The condensate trap may be primed by filling the CONDENSATE
U-ASSEMBLY with tap water using the supplied hose while the
water heater is not operating. The system is fully primed when
the hose is lowered below the hose clamp on the side of the
water heater and water begins to flow out of the hose. In most
installations the water heater will self-prime the condensate trap
during the first full heat-up cycle. IF A SOUND OF AIR BUBBLING
THROUGH WATER (GURGLING) IS HEARD WHILE THE
BLOWER IS OPERATING AFTER THE FIRST HEAT-UP CYCLE,
THEN TURN THE UNIT OFF AND CONTACT YOUR PLUMBER
OR SERVICE REPRESENTATIVE.
IF THESE INSTRUCTIONS ARE NOT FOLLOWED, THE
CONDENSATE BUILD-UP WILL BLOCK THE EXHAUST
OUTLET, WHICH WILL CAUSE IMPROPER OPERATION.
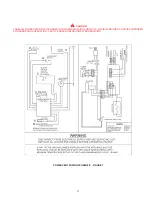
CONDENSATE SYSTEM - FIGURE 4
Condensate is likely to form in the venting system attached to
this water heater. The vent pipe should be sloped downward away
from the blower assembly (not less than 1/8" (3.2 mm) nor greater
than 1/2" (12.7 mm) per foot maximum). If the vent piping is vented
level or sloped upwards away from the blower assembly, then
adequate means for draining and disposing of the condensate
needs to be made by the installer. In either case, a 3/8" drain
hose should be connected to the built-in drain port. Prior to
operating the water heater, make sure the removable cap is
installed on the second drain port (See Figure 5).
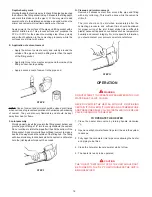
PREPARATION OF BLOWER ASSEMBLY
1. Check to make sure that the wire harness is attached to the
gas valve and blower control box.
2. Make sure no material is still attached to the outside or inside
of blower assembly.
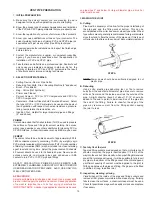
joints, including joining the pipe to the Termination (PVC
Material). If local codes do not allow the use of the PVC
termination when a material other than PVC is used for
venting, then an equivalent fitting of that material may be
substituted if the screen in the PVC terminal is removed
and inserted into the new fitting.
PVC Materials should use ASTM D-2564 Grade Cement; CPVC
Materials should use ASTM F-493 Grade Cement and ABS
Materials should use ASTM D-2235 Grade Cement.
If the water heater is being installed as a replacement for
an existing power vented heater in pre-existing venting, a
thorough inspection of the existing venting system must
be performed prior to any installation work. Verify that the
correct material as detailed above has been used, and that
the minimum or maximum vent lengths and terminal
location as detailed in this manual have been met. Carefully
inspect the entire venting system for any signs of cracks
or fractures, particularly at the joints between elbows and
other fittings and the straight runs of vent pipe. Check the
system for signs of sagging or other stresses in the joints
as a result of misalignment of any components in the
system. If any of these conditions are found, they must be
corrected in accordance with the venting instructions in
this manual before completing the installation and putting
the water heater into service.
NOTE:
A.
For water heaters in locations with high
ambient temperatures (above 100°F) it is recommended
that CPVC or ABS pipe and fittings be used.
B.
A 22.5
degree elbow (2" vent pipe) or a 45 degree elbow (3" and
4" vent pipe) with an installed screen VENT TERMINAL
must be used in all cases.
4. There will be some installations where condensate will be
formed in the horizontal runs of the vent system. This
condensate will run into the condensate boot attached to
the blower and out the fitting. The water heater is shipped
with condensate hose that attaches to the fitting on the
condensate boot. No other Tee or fitting is required. See
Figures 5, 8 and 9.
CONDENSATE
WARNING
THIS WATER HEATER IS A CONDENSING UNIT AND
R E Q U I R E S A D R A I N TO B E L O C AT E D I N C L O S E
PROXIMITY TO ALLOW THE CONDENSATE TO DRAIN
SAFELY. THE CONDENSATE DRAINS FROM THE UNIT AT
THE EXHAUST TEE LOCATED AT THE BOTTOM OF THE
UNIT (SEE FIGURE 4) AND FROM TWO PLACES ON THE
BLOWER ASSEMBLY (SEE FIGURE 5). Condensate from this
water heater is mildly acidic. Please note that some local
codes require that condensate is treated by using a pH
neutralizing filter prior to disposal.
NOTE: IT IS IMPORTANT THAT THE CONDENSATE HOSE
ON THE BOTTOM OF THE UNIT IS NOT INSTALLED
ELEVATED ABOVE THE CLAMP THAT IS SECURED TO THE
SIDE OF THE JACKET, SEE FIGURE 4. THIS MUST BE TRUE
FOR THE ENTIRE LENGTH OF THE HOSE FROM THE CLAMP
TO THE EXIT INTO AN APPROPRIATE DRAIN. If these
instructions are not followed or if the condensate hose is blocked,
water will spill from the condensate trap. As with every water heater
installation, a drain pan should be used to prevent water damage
to the surrounding area. If necessary, a condensate pump with
Содержание BTX-80
Страница 24: ...24...


