background image

24

WebGUI Control

Video Tab

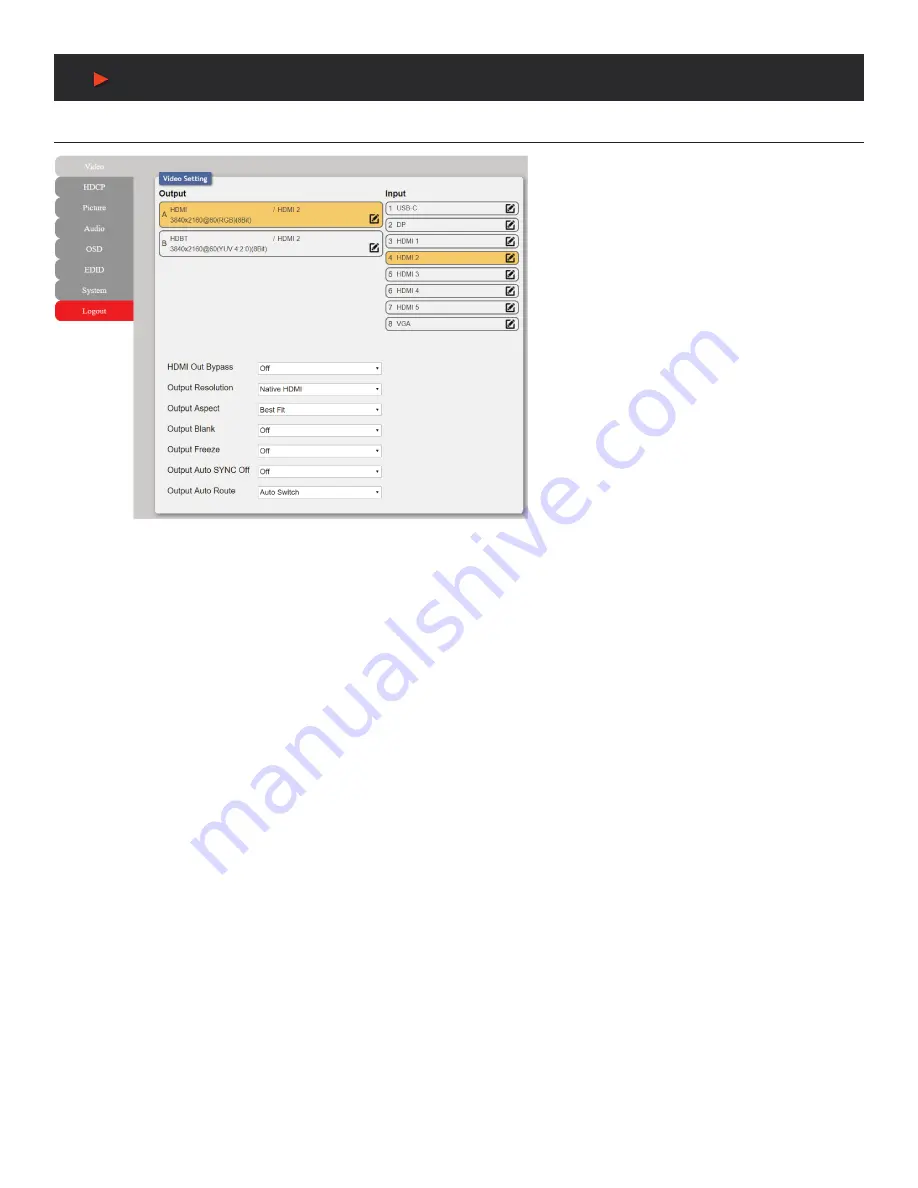
This page provides video routing settings, I/O 

renaming options and control over the video output 

signal’s format and behavior. To begin assigning a 

new video route, please click an output button and 

then click on the button of the preferred input port. 

As you select each button they will change their 

color to orange. The new route will become active 

immediately after selecting the input port and the 

routing information displayed on the buttons will 

change accordingly.

Note:

 Both outputs are linked together, so selecting 

a source for one will automatically change the source 
for the other.

1. OUTPUT: 

Buttons for selecting the output (A & B) 

to route A/V Inputs to. Details about the output names 

and currently selected Input are also displayed here. 

To change the name of an output, click on the edit 

icon (    ).

2. INPUT:

 Buttons for selecting the input to route to 

the selected output. Detail about the input names 

is also displayed here. To change the name of an 

output, click on the edit icon (     ).

3. ADDITIONAL SETTINGS:

■ 

HDMI Out Bypass:

 Enable or disable the video output bypass mode. When bypass is enabled, HDR video and bitstream audio can 

be supported, however it will disable the unit’s scaling and video adjustment functions.

Note:

 This setting affects both the HDMI and HDBaseT

 outputs. This setting does not enable audio bypass.

■ 

Output Resolution: 

Selects the output resolution to use when HDMI bypass is disabled. Selecting a 

“Native”

 resolution option will 

make the unit automatically select an output resolution based on the detected EDID of the connected display.

Note:

 Not active when HDMI bypass mode is enabled.

■ 

Output Aspect: 

Selects the aspect ratio to use when outputting the source. 

“Full”

 stretches the source to fill the output resolution, 

regardless of the original aspect ratio, while 

“Best Fit”

 will always attempt to retain the original source’s correct aspect ratio by adding 

black bars if necessary. 

“Follow In”

 centers the source on the screen, without any scaling (1:1 pixel reproduction).

Note:

 Not active when HDMI bypass mode is enabled.

■ 

Output Blank:

 Enable or disable blanking the video output.

Note:

 Not available when HDMI bypass mode is enabled.


Output Freeze:

 Enable or disable freezing the video output.

Note:

 Not available when HDMI bypass mode is enabled.

■ 

O

utput Auto Sync Off:

 Sets the amount of time to continue outputting sync with the free run color if there is no live source and no 

operations have been executed on the unit. Setting this to 

“OFF”

 forces the unit to always output sync.

■ 

Output Auto Route:

 Enable or disable automatically switching to any newly detected source.

A


NEU

VIDEO

Содержание ANI-8X2MFS

Страница 1: ...AUDIO VIDEO MANUFACTURER ANI 8X2MFS 8x2 4K 60Hz MULTI FORMAT HDMI DP USB C VGA to HDMI HDBaseT SCALER PRESENTATION SWITCH w AUDIO INSTRUCTION MANUAL A NeuVideo com Frisco Texas 75036...

Страница 2: ...on 12 This unit should be installed in a cool dry place away from sources of excessive heat vibration dust moisture and cold Do not use the unit near stoves heat registers radiators or other heat prod...

Страница 3: ...roduct has a 3 year warranty SAFETY PRECAUTIONS Please read all instructions before attempting to unpack install or operate this equipment and before connecting the power supply Please keep the follow...

Страница 4: ...input Trigger Control Keypad support for easy single button function activation Optional Supports standard PoH PSE from the HDBaseT output to a connected HDBaseT PD receiver Optional ANI 7251RX USB Ty...

Страница 5: ...RS 232 4 pin Terminal Block Trigger 10 pin Terminal Block Service Port USB 2 0 Type A IR Frequency 30 50kHz 30 60kHz under ideal conditions Baud Rate Up to 115200 19200 Control Default Power Supply 2...

Страница 6: ...70 75 85 1152x864p 75 1280x720p 50 60 1280x768p 60 75 85 1280x800p 60 75 85 1280x960p 60 85 1280x1024p 60 75 85 1360x768p 60 1366x768p 60 1400x1050p 60 1440x900p 60 75 1600x900p 60RB 1600x1200p 60 168...

Страница 7: ...768p 60 70 75 85 60 60 1152x864p 75 X X 1280x720p 50 60 1280x768p 60 75 85 60 60 1280x800p 60 75 85 60 60 1280x960p 60 85 X X 1280x1024p 60 75 85 60 60 1360x768p 60 1366x768p 60 X X 1400x1050p 60 1440...

Страница 8: ...Audio Level 1Vrms Impedance 10k Type Unbalanced MIC INPUT Max Audio Level 50Vrms Impedance 6 8k Type Unbalanced ANALOG OUTPUT 5 PIN TERMINAL BLOCK Max Audio Level 4Vrms THD N 84dB 0dBFS 1kHz A wt SNR...

Страница 9: ...1080p 60Hz 12 bit color Data rates lower than 5 3Gbps or below 225MHz TMDS clock 4K30 UHD Video 4K 24 25 30Hz 4K 50 60Hz 4 2 0 8 bit color Data rates higher than 5 3Gbps or above 225MHz TMDS clock bu...

Страница 10: ...Bypass function When bypass is enabled the LED will illuminate u VIDEO IN BUTTONS LEDS Press any of these buttons to switch immediately to the corresponding input An LED will illuminate to indicate wh...

Страница 11: ...ne of sight of the IR Extender IR OUT PORT Connect to an IR Blaster to transmit IR signals from the other end of the HDBaseT connection to devices within direct line ofsight of the IR Blaster Note IR...

Страница 12: ...compatible PD receiver ANI 7251RX h SERVICE PORT This port is reserved for firmware update use only j LAN PORT Connect directly or through a network switch to your PC laptop to control the unit via T...

Страница 13: ...Baud Rate 19200bps Data Bits 8bit Parity Bits None Stop Bits 1bit Flow Control None RS 232 Port 1 Unit control RS 232 Port 2 HDBaseT extension Note The 24 volt pins pin 1 are included to provide power...

Страница 14: ...4 ASPECT Select the aspect ratio to use when outputting the source Full stretches the source to fill the output resolution regardless of the original aspect ratio while Best Fit will always attempt to...

Страница 15: ...80 60 800x600 60 1024x768 60 1280x768 60 1360x768 60 1280x720 60 1280x800 60 1280x1024 60 1440x900 60 1400x1050 60 1680x1050 60 1600x1200 60 1920x1080 60 1920x1200 60RB 2560x1600 60RB 720x480p 720x576...

Страница 16: ...096x2160p24 4096x2160p25 4096x2160p30 4096x2160p50 4096x2160p60 4096x2160p50 420 4096x2160p60 420 Aspect BEST FIT Pan Scan Aspect Letterbox Under 1 Under 2 Follow In Overscan Full No Signal Color BLAC...

Страница 17: ...ast of the scaled output image 4 FINE TUNE HDMI DIGITAL SOURCES ONLY Hue Set the hue shift of the scaled output image Saturation Set the color saturation level of the scaled output image Sharpness Set...

Страница 18: ...Position 0 250 PC Clock 0 250 PC Phase 0 255 PC Reset NO Execute Reset Picture NO Execute AUDIO 1 HDMI OUT BYPASS Enable or disable HDMI audio bypass mode When enabled all audio will automatically be...

Страница 19: ...phone input s volume level when the microphone is an active audio source mixed or unmixed 6 HDMI ANALOG SPEAKER OUT VOLUME Set the volume level for each audio output type Note LPCM 2 0 sources only No...

Страница 20: ...kground The available range is from Level 0 fully opaque to Level 8 fully transparent 3 OSD MENU TIMEOUT Set how long to wait before automatically closing the OSD menu if there is no user activity The...

Страница 21: ...e 2 STATIC IP SETTING The unit s static IP address netmask and gateway address can be set here Press the Enter button to begin editing the address and use the and buttons to adjust each value Press th...

Страница 22: ...LEVEL 4TH LEVEL EDID On USB C DEFAULT FHD 2CH Default FHD MCh Default UHD 2Ch Default UHD MCh Default UHD 2Ch Default UHD MCh Default VGA User 1 User 2 Sink HDMI Sink HDBT EDID On DP Same options as f...

Страница 23: ...D 2Ch Default UHD MCh Default VGA User 1 User 2 Sink HDMI Sink HDBT EDID On HDBT 1 Same options as for USB C EDID On HDBT 2 Same options as for USB C EDID On HDMI 1 Same options as for USB C EDID On H...

Страница 24: ...hen select this option After the update is complete the unit will automatically reboot 2ND LEVEL 3RD LEVEL Reset All NO Execute FW Update From USB NO Execute INFORMATION 1 INFORMATION This screen disp...

Страница 25: ...settings from a local DHCP server To switch to DHCP mode please select DHCP from the IP mode drop down then click Save followed by Reboot 2 WEBGUI HOTKEY Once you are satisfied with the network settin...

Страница 26: ...ing and video adjustment functions Note This setting affects both the HDMI and HDBaseT outputs This setting does not enable audio bypass Output Resolution Selects the output resolution to use when HDM...

Страница 27: ...ed 1 PICTURE SETTINGS GLOBAL Color Gain R G B These sliders provide control over the red green and blue color gain level of the scaled output Color Offset R G B These sliders provide control over the...

Страница 28: ...s analog audio output Note LPCM 2 0 sources only MIC Gain Sets the microphone input s volume level when the microphone is an active audio source mixed or unmixed Output Mixer Set the microphone mixing...

Страница 29: ...letely 4 DISPLAY Controls the behavior of the OSD informational display Selecting Info will show the information display for a short time after a source or display change Selecting Off will disable th...

Страница 30: ...rare cases it is possible for custom or external EDIDs to cause compatibility issues with certain sources If this happens it is recommended to switch to one of the 7 default EDIDs for maximum compati...

Страница 31: ...s factory default state After the reset is complete the unit will reboot automatically 5 FIRMWARE UPGRADE To update the unit s firmware click the Choose File button to open the file selection window a...

Страница 32: ...in the Command Line Interface CLI type telnet followed by the IP address of the unit and the port number if it is non standard and then hit Enter This will connect us to the unit we wish to control N...

Страница 33: ...TATIC GATEWAY 8 Show the unit s current gateway address SET WEBGUI USERNAME N1 8 Set the WebGUI login username N1 Name 16 characters max GET WEBGUI USERNAME 8 Show the current WebGUI login username SE...

Страница 34: ...p60 26 3840x2160p24 27 3840x2160p25 28 3840x2160p30 29 3840x2160p50 30 3840x2160p60 31 3840x2160p50 4 2 0 32 3840x2160p60 4 2 0 33 4096x2160p24 34 4096x2160p25 35 4096x2160p30 36 4096x2160p50 37 4096x...

Страница 35: ...e Auto Sync Off function and set the timeout length Available values for N1 0 Disabled 1 30 seconds 2 60 seconds GET OUT A AUTO SYNC OFF 8 Show the current Auto Sync Off setting SET OUT A R GAIN N1 8...

Страница 36: ...urrent VGA source s parameters SET OUT A BLANK 8 Enable or disable blanking the video output Available values for N1 0 Video output normal 1 Video output blanked SET OUT A BLANK N1 8 Show the current...

Страница 37: ...d Note The HDMI and HDBaseT outputs share their settings GET AUDIO OUT N1 MUTE 8 Show the current mute state of the specified output Available values for N1 A HDMI audio output B HDBaseT audio output...

Страница 38: ...ROUTE N2 8 Set the audio source to use with the specified video input when Follow User Mode is enabled Available values for N1 1 USB C input 2 DisplayPort input 3 HDMI input 1 4 HDMI input 2 5 HDMI i...

Страница 39: ...nput 2 DisplayPort input 3 HDMI input 1 4 HDMI input 2 5 HDMI input 3 6 HDMI input 4 7 HDMI input 5 Available values for N2 0 HDCP support disabled 1 HDCP support enabled GET IN N1 HDCP MODE 8 Show th...

Страница 40: ...8 Open or close the specified relay N1 1 2 Relay port number Available values for N2 ON Closed OFF Open GET RELAY N1 8 Show the current state of the specified relay N1 1 2 Relay port number Note Comma...

Страница 41: ...39 CONNECTION DIAGRAM CONNECTION DIAGRAM A NEUVIDEO...

Страница 42: ...40 optional RECEIVER ANI 7251RX RECEIVER OPTIONAL A NEUVIDEO...

Страница 43: ...41 THIS PAGE IS INTENTIONALLY LEFT BLANK...

Страница 44: ...offices within the State of Texas United States of America A NeuVideo makes no representation that materials pertaining to the Product are appropriate or available for use in other locations other th...

Отзывы: