background image

9 .  When the material jets from the print jet tip, the next screen will ask if you want to 

replace another cartridge . If replacing another or adding cartridge, select the print 
jet’s material cartridge to be replaced / added and repeat “LOADING MATERIAL 
CARTRIDGE” instructions . (Fig . 38)

NOTE: Test creations have been printed on your CubeX before leaving our 
factory. A different material and / or color may have been used for the test 
creation and may have a small amount of this test material in the print jet. 
Therefore, when the material jets for the first time, the color may be different 
until the test material is completely jetted from the print jet and your choice of 
material will become visible during this process.

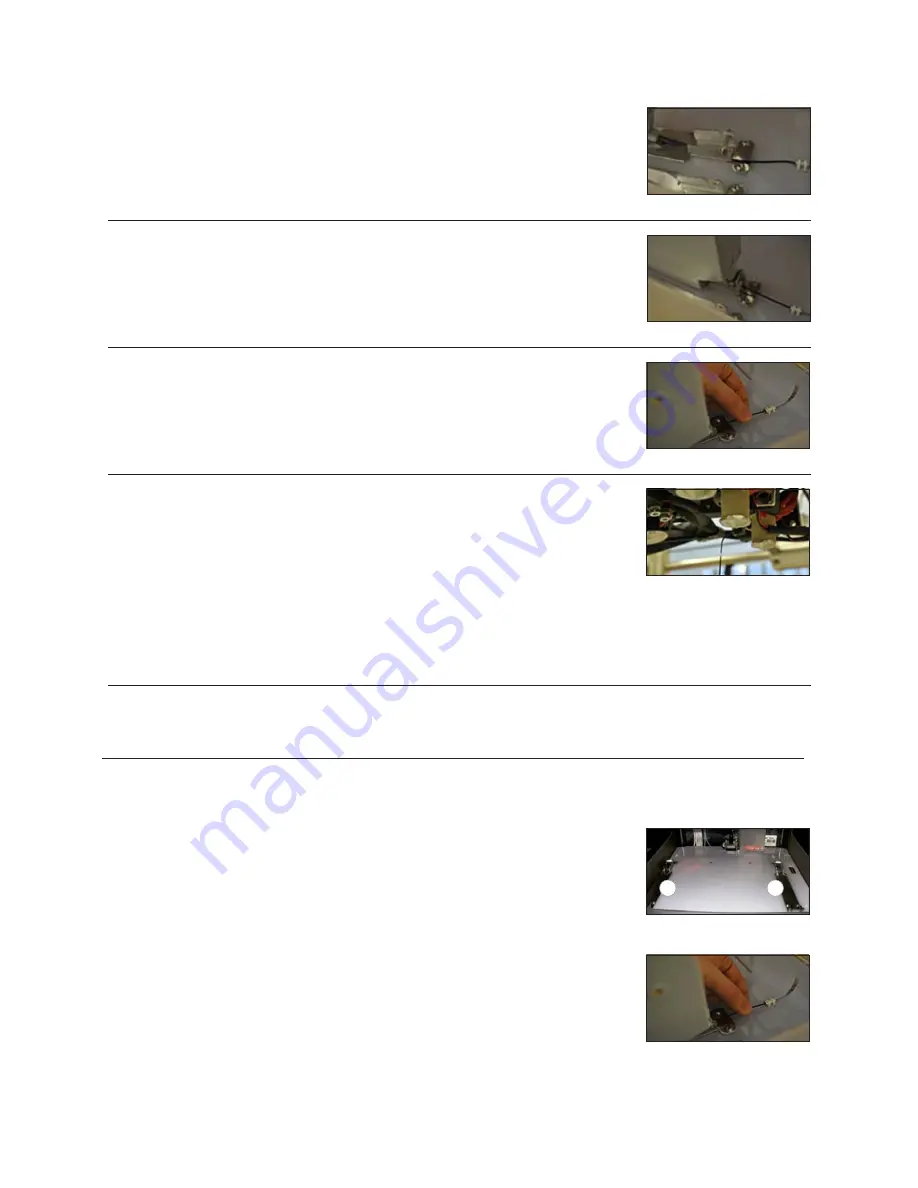
Fig . 35

6 .  Thread the filament under the cartridge clamp bar and into the feed tube. (Fig. 35)

Fig . 36

7 .  Install the new cartridge from the side of CubeX and into the cartridge bay . (Fig . 36)

Fig . 37

8 .  Push filament between the front of cartridge and the eyelet, through the feed tube 

and up to the printjet . (Fig . 37)

Fig . 38

10 .  Once cartridge is installed, press “Next” on the touchscreen . A message “Would you like to load a new Print Jet” will 

appear on the touchscreen . If you are adding another cartridge, select the check box and repeat Steps 1-9 . Otherwise 
select X to return to the main menu .

REPLACING A MATERIAL CARTRIDGE

NOTE: The REPLACE functions will take you through the process of installing the material cartridge.

1 .  Press REPLACE on the touchscreen and select the bay that the cartridge be 

installed . Print Jet 1 represents bay 1, Print Jet 2 represents bay 2 and Print Jet 3 
represents bay 3 . Press “Next” on the touchscreen, a message “Heating Print Jet 
Please Wait…” will appear on the control panel . (Fig . 39)

2 .  After the print jet is heated, the next message will appear asking to “Gently Pull 

Filament From Feed Tube.” Gently pull the filament in between the cartridge front 
holder and eyelet as shown . Press “Next” on the touchscreen . (Fig . 40)

Fig . 39

1

2

Fig . 40

15

Содержание CubeX

Страница 1: ...CubeX 3D printer User guide TM See inside for use and safety information ...

Страница 2: ...14 Installing Material Cartridge 14 15 Replacing a Material Cartridge 15 16 Create a test print 16 INSTALL YOUR CUBIFY INVENT SOFTWARE 17 DOWNLOADING AND INSTALLING CUBEX SOFTWARE 17 18 CubeX software overview 18 19 CubeX software user interface Home Tab 19 View Tab 20 Settings Tab 20 CREATION FILE PREPARATION PRINTING YOUR CREATIONS How to open files in the CubeX software 20 21 Opening a single p...

Страница 3: ...he Jet Wiper height 29 Leveling the Aluminum Print Plate 29 30 Fine tuning your Print Pad 31 Unblocking the CubeX Print Jet tip 31 Unblocking the CubeX Print Jet 31 Setting the Print Jet gap 31 32 Updating CubeX firmware 32 34 Restoring the settings your CubeX 3D printer firmware from v1 01 34 How to contact Cubify support 34 Setting up the CubeX Print Jet offsets 34 35 2 ...

Страница 4: ...s described in the documentation provided to you including this User Guide 3D Systems will promptly repair or replace the CubeX 3D Printer if required to make it free of defects during the warranty period This warranty excludes i normal consumable or expendable parts such as Material Cartridges ii repairs required during the warranty period because of abnormal use or conditions such as riots flood...

Страница 5: ...s and ensure the CubeX s appropriate use Ensure small 3D prints are not accessible to young children 3D prints are potential choking hazards for young children When the CubeX is operating the tip of the material dispenser Print Jet becomes hot avoid touching this area until it has cooled down Hot Surface Hazard A hot surface is accessible in the vicinity of this sign or at the Print Jet avoid cont...

Страница 6: ...use two different types of print materials PLA and ABS Each material has unique benefits and you can guide your selection based on the properties your part requires CUBEX 3D PRINTER FEATURES AND BENEFITS Glow in the dark Neon Green Natural is only available in PLA plastic not ABS Neon Orange Glow in the dark Neon Blue Tan White Yellow Black Neon Green Silver Green Industrial Grey Blue Natural Teal...

Страница 7: ...rio Touchscreen Function button Jet Wiper Z axis Print Pad Print Plate Memory stick USB port and PC connection USB port Power supply Print Jet 1 Print Jet 2 Print Jet 3 Print Jet Tip 1 Print Jet Tip 2 Print Jet Tip 3 Material Cartridge Bay 1 for Print Jet 1 Material Cartridge Bay 2 for Print Jet 2 Material Cartridge Bay 3 for Print Jet 3 A B F E C D P O N G Front Bottom area inside printer Top are...

Страница 8: ... SP3 or higher Microsoft Windows 8 Software CubeX Client Software available at Cubify com Electrical requirements 110 240v AC Material storage although all polymers degrade with time the following conditions help ensure that the material remains of high quality Unpack material only as needed Store material at 10 30 C Use within 12 months of receipt WHAT S INCLUDED CubeX printer Toolkit USB Stick S...

Страница 9: ...t from the metal frame on both sides of the printer Place CubeX on a table Fig 2 3 Remove the material cartridges and tool kit from the bottom of box Fig 3 4 Using the snips located in the tool kit cut blue straps away from cardboard Cut away all blue zip ties securing the printer carriage Fig 4 5 Using the snips cut away all yellow zip ties securing the foam parts in place Remove foam packing mat...

Страница 10: ...lting the 4 screws holding it in place and remove plexiglass and bolts Fig 9 10 To power on plug the power cord into the power supply located underneath the printer base Lift the right side of the printer to gain access to the power supply Fig 10 11 The LED on the control panel should light up indicating the printer has power Remove the Warning label from the touchscreen Fig 11 12 Press the Contro...

Страница 11: ...k box again to return to the touchscreen menu 10 ACTIVATE YOUR CUBEX AND LINK TO YOUR CUBIFY ACCOUNT Creating an account on Cubify com is easy and gives you access to all of the great designs and collections that will drive and inspire your creativity To create an account type in Cubify com in your web browser and click on Sign Up to open the registration form If you already have an account click ...

Страница 12: ...plate up far enough to remove the foam Fig 19 Fig 20 3 Remove the last foam piece underneath the build plate Fig 20 Fig 21 4 Move the Print Pad all the way down to install the Jet Wiper Fig 21 Fig 22 5 To install the Print Wiper insert the wiper s two key holes onto the two rods located at the back right side of printer The wiper s white plastic piece and spring should be facing the front Fig 22 1...

Страница 13: ...select a cubex file to print INFO Provides Material Cartridge status and printing status during the printing process PJ MAP Allows you to re map your print jets PJ CON Allows you to manually jet your print jets giving you control of temperature and RPM MOVE Manually moves your print jet carriage in the X Y and Z directions HOME Sends the print jet carriage to its home position located in the back ...

Страница 14: ...ion please verify that the X Y and Z axes are aligned X Y Z Axis Movements X Axis Print Jet moves front to back and back to front Y Axis Print Jet moves left to right and right to left CAUTION Always move the print plate Z Axis down first to avoid collision with the print jet tips When moving the print jet X and Y axis make sure you do not stray too far from the home switches left rear of the prin...

Страница 15: ...t the gap 1 Scroll to Z GAP using the arrows on the touchscreen Select Z GAP and using the Up Down arrows move the print pad up so that it is just touching the tip of the print jet Fig 28 29 Fig 28 Fig 29 Fig 30 Fig 32 Fig 31 Fig 33 Fig 34 1 3 2 2 Using the Down arrow lower the printpad down by 0 1 from the print jet tip Click on the Control button the next screen will allow you to save the settin...

Страница 16: ...ridge bay Fig 36 Fig 37 8 Push filament between the front of cartridge and the eyelet through the feed tube and up to the printjet Fig 37 Fig 38 10 Once cartridge is installed press Next on the touchscreen A message Would you like to load a new Print Jet will appear on the touchscreen If you are adding another cartridge select the check box and repeat Steps 1 9 Otherwise select X to return to the ...

Страница 17: ...rinter is functioning properly 1 Insert the USB stick containing your CUBEX file creation files into the USB port on the CubeX Fig 42 Fig 41 Fig 42 Fig 43 Fig 44 Fig 45 Fig 46 3 A message Install Thumbscrew into Cartridge will appear If a cartridge is being replaced ensure that the thumbscrew is installed into cartridge if it is to be stored Fig 41 4 Press Next on the touchscreen A message Would y...

Страница 18: ...uctions Fig 48 3 Once set up is completed open Cubify Invent and click on Enter License Key the license key can be found on the Installation Card located in the toolkit Fig 49 4 Enter the license key in the key field and select Finish Fig 50 5 Congratulations You now have access to Cubify Invent Go to Cubify com cubex index aspx and click on DOWNLOAD SOFTWARE FOR WINDOWS to your USB stick or save ...

Страница 19: ...ct yes Fig 55 56 6 The installation is now complete you can open the CubeX software from the icon located on your desktop Fig 57 CUBEX SOFTWARE OVERVIEW The CubeX software is used to create the cubex files that your CubeX will use to create your parts The software allows you to orient scale re size and rotate the part before printing Fig 58 Fig 58 Fig 59 When you first open the CubeX software you ...

Страница 20: ...ur part before creating the cubex file To mm Change a part from inches to mm To inches Change a part from mm to inches Revert Undo changes made using the Scale Geometry options ROTATE GEOMETRY X Y Z Rotate the part in the X Y or Z axis Revert Undo changes made using the Rotate Geometry options PICK SHELLS Select which Print Jets print which parts The available options will vary depending on how ma...

Страница 21: ...at a time Scroll through the layers using the scroll bar found down the right hand side of the window PRINTER CONFIGURATION Opens the printer configuration window BUILD SETTINGS Opens the build settings window FIRMWARE UPDATE Used to update the CubeX 3D Printer firmware WARNING PRINT JET TIPS BECOME EXTREMELY HOT DURING SET UP AND OPERATION DO NOT TOUCH PRINT JET TIP DO NOT CHANGE CARTRIDGE COLOR ...

Страница 22: ...ened onto one Print Pad these can be selected as one two or three shells A multi part assembly file consist of multiple stl files designed to create one assembly part These can be treated as one two or three shells 2 Select your stl file or creation file and click open Fig 62 3 The file will appear in the middle of the bed in the software Fig 63 4 When printing in a single material be sure to keep...

Страница 23: ...Fig 68 69 Fig 68 Fig 69 Fig 70 Fig 71 Autoplace Clicking the auto place button will automatically position your parts on the bed for you Fig 70 71 OPENING A MULTI PART ASSEMBLY FILE 1 Select the Open Model Assembly Fig 72 Fig 72 Fig 73 2 Open the first part of your stl assembly file a screen will appear asking if you wish to add an additional assembly model Selecting OK will bring back the open fi...

Страница 24: ...n all the stl files are open click the done button to finish the assembly file This file can now be treated as one stl file with multiple shells Fig 75 1 Select the shell color you wish to use Fig 77 2 Hover over the shell you wish to select Fig 78 3 Left click to color the shell Fig 79 4 Continue this process until all the shells are colored as desired Fig 80 5 When you have finished using the Sh...

Страница 25: ...art will contain Hollow The part will have no internal structure Thin The part will have a small amount of internal structure to give it support Medium The part will have a good internal structure supporting it Heavy A heavy part with a strong internal structure RAFT MATERIAL Use this to select which material will print your raft or the raftless option We recommend printing raftless but some large...

Страница 26: ...er Configuration this tells the software which materials are loaded into which print jets Part materials works in a similar way to Printer Configuration telling the software which materials are loaded into which print jets Please be sure that the materials selected in part materials correspond to the print jets the materials are allocated too BUILD Once you have selected all of your preferences pr...

Страница 27: ... raft the following instructions will help you remove it REMOVING SUPPORTS WITH WIRE CUTTERS Use wire cutters to cut away the support structure from your model You should cut the supports at the point where they touch the model FINISHING YOUR CREATION Fig 92 Fig 93 ABS RAFT PLA PART PLA RAFT ABS PART ABS rafts can be peeled away from PLA parts ABS RAFT ABS PART PLA RAFT PLA PART Use pliers to pull...

Страница 28: ...g water onto electrical components 2 Pour 0 75 liters of water into the tank 3 Place the models to be cleaned in the tank 4 Close the lid connect the power supply and press the power button to turn on the tank 5 Use the 5 and 5 buttons to set the temperature For best results set the temperature to 80 C 6 Set an alarm for 48 hours Do not use the timer on the tank when using the hot water method Thi...

Страница 29: ...the plastic tongs and all the personal protection equipment provided gently lower the model into the caustic soda solution being very careful not to spill any of the solution 7 Close the lid connect the power supply and press the power button to turn on the tank 8 Use the 5 and 5 buttons to set the temperature For best results set the temperature to 60 C Do not set the temperature above 60 C as th...

Страница 30: ...ORING ROUGHNESS TO THE PRINT PAD To restore roughness to the Print Pad run the sandpaper included in your toolkit diagonally across the bed corner to corner in both directions Fig 94 CUBEX MAINTENANCE 29 Fig 94 Fig 95 LEVELING THE PRINT PAD Make sure the Print Pad is securely installed onto the Aluminum Print Plate Do not perform leveling function without the Print Pad correctly installed The alum...

Страница 31: ... the side of the Print Plate Fig 99 102 5 Using the 3mm hex driver from the tool kit adjust the height of the Print Pad bolts Fig 103 to make each side level 6 There is a locking nut beneath each of the 3 bed bolts that must be loosened with the 8mm spanner wrench before the bolt can be adjusted Fig 104 7 It may take several Print Jet movements and bolt adjustments to ensure that the Print Plate i...

Страница 32: ...IT AND THE PRINT JET TIP CAN BECOME HOT WHEN UNBLOCKING THE PRINT JET TIP USE HEAT RESISTANT GLOVES WHEN UNBLOCKING THE CUBEX PRINT JET TIP UNBLOCKING THE CUBEX PRINT JET If the print jet tip still won t jet material after unblocking it you may need to unblock the print jet First remove the delivery tube face plate and take out the cartridge removing all filament from the corresponding cartridge b...

Страница 33: ...HE PRINT JET PUSHES AGAINST THE PRINT PAD TOO HARD THE PRINT JET WILL BE FORCED INTO THE PRINT PAD FOR THE ENTIRE FIRST LAYER OF PRINTING THIS WILL DAMAGE BOTH THE PRINT PAD AND THE PRINT JET MAKE SURE THE PRINT PAD SPRINGS ARE NOT COMPROMISED WHEN SETTING THE PRINT JET AGAINST THE PRINT PAD Clicking the Function button gives the option to save the gap setting to the printer s memory which will be...

Страница 34: ...E SETTINGS TO YOUR CUBEX 3D PRINTER FIRMWARE FROM V1 01 33 Fig 119 Fig 120 Fig 114 Fig 116 Fig 117 Fig 118 Fig 115 Fig 112 Fig 113 7 Press the tick on the screen to put the CubeX 3D Printer into boot loader mode Fig 112 113 Release the function button after Setting saved message disappears Your printer is now in firmware mode 8 Remove the USB stick from the CubeX 3D Printer Fig 114 9 Open the Cube...

Страница 35: ...our activation code you can locate it be going to Cubify com MY ACCOUNT MY DEVICES and then viewing your registered CubeX 3 Once it is re activated turn off the CubeX 3D Printer 4 Plug the USB stick into the CubeX 3D Printer and turn it on touch the screen and you will receive a notification of your settings being restored 5 Your firmware has now been upgraded HOW TO CONTACT CUBIFY SUPPORT If you ...

Страница 36: ...the ones that most accurately line up Because variation is small it may be easiest to spot 3 that look like they all line up If this is the case use the middle one as the correct one Mark this line with a pen for easier identification On Y scale 3 count from the center line with the arrow to the marked line If you are counting down the scale the number is negative If you are counting up the scale ...

Страница 37: ...stems Inc 333 Three D Systems Circle Rock Hill SC 29730 Cubify com 2013 3D Systems Inc All rights reserved The 3D Systems logo CubeX and Cubify are registered trademarks of 3D Systems Inc pn 401647 00 Rev C ...

Отзывы: