background image

Appendix B Setting Up Your Computer’s IP Address

WRE6505 v2 User’s Guide

98

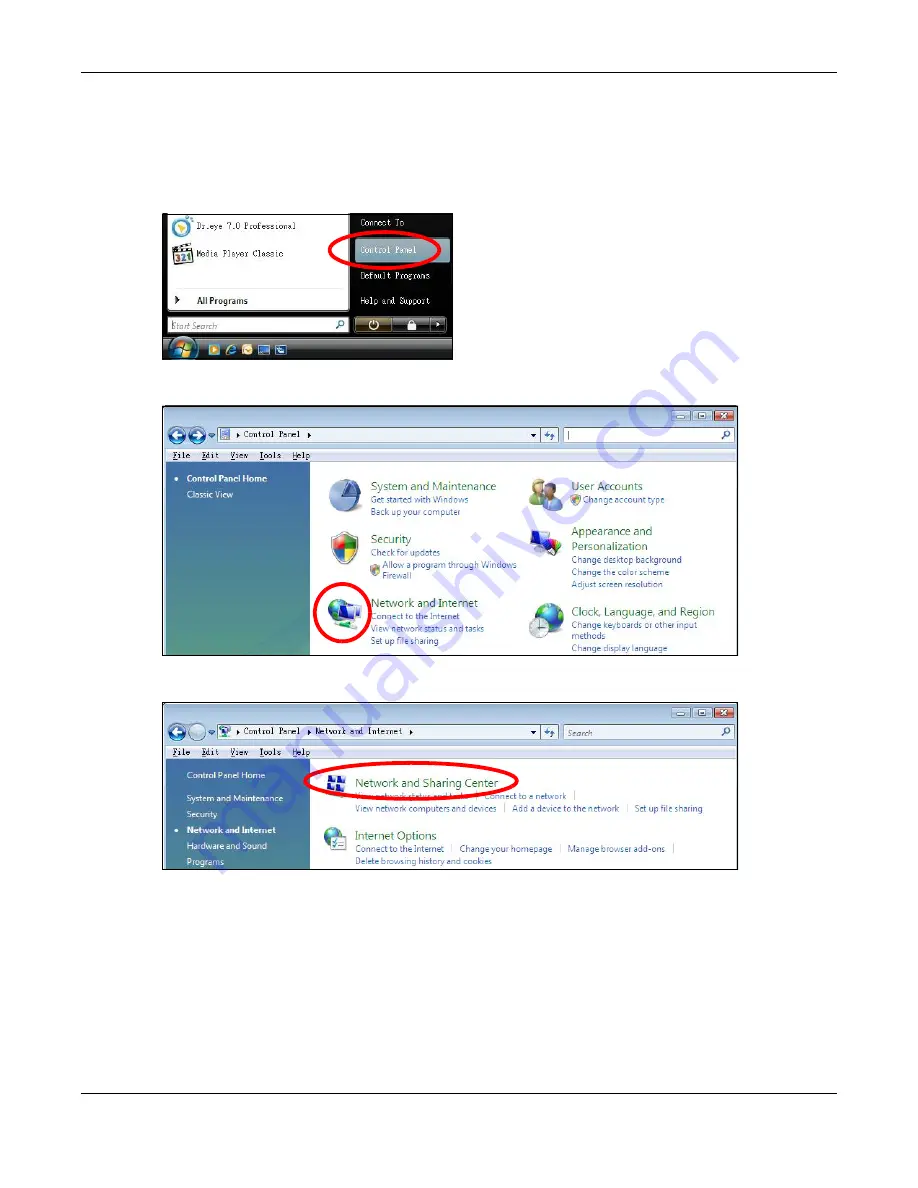
Windows Vista

This section shows screens from Windows Vista Professional.

1

Click 

Start

 > 

Control Panel

.

2

In the 

Control Panel

, click the 

Network and Internet

 icon.

3

Click the 

Network and Sharing Center

 icon.

4

Click 

Manage network connections

.

Summary of Contents for WRE6505 v2

Page 1: ...RE6505 v2 Wireless AC750 Range Extender Version 1 00 Edition 1 10 2016 Copyright 2016 ZyXEL Communications Corporation User s Guide Default Login Details Web Address http zyxelsetup http DHCP assigned IP http 192 168 1 2 Password 1234 ...

Page 2: ...E KEEP THIS GUIDE FOR FUTURE REFERENCE Related Documentation Quick Start Guide The Quick Start Guide shows how to connect the WRE6505 v2 and access the Web Configurator wizards More Information Go to support zyxel com to find other information on the WRE6505 v2 ...

Page 3: ...view User s Guide 8 Introduction 9 The Web Configurator 13 WRE6505 v2 Modes 19 Repeater Mode 21 Access Point Mode 27 eaZy123 Wizard Setup 33 Tutorials 38 Technical Reference 46 Monitor 47 Wireless LAN 49 LAN 66 One Connect 68 Maintenance 70 Troubleshooting 83 ...

Page 4: ...erview 13 2 2 Accessing the Web Configurator 13 2 2 1 Login Screen 13 2 2 2 Password Screen 14 2 2 3 Home Screen 15 2 3 Navigating the Web Configurator 16 2 3 1 Title Bar 17 2 3 2 Navigation Panel 18 2 4 Resetting the WRE6505 v2 18 Chapter 3 WRE6505 v2 Modes 19 3 1 Overview 19 3 1 1 Device Modes 19 Chapter 4 Repeater Mode 21 4 1 Overview 21 4 2 What You Can Do 21 4 3 What You Need to Know 21 4 3 1...

Page 5: ...ing the Wizard 33 6 3 Using the Wizard 33 6 3 1 Repeater Mode 33 6 3 2 AP Mode 36 Chapter 7 Tutorials 38 7 1 Overview 38 7 2 Connecting to the Internet from an Access Point 38 7 3 Connecting to a Wireless Network Using WPS 38 7 3 1 Push Button Configuration PBC 39 7 3 2 PIN Configuration 40 7 4 Connecting the WRE6505 v2 in Repeater mode to an AP 41 7 4 1 Selecting an AP from an Automatically Detec...

Page 6: ...2 9 10 WPS Screen 62 9 11 WPS Device Screen 63 9 12 Scheduling Screen 64 Chapter 10 LAN 66 10 1 Overview 66 10 2 LAN IP Screen 66 Chapter 11 One Connect 68 11 1 Overview 68 11 1 1 What You Can Do 68 11 2 One Connect Screen 68 Chapter 12 Maintenance 70 12 1 Overview 70 12 2 What You Can Do 70 12 3 General 70 12 4 System Password Screen 71 12 5 Time Screen 71 12 6 Firmware Upgrade Screen 73 12 7 Bac...

Page 7: ...e Connections and LEDs 83 13 2 WRE6505 v2 Access and Login 84 13 3 Internet Access 85 13 4 Resetting the WRE6505 v2 to Its Factory Defaults 86 13 5 Wireless Problems 86 Appendix A Customer Support 88 Appendix B Setting Up Your Computer s IP Address 94 Appendix C Legal Information 122 Index 130 ...

Page 8: ...8 PART I User s Guide ...

Page 9: ...etup WPS Button on page 11 provides frustration free wireless client setup and completes the instant network access setup Figure 1 Universal Repeater Your can create the following connections using the WRE6505 v2 LAN You can connect network devices via the Ethernet port of the WRE6505 v2 so that they can communicate with each other and access the Internet WLAN Wireless clients can connect to the W...

Page 10: ...ut it in a safe place Back up the configuration and make sure you know how to restore it Restoring an earlier working configuration may be useful if the device becomes unstable or even crashes If you forget your password you will have to reset the WRE6505 v2 to its factory default settings If you backed up an earlier configuration file you would not have to totally re configure the WRE6505 v2 You ...

Page 11: ... is no signal detected or the WRE6505 v2 repeater mode is not connected to a wireless router AP or the LEDs are turned off using the WPS button 5 GHz Signal Strength White On The more the LEDs are on the better the Wi Fi signal strength Three LEDs signifies a signal strength of 51 100 Two LEDs signifies a signal strength of 20 50 One LED signifies a signal strength under 20 Blinking Firmware upgra...

Page 12: ... devices you have you can either press a button recommended on the device itself or in its configuration utility or enter a PIN a unique Personal Identification Number that allows one device to authenticate the other in each of the two devices When WPS is activated on a device it has two minutes to find another device that also has WPS activated Then the two devices connect and set up a secure net...

Page 13: ...e the Web Configurator you need to allow Web browser pop up windows from your device JavaScript enabled by default Java permissions enabled by default Refer to Chapter 13 Troubleshooting to see how to make sure these functions are allowed in Internet Explorer 2 2 Accessing the Web Configurator 1 Make sure your WRE6505 v2 hardware is properly connected and prepare your computer or computer network ...

Page 14: ...y recommended as shown next Figure 4 Change Password Screen Table 3 Login screen LABEL DESCRIPTION Password Type 1234 default as the password Language Select the language you want to use to configure the Web Configurator Click Login This shows the time hh mm and date yyyy mm dd of the timezone you select in the Maintenance Time screen see Section 12 5 on page 71 The time is in 24 hour format for e...

Page 15: ...e labels in this screen Table 4 Change Password Screen LABEL DESCRIPTION New Password Type a new password Retype to Confirm Retype the password for confirmation Apply Click Apply to save your changes back to the WRE6505 v2 Ignore Click Ignore if you do not want to change the password this time Table 5 Home Screen LABEL DESCRIPTION GO Click this to return to the previous screen Language Select a la...

Page 16: ... Click the icon to change the time and date display Figure 6 Change Time Zone The following table describes the labels in this screen 2 3 Navigating the Web Configurator The following summarizes how to navigate the web configurator from the Status screen Table 6 Change Time Zone LABEL DESCRIPTION Change time zone Select the specific country whose current time and date you want the WRE6505 v2 to di...

Page 17: ... 3 1 Title Bar The title bar provides some useful links that always appear over the screens below regardless of how deep into the Web Configurator you navigate Figure 8 Title Bar The icons provide the following functions A C B Table 7 Title Bar Web Configurator Icons LABEL DESCRIPTION Logout Click this at any time to exit the Web Configurator Home Click this to open the home screen See Section 2 2...

Page 18: ...eset to 1234 1 Make sure the power LED is on 2 Press and hold the WPS button After 10 seconds the power LED begins flashing 3 Release the WPS button The WRE6505 v2 reloads factory defaults and begins to reboot About Click this icon to view copyright and a link for related product information eaZy123 Click this icon to open the wizard See Chapter 6 on page 33 Table 7 Title Bar Web Configurator Icon...

Page 19: ... wireless router or access point in your network and you also want to allow clients to connect to the WRE6505 v2 wirelessly Access Point Use this mode if you want to extend your network by allowing network devices to connect to the WRE6505 v2 wirelessly Go to Section 5 4 on page 28 to view the Status screen in this mode In this mode you can also set the WRE6505 v2 to work as an AP only a wireless ...

Page 20: ...haviors are only available in Repeater mode through the Maintenance screen 3 1 1 1 Changing Operating Mode The WRE6505 v2 is in repeater mode by default To change its operating mode access the web configurator and go to the Maintenance System Mode screen See Section 12 9 on page 78 for detailed information The WRE6505 v2 restarts automatically after you change operating modes ...

Page 21: ...nd the access point connect the WRE6505 v2 acquires its IP address from the access point The clients of the WRE6505 v2 can now surf the Internet 4 2 What You Can Do Use the Status screen Section 7 1 on page 38 to view read only information about your WRE6505 v2 Use the LAN screen Chapter 10 on page 66 to set the IP address for your WRE6505 v2 Use the Wireless LAN AP Select screen Section 9 6 on pa...

Page 22: ... you change modes As soon as you do your WRE6505 v2 is already in Repeater mode Note If a client is connected to the WRE6505 v2 through the wired Ethernet connection the client can only access the 2 4 GHz Wi Fi In the following figure the LAN Client is only able to communicate with devices in the 2 4 GHz wireless network Figure 11 Repeater Mode Overview 4 3 2 Configuring your WLAN LAN and Maintena...

Page 23: ...t Name This is the WRE6505 v2 s system name you configure in the Maintenance General screen Firmware Version This is the firmware version and the date created Sys OP Mode This is the device mode Section 3 1 1 on page 19 to which the WRE6505 v2 is set Repeater Mode LAN Information MAC Address This shows the LAN Ethernet adapter MAC Address of your device IP Address This shows the LAN port s IP addr...

Page 24: ...curity settings for WPS connections on the WRE6505 v2 To AP Security This displays the type of established security protocol with the WRE6505 v2 System Status Item This column shows the type of data the WRE6505 v2 is recording Data This column shows the actual data recorded by the WRE6505 v2 System Up Time This is the total time the WRE6505 v2 has been on Current Date Time This field displays your...

Page 25: ...eless station first associated with the WRE6505 v2 s WLAN network Association List 5G This is the index number of an associated wireless station MAC Address This field displays the MAC address of an associated wireless station Association Time This field displays the time a wireless station first associated with the WRE6505 v2 s WLAN network Table 9 Status Screen Repeater Mode LABEL DESCRIPTION Ta...

Page 26: ...he WRE6505 v2 Advanced Use this screen to configure advanced wireless settings QoS Use this screen to enable Wi Fi MultiMedia Quality of Service WMMQoS WPS Use this screen to enable WPS WPS Device Use this screen to add a wireless station using WPS LAN IP Use this screen to configure LAN IP address and subnet mask OneConnect OneConnect Use this screen to enable or disable Wi Fi auto configuration ...

Page 27: ...ee Chapter 7 on page 38 for an example of setting up a wireless network in Access Point mode 5 2 What You Can Do Use the Status screen Section 5 4 on page 28 to view read only information about your WRE6505 v2 Use the LAN screen Chapter 10 on page 66 to set the IP address for your WRE6505 v2 acting as an access point Use the Wireless LAN screens Section 9 10 on page 62 to configure the wireless se...

Page 28: ...le to the Ethernet port on the WRE6505 v2 and the other end to your router 3 Connect your computer to your network make sure both the WRE6505 v2 and computer are under the same subnet 4 Open a web browser window and type http zyxelsetup in the web address The login screen displays 5 Enter 1234 default as the password and click Login 6 Type a new password and retype it to confirm then click Apply O...

Page 29: ...creen Firmware Version This is the firmware version and the date created Sys OP Mode This is the device mode Section 3 1 1 on page 19 to which the WRE6505 v2 is set AP Mode LAN Information MAC Address This shows the LAN Ethernet adapter MAC Address of your device IP Address This shows the LAN port s IP address IP Subnet Mask This shows the LAN port s subnet mask Default Gateway This shows the LAN ...

Page 30: ... turn off other applications for example using bandwidth management Memory Usage This shows what percentage of the heap memory the WRE6505 v2 is using Interface Status Interface This displays the WRE6505 v2 port types The port types are LAN and WLAN Status For the LAN port this field displays Down line is down or Up line is up or connected For the WLAN it displays Up when the WLAN is enabled or Do...

Page 31: ...block access to devices or block the devices from accessing the WRE6505 v2 Advanced Use this screen to configure advanced wireless settings QoS Use this screen to enable Wi Fi MultiMedia Quality of Service WMMQoS WPS Use this screen to enable and configure WPS WPS Device Use this screen to add a wireless station using WPS Scheduling Use this screen to schedule the times the Wireless LAN is enabled...

Page 32: ... v2 Time Time Setting Use this screen to change your WRE6505 v2 s time and date Firmware Upgrade Firmware Upgrade Use this screen to upload firmware to your WRE6505 v2 Backup Restore Backup Restore Use this screen to backup and restore the configuration or reset your WRE6505 v2 to the factory defaults Restart Restart Use this screen to reboot the WRE6505 v2 without turning the power off System Mod...

Page 33: ... The wizard screen opens Note If you have already configured the wizard screens and want to open it again click the eaZy123 icon on the upper right corner of any Web Configurator screen 6 3 Using the Wizard The eaZy123 wizard for the WRE6505 v2 is available in both Repeater and AP mode 6 3 1 Repeater Mode 1 The wizard scans for available Wi Fi networks and displays the network list Select a 2 4 GH...

Page 34: ...ide 34 2 Type the selected network s Wi Fi password key if wireless security is enabled Click Continue 3 If you click Choose Network Manually the following screen displays Enter the SSID and security settings of your wireless router or AP Click Continue ...

Page 35: ...creen displays Repeat previous steps to select and connect to a 5 GHz Wi Fi network 5 Configure the wireless settings between the WRE6505 v2 and its wireless clients The WRE6505 v2 automatically copies the SSID of the associated AP and appends speed to the 5GHz SSID Click Apply ...

Page 36: ...y the WRE6505 v2 s wireless network settings and click GO to log into the web configurator again 6 3 2 AP Mode 1 Configure the wireless settings between the WRE6505 v2 and its wireless clients The WRE6505 v2 automatically copies the SSID of the associated AP and appends speed to the 5GHz SSID Click Apply ...

Page 37: ...Chapter 6 eaZy123 Wizard Setup WRE6505 v2 User s Guide 37 2 The eaZy 123 setup wizard is complete Verify the WRE6505 v2 s wireless network settings and click GO to log into the web configurator again ...

Page 38: ...Connecting to a Wireless Network Using WPS This section gives you an example of how to set up wireless network using WPS The following example uses the WRE6505 v2 as the AP and NWD 211AN as the wireless client which connects to a notebook Note The wireless client must be a WPS aware device for example a WPS USB adapter or PCI card The following WPS methods for creating a secure connection are desc...

Page 39: ...d in the Network Wireless LAN WPS screen 5 Navigate to Network Wireless LAN 2 4G or Wireless LAN 5G WPS Device and press the WPS button Note Your WRE6505 v2 has a WPS button located on its panel as well as a WPS button in its configuration utility Both buttons have exactly the same function you can use one or the other Note It doesn t matter which button is pressed first You must press the second ...

Page 40: ...N method to get a PIN number 2 On the WRE6505 v2 navigate to the Network Wireless LAN 2 4G or Wireless LAN 5G WPS screen 3 Obtain the PIN number for the WRE6505 v2 or press the Generate button to create a new PIN number See Section 9 10 on page 62 4 Enter the WRE6505 v2 PIN number in the wireless station s utility screen The WRE6505 v2 authenticates the wireless client and sends the proper configu...

Page 41: ...curity on WRE6505 v2 and wireless client ex NWD210N in this example by using PIN method Figure 19 Example WPS Process PIN Method 7 4 Connecting the WRE6505 v2 in Repeater mode to an AP Repeater mode allows you to extend the original AP coverage Authentication by PIN SECURITY INFO WITHIN 2 MINUTES Wireless Client COMMUNICATION ...

Page 42: ...n Automatically Detected List Follow the steps below to create a secure wireless network by selecting an AP from a list of detected APs The AP select function is only available in repeater mode See Section 3 1 1 on page 19 The instructions require that your hardware is connected see the Quick Start Guide and you are logged into the Web Configurator through your LAN connection see Section 2 2 on pa...

Page 43: ...ings 7 4 2 Selecting an AP by Manually Entering Security Information This example shows you how to configure wireless security settings with the following parameters on your WRE6505 v2 Follow the steps below to create a secure wireless network by manually entering the AP s wireless security settings in the WRE6505 v2 s interface The instructions require that your hardware is connected see the Quic...

Page 44: ...igure 25 Tutorial Typing an SSID 3 Configure the wireless settings between the WRE6505 v2 and its wireless clients The WRE6505 v2 automatically copies the SSID of the associated AP and appends speed to the 5GHz SSID Click Apply to save settings and restart the WRE6505 v2 Figure 26 Tutorial Configure WRE6505 v2 s WLAN 4 You have successfully set up your WRE6505 v2 to connect to an AP Click GO to go...

Page 45: ...Chapter 7 Tutorials WRE6505 v2 User s Guide 45 Figure 27 Tutorial Saving settings ...

Page 46: ...46 PART II Technical Reference ...

Page 47: ...tistics screen Section 8 3 on page 47 to view port status packet specific statistics the system up time and so on 8 3 Packet Statistics Screen Click Monitor Packet Statistics Read only information here includes port status packet specific statistics and the system up time The Poll Interval s field is configurable and is used for refreshing the screen Figure 28 Monitor Packet Statistics ...

Page 48: ... WLAN is disabled TxPkts This is the number of transmitted packets on this port RxPkts This is the number of received packets on this port Collisions This is the number of collisions on this port Tx kb s This displays the transmission speed in kilobits per second on this port Rx kb s This displays the reception speed in kilobits per second on this port System Up Time This is the total time the WRE...

Page 49: ...age 61 Use the QoS screen to enable Wi Fi MultiMedia Quality of Service WMMQoS This allows the WRE6505 v2 to automatically set priority levels to services such as e mail VoIP chat and so on Section 9 8 on page 61 Use the WPS screen to enable WPS to quickly set up a wireless network with strong security without having to configure security settings manually Section 9 10 on page 62 Use the WPS Devic...

Page 50: ...urity does not protect the information that is sent in the wireless network Furthermore there are ways for unauthorized devices to get the MAC address of an authorized wireless client Then they can use that MAC address to use the wireless network 9 3 1 2 Encryption Wireless networks can use encryption to protect the information that is sent in the wireless network Encryption is like a secret code ...

Page 51: ...ually Depending on the devices in your network you can either press a button on the device itself or in its configuration utility or enter a PIN Personal Identification Number in the devices Then they connect and set up a secure network by themselves See how to set up a secure wireless network using WPS in the Section 7 3 on page 38 9 4 General Wireless LAN Screen Use this screen to enable the Wir...

Page 52: ...he wireless LAN Hide SSID Select this check box to hide the SSID in the outgoing beacon frame so a wireless client cannot obtain the SSID through scanning using a site survey tool Channel Selection Set the operating frequency channel depending on your particular region Select a channel from the drop down list box The options vary depending on the frequency band and the country you are in This opti...

Page 53: ...hannel Bandwidth Select the channel bandwidth you want to use for your wireless network Select 20 MHz if you want to lessen radio interference with other wireless devices in your neighborhood Select 40 MHz if you want to lessen radio interference with other wireless devices in your neighborhood Select 20 40 MHz to allow the WRE6505 v2 to choose the channel bandwidth 20 or 40 MHz that has least int...

Page 54: ...n 9 5 2 WEP Encryption WEP encryption scrambles the data transmitted between the wireless stations and the access points to keep network communications private It encrypts unicast and multicast communications in a network Both the wireless stations and the access points must use the same WEP key Your WRE6505 v2 allows you to configure up to four 64 bit or 128 bit WEP keys but only one key can be e...

Page 55: ...ring that is referred to as the key This key is requested from all devices wishing to connect to a wireless network WEP Encryption Select 64 bits or 128 bits This dictates the length of the security key that the network is going to use Authentication Method Select Auto or Shared Key from the drop down list box This field specifies whether the wireless clients have to provide the WEP key to login t...

Page 56: ...Both the WRE6505 v2 and the wireless stations must use the same WEP key for data transmission If you chose 64 bits then enter any 5 ASCII characters or 10 hexadecimal characters 0 9 A F If you chose 128 bits then enter 13 ASCII characters or 26 hexadecimal characters 0 9 A F You must configure at least one key only one key can be activated at any one time The default key is key 1 Apply Click Apply...

Page 57: ...BEL DESCRIPTION Security Mode Select WPA PSK or WPA2 PSK to enable data encryption WPA PSK Compatible This field appears when you choose WPA2 PSK as the Security Mode Check this field to allow wireless devices using WPA PSK security mode to connect to your WRE6505 v2 Pre Shared Key WPA PSK WPA2 PSK uses a simple common password for authentication Type a pre shared key from 8 to 63 case sensitive k...

Page 58: ... The SSID is a unique name that identifies a wireless network All devices in a wireless network must use the same SSID MAC This displays the MAC address of the wireless device Channel This displays the channel number used by this wireless device Mode This displays which IEEE 802 11b g n wireless networking standards the wireless device supports Security Mode This displays the type of security conf...

Page 59: ...is is useful when the AP s SSID is hidden Click Continue to configure the wireless settings between the WRE6505 v2 and its wireless clients see Set up the WRE6505 v2 s WLAN for clients on page 58 Complete the AP and WLAN setup This screen displays when you have successfully set up your WRE6505 v2 to connect to an AP Verify the WRE6505 v2 s wireless network settings and click GO to open the Status ...

Page 60: ...or which you want to configure MAC filtering Policy Define the filter action for the list of MAC addresses in the MAC Address table Select Disable to deactivate the MAC filtering rule you configure below Select Allow to permit access to the WRE6505 v2 MAC addresses not listed will be denied access to the WRE6505 v2 Select Reject to block access to the WRE6505 v2 MAC addresses not listed will be al...

Page 61: ...client go through one access point AP Intra BSS traffic is traffic between wireless clients in the BSS When Intra BSS traffic blocking is not enabled wireless clients can access the wired network and communicate with each other When Intra BSS traffic blocking is enabled wireless clients can still access the wired network but cannot communicate with each other Output Power Set the output power of t...

Page 62: ...nerate a new PIN and check current WPS status To open this screen click Network Wireless LAN 2 4G or Wireless LAN 5G WPS tab Figure 38 Network Wireless LAN 2 4G 5G WPS Table 22 Network Wireless LAN 2 4G 5G QoS LABEL DESCRIPTION Enable WMM QoS Check this to have the WRE6505 v2 automatically give a service a priority level according to the ToS value in the IP header of packets it sends WMM QoS Wifi ...

Page 63: ...the WRE6505 v2 has connected to a wireless network using WPS or when Enable WPS is selected and wireless or wireless security settings have been changed The current wireless and wireless security settings also appear in the screen This displays Unconfigured if WPS is disabled and there are no wireless or wireless security changes on the WRE6505 v2 or click Release Configuration AP mode only to rem...

Page 64: ... LAN 2 4G or Wireless LAN 5G Scheduling tab Table 24 Network Wireless LAN 2 4G 5G WPS Device LABEL DESCRIPTION WPS Use this button when you use the PBC Push Button Configuration method to configure wireless stations s wireless settings See Section 7 3 1 on page 39 Click this to start WPS aware wireless station scanning and the wireless security information synchronization Or input your devices PIN...

Page 65: ...the Wireless LAN on or off If you select Everyday you can not select any specific days This field works in conjunction with the For the following times field For the following times 24 Hour Format Select a begin time using the first set of hour and minute min drop down boxes and select an end time using the second set of hour and minute min drop down boxes If you have chosen On earlier for the WLA...

Page 66: ...IP address and configure the DNS server information that the WRE6505 v2 sends to the DHCP clients Click Network LAN Note If you change the IP address of the WRE6505 v2 in the screen below you will need to log into the WRE6505 v2 again using the new IP address Figure 42 Network LAN IP The following table describes the labels in this screen Table 26 Network LAN IP LABEL DESCRIPTION LAN TCP IP Get fr...

Page 67: ...assigns DNS server information and the WRE6505 v2 s IP address The field to the right displays the read only DNS server IP address that the ISP assigns Select User Defined if you have the IP address of a DNS server Enter the DNS server s IP address in the field to the right Select None if you do not want to configure DNS servers If you do not configure a DNS server you must know the IP address of ...

Page 68: ...in your network block or allow a device s access and set up a guest Wi Fi network from the mobile device You can even use the App to access the WRE6505 v2 s web configurator The mobile device with the App installed must be connected to the WRE6505 v2 wirelessly Figure 43 ZyXEL One Connect App 11 1 1 What You Can Do Use the One Connect screen to enable or disable Wi Fi auto configuration Section 11...

Page 69: ...o allow the WRE6505 v2 to automatically update the wireless settings on the APs or wireless repeaters which also support ZyXEL One Connect in its network Select Disable to turn this feature off if you want to have the APs or repeaters in the network use different wireless settings Apply Click Apply to save your changes back to the WRE6505 v2 Reset Click Reset to reload the previous configuration f...

Page 70: ...ge 71 Use the Firmware Upgrade screen to update firmware Section 12 6 on page 73 Use the Backup Restore screen to backup and restore device configurations Section 12 7 on page 75 Use the Restart screen to reboot the WRE6505 v2 without turning the power off Section 12 8 on page 77 Use the System Mode screen to select how you want to use your WRE6505 v2 Section 12 9 on page 78 12 3 General Use this ...

Page 71: ...many minutes a management session can be left idle before the session times out After it times out you have to log in with your password again Very long idle timeouts may have security risks A value of 0 means a management session never times out no matter how long it has been left idle not recommended Apply Click Apply to save your changes back to the WRE6505 v2 Reset Click Reset to reload the pr...

Page 72: ...e Time Zone and Daylight Saving at the same time the new time and date you entered has priority and the Time Zone and Daylight Saving settings do not affect it New Time hh mm ss This field displays the last updated time from the time server or the last time configured manually When you select Manual enter the new time in this field and then click Apply New Date yyyy mm dd This field displays the l...

Page 73: ...es starts using Daylight Saving Time at 2 A M local time So in the United States you would select Second Sunday March and select 2 in the at field Daylight Saving Time starts in the European Union on the last Sunday of March All of the time zones in the European Union start using Daylight Saving Time at the same moment 1 A M GMT or UTC So in the European Union you would select Last Sunday March Th...

Page 74: ...on You are currently using firmware version The firmware version consists of the trunk version number model code and release number For example V1 00 AAAG 5 means V1 00 is the trunk number AAAG represents WRE6505 v2 and 5 means the fifth release The Latest Firmware Version Compare the release number in the previous field with the release number in this one to see if you have the latest firmware In...

Page 75: ... on your desktop Figure 50 Network Temporarily Disconnected After the WRE6505 v2 restarts the Upgrade Accomplished screen appears Figure 51 Upgrade Accomplished Refresh the web page and log in again and check your new firmware version in the Status screen 12 7 Backup Restore Screen Click Maintenance Backup Restore Information related to factory defaults backup configuration and restoring configura...

Page 76: ...Restore Configuration Restore configuration allows you to upload a new or previously saved configuration file from your computer to your WRE6505 v2 Note Do not turn off the WRE6505 v2 while configuration file upload is in progress After you see a configuration upload successful screen you must then wait one minute before logging into the WRE6505 v2 again The WRE6505 v2 automatically restarts in th...

Page 77: ...ration information and return the WRE6505 v2 to its factory defaults The following warning screen appears Figure 54 Reset Warning Message You can also press the WPS button see Section 1 4 on page 11 on the front panel for more than 10 seconds to reset the factory defaults of your WRE6505 v2 Refer to Section 1 4 on page 11 for more information on the resetting the WRE6505 v2 12 8 Restart Screen Sys...

Page 78: ...operating mode see Section 3 1 1 on page 19 Figure 56 Maintenance System Mode The following table describes the labels in this menu Table 33 Maintenance System Mode LABEL DESCRIPTION AP Mode Select this option to set the WRE6505 v2 to act as an access point Normal mode The default WPS behavior both 2 4 GHz and 5 GHz bands are supported in up and down broadcasting ...

Page 79: ...The following section describes the Normal Range Boost and Speed Boost mode WPS behaviors in a home and work network connection As connection profiles are established the WRE6505 v2 maintains a record of the varying profiles and automatically joins the network when in range Note The home wireless network is the initial setup environment The WRE6505 v2 does not have any established network profiles...

Page 80: ...ORK WIRELESS NETWORK WPS BAND UP DOWN UP DOWN 2 4 GHz No profile Initial Setup No profile Initial Setup Work1 Work1_2 4GEXT No profile No profile No profile Work2_2 4GEXT Home1 Home1_2 4GEXT Work3 Work3_2 4GEXT no profile no profile No profile Work4_2 4GEXT Home1 Home1_2 4GEXT Work3 Work3_2 4GEXT Home1 Home1_2 4GEXT Work1 Work1_2 4GEXT 5 GHz No profile Initial Setup No profile Initial Setup No pro...

Page 81: ...PS Behavior Range Boost Mode HOME WIRELESS NETWORK WORK WIRELESS NETWORK WPS BAND UP DOWN UP DOWN 2 4 GHz No profile Initial Setup No profile Initial Setup Work1 Off Home1 Home1_2 4GEXT Work3 Off No profile Home2_2 4GEXT Work3 Off Home1 Home1_2 4GEXT Work3 Off 5 GHz No profile Initial Setup No profile Initial Setup No profile Work1_5GEXT Home2 Home2_5GEXT Work2 Work3_5GEXT Home2 Home2_5GEXT Work2 ...

Page 82: ...BAND UP DOWN UP DOWN 2 4 GHz No profile Initial Setup No profile Initial Setup No profile Work2_2 4GEXT Home1 Home1_2 4GEXT Work1 Work4_2 4GEXT No profile Home2_2 4GEXT No profile Work4_2 4GEXT Home1 Home1_2 4GEXT Work1 Work3_2 4GEXT 5 GHz No profile Initial Setup No profile Initial Setup Work2 Off Home2 Home2_5GEXT Work4 Off Home2 Home2_5GEXT Work4 Off No profile No profile Work3 Off ...

Page 83: ...ower source is turned on 2 Disconnect and re connect the WRE6505 v2 3 Remove the WRE6505 v2 from the outlet Then connect an electrical device that you know works into the same power outlet This checks the status of the power outlet 4 If the problem continues contact the vendor One of the LEDs does not behave as expected 1 Make sure you understand the normal behavior of the LED See Section 1 3 on p...

Page 84: ...up windows and has JavaScript and Java enabled 4 Reset the device to its factory defaults and try to access the WRE6505 v2 with the default address 5 If the problem continues contact the network administrator or vendor or try one of the advanced suggestions Advanced Suggestions If your computer is connected wirelessly use a computer that is connected to a LAN ETHERNET port I can see the Login scre...

Page 85: ...connection is not available anymore 1 Check the hardware connections and make sure the LEDs are behaving as expected See the Quick Start Guide and Section 1 3 on page 10 2 Reboot the WRE6505 v2 3 Try to connect directly to the AP If you can access the Internet check that the WRE6505 v2 repeater mode has associated with the AP by checking the Status screen See Section 4 4 on page 22 4 If the proble...

Page 86: ...Power LED begins to blink to set the WRE6505 v2 back to its factory default configuration OR 3 Click Maintenance Backup Restore Restore and then click Reset If the WRE6505 v2 restarts automatically wait for the WRE6505 v2 to finish restarting and log in to the Web Configurator The password is 1234 If the WRE6505 v2 does not restart automatically disconnect and reconnect the WRE6505 v2 Then follow ...

Page 87: ...ess station are using the same wireless and wireless security settings and that both the WRE6505 v2 and the AP are using the same wireless and wireless security settings 6 Make sure traffic between the WLAN and the LAN is not blocked by the MAC Address List of the WRE6505 v2 See Section 9 7 on page 60 ...

Page 88: ...ormation Please have the following information ready when you contact an office Required Information Product model and serial number Warranty Information Date that you received your device Brief description of the problem and the steps you took to solve it Corporate Headquarters Worldwide Taiwan ZyXEL Communications Corporation http www zyxel com Asia China ZyXEL Communications Shanghai Corp ZyXEL...

Page 89: ...m pk Philippines ZyXEL Philippines http www zyxel com ph Singapore ZyXEL Singapore Pte Ltd http www zyxel com sg Taiwan ZyXEL Communications Corporation http www zyxel com tw zh Thailand ZyXEL Thailand Co Ltd http www zyxel co th Vietnam ZyXEL Communications Corporation Vietnam Office http www zyxel com vn vi Europe Austria ZyXEL Deutschland GmbH http www zyxel de Belarus ZyXEL BY http www zyxel b...

Page 90: ...ech Republic ZyXEL Communications Czech s r o http www zyxel cz Denmark ZyXEL Communications A S http www zyxel dk Estonia ZyXEL Estonia http www zyxel com ee et Finland ZyXEL Communications http www zyxel fi France ZyXEL France http www zyxel fr Germany ZyXEL Deutschland GmbH http www zyxel de Hungary ZyXEL Hungary SEE http www zyxel hu Italy ZyXEL Communications Italy http www zyxel it ...

Page 91: ...ux http www zyxel nl Norway ZyXEL Communications http www zyxel no Poland ZyXEL Communications Poland http www zyxel pl Romania ZyXEL Romania http www zyxel com ro ro Russia ZyXEL Russia http www zyxel ru Slovakia ZyXEL Communications Czech s r o organizacna zlozka http www zyxel sk Spain ZyXEL Communications ES Ltd http www zyxel es Sweden ZyXEL Communications http www zyxel se Switzerland Studer...

Page 92: ...ine http www ua zyxel com Latin America Argentina ZyXEL Communication Corporation http www zyxel com ec es Brazil ZyXEL Communications Brasil Ltda https www zyxel com br pt Ecuador ZyXEL Communication Corporation http www zyxel com ec es Middle East Israel ZyXEL Communication Corporation http il zyxel com homepage shtml Middle East ZyXEL Communication Corporation http www zyxel com me en ...

Page 93: ...ser s Guide 93 North America USA ZyXEL Communications Inc North America Headquarters http www zyxel com us en Oceania Australia ZyXEL Communications Corporation http www zyxel com au en Africa South Africa Nology Pty Ltd http www zyxel co za ...

Page 94: ...ions of UNIX LINUX include the software components you need to use TCP IP on your computer If you manually assign IP information instead of using a dynamic IP make sure that your network s computers have IP addresses that place them in the same subnet In this appendix you can set up an IP address for Windows XP NT 2000 on page 94 Windows Vista on page 98 Windows 7 on page 102 Mac OS X 10 3 and 10 ...

Page 95: ... IP Address WRE6505 v2 User s Guide 95 2 In the Control Panel click the Network Connections icon 3 Right click Local Area Connection and then select Properties 4 On the General tab select Internet Protocol TCP IP and then click Properties ...

Page 96: ...Appendix B Setting Up Your Computer s IP Address WRE6505 v2 User s Guide 96 5 The Internet Protocol TCP IP Properties window opens ...

Page 97: ...ator or ISP You may also have to enter a Preferred DNS server and an Alternate DNS server if that information was provided 7 Click OK to close the Internet Protocol TCP IP Properties window 8 Click OK to close the Local Area Connection Properties window Verifying Settings 1 Click Start All Programs Accessories Command Prompt 2 In the Command Prompt window type ipconfig and then press ENTER You can...

Page 98: ... v2 User s Guide 98 Windows Vista This section shows screens from Windows Vista Professional 1 Click Start Control Panel 2 In the Control Panel click the Network and Internet icon 3 Click the Network and Sharing Center icon 4 Click Manage network connections ...

Page 99: ...uide 99 5 Right click Local Area Connection and then select Properties Note During this procedure click Continue whenever Windows displays a screen saying that it needs your permission to continue 6 Select Internet Protocol Version 4 TCP IPv4 and then select Properties ...

Page 100: ...Appendix B Setting Up Your Computer s IP Address WRE6505 v2 User s Guide 100 7 The Internet Protocol Version 4 TCP IPv4 Properties window opens ...

Page 101: ...ISP You may also have to enter a Preferred DNS server and an Alternate DNS server if that information was provided Click Advanced 9 Click OK to close the Internet Protocol TCP IP Properties window 10 Click OK to close the Local Area Connection Properties window Verifying Settings 1 Click Start All Programs Accessories Command Prompt 2 In the Command Prompt window type ipconfig and then press ENTER...

Page 102: ...dows 7 This section shows screens from Windows 7 Enterprise 1 Click Start Control Panel 2 In the Control Panel click View network status and tasks under the Network and Internet category 3 Click Change adapter settings 4 Double click Local Area Connection and then select Properties ...

Page 103: ... IP Address WRE6505 v2 User s Guide 103 Note During this procedure click Continue whenever Windows displays a screen saying that it needs your permission to continue 5 Select Internet Protocol Version 4 TCP IPv4 and then select Properties ...

Page 104: ...Appendix B Setting Up Your Computer s IP Address WRE6505 v2 User s Guide 104 6 The Internet Protocol Version 4 TCP IPv4 Properties window opens ...

Page 105: ... to you by your network administrator or ISP You may also have to enter a Preferred DNS server and an Alternate DNS server if that information was provided Click Advanced if you want to configure advanced settings for IP DNS and WINS 8 Click OK to close the Internet Protocol TCP IP Properties window 9 Click OK to close the Local Area Connection Properties window Verifying Settings 1 Click Start Al...

Page 106: ...er s IP Address WRE6505 v2 User s Guide 106 Mac OS X 10 3 and 10 4 The screens in this section are from Mac OS X 10 4 but can also apply to 10 3 1 Click Apple System Preferences 2 In the System Preferences window click the Network icon ...

Page 107: ...505 v2 User s Guide 107 3 When the Network preferences pane opens select Built in Ethernet from the network connection type list and then click Configure 4 For dynamically assigned settings select Using DHCP from the Configure IPv4 list in the TCP IP tab ...

Page 108: ...Manually In the IP Address field type your IP address In the Subnet Mask field type your subnet mask In the Router field type the IP address of your device 6 Click Apply Now and close the window Verifying Settings Check your TCP IP properties by clicking Applications Utilities Network Utilities and then selecting the appropriate Network Interface from the Info tab ...

Page 109: ... WRE6505 v2 User s Guide 109 Figure 61 Mac OS X 10 4 Network Utility Mac OS X 10 5 and 10 6 The screens in this section are from Mac OS X 10 5 but can also apply to 10 6 1 Click Apple System Preferences 2 In System Preferences click the Network icon ...

Page 110: ...preferences pane opens select Ethernet from the list of available connection types 4 From the Configure list select Using DHCP for dynamically assigned settings 5 For statically assigned settings do the following From the Configure list select Manually In the IP Address field enter your IP address ...

Page 111: ... field enter your subnet mask In the Router field enter the IP address of your WRE6505 v2 6 Click Apply and close the window Verifying Settings Check your TCP IP properties by clicking Applications Utilities Network Utilities and then selecting the appropriate Network interface from the Info tab ...

Page 112: ...epending on your specific distribution release version and individual configuration The following screens use the default Ubuntu 8 installation Note Make sure you are logged in as the root administrator Follow the steps below to configure your computer IP address in GNOME 1 Click System Administration Network 2 When the Network Settings window opens click Unlock to open the Authenticate window By ...

Page 113: ...dress WRE6505 v2 User s Guide 113 3 In the Authenticate window enter your admin account name and password then click the Authenticate button 4 In the Network Settings window select the connection that you want to configure then click Properties ...

Page 114: ... the Configuration list select Static IP address if you have a static IP address Fill in the IP address Subnet mask and Gateway address fields 6 Click OK to save the changes and close the Properties dialog box and return to the Network Settings screen 7 If you know your DNS server IP address es click the DNS tab in the Network Settings window and then enter the DNS server information in the fields...

Page 115: ...the Close button to apply the changes Verifying Settings Check your TCP IP properties by clicking System Administration Network Tools and then selecting the appropriate Network device from the Devices tab The Interface Statistics column shows data if your connection is working properly ...

Page 116: ...ent KDE using the openSUSE 10 3 Linux distribution The procedure screens and file locations may vary depending on your specific distribution release version and individual configuration The following screens use the default openSUSE 10 3 installation Note Make sure you are logged in as the root administrator Follow the steps below to configure your computer IP address in the KDE 1 Click K Menu Com...

Page 117: ...puter s IP Address WRE6505 v2 User s Guide 117 2 When the Run as Root KDE su dialog opens enter the admin password and click OK 3 When the YaST Control Center window opens select Network Devices and then click the Network Card icon ...

Page 118: ...ss WRE6505 v2 User s Guide 118 4 When the Network Settings window opens click the Overview tab select the appropriate connection Name from the list and then click the Configure button 5 When the Network Card Setup window opens click the Address tab ...

Page 119: ...amic IP address Select Statically assigned IP Address if you have a static IP address Fill in the IP address Subnet mask and Hostname fields 7 Click Next to save the changes and close the Network Card Setup window 8 If you know your DNS server IP address es click the Hostname DNS tab in Network Settings and then enter the DNS server information in the fields provided ...

Page 120: ...dow Verifying Settings Click the KNetwork Manager icon on the Task bar to check your TCP IP properties From the Options sub menu select Show Connection Information Figure 65 openSUSE 10 3 KNetwork Manager When the Connection Status KNetwork Manager window opens click the Statistics tab to see if your connection is working properly ...

Page 121: ...Appendix B Setting Up Your Computer s IP Address WRE6505 v2 User s Guide 121 Figure 66 openSUSE Connection Status KNetwork Manager ...

Page 122: ... the party responsible for compliance could void the user s authority to operate the device This product has been tested and complies with the specifications for a Class B digital device pursuant to Part 15 of the FCC Rules These limits are designed to provide reasonable protection against harmful interference in a residential installation This device generates uses and can radiate radio frequency...

Page 123: ... and 5725 5850 MHz est activée pour ce produit il est nécessaire de porter une attention particulière aux choses suivantes Les dispositifs fonctionnant dans la bande 5150 5250 MHz sont réservés uniquement pour une utilisation à l intérieur afin de réduire les risques de brouillage préjudiciable aux systèmes de satellites mobiles utilisant les mêmes canaux Pour les dispositifs munis d antennes amov...

Page 124: ...ΙΤΗΣΕΙΣ ΚΑΙ ΤΙΣ ΛΟΙΠΕΣ ΣΧΕΤΙΚΕΣ ΙΑΤΑΞΕΙΣ ΤΗΣ Ο ΗΓΙΑΣ 1999 5 ΕC English Hereby ZyXEL declares that this device is in compliance with the essential requirements and other relevant provisions of Directive 1999 5 EC Français French Par la présente ZyXEL déclare que l appareil équipements est conforme aux exigences essentielles et aux autres dispositions pertinentes de la directive 1999 5 EC Hrvatski C...

Page 125: ...torm There is a remote risk of electric shock from lightning Connect ONLY suitable accessories to the device Do not open the device or unit Opening or removing covers can expose you to dangerous high voltage points or other risks ONLY qualified service personnel should service or disassemble this device Please contact your vendor for further information Make sure to connect the cables to the corre...

Page 126: ...ennt vom Hausmüll entsorgt werden muss Wenden Sie sich an eine Recyclingstation wenn dieses Produkt das Ende seiner Lebensdauer erreicht hat Zum Zeitpunkt der Entsorgung wird die getrennte Sammlung von Produkt und oder seiner Batterie dazu beitragen natürliche Ressourcen zu sparen und die Umwelt und die menschliche Gesundheit zu schützen El símbolo de abajo indica que según las regulaciones locale...

Page 127: ...Appendix C Legal Information WRE6505 v2 User s Guide 127 Environmental Product Declaration ...

Page 128: ... 切勿讓設備接觸水 雨水 高濕度 污水腐蝕性的液體或其他水份 灰塵及污物 切勿接觸灰塵 污物 沙土 食物或其他不合適的材料 雷雨天氣時 不要安裝 使用或維修此設備 有遭受電擊的風險 切勿重摔或撞擊設備 並勿使用不正確的電源變壓器 若接上不正確的電源變壓器會有爆炸的風險 請勿隨意更換產品內的電池 如果更換不正確之電池型式 會有爆炸的風險 請依製造商說明書處理使用過之電池 請將廢電池丟棄在適當的電器或電子設備回收處 請勿將設備解體 請勿阻礙設備的散熱孔 空氣對流不足將會造成設備損害 請插在正確的電壓供給插座 如 北美 台灣電壓 110V AC 歐洲是 230V AC 假若電源變壓器或電源變壓器的纜線損壞 請從插座拔除 若您還繼續插電使用 會有觸電死亡的風險 請勿試圖修理電源變壓器或電源變壓器的纜線 若有毀損 請直接聯絡您購買的店家 購買一個新的電源變壓器 請勿將此設備安裝於室外 此設備僅適合放...

Page 129: ... is the exclusive remedy of the purchaser This warranty is in lieu of all other warranties express or implied including any implied warranty of merchantability or fitness for a particular use or purpose ZyXEL shall in no event be held liable for indirect or consequential damages of any kind to the purchaser To obtain the services of this warranty contact your vendor You may also refer to the warra...

Page 130: ...onfiguration backup 76 reset factory defaults 77 restore 76 connection AP 41 contact information 88 copyright 122 CPU usage 24 30 customer support 88 D Daylight saving 73 disclaimer 122 documentation related 2 duplex setting 24 30 E encryption 50 key 51 F factory defaults restore 77 file sharing FTP 68 firmware upgrade screen 73 firmware upload 73 file extension using HTTP firmware version 23 29 G...

Page 131: ...nel 25 31 navigation panel 25 31 normal mode 80 O operating mode 20 operating mode changing 20 normal 80 range boost 80 speed boost 81 other documentation 2 P PIN configuration 38 40 port speed 24 30 push button configuration 38 39 Q quick start guide 2 R range boost mode 80 related documentation 2 reset the device 18 resetting factory default 18 restore configuration 76 RTS CTS threshold 61 S sch...

Page 132: ...tting 71 W warranty 129 note 129 web configurator accessing 13 overview 13 WEP Encryption 53 55 57 WEP encryption 54 WEP key 54 wireless channel 86 wireless LAN 86 wireless network 50 basic guidelines 49 encryption 50 security 50 SSID 49 wireless security 50 overview 50 troubleshooting 86 type 50 wireless tutorial 38 wizard setup 33 WPS 62 behavior 79 screen 62 WPS button 11 18 ...

Reviews: