background image

Appendix A Setting Up Your Computer’s IP Address

WAP5705 User’s Guide

108

5

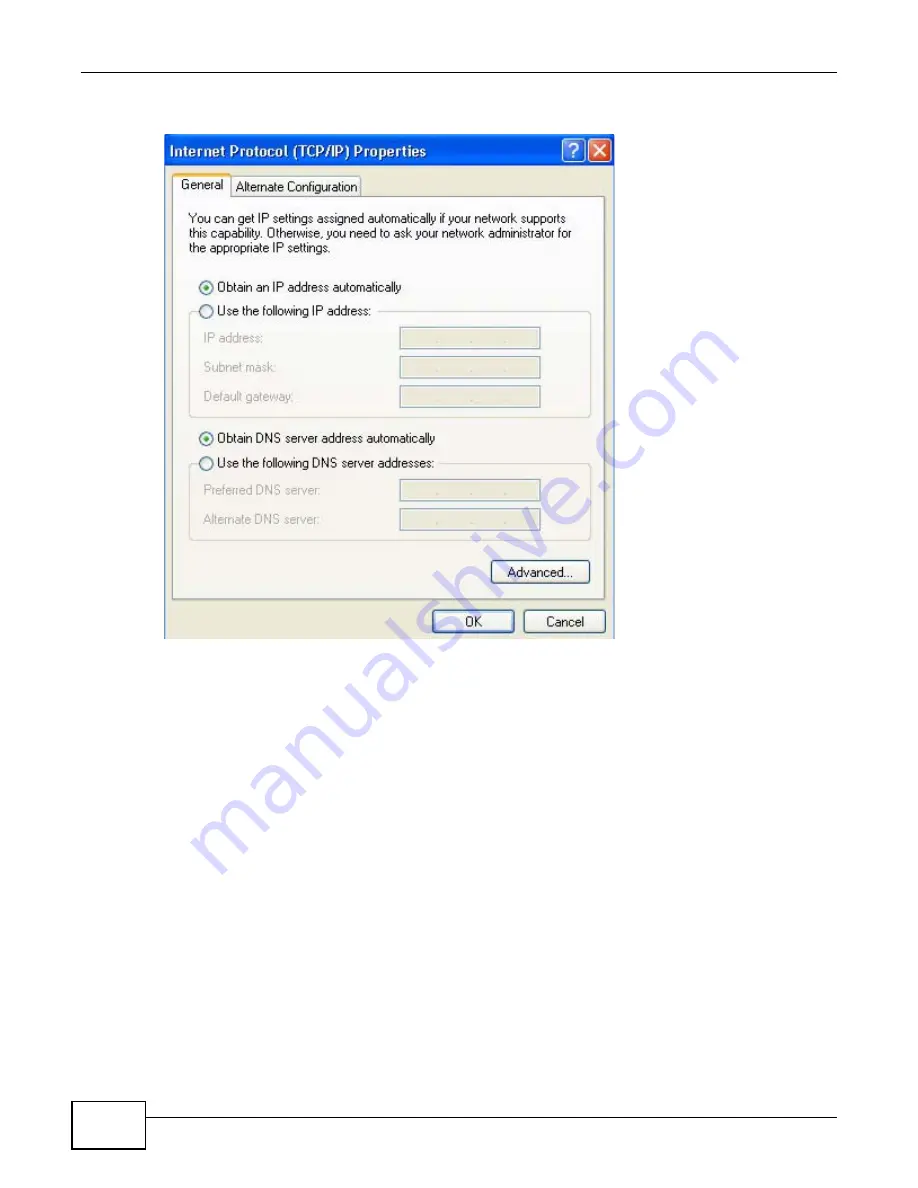
The 

Internet Protocol TCP/IP Properties

 window opens.

6

Select 

Obtain an IP address automatically

 if your network administrator or ISP assigns your IP 

address dynamically.

Select 

Use the following IP Address

 and fill in the 

IP address

Subnet mask

, and 

Default 

gateway

 fields if you have a static IP address that was assigned to you by your network 

administrator or ISP. You may also have to enter a 

Preferred DNS server

 and an 

Alternate


DNS 

server,

 if that information was provided.

7

Click 

OK

 to close the 

Internet Protocol (TCP/IP) Properties

 window.

8

Click 

OK

 to close the 

Local Area Connection Properties

 window.

Verifying Settings

1

Click 

Start

 > 

All Programs

 > 

Accessories

 > 

Command Prompt

.

2

In the 

Command Prompt

 window, type "ipconfig" and then press [ENTER]. 

You can also go to 

Start > Control Panel > Network Connections

, right-click a network 

connection, click 

Status

 and then click the 

Support 

tab to view your IP address and connection 

information.

Summary of Contents for WAP5705

Page 1: ...P5705 5 GHz Wireless HD Media Streaming Box Version 1 00 Edition 1 10 2012 Copyright 2012 ZyXEL Communications Corporation User s Guide Default Login Details IP Address AP 192 168 1 2 Client 192 168 1...

Page 2: ...tems operating system versions or if you installed updated firmware software for your device Every effort has been made to ensure that the information in this manual is accurate Related Documentation...

Page 3: ...Overview User s Guide 9 Getting to Know Your WAP5705 11 WAP5705 Modes 19 Easy Mode 21 Access Point Mode 29 Client Mode 35 The Web Configurator 47 Tutorials 53 Technical Reference 67 Monitor 69 Wireles...

Page 4: ...Contents Overview WAP5705 User s Guide 4...

Page 5: ...the WAP5705 13 1 5 1 Procedure to Use the Reset Button 13 1 6 The WPS Button 13 1 7 LEDs 14 1 8 Desktop Installation 16 1 9 Wall mounting Instructions 17 Chapter 2 WAP5705 Modes 19 2 1 Overview 19 2...

Page 6: ...a New WLAN Profile 39 5 7 Site Survey Screen 43 5 8 WPS Screen 44 5 9 LED Link Quality Screen 45 Chapter 6 The Web Configurator 47 6 1 Overview 47 6 2 Accessing the Web Configurator 47 6 2 1 Login Scr...

Page 7: ...Chapter 9 Wireless LAN 73 9 1 Overview 73 9 2 What You Can Do 73 9 3 What You Should Know 74 9 3 1 Wireless Security Overview 74 9 4 General Wireless LAN Screen 76 9 5 Wireless Security Screen 77 9 5...

Page 8: ...rade Screen 94 11 7 Configuration Backup Restore Screen 96 11 8 Reset Restart Screen 97 Chapter 12 Troubleshooting 99 12 1 Power Hardware Connections and LEDs 99 12 2 WAP5705 Access and Login 100 12 3...

Page 9: ...9 PART I User s Guide...

Page 10: ...10...

Page 11: ...mmunicate with other WAP5705s With data rates of up to 300 Mbps you can enjoy a breathtaking high speed connection at home or in the office It is an excellent solution for daily activities such as fil...

Page 12: ...Configurator to set up a wireless network with your WAP5705 1 4 Good Habits for Managing the WAP5705 Do the following things regularly to make the WAP5705 more secure and to manage the WAP5705 more e...

Page 13: ...1 Procedure to Use the Reset Button 1 Make sure the power LED is on 2 Press the RESET button for longer than 1 second to restart reboot the WAP5705 3 Press the RESET button for longer than five second...

Page 14: ...Chapter 1 Getting to Know Your WAP5705 WAP5705 User s Guide 14 1 7 LEDs Figure 2 Front Panel...

Page 15: ...not receiving power Client mode The WAP5705 is not receiving power or not associating with an AP Wireless Green On The WAP5705 is ready but is not sending receiving data through the wireless LAN Blin...

Page 16: ...her place the WAP5705 flat on a desk or table or use the stand for a vertical installation To attach the stand line up the arrow on the stand with the arrow on the bottom of the WAP5705 as shown Press...

Page 17: ...hang your WAP5705 on a wall 1 Select a position free of obstructions on a sturdy wall 2 Install the stand on the wall Make sure the screw holes of the stand are on the top and screws are snugly fasten...

Page 18: ...de the wall when installing the stand Figure 5 Installing the Stand 3 Hold the WAP5705 with the LEDs facing upward Align the holes on the back of the WAP5705 with the tabs on the stand Attach the WAP5...

Page 19: ...the Web Configurator The User s Guide Chapter 6 on page 47 through Chapter 11 on page 91 discusses the screens in this mode 2 1 2 Device Operating Modes This refers to the operating mode of the WAP570...

Page 20: ...nge the WAP5705 mode from AP mode to client mode make sure you use the RESET button to return the IP address of the WAP5705 in client mode to 192 168 1 10 Otherwise the client mode IP address will be...

Page 21: ...al key features of the WAP5705 in this mode This mode is useful to users who are not fully familiar with some features that are usually intended for network administrators When you log in to the Web C...

Page 22: ...s connected to the Internet Use the Control Panel Section 3 6 on page 24 to configure wireless security Use the Status Screen screen Section 3 7 on page 27 to view read only information about the WAP5...

Page 23: ...work location to Home network in the Control Panel Network and Internet Network and Sharing Center screen Figure 11 Set Network Location to Home Network in Windows Vista or 7 Note Don t worry if the N...

Page 24: ...to the WAP5705 including those connecting wirelessly Right click on the WAP5705 icon to refresh the network map Right click on the other icons to view information about the device or left click the de...

Page 25: ...point AP must have the same SSID Enter a descriptive name up to 32 keyboard characters for the wireless LAN The default SSID is ZyXEL the last six characters of the WAP5705 s MAC address Security mod...

Page 26: ...o another wireless device that supports WPS Table 5 Wireless Security LABEL DESCRIPTION Table 6 Wireless Security WPS LABEL DESCRIPTION Wireless Security Click this to go back to the Wireless Security...

Page 27: ...face and pushing this button Type the same PIN number generated in the wireless station s utility Then click Register to associate to each other and perform the wireless security information synchroni...

Page 28: ...ws the trunk version model code and release number Wireless Network Name SSID This shows the SSID of the wireless network You can configure this in the Wireless Security screen Section 3 6 1 on page 2...

Page 29: ...Point Mode Note See Chapter 7 on page 53 for an example of setting up a wireless network in Access Point mode 4 2 What You Can Do Use the Status screen Section 4 4 on page 31 to view read only inform...

Page 30: ...to show your computer s IP address If your computer s IP address is not in the correct range then see Appendix A on page 105 for information on changing your computer s IP address 5 After you ve set...

Page 31: ...ew copyright and a link for related product information Select a number of seconds or None from the drop down list box to refresh all screen statistics automatically at the end of every time interval...

Page 32: ...he WAP5705 in the wireless LAN Channel This shows the channel number which you select manually or the WAP5705 automatically scans and selects Operating Channel This shows the channel number which the...

Page 33: ...mode you are viewing Expert Summary Packet Statistics Click Details to go to the Monitor Packet Statistics screen Section 8 5 on page 71 Use this screen to view port status and packet specific statis...

Page 34: ...dd a wireless station using WPS Scheduling Use this screen to schedule the times the Wireless LAN is enabled LAN IP Use this screen to configure LAN IP address and subnet mask IP Alias Use this screen...

Page 35: ...ter the WAP5705 and the access point connect the WAP5705 acquires its WAN IP address from the access point The clients of the WAP5705 can now surf the Internet 5 2 What You Can Do Use the Status scree...

Page 36: ...box Enter ipconfig to show your computer s IP address If your computer s IP address is not in the correct range then see Appendix A on page 105 for information on changing your computer s IP address 5...

Page 37: ...e Wireless LAN ON Connect Status This shows whether or not the WAP5705 has successfully associated with an access point Associated or Disassociated Name SSID This shows a descriptive name used to iden...

Page 38: ...k Details to go to the Monitor Packet Statistics screen Section 8 5 on page 71 Use this screen to view port status and packet specific statistics Table 11 Status Screen Client Mode LABEL DESCRIPTION T...

Page 39: ...odify it Activate Select a profile and click this button to enable it Note You can activate only one profile at a time Table 12 Client Mode WLAN Profile continued LABEL DESCRIPTION Table 13 Client Mod...

Page 40: ...Mode WLAN Profile No Security LABEL DESCRIPTION Wireless Setup Profile Name Enter a descriptive name for this profile Network Name SSID Enter the name of the access point to which you are connecting S...

Page 41: ...ich you are connecting Site Survey Click this button to go to the Site Survey screen and see available wireless devices within range Security Security Mode Select Static WEP to enable data encryption...

Page 42: ...s as a WEP key The preceding 0x that identifies a hexadecimal key is entered automatically Key 1 to Key 4 The WEP keys are used to encrypt data Both the WAP5705 and the wireless stations must use the...

Page 43: ...ient Mode WLAN Profile WPA PSK WPA2 PSK LABEL DESCRIPTION Table 17 Client Mode WLAN Site Survey LABEL DESCRIPTION Station Site Survey Select a wireless device and click Add Profile to open a configura...

Page 44: ...splays the strength of the wireless signal The signal strength mainly depends on the antenna output power and the distance between your WAP5705 and this device Ch This displays the channel number used...

Page 45: ...45 5 9 LED Link Quality Screen Use this screen to view the threshold for each color of the quality LED on the WAP5705 Go to Configuration Wireless LAN LED Link Quality to open the following screen Fi...

Page 46: ...Chapter 5 Client Mode WAP5705 User s Guide 46...

Page 47: ...sions enabled by default Refer to the Troubleshooting chapter Chapter 12 on page 99 to see how to make sure these functions are allowed in Internet Explorer 6 2 Accessing the Web Configurator 1 Connec...

Page 48: ...CRIPTION Password Type 1234 default as the password Language Select the language you want to use to configure the Web Configurator Click Login This shows the current weather either in celsius or fahre...

Page 49: ...minutes go to Chapter 11 on page 91 to change this Simply log back into the WAP5705 if this happens 6 2 3 Home Screen If you have previously logged into the Web Configurator but did not click Logout...

Page 50: ...er display Figure 34 Change Weather Table 21 Home Screen LABEL DESCRIPTION Go Click this to open the Easy mode Web Configurator Language Select a language to go to the Easy mode Web Configurator in th...

Page 51: ...els in this screen Note You can also edit the timezone in Section 11 5 on page 93 Table 22 Change Weather LABEL DESCRIPTION o C or o F Choose which temperature unit you want the WAP5705 to display Cha...

Page 52: ...Chapter 6 The Web Configurator WAP5705 User s Guide 52...

Page 53: ...n Client Mode to an AP 7 2 Connecting to the Internet from an Access Point This section gives you an example of how to set up an access point A and wireless client B in this example for wireless commu...

Page 54: ...t they are within range of each other 2 Make sure the WPS buttons of both WAP5705s are on 3 Press the WPS buttons for more than three seconds The WPS LEDs blink Note It doesn t matter which button is...

Page 55: ...e configuration interfaces of both AP and client 1 Log into the client s Web Configurator Go to the Configuration Network Wireless LAN WPS screen to get a PIN number 2 Log into the AP s Web Configurat...

Page 56: ...lient This may take up to two minutes Then the wireless client is able to communicate with the AP securely The following figure shows you how to set up wireless network and security on AP and wireless...

Page 57: ...ed see the Quick Start Guide and you are logged into the Web Configurator through your LAN connection see Section 6 2 on page 47 1 Open the Wireless LAN General screen in the AP s Web Configurator 2 E...

Page 58: ...A PSK and enter ThisismyWPA PSKpre sharedkey in the Pre Shared Key field Click Apply Figure 40 Tutorial Network Wireless LAN Security 5 Open the Status screen Verify your wireless and wireless securit...

Page 59: ...is operating in access point mode This allows you to configure multiple independent wireless networks on the WAP5705 as if there were multiple APs virtual APs Each virtual AP has its own SSID wireles...

Page 60: ...changing your computer s IP address 4 After you ve set your computer s IP address open a web browser such as Internet Explorer and type http 192 168 1 2 as the web address in your web browser 5 Enter...

Page 61: ...k the Security tab to configure security settings for each SSID Select SSID_Worker from the SSID drop down list Configure the screen as follows Click Apply 10 Select SSID_Guest from the SSID drop down...

Page 62: ...ork already and you want to use the WAP5705 as a wireless client to connect to the existing AP set the WAP5705 to client mode The WAP5705 then acts as a wireless client Your device such as a computer...

Page 63: ...ppears Click Expert Mode in the navigation panel 8 To connect to a specific wireless network you can manually create a wireless profile or use the site survey tool to associate with it 7 6 1 Connectin...

Page 64: ...ings must be the same as those on the AP to which you are connecting 3 The new profile entry displays in the Profile screen The green check icon means this profile is active and the WAP5705 is associa...

Page 65: ...en check icon means this profile is active and the WAP5705 is associating with the specified wireless network 7 6 3 Deploying the WAP5705 in your Network 1 After you finish configuring the operating m...

Page 66: ...Chapter 7 Tutorials WAP5705 User s Guide 66...

Page 67: ...67 PART II Technical Reference...

Page 68: ...68...

Page 69: ...ategories that you selected in the Log Settings screen Use the Log Settings screen Section 8 4 on page 70 to configure which logs and or immediate alerts the WAP5705 is to record use the Packet Statis...

Page 70: ...Log Log Settings The screen appears as shown Figure 43 Monitor Log Log Settings Table 24 Monitor Log LABEL DESCRIPTION Display Select a category of logs to view Select all log to view logs from all o...

Page 71: ...s the maximum transmission rate when the WLAN is enabled and Down when the WLAN is disabled TxPkts This is the number of transmitted packets on this port RxPkts This is the number of received packets...

Page 72: ...reless router using the same SSID channel and security settings Note This screen is not available when the WAP5705 is in Client mode Figure 45 Monitor WLAN Station Status Association List The followin...

Page 73: ...twork devices A and B are called wireless clients The wireless clients use the access point AP to interact with other devices such as the printer or with the Internet Your WAP5705 is the AP 9 2 What Y...

Page 74: ...ess client in the same wireless network must use security compatible with the AP Security stops unauthorized devices from using the wireless network It can also protect the information that is sent in...

Page 75: ...ess network Note It is recommended that wireless networks use WPA PSK or stronger encryption IEEE 802 1x and WEP encryption are better than none at all but it is still possible for unauthorized device...

Page 76: ...ch a wireless client is associated Enter a descriptive name up to 32 printable characters found on a typical English language keyboard for the wireless LAN You can configure up to four SSIDs to enable...

Page 77: ...ticular region Select a channel from the drop down list box The options vary depending on the frequency band and the country you are in This option is only available if Auto Channel Selection is disab...

Page 78: ...less LAN Security Static WEP The following table describes the wireless LAN security labels in this screen Table 30 Network Wireless LAN Security Static WEP LABEL DESCRIPTION SSID Select the SSID for...

Page 79: ...is entered automatically Key 1 to Key 4 The WEP keys are used to encrypt data Both the WAP5705 and the wireless stations must use the same WEP key for data transmission If you chose 64 bit WEP then e...

Page 80: ...ntication Type a pre shared key from 8 to 63 case sensitive keyboard characters Group Key Update Timer The Group Key Update Timer is the rate at which the AP sends a new group key out to all clients T...

Page 81: ...12 34 56 78 9a bc MAC Filter Summary Delete Click the delete icon to remove the MAC address from the list MAC Address This is the MAC address of the wireless station that are allowed or denied access...

Page 82: ...802 11 wireless environment of your WAP5705 Operating Mode Choose this according to the wireless mode s used in your network Mixed Select this if the wireless clients in your network use different wi...

Page 83: ...le 34 Network Wireless LAN QoS LABEL DESCRIPTION Enable WMM QoS Check this to have the WAP5705 automatically give a service a priority level according to the ToS value in the IP header of packets it s...

Page 84: ...reless and wireless security settings also appear in the screen This displays Unconfigured if WPS is disabled and there are no wireless or wireless security changes on the WAP5705 or you click Release...

Page 85: ...this button when you use the PBC Push Button Configuration method to configure wireless stations s wireless settings See Section 7 3 1 on page 54 Click this to start WPS aware wireless station scanni...

Page 86: ...ng times 24 Hour Format Select a begin time using the first set of hour and minute min drop down boxes and select an end time using the second set of hour and minute min drop down boxes If you have ch...

Page 87: ...uilding or floor of a building The LAN screens can help you configure a LAN DHCP server manage IP addresses and partition your physical network into logical networks Figure 57 LAN Example The LAN scre...

Page 88: ...th subnet mask of 255 255 255 0 24 bits Client mode IP address of 192 168 1 10 with subnet mask of 255 255 255 0 24 bits 10 3 1 IP Alias IP alias allows you to partition a physical network into differ...

Page 89: ...e Defined LAN IP Address Click this if you want to specify the IP address of your WAP5705 Or if your ISP or network administrator gave you a static IP address to access the network or the Internet IP...

Page 90: ...ESCRIPTION IP Alias Check this to enable IP alias IP Address Type the IP alias address of your WAP5705 in dotted decimal notation IP Subnet Mask The subnet mask specifies the network number portion of...

Page 91: ...on page 93 to change your WAP5705 s time and date Use the Firmware Upgrade screen Section 11 6 on page 94 to upload firmware to your WAP5705 Use the Backup Restore screen Section 11 8 on page 97 to vi...

Page 92: ...ur password again Very long idle timeouts may have security risks A value of 0 means a management session never times out no matter how long it has been left idle not recommended Apply Click Apply to...

Page 93: ...your WAP5705 Each time you reload this page the WAP5705 synchronizes the date with the time server Current Time and Date Manual Select this radio button to enter the time and date manually If you con...

Page 94: ...s of the United States on the second Sunday of March Each time zone in the United States starts using Daylight Saving Time at 2 A M local time So in the United States you would select Second Sunday Ma...

Page 95: ...de Firmware File Path Type in the location of the file you want to upload in this field or click Browse to find it Browse Click Browse to find the bin file you want to upload Remember that you must de...

Page 96: ...re Screen Backup configuration allows you to back up save the WAP5705 s current configuration to a file on your computer Once your WAP5705 is configured and functioning properly it is highly recommend...

Page 97: ...h Type in the location of the file you want to upload in this field or click Browse to find it Browse Click Browse to find the file you want to upload Remember that you must decompress compressed ZIP...

Page 98: ...Chapter 11 Maintenance WAP5705 User s Guide 98...

Page 99: ...uded with the WAP5705 2 Make sure the power adaptor or cord is connected to the WAP5705 and plugged in to an appropriate power source Make sure the power source is turned on 3 Disconnect and re connec...

Page 100: ...f this does not work you have to reset the device to its factory defaults See Section 12 4 on page 102 I cannot see or access the Login screen in the Web Configurator 1 Make sure you are using the cor...

Page 101: ...n after 5 minutes 3 Disconnect and re connect the power adaptor or cord to the WAP5705 4 If this does not work you have to reset the device to its factory defaults See Section 12 4 on page 102 12 3 In...

Page 102: ...h If the signal strength is low try moving the clients closer to the AP if possible and look around to see if there are any devices that might be interfering with the wireless network for example micr...

Page 103: ...WAP5705 back to its factory default configurations If the WAP5705 restarts automatically wait for the WAP5705 to finish restarting and log in to the Web Configurator The password is 1234 If the WAP570...

Page 104: ...Chapter 12 Troubleshooting WAP5705 User s Guide 104...

Page 105: ...d all versions of UNIX LINUX include the software components you need to use TCP IP on your computer If you manually assign IP information instead of using a dynamic IP make sure that your network s c...

Page 106: ...Setting Up Your Computer s IP Address WAP5705 User s Guide 106 1 Click Start Control Panel 2 In the Control Panel click the Network Connections icon 3 Right click Local Area Connection and then select...

Page 107: ...Appendix A Setting Up Your Computer s IP Address WAP5705 User s Guide 107 4 On the General tab select Internet Protocol TCP IP and then click Properties...

Page 108: ...by your network administrator or ISP You may also have to enter a Preferred DNS server and an Alternate DNS server if that information was provided 7 Click OK to close the Internet Protocol TCP IP Pro...

Page 109: ...P Address WAP5705 User s Guide 109 Windows Vista This section shows screens from Windows Vista Professional 1 Click Start Control Panel 2 In the Control Panel click the Network and Internet icon 3 Cli...

Page 110: ...WAP5705 User s Guide 110 4 Click Manage network connections 5 Right click Local Area Connection and then select Properties Note During this procedure click Continue whenever Windows displays a screen...

Page 111: ...Appendix A Setting Up Your Computer s IP Address WAP5705 User s Guide 111 6 Select Internet Protocol Version 4 TCP IPv4 and then select Properties...

Page 112: ...your network administrator or ISP You may also have to enter a Preferred DNS server and an Alternate DNS server if that information was provided Click Advanced 9 Click OK to close the Internet Protoc...

Page 113: ...WAP5705 User s Guide 113 Windows 7 This section shows screens from Windows 7 Enterprise 1 Click Start Control Panel 2 In the Control Panel click View network status and tasks under the Network and In...

Page 114: ...ter s IP Address WAP5705 User s Guide 114 4 Double click Local Area Connection and then select Properties Note During this procedure click Continue whenever Windows displays a screen saying that it ne...

Page 115: ...Appendix A Setting Up Your Computer s IP Address WAP5705 User s Guide 115 5 Select Internet Protocol Version 4 TCP IPv4 and then select Properties...

Page 116: ...lds if you have a static IP address that was assigned to you by your network administrator or ISP You may also have to enter a Preferred DNS server and an Alternate DNS server if that information was...

Page 117: ...r Computer s IP Address WAP5705 User s Guide 117 3 The IP settings are displayed as follows Mac OS X 10 3 and 10 4 The screens in this section are from Mac OS X 10 4 but can also apply to 10 3 1 Click...

Page 118: ...uter s IP Address WAP5705 User s Guide 118 2 In the System Preferences window click the Network icon 3 When the Network preferences pane opens select Built in Ethernet from the network connection type...

Page 119: ...rom the Configure IPv4 list in the TCP IP tab 5 For statically assigned settings do the following From the Configure IPv4 list select Manually In the IP Address field type your IP address In the Subne...

Page 120: ...properties by clicking Applications Utilities Network Utilities and then selecting the appropriate Network Interface from the Info tab Figure 68 Mac OS X 10 4 Network Utility Mac OS X 10 5 and 10 6 T...

Page 121: ...In System Preferences click the Network icon 3 When the Network preferences pane opens select Ethernet from the list of available connection types 4 From the Configure list select Using DHCP for dynam...

Page 122: ...AP5705 User s Guide 122 From the Configure list select Manually In the IP Address field enter your IP address In the Subnet Mask field enter your subnet mask In the Router field enter the IP address o...

Page 123: ...s section shows you how to configure your computer s TCP IP settings in the GNU Object Model Environment GNOME using the Ubuntu 8 Linux distribution The procedure screens and file locations may vary d...

Page 124: ...ow opens click Unlock to open the Authenticate window By default the Unlock button is greyed out until clicked You cannot make changes to your configuration unless you first enter your admin password...

Page 125: ...The Properties dialog box opens In the Configuration list select Automatic Configuration DHCP if you have a dynamic IP address In the Configuration list select Static IP address if you have a static I...

Page 126: ...P Address WAP5705 User s Guide 126 7 If you know your DNS server IP address es click the DNS tab in the Network Settings window and then enter the DNS server information in the fields provided 8 Click...

Page 127: ...70 Ubuntu 8 Network Tools Linux openSUSE 10 3 KDE This section shows you how to configure your computer s TCP IP settings in the K Desktop Environment KDE using the openSUSE 10 3 Linux distribution T...

Page 128: ...endix A Setting Up Your Computer s IP Address WAP5705 User s Guide 128 1 Click K Menu Computer Administrator Settings YaST 2 When the Run as Root KDE su dialog opens enter the admin password and click...

Page 129: ...uide 129 3 When the YaST Control Center window opens select Network Devices and then click the Network Card icon 4 When the Network Settings window opens click the Overview tab select the appropriate...

Page 130: ...k the Address tab Figure 71 openSUSE 10 3 Network Card Setup 6 Select Dynamic Address DHCP if you have a dynamic IP address Select Statically assigned IP Address if you have a static IP address Fill i...

Page 131: ...in Network Settings and then enter the DNS server information in the fields provided 9 Click Finish to save your settings and close the window Verifying Settings Click the KNetwork Manager icon on th...

Page 132: ...omputer s IP Address WAP5705 User s Guide 132 When the Connection Status KNetwork Manager window opens click the Statistics tab to see if your connection is working properly Figure 73 openSUSE Connect...

Page 133: ...s commonly referred to as an ad hoc network or Independent Basic Service Set IBSS The following diagram shows an example of notebook computers using wireless adapters to form an ad hoc wireless LAN Fi...

Page 134: ...consists of a series of overlapping BSSs each containing an access point with each access point connected together by a wired network This wired connection between APs is called a Distribution System...

Page 135: ...interference Interference occurs when radio signals from different access points overlap causing interference and degrading performance Adjacent channels partially overlap however To avoid interferen...

Page 136: ...and confirms with the requesting station the time frame for the requested transmission Stations can send frames smaller than the specified RTS CTS directly to the AP without the RTS Request To Send CT...

Page 137: ...ly use short preamble when all wireless devices on the network support it otherwise the WAP5705 uses long preamble Note The wireless devices MUST use the same preamble mode in order to communicate IEE...

Page 138: ...ofile and accounting management on a network RADIUS server Support for EAP Extensible Authentication Protocol RFC 2486 that allows additional authentication methods to be deployed with no changes to t...

Page 139: ...work security the access point and the RADIUS server use a shared secret key which is a password they both know The key is not sent over the network In addition to the shared key password information...

Page 140: ...kes user identity vulnerable to passive attacks A digital certificate is an electronic ID card that authenticates the sender s identity However to implement EAP TLS you need a Certificate Authority CA...

Page 141: ...s a single identical password entered into each access point wireless gateway and wireless client As long as the passwords match a wireless client will be granted access to a WLAN If the AP or the wir...

Page 142: ...mon password approach makes WPA 2 PSK susceptible to brute force password guessing attacks but it s still an improvement over WEP as it employs a consistent single alphanumeric password to derive a PM...

Page 143: ...IUS server distributes the PMK to the AP The AP then sets up a key hierarchy and management system using the PMK to dynamically generate unique data encryption keys The keys are used to encrypt every...

Page 144: ...urity features Antenna Overview An antenna couples RF signals onto air A transmitter within a wireless device sends an RF signal to the antenna which propagates the signal through the air The antenna...

Page 145: ...for WLAN There are two types of antennas used for wireless LAN applications Omni directional antennas send the RF signal out in all directions on a horizontal plane The coverage area is torus shaped l...

Page 146: ...Appendix B Wireless LANs WAP5705 User s Guide 146...

Page 147: ...armful interference in a residential installation This device generates uses and can radiate radio frequency energy and if not installed and used in accordance with the instructions may cause harmful...

Page 148: ...oducts or components without charge for either parts or labor and to whatever extent it shall deem necessary to restore the product or components to proper operating condition Any replacement will con...

Page 149: ...nforme ai requisiti essenziali ed alle altre disposizioni pertinenti stabilite dalla direttiva 1999 5 CE Latvian Ar o ZyXEL deklar ka iek rtas atbilst Direkt vas 1999 5 EK b tiskaj m pras b m un citie...

Page 150: ...aly This product meets the National Radio Interface and the requirements specified in the National Frequency Allocation Table for Italy Unless this wireless LAN product is operating within the boundar...

Page 151: ...e the device if the power adaptor or cord is damaged as it might cause electrocution If the power adaptor or cord is damaged remove it from the power outlet Do NOT attempt to repair the power adaptor...

Page 152: ...Appendix C Legal Information WAP5705 User s Guide 152...

Page 153: ...nnel 32 channel 74 135 interference 135 Client 11 Configuration restore 97 copyright 147 CPU usage 33 38 CTS Clear to Send 136 D Daylight saving 94 disclaimer 147 documentation related 2 dynamic WEP k...

Page 154: ...web configurator using the WPS See WPS Media access control 80 Memory usage 33 38 Message Integrity Check MIC 141 mode 11 N Navigation Panel 33 navigation panel 33 O Operating Channel 32 operating mo...

Page 155: ...wireless client WPA supplicants 142 wireless LAN scheduling 85 Wireless network basic guidelines 73 channel 74 encryption 75 example 73 MAC address filter 74 overview 73 security 74 SSID 74 Wireless...

Page 156: ...Index WAP5705 User s Guide 156...

Reviews: