background image

VSG1432 User Setup Guide

6

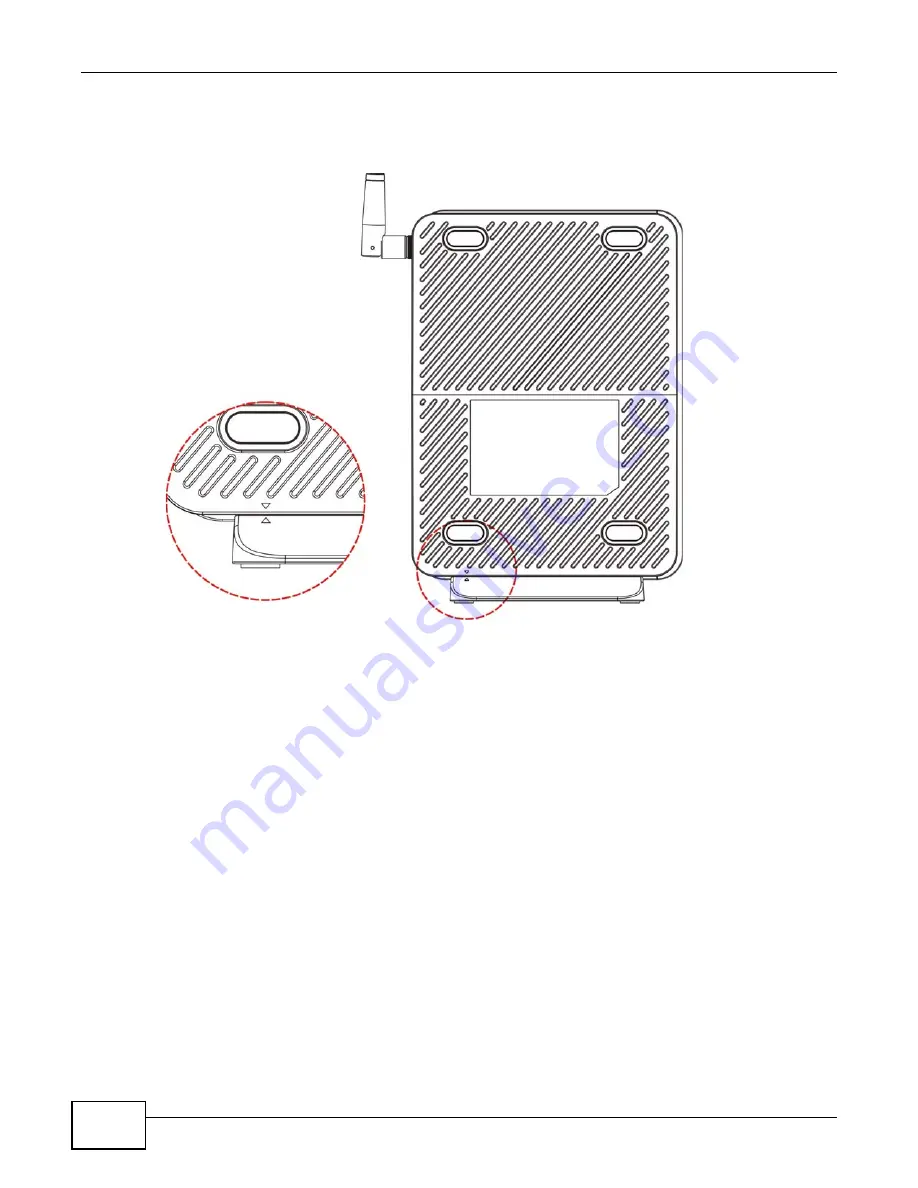
To connect the stand, line up the arrow on the stand with the arrow on the bottom of the device as 
shown. 

Figure 1   

Connecting the Stand 

Summary of Contents for VSG1432

Page 1: ...SG1432 User Setup Guide 802 11n Wireless VDSL2 4 port Gateway Copyright 2011 ZyXEL Communications Corporation Firmware Version 1 10 Edition 1 10 2011 Default Login Details IP Address http 192 168 1 254 Username admin Password telus ...

Page 2: ......

Page 3: ...Contents Overview VSG1432 User Setup Guide 3 Contents Overview Introducing the VSG1432 5 User Setup Guide 13 Troubleshooting 49 Technical Specifications 55 ...

Page 4: ...Contents Overview VSG1432 User Setup Guide 4 ...

Page 5: ...ce Use the Web Configurator for management of the Device using a supported web browser See Section 2 1 1 on page 13 for information on accessing the Web Configurator 1 3 Good Habits for Managing the Device Do the following things regularly to make the Device more secure and to manage the Device more effectively Change the password Use a password that s not easy to guess and that consists of differ...

Page 6: ...VSG1432 User Setup Guide 6 To connect the stand line up the arrow on the stand with the arrow on the bottom of the device as shown Figure 1 Connecting the Stand ...

Page 7: ...elephone cable to connect your Device s DSL WAN port to a telephone jack or the DSL or modem jack on a splitter if you have one 2b ETHERNET WAN If you already have a broadband router or modem use an Ethernet cable to connect the ETHERNET WAN port to it for Internet access 3 ETHERNET LAN Use an Ethernet cable to connect a computer to an ETHERNET LAN port for initial configuration and or Internet ac...

Page 8: ...o connect the POWER socket to an appropriate power source Make sure the power at the outlet is on After connecting the power adaptor look at the lights on the front panel 1 6 LEDs Lights The following graphic displays the labels of the LEDs Figure 3 LEDs on the Device ...

Page 9: ...a Network LAN Blinking The Device is sending or receiving data to from the LAN at 100 Mbps Off The Device does not have an Ethernet connection with the LAN ETHERNET WAN Green On The Gigabit Ethernet connection is working Blinking The Device is sending or receiving data to from the Gigabit Ethernet link Off There is no Gigabit Ethernet link USB Green On The Device recognizes a USB connection Blinki...

Page 10: ...ving to rely on inconvenient Ethernet cables You can connect to your wireless network using the WPS button without having to access the Web Configurator Figure 4 Wireless Access Example 1 8 1 Using the WLAN WPS Button Note The wireless client must be a WPS aware device for example a WPS USB adapter or PCMCIA card which can be identified by the WPS logo If the wireless network is turned off enable ...

Page 11: ...led client device within range of the Device If you do not know how to enable WPS on that client device refer to its manual The WLAN WPS LED flashes green and orange while the Device sets up a WPS connection with the other WPS enabled client device 4 Once the connection is successfully made the WLAN WPS LED shines green ...

Page 12: ...VSG1432 User Setup Guide 12 ...

Page 13: ...nternet Using DDNS see page 30 Firewall Setup see page 32 MAC Filter Setup for Blocking LAN Computers see page 35 Scheduler Rules and Parental Control see page 37 LAN DHCP for IP Addressing Assignment see page 40 Check the Firmware Version see page 43 Restore to Factory Default see page 44 2 1 1 Access the Web Configurator for Setting Up the Device You will need to log in to the Web Configurator t...

Page 14: ...s as an access point AP and the notebook is the wireless client The wireless client can access the Internet through the AP Thomas has to configure the wireless network settings on the Device Then he can set up a wireless network using WPS Section 2 2 2 on page 16 or manual configuration Section 2 2 3 on page 20 2 2 1 Configuring the Wireless Network Settings This example uses the following paramet...

Page 15: ...VSG1432 User Setup Guide 15 1 Click Wireless to open the Basic Wireless Setup screen ...

Page 16: ...age 20 2 2 2 Using WPS This section shows you how to set up a wireless network using WPS It uses the Device as the AP and ZyXEL NWD210N as the wireless client which connects to the notebook Note The wireless client must be a WPS aware device for example a WPS USB adapter or PCMCIA card which can be identified by the WPS logo There are two WPS methods to set up the wireless client settings Push But...

Page 17: ...rator and go to the Network Settings Wireless WPS screen Enable the WPS function and click Apply Then click the Connect button Note Your Device has a WPS button located on its front panel as well as a WPS button in its configuration utility Both buttons have exactly the same function you can use one or the other Note It doesn t matter if the WPS button on the wireless client or AP is pressed first...

Page 18: ...S Process PBC Method PIN Configuration When you use the PIN configuration method you need to use both the Device s web configurator and the wireless client s utility 1 Launch your wireless client s configuration utility Go to the WPS settings and select the PIN method to get a PIN number Wireless Client ZyXEL Device SECURITY INFO COMMUNICATION WITHIN 2 MINUTES Press and hold for 5 seconds ...

Page 19: ... number of the wireless client and click the Register button Activate WPS function on the wireless client utility screen within two minutes The Device authenticates the wireless client and sends the proper configuration settings to the wireless client This may take up to two minutes The wireless client is then able to communicate with the Device securely ...

Page 20: ... and a wireless client by using PIN method Example WPS Process PIN Method 2 2 3 Without WPS This section describes how to connect wirelessly to your Device The connection procedure is shown here using Windows XP as an example Authentication by PIN SECURITY INFO WITHIN 2 MINUTES Wireless Client ZyXEL Device COMMUNICATION ...

Page 21: ...D SecureWirelessNetwork is given here as an example Tutorial Network Wireless LAN SecuritOpen the Status screen Verify your wireless and wireless security settings under Device Information and check if the WLAN connection is up under Interface Status Tutorial Status 3 You are prompted to enter a password Enter it and click Connect Tutorial Network Wireless LAN SecuritOpen the Status screen Verify ...

Page 22: ...that does not work ensure your wireless network adapter is enabled by clicking on the wireless adapter icon and clicking Enable 2 3 Setting Up Multiple Wireless Groups Thomas wants to create different wireless network groups for different types of users as shown in the following figure Each group has its own SSID and security mode Thomas will use the secured Secure wireless network group Visitors ...

Page 23: ...creen Use this screen to set up a secure general wireless network group Configure the screen using the provided parameters and click Apply 2 Click Wireless Additional WLANs to open the following screen Click the Edit icon to configure the second wireless network group ...

Page 24: ...VSG1432 User Setup Guide 24 3 Configure the screen using the provided parameters and click Apply 4 In the Additional WLANs screen click the Edit icon to configure the third wireless network group ...

Page 25: ...e yellow bulbs signify that the SSIDs are active and ready for wireless access 2 4 Wireless MAC Authentication for Blocking a Computer s Access to the Wireless Network This example shows how to configure MAC Authentication to use a computer s MAC address to block it from accessing the wireless network Note MAC Authentication is not a highly secure method of security ...

Page 26: ... 26 1 Click the Wireless icon and click the MAC Authentication tab In the MAC Authentication screen click the Add new MAC address button 2 In the MAC Address field enter the MAC Address of the computer to block and click Apply ...

Page 27: ...e with the server Thomas can use port forwarding or application forwarding Application forwarding can be easier to set up since you do not need to specify port numbers manually Note You cannot configure an application forwarding rule that uses the same ports as a configured port forwarding rule Note If firewall is enabled you may also need to configure an Access Control List rule for the relevant ...

Page 28: ... 1 Click Network Settings NAT Add new rule and configure the screen with the following values 2 The screen should look as follows Click Apply 3 Repeat steps 1 and 2 for UDP ports 2302 and 13139 The port forwarding settings you configured appear in the table Players on the Internet then can have access to Thomas server Service Name CivIV External Port s Enter 6500 as the Start and End port Server I...

Page 29: ...rding for forwarding traffic to the server 1 Click Network Settings NAT Add new rule Select Active and in the Application Category dropdown menu select Games 1 The following screen appears Enter the Server IP Address as 192 168 1 34 and in the Application Forwarded dropdown menu select Civilization IV Click Apply ...

Page 30: ...ed to enable remote desktop server service on your home computer The remote desktop server feature is only included in Windows Professional Business and Ultimate versions Note If firewall is enabled you may also need to configure an Access Control List rule for the relevant ports See Access Control List To use this feature you have to apply for DDNS service at www dyndns org This tutorial covers R...

Page 31: ...Device s Web Configurator Status page Then you will need to configure the same account and host name on the Device later 2 6 2 Configuring DDNS on Your Device Configure the following settings in the Network Setting DNS Setting Dynamic DNS screen Select Enable Dynamic DNS Select DynDNS org as the service provider Type zyxelrouter dyndns org in the Host Name field Enter the user name UserName1 and p...

Page 32: ...lso need to configure a Static DHCP rule for this IP address See Configuring Static DHCP Click Apply 2 6 4 Testing the DDNS Setting Now you should be able to access the Device from the Internet To test this 1 Open the remote desktop client application on the remote computer using the IP address a b c d that is connected to the Internet 2 Type http zyxelrouter dyndns org and press Enter 3 Your comp...

Page 33: ...ddress 2 In the security Level dropdown you can select High Medium or Low High All WAN to LAN and LAN to WAN traffic is blocked Medium All WAN to LAN traffic is blocked All LAN to WAN traffic is allowed except for Access Control Lists ACL s Low All WAN to LAN and LAN to WAN traffic is allowed except for ACL s Firewall Example Edit Rule Destination Address ...

Page 34: ...n to from the Internet 1 Click the Access Control List ACL tab Finally click the Add New ACL Rule button Firewall Example Edit Rule Destination Address 2 In the Access Control List ACL screen configure the screen as follows and click Apply Firewall Example Edit Rule Destination Address Firewall Example Edit Rule Select Customized Services ...

Page 35: ...ollowing Firewall Example Edit Rule Destination Address 2 8 MAC Filter Setup for Blocking LAN Computers The following example shows how to create a MAC filter rule to block a computer from accessing the Device 1 Place your mouse over the Security Settings icon and click MAC Filter in the drop down Firewall Example Edit Rule Destination Address ...

Page 36: ...ply To add a device to the MAC Filter Lists click the Add Device button Firewall Example Edit Rule Destination Address Firewall Example Edit Rule Select Customized Services 3 Enter the MAC address of the computer you want to block and cilck Apply Firewall Example Edit Rule Destination Address ...

Page 37: ...ck List Firewall Example Edit Rule Destination Address 5 The entry will now appear in the Block List Click Apply Firewall Example Edit Rule Destination Address 2 9 Scheduler Rules and Parental Control The following example creates a Parental Control to block web access from a selected computer during a specified time period You will first configure a Scheduler Rule ...

Page 38: ...Settings icon and click Scheduler Rules in the drop down Firewall Example Edit Rule Destination Address 2 In the Scheduler Rules screen click the Add new rule button Firewall Example Edit Rule Destination Address Firewall Example Edit Rule Select Customized Services ...

Page 39: ...On completing the configuration procedure for this schedule rule the rule should appear in the rule list as below Firewall Example Edit Rule Destination Address 5 Now configure the Parental Control rule Place your mouse over the Security Settings icon and click Parental Control in the drop down Firewall Example Edit Rule Destination Address ...

Page 40: ...e Destination Address 7 Select the desired computer in the PC Name IP MAC field and select Block All In the Scheduler Rules menu select WeekdayNight Click Apply Firewall Example Edit Rule Destination Address 2 10 LAN DHCP for IP Addressing Assignment The following example shows how to configure LAN DHCP settings ...

Page 41: ...VSG1432 User Setup Guide 41 1 Place your mouse over the Networking Settings icon and click Home Networking in the drop down Firewall Example Edit Rule Destination Address ...

Page 42: ...range In the DHCP Server Lease Time section you can specify how long an IP address is leased to a LAN computer Click Apply Firewall Example Edit Rule Destination Address 2 10 1 Configuring Static DHCP Configure the following settings in the Network Setting Home Networking Static DHCP Add screen Select Active ...

Page 43: ...ddress will be displayed in the IP Address field Click Apply Firewall Example Edit Rule Select Customized Services 2 11 Check the Firmware Version The following procedure shows how to check the firmware version that is installed on the Device 1 In your web browser enter the LAN IP address of the Device The default is http 192 168 1 254 Firewall Example Edit Rule Destination Address ...

Page 44: ...en will display The Firmware Version field displays the current firmware version Firewall Example Edit Rule Destination Address 2 12 Restore to Factory Default The following procedure shows how to restore the factory default settings to the Device ...

Page 45: ...VSG1432 User Setup Guide 45 1 Place your mouse over the Maintenance icon and click Configuration in the drop down Firewall Example Edit Rule Destination Address ...

Page 46: ...p Guide 46 2 In the Back to Factory Defaults section click the Reset button Firewall Example Edit Rule Destination Address 3 Click Confirm Firewall Example Edit Rule Destination Address 4 The Reboot screen will display ...

Page 47: ...id green the modem will be configured to its default settings and will be ready to be reconfigured To reprogram your modem follow the instructions provided by your ISP Note The default username and password are on the label on the bottom of the Device Firewall Example Edit Rule Destination Address ...

Page 48: ...VSG1432 User Setup Guide 48 ...

Page 49: ...Make sure the power adaptor or cord is connected to the Device and plugged in to an appropriate power source Make sure the power source is turned on 4 Unplug the the Device s power adapter and plug it back in 5 Try plugging the power adaptor into a different power outlet 6 If the problem continues contact the vendor One of the LEDs does not behave as expected 1 Make sure you understand the normal ...

Page 50: ...uide and on the label on the bottom of the Device 2 If this does not work you have to reset the device to its factory defaults See Section 2 12 on page 44 I cannot see or access the Login screen in the web configurator 1 Make sure you are using the correct IP address The default IP address is 192 168 1 254 If you changed the IP address use the new IP address If you changed the IP address and have ...

Page 51: ... hardware connections and make sure the LEDs are behaving as expected See Section 1 6 on page 8 2 If you are trying to access the Internet wirelessly make sure that you enabled the wireless LAN in the Device and your wireless client and that the wireless settings in the wireless client are the same as the settings in the Device 3 Disconnect all the cables from your device and follow the directions...

Page 52: ...gth is low Reduce wireless interference that may be caused by other wireless networks or surrounding wireless electronics such as cordless phones Place the AP where there are minimum obstacles such as walls and ceilings between the AP and the wireless client Reduce the number of wireless clients connecting to the same AP simultaneously or add additional APs if necessary Try closing some programs t...

Page 53: ...s a pre shared key with the WPA2 standard WPA PSK This has the device use either WPA PSK or WPA2 PSK depending on which security mode the wireless client uses WEP Wired Equivalent Privacy WEP encryption scrambles the data transmitted between the wireless stations and the access points to keep network communications private ...

Page 54: ...VSG1432 User Setup Guide 54 ...

Page 55: ...tch Four auto negotiating auto MDI MDI X 10 100 Mbps RJ 45 Ethernet ports Wireless Functionality Allow the IEEE 802 11b IEEE 802 11g and or IEEE 802 11n wireless clients to connect to the Device wirelessly Enable wireless security WEP WPA PSK WPA2 PSK Mixed WPA2 PSK WPA PSK and or MAC filtering to protect your wireless network DSL Port One RJ 11 connector for DSL over POTS Power Adaptor Output 12 ...

Page 56: ...Technical Specifications VSG1432 User Setup Guide 56 ...

Reviews: