Chapter 5 Initial Setup Example
GS2200 Series User’s Guide
42
1
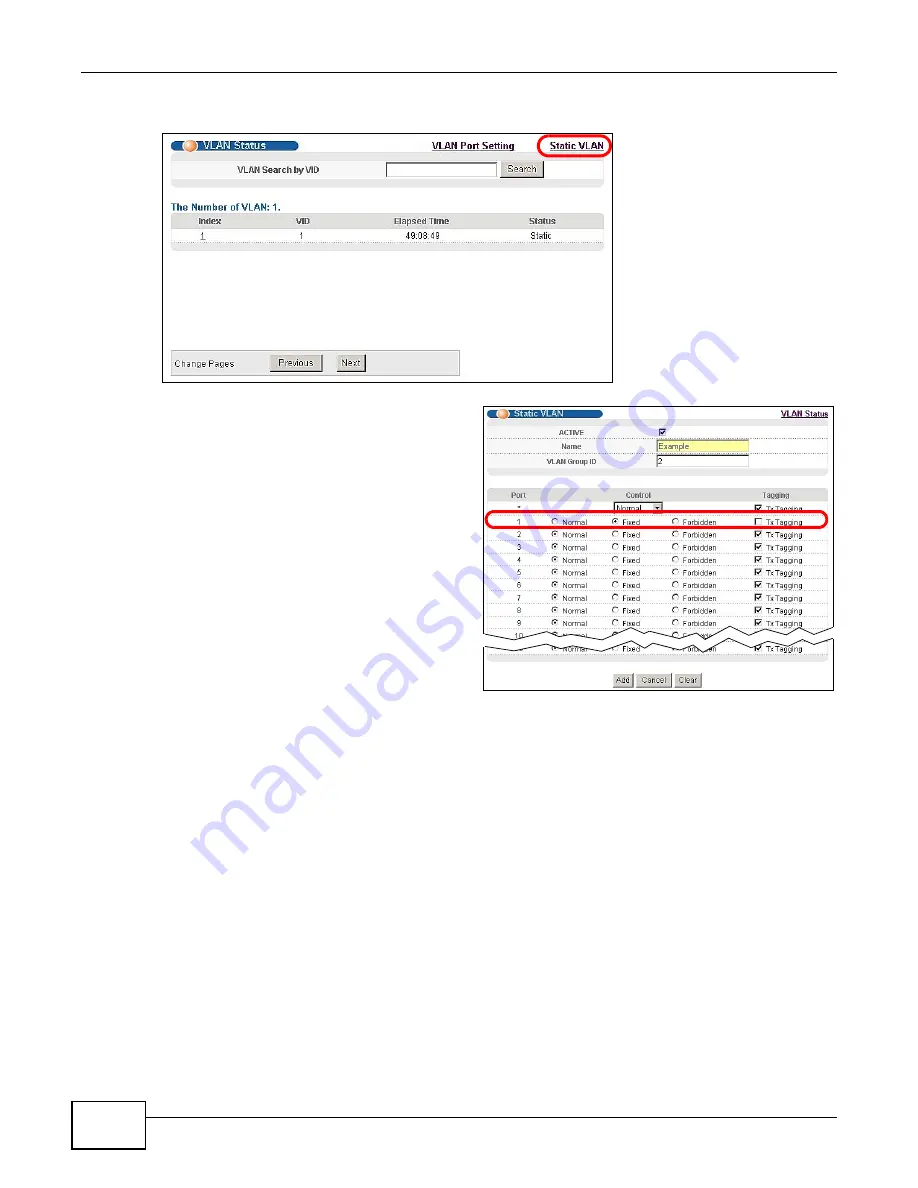
Click Advanced Application > VLAN in the navigation panel and click the Static VLAN link.
2
In the Static VLAN screen, select ACTIVE,
enter a descriptive name in the Name field
and enter 2 in the VLAN Group ID field for
the VLAN2 network.
Note: The VLAN Group ID field in this screen and the VID field in the IP Setup screen
refer to the same VLAN ID.
3
Since the VLAN2 network is connected to port 1 on the Switch, select Fixed to configure port 1 to
be a permanent member of the VLAN only.
4
To ensure that VLAN-unaware devices (such as computers and hubs) can receive frames properly,
clear the TX Tagging check box to set the Switch to remove VLAN tags before sending.
5
Click Add to save the settings to the run-time memory. Settings in the run-time memory are lost
when the Switch’s power is turned off.
5.1.2 Setting Port VID
Use PVID to add a tag to incoming untagged frames received on that port so that the frames are
forwarded to the VLAN group that the tag defines.
Summary of Contents for GS2200 Series
Page 15: ...15 PART I User s Guide...
Page 16: ...16...
Page 31: ...31 PART II Technical Reference...
Page 32: ...32...
Page 76: ...Chapter 8 Basic Setting GS2200 Series User s Guide 76...
Page 92: ...Chapter 9 VLAN GS2200 Series User s Guide 92 Figure 60 Port Based VLAN Setup Port Isolation...
Page 230: ...Chapter 29 Error Disable GS2200 Series User s Guide 230...
Page 248: ...Chapter 33 ARP Learning GS2200 Series User s Guide 248...
Page 302: ...Appendix A Changing a Fuse GS2200 Series User s Guide 302...
Page 306: ...Appendix B Common Services GS2200 Series User s Guide 306...
Page 309: ...Appendix C Legal Information GS2200 Series User s Guide 309 ROHS...
Page 310: ...Appendix C Legal Information GS2200 Series User s Guide 310...


