Zxtech Mini DVR & IP Camera User Manual Download Page 17

User Manual

Chapter9: Arrange Remote Setup Session 

Step 1: 

Please Connect a laptop or a PC to 
your Network, and you need to it 
connected to the network BOTH 
wired and wirelessly. Basically, you 
need to use the wireless network, 
and also plug a ethernet cable to 
your router at the same time. 

Step 2: 

Make sure the PC or Laptop is 
windows and the operation system 
is minimum Windows Vista. 
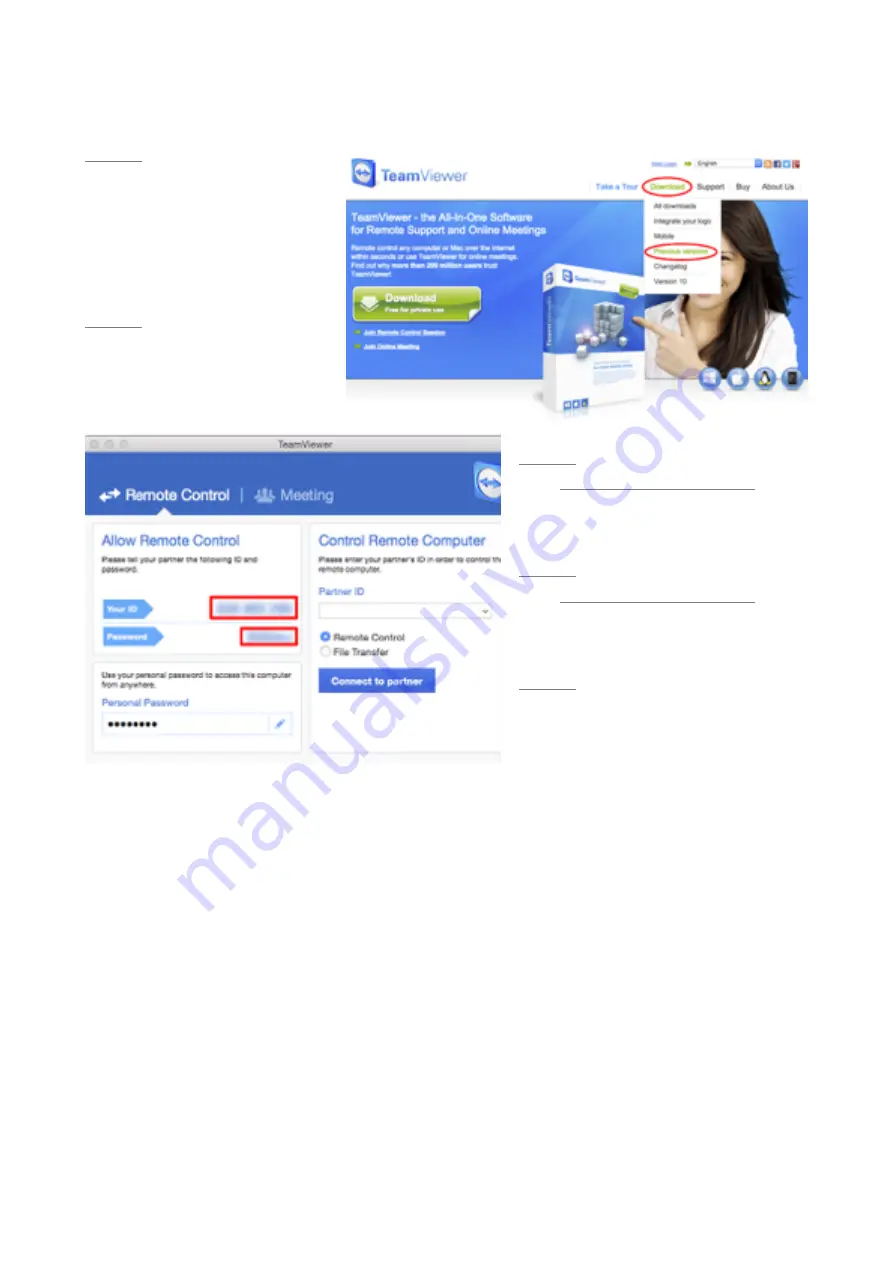
Step 3: 

Go to https://www.teamviewer.com and 
download this software. Make sure you 
need to download version 9. Other version 
will not be compatible with us.

Step 4: 

Go to https://www.teamviewer.com and 
download this software. Make sure you 
need to download version 9. Other version 
will not be compatible with us.

Step 5: 

Make sure YOUR ID and Password is 
ready before calling us. Please also 
prepare your Credit or Debit card details.

0800 756 5370 or 0203 695 0315

Chapter 10: Returning the Item 

Install an IP System requires professional knowledge in IP configuration. If you wish to install the system by 
yourself, it does take some learning and studying. If you hired a engineers to do it for you, make sure you 
have checked their licenses.

We have a no questions asked policy if you want to return the item within 14 days. However, You need to 
make sure the item has no scratches or any other physical damages.

We have a very swift repair or return policy. Try to get help from us first. Please contact us by email @ 
[email protected] or [email protected]. For more product informations you can visit: 
www.domarsolutions.co.uk

Copyright: Domarsolutions Ltd

17

Summary of Contents for Mini DVR & IP Camera

Page 1: ...User Manual Zxtech Mini DVR IP Camera User Manual Copyright Domarsolutions Ltd 1...

Page 2: ...to Modify the IP Address 6 Step 5 Repeat for Each IP Camera 7 Step 6 Change the Network Setting for Your NVR 7 Step 7 Change Computer to Original Setting 7 Step 8 Putting Things Together 7 Chapter 3...

Page 3: ...arch tool from here http goo gl hp8rL6 Use the Search Tool to find your IP Camera or NVR on your network You will be using this search tool repeatedly Connect to the Network Connect your camera or NVR...

Page 4: ...ID into the the the Device SN section Camera FREEIP ID on network section after you login to the web interface NVR FREEIP ID Main Menu System Setup P2P Config Type your username and password Install a...

Page 5: ...ve your computer connect to a router And connect the first IP Camera to the router as well it is very important to do so 2 You also need to use a windows computer minimum requirement is Vista XP may w...

Page 6: ...w up click on Internet Protocol Version 4 4 Click on Use the following IP address put in the same detail you find on Step 2 Subnet Mask and Default Gateway should be the same figure you find on Step 2...

Page 7: ...e figure you find on Step 1 but IP address you need to change the last digital to avoid conflict for example if your Step 1 s ip address is 192 168 1 2 you need to change it to 192 168 1 10 or anythin...

Page 8: ...d and Motion 17 Tick ALL under Use to Or you can only select a particular channel 18 Click on save 19 Now you have setup Motion Recording Schedule NVR 1 Go to main Main Menu Sys Setup Rec Setup 2 You...

Page 9: ...a Web browser 1 Login to your web interface through Internet Explorer Refer to Chapter 1 if you don t know how to login to your IP Camera by web interface 2 Click on Service 3 Put in correct SMTP deta...

Page 10: ...ter How to Enable DHCP 4 If Part of the User Interface is Outside your TV or Display If your operating system is not show on your monitor or TV properly For instance if part of the footage is outside...

Page 11: ...ing image of 1080p then the system will get confused The easy way to fix it is firstly find out what is the resolution setup on the camera and the NVR Then change one of them to be the same as others...

Page 12: ...User Manual Chapter 6 Plug Things Together Copyright Domarsolutions Ltd 12...

Page 13: ...l Area Connection on the drop down click on Properties 3 On the newly opened window Click on the Internet Protocol Version 4 TCP IPv4 4 Change the setting to following 1 Click on Use the following IP...

Page 14: ...wing you can go straight to See Live Footage Chapter If DHCP is not tick you will need to keep ready this chapter 4 If the IP address match then open up Internet Explorer 5 Type 192 168 1 168 or 192 1...

Page 15: ...Network and Internet Network Connection 2 Right click on Local Area Connection on the drop down click on Properties 3 On the newly opened window Click on the Internet Protocol Version 4 TCP IPv4 4 Ch...

Page 16: ...e on your NVR or Camera If the scan is successful It will give a message saying successfully added If you see Device blinded Please refer to Chapter 5 Check Device Status Now you click back to device...

Page 17: ...ompatible with us Step 5 Make sure YOUR ID and Password is ready before calling us Please also prepare your Credit or Debit card details 0800 756 5370 or 0203 695 0315 Chapter 10 Returning the Item In...

Reviews: