background image

16


Channel


DVR


Quick


Manual


12


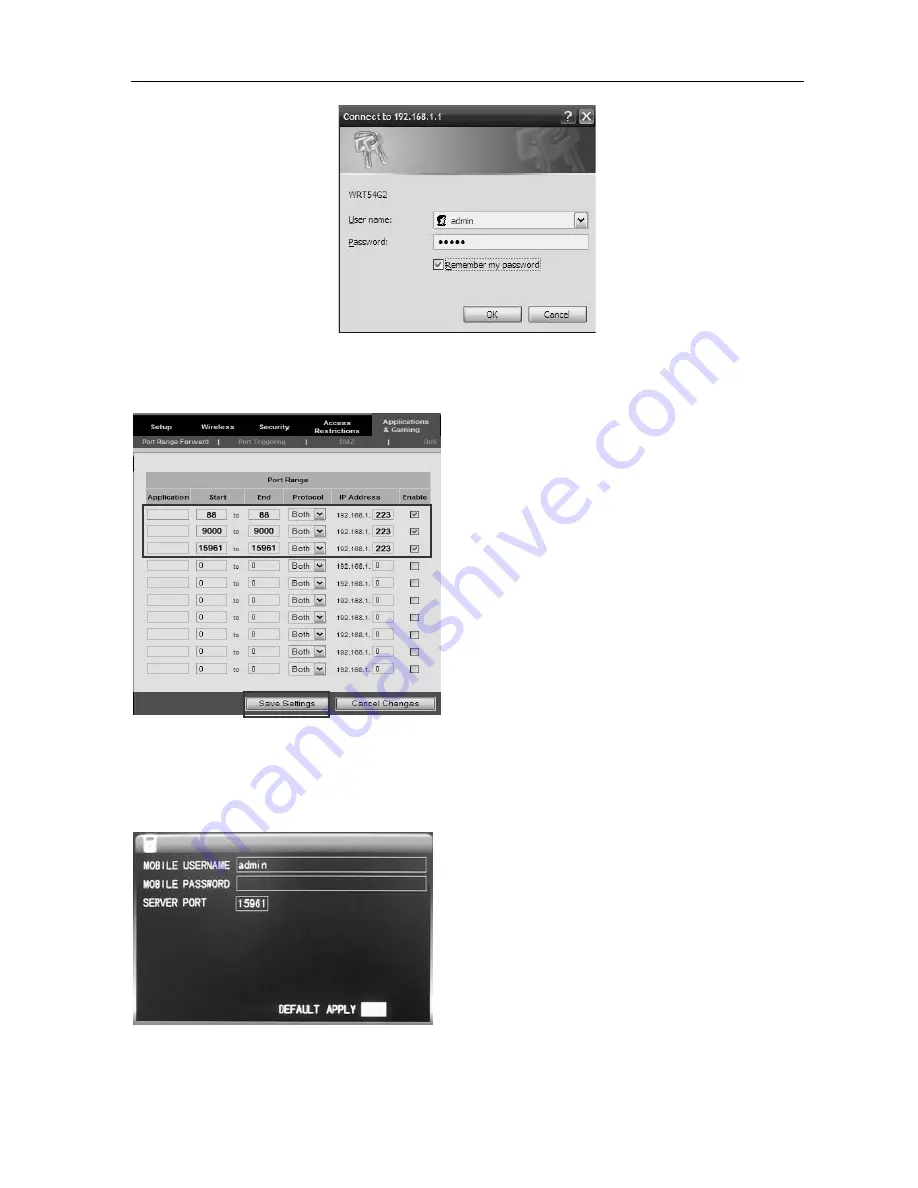
Click


OK


to


enter


the


router


main


interface,


click


the


Applications


&


Gaming

as


shown


below:


Put


the


DVR's


IP


and


port


(WEB


port,


media


port,


phone


port)


to


fill


in


the


corresponding


location,


the


protocol


is


“Both”,


and


the


state


is


“Enable”


or


Reboot.


Then


click


“Save


Settings”,


add


other


ports


in


the


same


way.


15961


is


mobile


phone


monitoring


port,


this


port


must


be


added


in


order


to


use


the


mobile


phone


surveillance


function.


As


shown


above,


88,9000


and


15961


port


can


all


be


modified


in


the


DVR


main


menu.


2.10


Mobile


phone


surveillance


2.10.1


Mobile


phone


surveillance


The


mobile


phone


surveillance


function


of


this


series


DVR


is


supported


by


mobile


phones


of


the


Windows


Mobile


and


Symbian


operating


systems.


Here


you


can


check


the


user


name


and


password


of


the


monitoring


video


by


using


the


mobile


phone


to


log


in


the


DVR.


Service


port:


The


setting


range


is


1024


65535.


This


port


needs


to


be


mapped


on


the


router,


and


the


setting


method


is


the


same


as


the


mapping


method


of


network


setting.


User


name:


admin


by


default.


Password:


empty


by


default


Summary of Contents for ZMD-DR-SFN6

Page 1: ...16 Channel DVR Quick Manual 0...

Page 2: ...operation The DVR should be installed to ensure proper connection with other devices Please buy HDD from official channel to meet DVR s long time and large data reading and writing requirements Statem...

Page 3: ...6 2 4 1 Search and playback 6 2 4 2 Recording backup 6 2 5 Alarm Setup 7 2 5 1 Alarm basic setup 7 2 5 2 E mail alarm setup 8 2 6 PTZ Control 8 2 7 Motion Detection 9 2 8 Network setup 10 2 9 Port ma...

Page 4: ...ece of User Manual One SATA HDD cable already installed in the case One DC12V3A power adapter One HDD bracket already installed and a set of mounting screws One HDD power supply cable installed in the...

Page 5: ...et and target the screw holes at the bracket D Fix the HDD on the bracket with screws and cover the DVR Note The newly installed HDD can be served for video recording after formatting on the mainframe...

Page 6: ...oller will disturb the adjacent mainframe 2 2 Main menu Click mouse right button after system startup and quick operations are available to DVR system in the pop up menu Users can set or control param...

Page 7: ...n and background color represent the alarm recording regular recording and not recording 2 4 Recording Search and Playback 2 4 1 Search and playback Enter the Video Search screen from Main Menu Video...

Page 8: ...the back panel of DVR as Figure below please refer to the physical interface of the faceplate Note The above picture is the type of normally on alarm and normally off is the opposite way 2 5 1 Alarm...

Page 9: ...sually being 25 with the exception of a few mailboxes such as the mailing port of the GMAIL server whose port number is 465 SMTP the server address of the mailbox used for example the SMTP server mail...

Page 10: ...hown below STATUS Each channel has a corresponding switch Select On or Off SENSITIVITY Each channel has a corresponding sensitivity setting with the 4 levels of 1 2 3 and 4 in which 4 is the highest S...

Page 11: ...s shown below TYPE with 4 options STATIC DHCP PPPOE and 3G STATIC allocating an IP address manually DHCP acquiring an IP address automatically left picture below After selecting the DHCP mode restart...

Page 12: ...DVR will map the port and IP into the router automatically DDNS SETUP Click DDNS Setup to enter the screen picture below DDNS Dynamic Domain Name Server with the two options of ON and OFF when a dyna...

Page 13: ...lance function As shown above 88 9000 and 15961 port can all be modified in the DVR main menu 2 10 Mobile phone surveillance 2 10 1 Mobile phone surveillance The mobile phone surveillance function of...

Page 14: ...et the parameters well and connect the server mobile phone preview interface will display right picture below Note Please refer to the Mobile Phone Surveillance Manual for detailed installation method...

Page 15: ...ression is adopted and a special player is needed Open the player s installation program PlaybackSetup exe in the CD After installing successfully as prompted run the desktop program Playback software...

Page 16: ...he CD for details Network LAN If the computer and DVR are in the same LAN choose LAN mode In this mode the image video transmission format is CIF and the frame rate is 25fps Internet If the computer a...

Page 17: ...to run CD file DVRCMS msi finish as prompted After successful installation double click desktop icon and run software Display as the following picture user name Create the initial user name for login...

Page 18: ...iew video playback system setup advanced setting PTZ control and so on Please refer to the detailed instruction of CMS in the CD for specific operation Add DVR Del DVR DVR list System configuration DV...

Page 19: ...16 Channel DVR Quick Manual 18 Appendix System Connection Picture...

Reviews: