16
Channel
DVR
Quick
Manual
10
E.
In
the
“Recording
Mode”
screen,
select
“Timing
Recording”
in
the
“Recording
Mode”
option,
also
click
“Record
Time
Configuration”
to
enter
the
Record
Time
Configuration
screen
and
set
the
corresponding
time
to
alarm
recording
(see
timing
recording
in
“Recording
Mode”
for
the
setup
method).
After
the
setup
has
been
done
and
motion
detection
is
triggered,
a
red
letter
“M”
will
appear
in
the
screen
of
this
channel.
See
“Alarm
processes”
in
Section
2.5.1
for
alarm
processing.
Operating
prompt
:
Remote
controller
operation:
Use
“ “
(display
mode)
to
select
full
screen
or
blank;
Mouse
operation:
Left
‐
click
the
mouse
and
drag
the
motion
box
to
set
the
area
of
dynamic
detection.
For
detailed
operation
procedures,
please
refer
to
the
manual
in
the
CD.
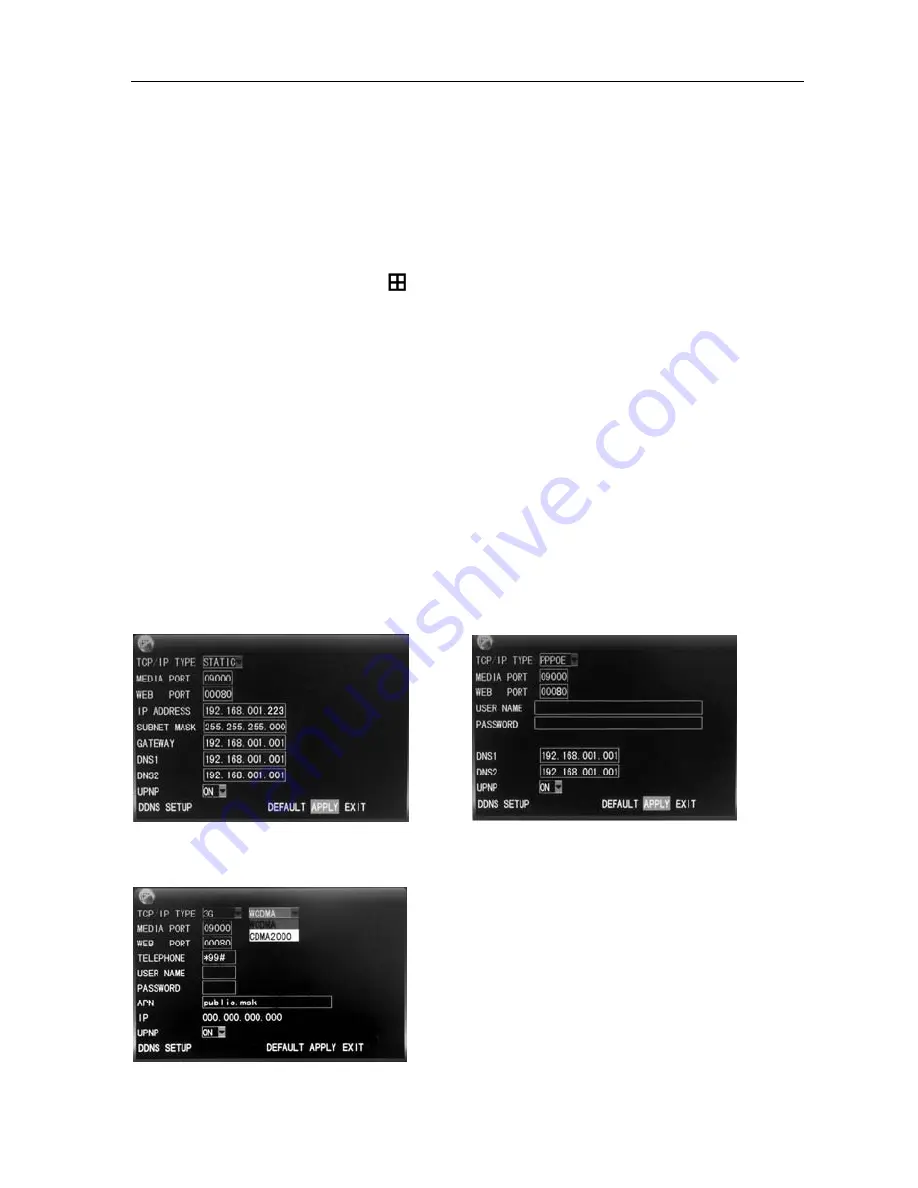
2.8
Network
setup
Enter
the
“Network”
screen
from
“Main
Menu”
→
“Advanced”
to
“Network
Setup”,
as
shown
below:
TYPE:
with
4
options:
STATIC,
DHCP
、
PPPOE
and
3G.
STATIC
:
allocating
an
IP
address
manually.
DHCP
:
acquiring
an
IP
address
automatically
(left
picture
below).
After
selecting
the
DHCP
mode,
restart
the
system
after
confirmation.
After
starting,
the
system
will
establish
a
connection
with
the
DHCP
server
automatically.
When
this
is
successful,
this
unit
will
be
allocated
with
an
IP
address,
which
will
be
displayed
on
the
screen.
PPPOE
:
broadband
dial
‐
up
network
access,
as
shown
on
the
right
picture
below:
3G:
3G
function(support
CDMA
2000
and
WCDMA),select
WCDMA.After
success
to
apply,
exit
from
3G,and
then
you
can
see
IP
info
.
PPPOE
name
and
password
:
Fill
in
the
PPPOE
user
name
and
password
provided
by
the
Internet
service
provider.
MEDIA
PORT
:
the
port
number
used
in
the
private
protocol
communication
between
the
DVR
and
PC,
usually
being
9000
by
default.
If
this
port
of
the
PC
is
occupied
by
any
other
service,
please
modify
it
to
another
unused
port.
WEB
PORT
:
the
http
port,
usually
being
80
by
default.
If
the
administrator
modifies
the


