


5.31
Support
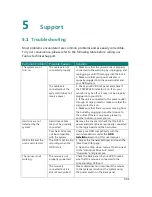
5
5.1
Troubleshooting
Most problems encountered are common problems and are easily correctible.
For your convenience, please refer to the following table before calling our
Funlux Technical Support.
Common Problem Possible Causes
Solution
The system won't
turn on.
The cables are not
connected properly
1. Make sure that the power brick is properly
connected to the wall plug by unplugging and
replugging it until it fits snugly into the brick.
2. Make sure that your power adapter is
properly plugged into the power outlet and
your DVR system.
The cables are
connected but the
system still does not
receive power
1. Check your DVR front panel and check if
the POWER LED indicator is on. If so, your
monitor may be off or it may not be properly
plugged into your DVR.
2. If the unit is connected to the power outlet
through a surge protector, make sure that the
surge protector is on.
3. Make sure that there is power coming from
the outlet by plugging in another device to
the outlet. If there is no power, please try
another outlet or power source.
Hard drive is not
detected by the
system
Hard drive cables
may not be properly
connected
Remove the cover and check that the SATA
power and data cables are properly connected
to the logic board and the hard drive.
Your hard drive may
not be compatible
with the system
Check your HDD compatibility with the
recommendations under the
HDD
Installation
section of this user manual.
HDD is full and the
unit is can't record
The DVR is set to stop
recording when the
HDD is full
1. Access the [General Settings] and open the
[Disk Drive Info] page.
2. Open the drop-down menu at the top next
to the "Hard Disk Drive Full", select
"Overwrite" and press save.
The mouse is not
working
The mouse is not
properly connected
Check the back panel of your DVR to make
sure that the mouse is connected to the
corresponding USB port.
The mouse is
connected but it is
still not recognized
Please disconnect and reconnect the mouse
to the system and reboot the system using
the power switch on the back panel.
Summary of Contents for Funlux
Page 1: ...1 ...
Page 2: ...2 ...
Page 13: ...Product Introduction 2 9 Rear Panel ...


