4.17
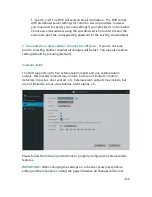
1. Choose an alarm to edit.
In the dropdown menu, choose an alarm and select
[On] to enable the alarm input. Choose the type (normally open or normally
closed) that describes your specific alarm. You may need to refer to the
instruction manual provided with your device.
2. Customize the active period for your alarm.
Next to the [Their Time] option,
press the [Config] button and open the active schedule. The alarm will be active
during the times that are highlighted blue. In order to select/deselect regions,
you must left-click and release or drag to edit more regions.
3. Define how the system responds when an alarm is triggered.
There are
four possible responses when an alarm is triggered. Choose an option by
selecting the box next to it.
NOTE:
The system will automatically record video
when an alarm is triggered.
a. "Buzzer" The DVR's built-in buzzer will sound.
b. "Alarm Output" The DVR will activate any external alarms that have
been connected to the back panel (see:
3.1 DVR Installation –
Connecting an External Alarm
).
c. "Alarm Duration" will adjust how long both the buzzer and the alarm
output will sound after motion is detected.
d. "Send E-mail" The DVR will send an email notification. The DVR comes
with predefined server settings for common service providers, however
you may need to specify your own settings if your provider is not included.
Choose an email address using the specified service provider to send the
email and input the corresponding password to the existing email address.
e. "Snapshot Ch" When selected, the DVR will capture a screenshot from
the selected channel when the alarm is triggered.
Alarm Input
Select the channel of the input alarm that you would like to edit.
Select "On" to enable this alarm.
Type
Select the type of alarm that you are using. Please refer to your alarm's
manual if you are unsure of this.
Summary of Contents for Funlux
Page 1: ...1 ...
Page 2: ...2 ...
Page 13: ...Product Introduction 2 9 Rear Panel ...


