18
19
3.1 Video Output
Connecting the power,camera will have initial configuration,IR indicator light will be
flashing. When the camera return to the HOME position(middle position for P/T),
and lens finish zoom in/out,the auto-testing is finished. IR led will also stop flashing.
If the preset 0 is set,camera will rotate to the 0 preset position after initial configuration.
Connect to the video output cable: the user select the output mode according to the
machine model.
Figure 1.4.1 is for your reference (output interface introduction for each product)
1) network output: connect this product and your computer through network cable,
then open the browser,enter the camera IP address (factory default 192.168.5.163)
in the address bar,then to the login page and input a user name and password
(factory default are “admin”) ,Finally enter the preview page,and the image comes out.
2) 3G-SDI output or DVI (HDMI) output: Connect the monitor with the corresponding
video output interface,then the monitor output image.
3) USB3.0 output: Connect this product with computer USB3.0 interface (blue),open
the Device Manager to see whether there is an image device and whether the
Universal Serial Bus controllers recognize USB3.0 device. After properly identified,
open the software,choose the image device and then it will output image.
4) USB3.0 compatible with USB2.0 output: Connect this product with computer USB2.0
interface (black),open the Device Manager to see whether there is an image device
and whether the Universal Serial Bus controllers recognize USB3.0 device. After
properly identified, open the software,choose the image device and then it will
output image.
3.1.1 Power-On Initial Configuration
3.1.2 Video output
Note: If you forget your user name, password, IP address, you can manually
the default by the remote controller key combination * #
restore
3. Application Instruction
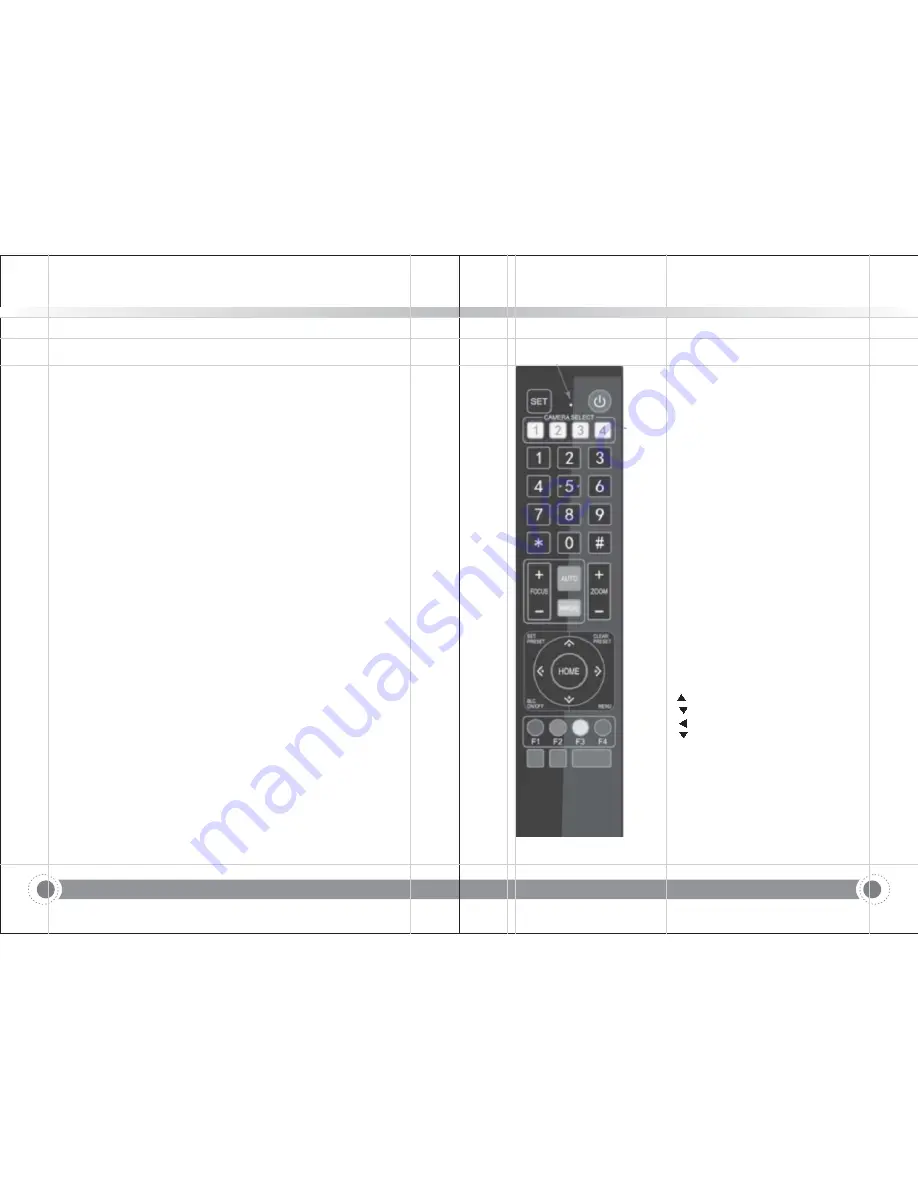
3 2 1 Keys Instruction
. .
1 Standby key
.
After 3S long press the camera will step into standby
,
mode Long press 3S again the camera will initial
.
,
configuration again and back to HOME position.
(
:
-
on and Preset 0 is
Note If power on mode is turned
set and there is no operation within 12s it will
,
,
automatically
nt to the specified preset position
poi
.
2 Camera address selection
.
Select the camera address which wants to be
controlled
3 Number key
.
Set or run
esets
0-9 pr
4
key
. * , #
Key
use
combination
5 Focus control key
.
Auto focus Enter into auto focus mode
:
.
Manual focus The camera focus mode is manual
:
Switch the camera focus mode to manual focus by
pressing focus
or focus
to adjust
[
+]
[
-]
.
6 Zoom Control key
.
zoom
+
:Lens near
zoom
-
:Lens far
7 Set or clear preset key
.
:
Set preset Set preset key
0 9 number key
:
+ -
:
Clear preset key Clear preset key
0 9 number key
:
+ -
8 pan tilt control key
.
/
Press
key :Up
Press
key :Down
Press
key :Left
Press
key Right
:
?
:
OME
key Return to the middle position or enter
into the next level menu
9 BLC
ntrol
,
co
key
Back light ON OFF Turn
f the back light
/
:
on or of
10 Menu setting
.
Open or close the OSD menu
Enter
exit the OSD menu or return to the previous
/
menu.
3.2 Remote controller
!"#$
Information and Communication PTZ Camera
!"#$
Information and Communication PTZ Camera


