BNP-160 TUMBLE BASKET BLAST CABINET
Page 9
© 2018 CLEMCO INDUSTRIES CORP.
www.clemcoindustries.com
Manual No. 25993 Rev B 05/18
The following are examples of the door slide setting
during factory tests:
1) #13 glass beads – slotted door shut
2) #8 glass beads – slotted door open about 3/16"
3) #11 glass beads – slotted door open about 3/32"
4) 180 mesh aluminum oxide – slotted door open
about 3/32"
5) 80 mesh aluminum oxide – slotted door open about
1/8"
4.6.4 To Remove Less Fines:
(Too much good
media carried over to the dust collector.) Loosen the
wing nuts and raise the door by no more than 1/16"
increments.
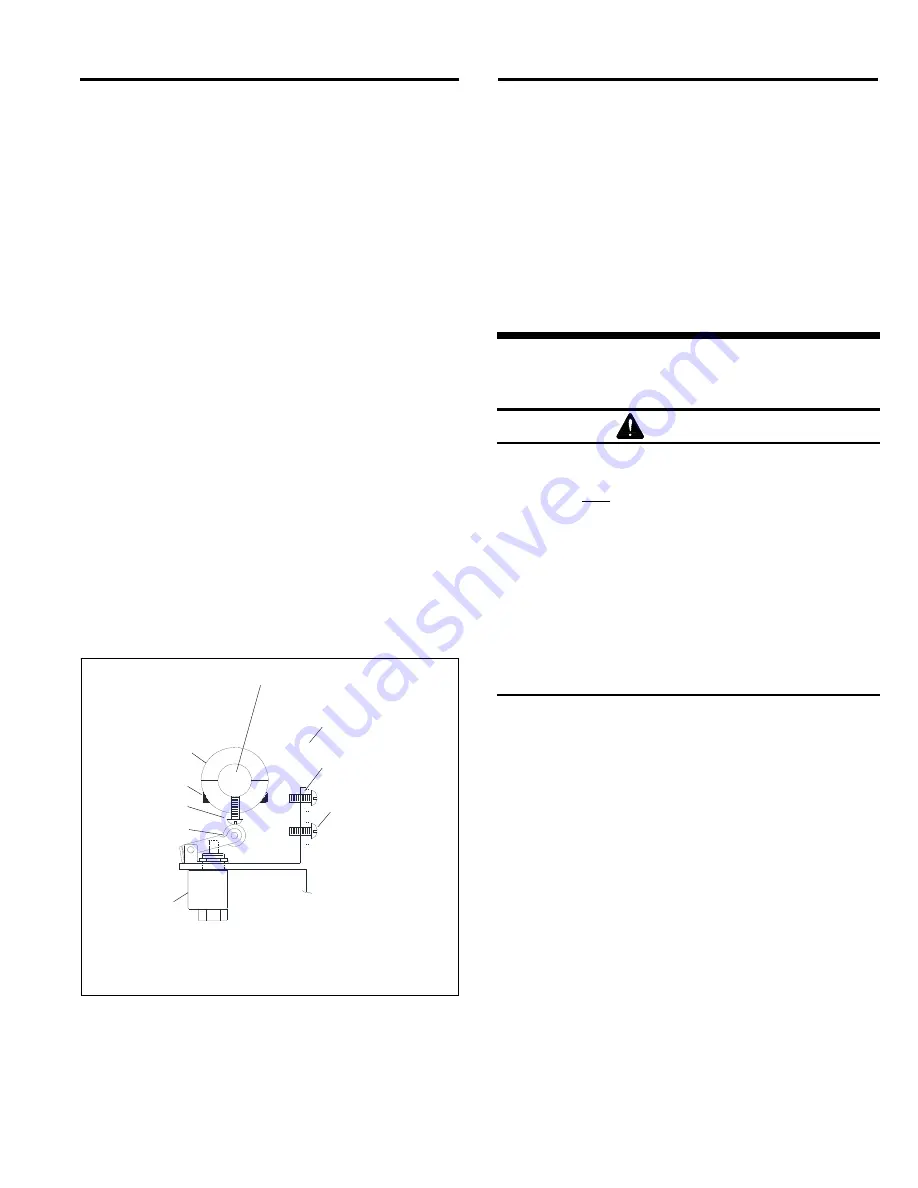
4.7
Dust Collector Pulse,
Pulse Valve/Cam Follower
‒
Figure 10
4.7.1
The pulse activating mechanism is located
within the motor mount bracket.
4.7.2
The dust collector pulses once with each
revolution of the basket. When the screw on the split
collar rotates over the cam follower, it pushes in the
plunger on the 3-way pulse valve and triggers the pulse.
4.7.3
Loosen the collar setscrews and rotate the split
collar so the cam screw is riding on the cam follower.
Tighten the setscrews to secure the collar.
Some items are removed for clarity.
Figure
10
4.7.4
Loosen the mounting bracket screws and adjust
the height so the cam follower depresses the plunger on
the 3-way pulse valve. Snug the screws to hold the
bracket in place.
4.7.5
Set the blast-pressure regulator to zero psi and
set the pulse-pressure regulator to 40 psi.
4.7.6
Turn the timer dial to start the basket rotation.
4.7.7
The collector should pulse each time the cam
screw rides onto the cam follower and stop when the
screw rides off the follower.
4.7.8
Adjust the mounting bracket up or down until the
pulse functions accordingly. Tighten the mounting
screws to secure.
5.0 PREVENTIVE
MAINTENANCE
WARNING
This machine is not to be used for applications
that generate dust from lead coatings, heavy
metals, or any other toxic materials. Failure to
wear approved respirators and eye protection
when servicing dust-laden areas of the cabinet
and dust collector, and when emptying the
container, can result in serious eye irritation and
lung disease. Toxicity and health risk vary with
type of media and dust generated by blasting.
The respirator must be approved for the type of
dust generated. Identify all material being
removed by blasting and obtain a safety data
sheet (SDS) for the blast media.
To avoid unscheduled downtime, establish a weekly
inspection schedule. Inspect all parts subjected to media
contact, including; nozzle, media hose, flex hose, wear
plate, and all items covered in this section.
5.1 Daily
Maintenance
5.1.1
Check media level and condition of media: Refill
or change media as necessary.
5.1.2
Check reclaimer screen for debris: The screen is
accessible through the reclaimer door. With the
exhauster OFF, remove the screen and empty it daily
and when loading media. Empty the screen more often if
part blasted causes excessive debris. Do not operate the
machine without the screen in place, oversized
byproduct from blasting could plug the nozzle.
5.1.3
Drain compressed air filter
‒
Figure 11: The
cabinet is equipped with a manual-drain air filter. Open
the drain at least daily; if water is present, open
periodically during operation. Moist air inhibits the flow of
media; if the filter does not remove enough moisture to
Screws
Setscrews
Mounting Bracket
Motor Mount
(Shown for reference.)
Basket Drive Shaft
(Shown for reference.)
Split Collar
3-Way
Pulse Valve
Cam Screw
Cam Follower


