background image


HOW to REPLACE the TURNTABLE STYLUS (NEEDLE)   


To replace the turntable stylus (needle), please refer to the instructions below:


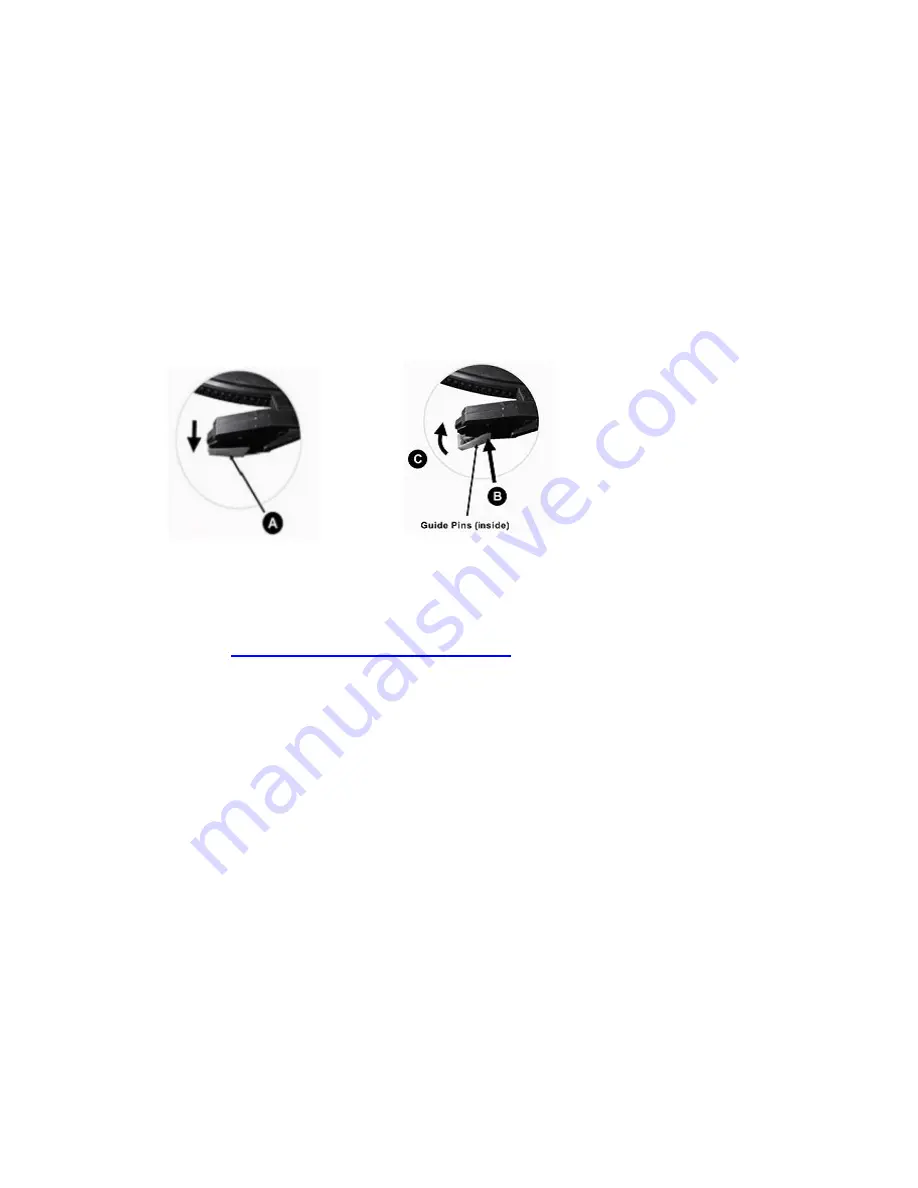
REMOVING the STYLUS from the CARTRIDGE


1.      Place a screwdriver at the tip of the stylus and push downward as shown in direction 

“A”.   

2.      Remove the stylus by pulling the stylus forward and pushing downward.   


INSTALLING the STYLUS (NEEDLE)   

1. Hold the tip of the stylus and insert the stylus by pressing as shown in direction “B”.   


2. Push the stylus upward as shown in direction "C" until the stylus locks into position.


Transferring your favourite tunes to your computer 


The  software  included  allows  quick  and  easy  transfer  of  music  to  your  computer. 
However, if you have problems downloading the software, you can also download it by 
visiting 

http://audacity.sourceforge.net/download/

  and  selecting  your  particular 

operating system. 


Before Starting the Software 


Make sure that your USB turntable is plugged into the computer with the supplied USB cable, 

and both the computer and the turntable are plugged in and on.     


For your first recording, we recommend that you test your settings on a short section (a 

minute or less) of recorded audio so you can become familiar with the process before 

recording a full LP.   

To Install Software (PC) 


Plug your turntable into an AC power outlet and use the included USB cable to connect the 

USB

 port on your turntable to the USB port on your computer.   

Turn your computer on if it is not on already.    Allow it to boot fully.   

Turn on the turntable by pressing the 

power button

Your computer might display a message saying that it has detected a new device, and that 

it is available to use.    Depending on your system, this message may or may not appear.   

This is normal.   

Insert the 

CD

 that came with your USB turntable into your computer’s CD drive.   

A window will pop up automatically.    Click on the 

[INSTALL]

 icon next to “Audacity”.   

Summary of Contents for JW-220GP/D3992

Page 1: ...USB Turntable Instruction Manual JW 220GP D3992...

Page 2: ...N 5 TONE ARM REST 6 TONE ARM 7 CARTRIDGE 8 TURNTABLE 9 POWER SWITCH 10 USB JACK 11 RCA OUTPUT 12 DC JACK LISTENING to a RECORD 1 Raise the dust cover 2 Connect the DC adaptor 12 to an electrical outle...

Page 3: ...ystem Before Starting the Software Make sure that your USB turntable is plugged into the computer with the supplied USB cable and both the computer and the turntable are plugged in and on For your fir...

Page 4: ...on t see a choice called Sound choose the Switch to Classic View option in the panel on the left of the window and the Sound Control Panel should become available on the right 5 Select the Recording t...

Page 5: ...vices choose the Switch to Classic View option in the panel on the left of the window and the Sounds and Audio Devices should become available on the right 5 Select the Voice tab at the top of the Sou...

Page 6: ...All Programs then Audacity 2 In Audacity click on the Edit menu at the top of the screen 3 Select Preferences from the Edit menu Figure 1 Select Preferences The Audacity Preferences window will come...

Page 7: ...he Preferences window 10 At the top of the main Audacity window to the right of the play control buttons you will see the input and output level meters labeled L and R Under the output level meter is...

Page 8: ...7 Under the Quality Tab set the Default Sample Format to 16 bit 8 Select OK to save your settings and close the Preferences window 9 At the top of the main Audacity window to the right of the play co...

Page 9: ...en select the USB Audio Codec as the audio input and output for your entire system Since your turntable does not have speakers audio will not be heard from your other programs until you tell your Mac...

Page 10: ...ces set The Default Input to USB Audio Codec The Default Output to Built in Audio or Built in Output The System Output to Built in Audio or Built in Output Now programs other than Audacity will only u...

Page 11: ...lected and the speaker volume up on your computer See troubleshooting at the end of this manual for more help 3 Play through the entire track album you desire to record 4 Press Stop 5 SAVE YOUR FILE N...

Page 12: ...as on the web See Figure 5 b Normalize should be used to have the correct volume on the recording See Figure 6 Please note It is a good idea to place the needle on the record while it is stopped befor...

Page 13: ...l now close automatically 4 Select the entire track of audio you wish to remove noise from If you wish to clean up the entire recording use Select All under the Edit Menu See Figure 4 5 Repeat Step 2...

Page 14: ...for every recording once it is set up HIGH SPEED RECORDING OF YOUR VINYL OPTIONAL Using the USB turntable with Audacity software you are able to quickly record your 33 1 3 speed vinyl into the compute...

Page 15: ...n good condition and has a distinct silence between the songs automatically splitting the tracks may be faster and easier If your record is in poor condition or does not have silence separating the so...

Page 16: ...with different settings If your markers appear to be correct proceed to the Exporting Your Tracks To Separate Files Section below 6 To undo select the Edit menu from the top of the screen and choose U...

Page 17: ...Step 4 Add Label At Selection 7 Note you can add or edit any track name circled 8 Repeat this process for adding labels for all tracks You may need to zoom in to select the tracks and track separation...

Page 18: ...up see Figure 17 a Select WAV as the export format and choose the Export location b Select the Export Location This is where you will save your files You may want to create a special folder on your De...

Page 19: ...ded sit or zip file and double click it this will extract the contents and create a new file on the desktop with the same name it should show without the sit or zip extension 3 Copy or move this new f...

Page 20: ...y click on the Interface tab and make sure that the Enable Mixer Toolbar and Enable Meter Toolbar options are checked If they are not please check them and then press OK Check the microphone slider to...

Page 21: ...ons restarting the computer and only run Audacity while recording If you are using the RCA plugs and your turntable is equipped with a PHONO LINE switch make sure that you have the switch on the botto...

Page 22: ...y guarantee is invalid if the product has been misused or subject to neglect or an attempted repair other than by our own service centre Due to continuous product improvement we reserve the right to c...

Reviews: