39
VC1001-001_v01
Technical parameters
The type of the vacuum cleaner and the technical parameters
are indicated on the rating label. Mains protection 16 A. Does
not cause interferences with audio/video devices.
Does not require grounding
.
ZELMER vacuum cleaners meet the requirements of the
applicable norms.
The appliance is in conformity with the requirements of the
directives:
Low voltage appliance (LVD) – 2006/95/EC.
–
Electromagnetic compatibility (EMC) – 2004/108/EC.
–
Noise level: 83 dB/A.
The appliance was marked by a CE sign on the rating label.
Static electricity
In the process of vacuuming of some surfaces in areas of
low air humidity the device may become electrically charged.
It is a natural phenomenon – it does not damage the device,
and it is not considered to be a fault.
In order to minimize the phenomenon, we recommend you to:
discharge the device by touching metal items in the room
●
with the pipe,
increase air humidity in the room,
●
use widely available antistatic agents.
●
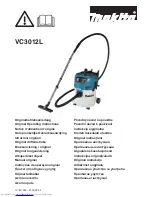
Design
A
1
Fastening for nozzle brush
2
Plug with the cord
3
Cord winder button
4
On/off button and suction power control knob in one
5
Full bag indicator
6
Fastening of the upper cover
7
Handle
8
Bolt – a mechanic controller of suction power
9
Suction hose
10
Telescopic suction pipe
11
Intake filter (HEPA 11)
12
Foam rubber cover
13
SAFBAGtype bag
14
Nozzle brush
15
Small nozzle
16
Crevice nozzle
17
Small brush
18
Parquet brush “BNB”
Is used to clean and polish hard, scratch sensitive surfaces
such as wooden floors, floor panels, parquet, marble,
tiles, etc.
Delicate and soft natural bristles ensure maximum vacuum
effectiveness and protects against scratching the cleaned
surface.
Before first use
B
Before starting the vacuum cleaner make sure, whether the
SAFBAG is properly installed in the chamber of the vacuum
cleaner, and whether all filters are in place as well.
1
Place the end of the hose in the opening of the vacuum
cleaner, and gently press it. A characteristic “click” signalizes
the hose has been properly installed.
2
Connect the other end of the hose (handle) with the
telescopic suction tube. In order to do so press the locking
device
“A”
and slide the tube into the hose handle so that
the locking device
“A”
is blocked in opening
“B”
.
3
Select the needed length of the telescopic suction pipe
by sliding the slider according to the arrow, and pulling out/in
the pipe.
4
Install a nozzle or a brush on the other end of the suction
pipe.
5
For hard surfaces (wooden floors, plastic floors, ceramic
tiling, etc.) pull out the brush by pressing the switch on the
nozzle brush as it is shown on the picture
.
6
Grab the plug of the cord
(2)
, and pull it out of the vacuum
cleaner.
When pulling out the cord pay attention to
the yellow band which marks the end of the
cord. Any attempts to unwind the cord further
(especially forcefully pulling on it) may lead to
damaging it.
7
Put the plug of the cord in an electric socket.
8
Press the on/off switch to start the vacuum cleaner.
9
The vacuum cleaner is equipped with an electronic
controller of suction power, which enables smooth regulation
of suction power of the vacuum cleaner. By turning the knob
(4)
clockwise or counterclockwise you may increase or
decrease the suction power.
10
The vacuum cleaner is also equipped with a mechanic
suction power controller
(8)
, which is situated on the hose
handle. You may use it to slightly regulate the suction power
without the need to use the knob
(4)
.
(De)installing the SAFBAG-type bag
C
The vacuum cleaner is equipped with safety
valve located in chamber of dust container
(bag). It opens automatically in case of total
stopping of suction hose or total stopping of
equipment elements connected thereto, as well
as in case of overfill of dust bag. After opening
the valve one can hear characteristic “whirr”
sound inside the vacuum cleaner.
1
The vacuum cleaner is equipped with a full bag indicator
(5)
. When the indicator light is on during work (a nozzle or
brush is over a cleaned surface), it means the bag needs to be
replaced. The full bag indicator
(5)
may also be on when the
suction hose or other accessories linked to it are clogged up.