background image

Basic functions and settings

The configuration program offers numerous functions for processing 
photomicrographs and for configuring camera ports. All changes made in the 
configuration program are immediately visible in the live image in the large field on 

the right.

The basic settings have been optimized in such a way for your first photographs that 

most photos should already be usable.
The most important basic functions are explained below. 

Online help using F1 function key

All functions are described in detail in the online help.

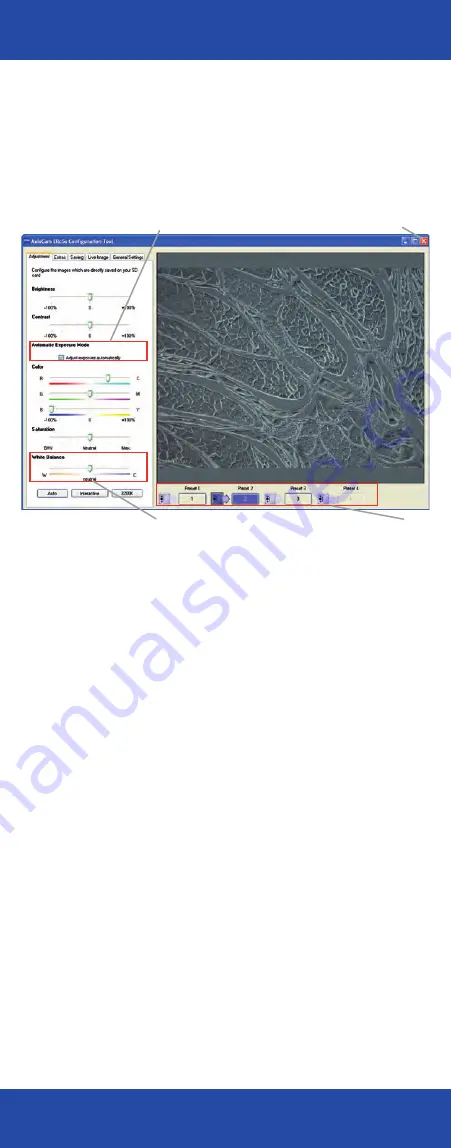
[1] User settings

Saving of several individual presettings. These can be retrieved at any time, e.g. for 
different employees/specimens.

[2] Automatic adjustment of the exposure time

Deactivation of the automatic adjustment of the exposure time. The value used most 
recently is used as a basic setting. This is helpful for very dark or bright objects, e.g. 

in the case of darkfield images.

[3] Saving and closing

This button gives you the option of transferring the settings currently specified on 

the property pages to the camera’s internal memory and then closes the program.

[4] White balance 

Balance for a neutral color display that is close to reality (see also Definitions on 

the cover!) To achieve this, set a color-neutral scene without a specimen under the 
microscope. This should be illuminated as homogeneously as possible. It should not 
be too bright and should on no account be a pure white tone!

Auto:

 Starts the measurement. This method only works if the object has color-

neutral gray or white surfaces.

Interactive:

 Allows you to define an individual reference point for the white 

balance using the mouse pointer. Click on a color-neutral gray/white area.

3200 K:

 Basic setting for white balance. This setting has been optimized for a light 

temperature of halogen light at 3200 K, which leads to image reproduction that is 
closest to the impression of the image in the microscope’s eyepiece.

  Configuration program

  Configuration program

2

4

1

3

Summary of Contents for AxioCam ERc 5s

Page 1: ...The purpose of the white balance is to calibrate the camera to the color temperature of the incident light and thereby prevent color cast However the automatic white balance that is normally used doe...

Page 2: ...ith the manufacturer concerned Always follow the instructions for the microscopes when it comes to connecting and operating external cameras Damage due to short circuit If the cable of the mains power...

Page 3: ...observation and recording devices by means of various standardized data interfaces Only pre fabricated standard connection cables may be used Obligations assurances and exclusions The envisaged uses o...

Page 4: ...Included with product Included with product Included in standard package AxioCam ERc5s camera with dust cap A to Mini B type USB cable 1 Camera 2 USB cable In addition DVD containing the configuration...

Page 5: ...hat may be present from the microscope s phototube 2 Place the unit comprising the camera and C mount adapter onto the microscope s phototube 3 Align the camera by rotating it so that the front of the...

Page 6: ...ve problems with the AWB please use a conversion filter to adjust the color temperature of the illumination to the camera limit Operation without PC connection Operation without PC connection Operatin...

Page 7: ...setup gives you the option of installing the configuration program for the camera the free imaging software AxioVision LE or both together To do so follow the instructions in the dialog boxes on the s...

Page 8: ...n the case of darkfield images 3 Saving and closing This button gives you the option of transferring the settings currently specified on the property pages to the camera s internal memory and then clo...

Page 9: ...opening so that it is impermeable to light Saving property page Naming Enter a prefix into the text field that will appear in front of the image number in the file name on the memory card Resolution...

Page 10: ...interface in US television format General Settings property page Reload Factory Defaults Resets camera to a defined status Note Your individual settings will be lost during this process Time And Date...

Page 11: ...e image subsequently click on the Properties button and then on the Display property page Adjust the image individually Brightness and Contrast sliders Set brightness and contrast automatically Min Ma...

Page 12: ...are update does not work An SD card must be inserted for an update to take place Insert a formatted unprotected SD card with at least 10 MB of free memory space No live image of the camera is visible...

Page 13: ...ol or maintenance elements on the camera housing or inside the camera that the user would be able to repair him herself If you are unable to resolve a problem using the troubleshooting table on the ba...

Page 14: ...For your notes For your notes For your notes...

Page 15: ...routine microscopy and image analysis The camera should only be installed and operated by trained individuals who have been informed about the possible risks associated with microscopy and the area o...

Reviews: