background image

YORK INTERNATIONAL

92

PRE-STARTUP CHECKLIST

G

12. Be certain field wiring for discharge air sensor,

liquid line solenoid valves, and zone thermostats
(if applicable) and air proving switches have been
correctly wired.

PANEL CHECKS
(Power ON – Both Unit Switch OFF)

G

1. Apply 3-phase power and verify its value. Volt-

age imbalance should be no more than 2% of
the average voltage.

G

2. Apply 120VAC and verify its value on the termi-

nal block in the Power Panel. Make the measure-
ment between terminals 5 and 2 of CTB2. The
voltage should be /- 10%.

G

3. Program/verify the Cooling Setpoints, Program

Setpoints, and unit Options. Record the values
below (see sections on Setpoints and Unit keys
for programming instruction).

G

4. Put the unit into Service Mode (as described un-

der  the Control Service And Troubleshooting sec-
tion) and cycle each condenser fan to ensure
proper rotation.

JOB NAME: ______________________________

SALES ORDER #: _________________________

LOCATION: _______________________________

SOLD BY: ________________________________

INSTALLING
CONTRACTOR: ___________________________

START-UP
TECHNICIAN/
COMPANY: _______________________________

START-UP DATE : _________________________

UNIT MODEL #:
____________________________

SERIAL #: ________________________________

CHECKING THE  SYSTEM
PRIOR TO INITIAL START (No Power)

Unit Checks

G

1. Inspect the unit for shipping or installation

damage.

G

2. Assure that all piping has been completed.

G

3. Visually check for refrigerant piping leaks.

G

4. Open suction line ball valve, discharge line ball

valve, and liquid line valve for each system.

G

5. The compressor oil level should be maintained

so that an oil level is visible in the sight glass.
The oil level can only be tested when the com-
pressor is running in stabilized conditions, guar-
anteeing that there is no liquid refrigerant in the
lower shell of the compressor. In this case, the
oil must be between 1/4 and 3/4 in the sight glass.
At shutdown, the oil level can fall to the bottom
limit of the oil sight glass.

G

6. Verify proper CFM of air across evaporator coil.

Verify air flow switch operation.

G

7. Check the control panel to assure it is free of

foreign material (wires, metal chips, etc.).

G

8. Visually inspect wiring (power and control). Wir-

ing MUST meet N.E.C. and local codes.

G

9. Check tightness of power wiring inside the power

panel on both sides of the motor contactors.

G

10. Check for proper size fuses in main and control

circuits.

G

11. Assure 120VAC Control Power to CTB2 has 15

A minimum capacity.


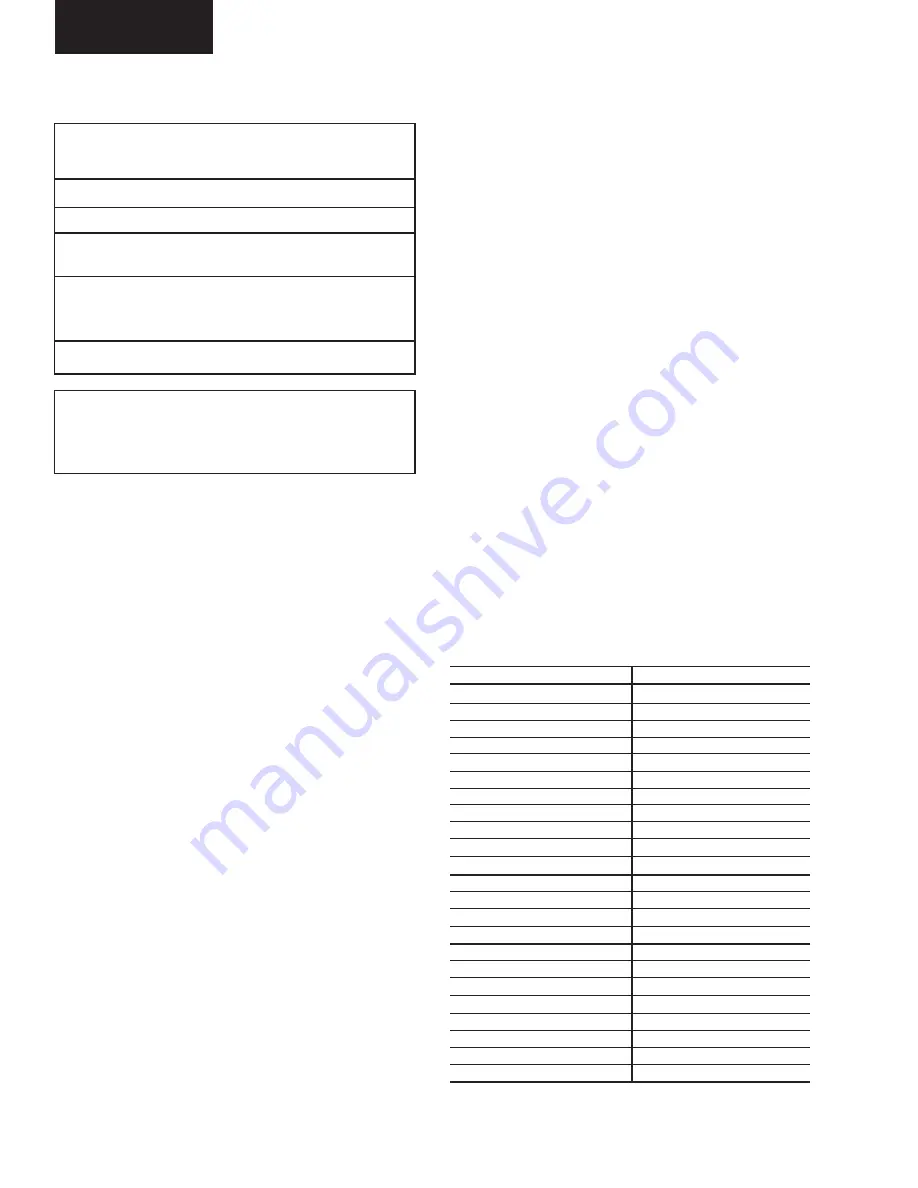
See Table 7.

OPTIONS
Display Language
Sys 1 Switch
Sys 2 Switch
Unit Type
Ambient Control
Local/ Remote Mode
Control Mode
Display Units
Lead/Lag Control
Fan Control
Manual Override
COOLING SETPOINTS
Cooling Setpoint
Range
EMS-PWM Max. Setpoint
PROGRAM
Discharge Pressure Cutout
Suct. Pressure Cutout
Low  Amb. Temp. Cutout
Anti-Recycle Time
Fan Control On-Pressure
Fan Differential Off-Pressure
Total # of  Compressors

TABLE 10 – SETPOINT ENTRY LIST

Initial Startup

Summary of Contents for MILLENNIUM YCUL0016SC

Page 1: ...C Standard Metric Models Combined 200 3 60 230 3 60 380 3 60 460 3 60 575 3 60 MODELS ONLY INSTALLATION OPERATION MAINTENANCE MILLENNIUM AIR COOLED CONDENSING UNITS HERMETIC SCROLL New Release Form 150 63 NM1 700 00096VIP ...

Page 2: ...ical Data English 36 Physical Data Metric 38 Dimensions English 40 Model YCUL0016C 40 Model YCUL0026C 42 Model YCUL0030C 44 Model YCUL0036C 46 Model YCUL0040C 48 Model YCUL0046C 50 Model YCUL0056C 52 Model YCUL0060C 54 Model YCUL0066C 56 Model YCUL0076C 58 Model YCUL0080C 60 Model YCUL0086C 62 Model YCUL0090C 64 Dimensions Metric 66 Model YCUL0016C 66 Model YCUL0026C 68 Model YCUL0030C 70 Model YC...

Page 3: ...Key Quick Reference Table 116 Table 16 Unit Keys Programming Quick Reference Table 120 Table 17 Discharge Air Temperature Control 6 Compressors 122 Table 18 Discharge Air Temperature Control 4 Compressors 122 Table 19 Discharge Air Temperature Control 3 Compressors 123 Table 20 Discharge Air Temperature Control 2 Compressors 123 Table 21 Condenser Fan Control Using Outdoor Ambient Temperature and ...

Page 4: ...ure 11 Suction Pressure Control 124 Figure 12 Field Factory Electrical Connections Optional Remote Temperature Reset Board 129 Figure 13 MicroBoard Layout 133 Figure 14 MicroBoard Relay Contact Architecture 139 Figure 15 Printer To Microboard Electrical Connections 140 Figure 16 Elementary Diagram YCUL0016 YCUL0036 148 Figure 17 Elementary Diagram YCUL0040 152 Figure 18 Elementary Diagram YCUL0046...

Page 5: ...gation and responsibility of operating service personnel to work safely Failure to comply with any of these requirements could result in serious damage to the equipment and or the property in which it is situated as well as severe personal injury or death to people at the site GENERAL SAFETY GUIDELINES During installation operation maintenance or service individuals may be exposed to certain compo...

Page 6: ...NT VOLTAGE STARTER DESIGN DEVELOPMENT LEVEL Y 0 S C 1 7 A C 1 2 8 A A 4 0 U 4 6 5 0 L 5 8 X YORK Chiller Air Cooled Condensing Unit Scroll 60HZ Nominal Tons Even Number 50HZ Nominal kW Odd Number Standard Unit 200 3 60 230 3 60 380 3 60 460 3 60 575 3 60 Across the Line Design Series A Engineering Change or PIN Level EXAMPLES 1 2 3 4 5 6 7 8 9 10 11 12 13 14 15 Y C U L 0 0 8 0 S C 4 6 X A A ...

Page 7: ...oth Low High Ambient factory BAS EMS Temp Reset Offset Spanish LCD Keypad Display French LCD Keypad Display German LCD Keypad Display Discharge Pressure Transducers Readout Kit Suction Pressure Transducers Readout Kit Both Discharge Suction Pressure Transducers Readout N American Safety Code cU L cETL No Listing typically 50HZ non CE non U L Remote Control Panel Sequence Control Automatic Lead Tra...

Page 8: ...E BALL VALVE SIGHT GLASS MOISTURE INDICATOR SOLENOID OPERATED HOT GAS BYPASS VALVE YCUL REFRIGERANT FLOW DIAGRAM NOTE YCUL0046 0090 HAVE TWO REFRIGERANT SYSTEMS HOT GAS OPTION SYSTEM 1 ONLY LIQUID LINE FILTER DRIER EVAP AIR FLOW DISCHARGE AIR TEMPERATURE SENSOR OPTIONAL SUCTION TEMP SENSOR FACTORY PIPING FIELD PIPING T T One TXV and Liquid Line Solenoid shown for illustration purposes Actual refri...

Page 9: ...rigerant holding charge but require field installation of a liquid line filter drier TXV liquid line solenoid sight glass discharge air temperature sensor and refrigerant pip ing to the air handling unit Care should be taken to avoid damage due to rough handling The unit should be lifted by inserting hooks through the holes provided in unit base rails Spreader bars must be used to avoid crushing t...

Page 10: ...ld be a problem The unit noise is a result of compressor and fan operation Con siderations should be made utilizing noise levels pub lished in the YORK Engineering Guide for the specific unit model Sound blankets for the compressors and low sound fans are available SPRING ISOLATORS OPTIONAL When ordered four 4 isolators will be furnished Identify the isolator and locate at the proper mounting poin...

Page 11: ...air blower is not operating If separate evaporator blowers are used with respect to each refrigerant system in the condensing unit then two air proving must be wired in series across CTB1 termi nals 13 14 one for each evaporator blower Refer to Figure 5 and unit wiring diagram When using Zone Thermostats in Suction Pressure con trol mode the air proving switch es should be wired in series with the...

Page 12: ... expansion valves liquid line solenoid valves and refrigerant piping are field supplied and installed Table 4 lists refrigerant line connections sizes per unit model number REFRIGERANT LINE SIZING Refrigerant piping systems must be designed to pro vide practical line sizes without excessive pressure drops prevent compressor oil from being trapped in the refrigerant piping and ensure proper flow of...

Page 13: ...refrigerant system REFRIGERANT PIPING REFERENCE For more details refer to ASHRAE Refrigeration Hand book Chapter 2 TABLE 1 FITTING EQUIVALENT LENGTHS COPPER FITTING EQUIVALENT LENGTHS LINE SIZE O D SHORT RADIUS ELL LONG RADIUS ELL 3 4 19mm 6 5 ft 2m 4 5 ft 1 4m 7 8 22mm 7 8 ft 2 4m 5 3 ft 1 6m 1 1 8 29mm 2 7 ft 8m 1 9 ft 6m 1 3 8 35mm 3 2 ft 1m 2 2 ft 7m 1 5 8 41mm 3 8 ft 1 2m 2 6 ft 8m 2 1 8 54mm...

Page 14: ... 7 4 4320 13 7 8 6 1 2 1 8 1 9 2430 1 1 8 1 7 36 1 31 2 1 8 2 4 2790 15 7 8 7 9 5 2 5 8 0 7 1860 1 1 8 2 2 40 1 39 2 1 8 3 7 3510 13 1 1 8 3 4 5 2 5 8 1 3 2340 1 3 8 1 3 46 1 21 1 5 8 4 7 3360 10 3 4 8 4 5 2 1 8 1 2 1890 7 8 3 8 2 21 1 5 8 4 7 3360 10 3 4 8 4 5 2 1 8 1 2 1890 7 8 3 8 56 1 27 1 5 8 7 4 4320 13 7 8 6 1 2 1 8 1 9 2430 1 1 8 1 7 2 27 1 5 8 7 4 4320 13 7 8 6 1 2 1 8 1 9 2430 1 1 8 1 7 ...

Page 15: ...FT FPM 76 1 40 2 1 8 3 9 3600 13 1 1 8 3 6 5 2 5 8 1 4 2400 1 3 8 1 4 2 31 5 2 1 8 2 4 2790 10 7 8 7 9 5 2 5 8 9 1860 1 1 8 2 2 80 1 39 2 1 8 3 7 3510 13 1 1 8 3 4 5 2 5 8 1 3 2340 1 3 8 1 3 2 39 2 1 8 3 7 3510 13 1 1 8 3 4 5 2 5 8 1 3 2340 1 3 8 1 3 86 1 45 2 1 8 4 9 4050 15 1 1 8 4 4 5 2 5 8 1 7 2700 1 3 8 1 7 2 39 2 1 8 3 7 3510 13 1 1 8 3 4 5 2 5 8 1 3 2340 1 3 8 1 4 90 1 45 2 1 8 4 9 4050 15 ...

Page 16: ... 1 2 1 8 13 0 12 3 1 1 8 11 7 36 1 109 2 1 8 16 5 14 2 53 7 8 54 5 5 2 5 8 4 8 9 4 1 1 8 15 2 40 1 137 2 1 8 25 5 17 8 46 1 1 8 23 4 5 2 5 8 9 0 11 9 1 3 8 9 0 46 1 74 1 5 8 32 4 17 1 35 3 4 58 0 5 2 1 8 8 3 9 6 7 8 26 2 2 74 1 5 8 32 4 17 1 35 3 4 58 0 5 2 1 8 8 3 9 6 7 8 26 2 56 1 95 1 5 8 51 0 21 9 46 7 8 42 2 1 8 13 1 12 3 1 1 8 11 7 2 95 1 5 8 51 0 21 9 46 7 8 42 1 2 1 8 13 1 12 3 1 1 8 11 7 ...

Page 17: ...1 8 26 9 18 3 46 1 1 8 24 8 5 2 5 8 9 7 12 2 1 3 8 9 7 2 109 5 2 1 8 16 5 14 2 35 7 8 54 5 5 2 5 8 6 2 9 4 1 1 8 15 2 80 1 137 2 1 8 25 5 17 8 46 1 1 8 23 4 5 2 5 8 9 0 11 9 1 3 8 9 0 2 137 2 1 8 25 5 17 8 46 1 1 8 23 4 5 2 5 8 9 0 11 9 1 3 8 9 0 86 1 158 2 1 8 33 8 20 6 53 1 1 8 30 3 5 2 5 8 11 7 13 7 1 3 8 11 7 2 137 2 1 8 25 5 17 8 46 1 1 8 23 4 5 2 5 8 9 0 11 9 1 3 8 9 7 90 1 158 2 1 8 33 8 20...

Page 18: ...eed 40 PSI 276 kPa based on 15 F 8 3 C subcooled liquid Vapor in the liquid line even in small amounts will measur ably reduce valve capacity and poor system performance will result In addition pressure loss for strainers filter driers solenoid valves and isolation valve or fittings are not included in this table and must be taken into account 4 Nominal Tons KW Unloaded is based on one compressor ...

Page 19: ...roving Switch CTB3 To Field Installed Liquid Line Solenoid Valves See Fig 6 FIG 2 MULTI POINT POWER SUPPLY WIRING MULTI POINT POWER SUPPLY WIRING 0046 0090 Electrical Notes and Legend located on page 24 LD04506 1 It is possible that multiple sources of power can be supplying the unit power panel To pre vent serious injury or death the technician should verify that no lethal voltages are present in...

Page 20: ...alled Liquid Line Solenoid Valves See Fig 6 Electrical Notes and Legend located on page 24 FIG 3 SINGLE POINT POWER SUPPLY WIRING SINGLE POINT POWER SUPPLY WIRING 0016 0090 LD04505 Installation It is possible that multiple sources of power can be supplying the unit power panel To pre vent serious injury or death the technician should verify that no lethal voltages are present inside the panel afte...

Page 21: ...Field Installed Liquid Line Solenoid Valves See Fig 6 Electrical Notes and Legend located on page 24 FIG 4 OPTIONAL SINGLE POINT POWER WIRING OPTIONAL SINGLE POINT POWER WIRING NON FUSED DISCONNECT SWITCH OR CIRCUIT BREAKER 0016 0090 LD04507 1 It is possible that multiple sources of power can be supplying the unit power panel To pre vent serious injury or death the technician should verify that no...

Page 22: ...ONTACTS SYS 2 YCUL0046 YCUL0090 SYS 1 ALARM STATUS CONTACTS REMOTE EMERGENCY CUTOFF EVAP BLOWER START CONTACTS SYS 2 ALARM STATUS CONTACTS YCUL0046 YCUL0090 Remove Factory Installed Jumper When Field Wiring Remote Emergency Cutoff Contacts CTB1 DISCHARGE AIR TEMPERATURE CONTROL 21 13 20 13 14 13 AIR PROVING SWITCH REMOTE START STOP CONTACTS PWM INPUT LOAD LIMIT INPUT CONTROL WIRING LD04289 LD04288...

Page 23: ... AIR SENSOR WITH MOUNTING BRACKET RED BLK FIELD SUPPLIED WIRING QUABBIN 930421 2 OR EQUIVALENT 15 14 13 10 9 8 5 4 3 RED SIGNAL BLK 5VDC DRAIN GND J5 PIN IDENTIFICATION ON MICRO BOARD REFER TO ASSEMBLY INSTRUCTIONS IN FACTORY SUPPLIED KIT CABLE SENSORS AND ELECTRICAL CONNECTIONS ARE INCLUDED SUCTION TEMP SENSOR SYS 1 RED BLK 12 11 11 7 6 6 2 1 1 7 12 1 8 13 2 RED SIGNAL BLK 5VDC DRAIN GND RED BLK ...

Page 24: ...load amps for all other loads included in the circuit per N E C Article 440 22 5 Circuit breakers must be U L listed and CSA certified and maximum size is based on 225 of the rated load amps for the largest motor plus 100 of the rated load amps for all other loads included in the circuit Excep tion YCUL0014 and YCUL0020 must have the optional factory overloads installed to use a standard circuit b...

Page 25: ...1 60 15A 10A 15A 30 A 480V CONTROL TRANS 46 460 1 60 15A 10A 15A 30 A 480V 58 575 1 60 15A 10A 15A 30 A 600V A Minimum 14 AWG 75 C Copper Recommended B Minimum and Maximum Over Current Protection Dual Element Fuse or Circuit Breaker LEGEND Factory Supplied Supplied by Others It is possible that multiple sources of power can be supplying the unit power panel To pre vent serious injury or death the ...

Page 26: ...125 2 1 0 230 60 93 100 110 125 110 125 2 1 0 380 60 52 60 60 60 60 60 6 2 460 60 45 60 50 60 50 60 8 4 575 60 36 60 40 45 40 45 8 4 200 60 127 150 150 175 150 175 1 2 0 0030SC 230 60 118 150 150 150 150 150 1 2 0 380 60 76 100 90 100 90 100 4 1 460 60 57 60 70 70 70 70 6 2 575 60 46 60 50 60 50 60 8 4 0036SC 200 60 140 150 175 175 175 175 1 0 3 0 230 60 130 150 150 175 150 175 1 0 3 0 380 60 75 1...

Page 27: ... 1 37 0 237 37 0 237 2 8 2 34 3 237 34 3 237 2 7 8 18 5 154 18 5 154 2 4 8 16 3 130 16 3 130 2 3 8 13 1 85 13 1 85 2 3 1 49 1 298 49 1 298 2 8 2 45 5 298 45 5 298 2 7 8 29 5 235 29 5 235 2 4 8 21 7 170 21 7 170 2 3 8 17 3 140 17 3 140 2 3 1 54 7 420 54 7 420 2 8 2 50 7 420 50 7 420 2 7 8 28 7 235 28 7 235 2 4 8 24 1 175 24 1 175 2 3 8 19 3 140 19 3 140 2 3 1 51 2 298 51 2 298 51 2 298 2 8 2 47 4 2...

Page 28: ... 100 4 1 29 6 235 29 6 235 2 4 8 460 60 63 100 70 80 70 80 6 2 24 2 175 24 2 175 2 3 8 575 60 50 60 60 60 60 60 6 2 19 4 140 19 4 140 2 3 1 0076SC 200 60 187 200 200 225 200 225 3 0 250 52 4 298 52 4 298 52 4 298 2 8 2 230 60 174 200 200 200 200 200 2 0 4 0 48 6 298 48 6 298 48 6 298 2 7 8 380 60 105 150 125 125 125 125 2 1 0 29 3 235 29 3 235 29 3 235 2 4 8 460 60 83 100 90 100 90 100 4 1 23 1 17...

Page 29: ...0 90 100 4 1 29 6 235 29 6 235 2 4 8 63 100 70 80 70 80 6 2 24 2 175 24 2 175 2 3 8 50 60 60 60 60 60 6 2 19 4 140 19 4 140 2 3 1 128 150 150 150 150 150 1 2 0 34 2 265 34 2 265 34 2 265 2 8 2 119 150 150 150 150 150 1 2 0 31 6 265 31 6 265 31 6 265 2 7 8 76 100 90 90 90 90 4 1 20 2 155 20 2 155 20 2 155 2 4 8 57 100 70 70 70 70 6 2 15 1 120 15 1 120 15 1 120 2 3 8 46 60 50 50 50 50 8 4 12 0 80 12...

Page 30: ...00 250 350 250 350 250 350 230 60 229 250 250 250 250 250 4 0 300 4 0 300 4 0 300 380 60 139 200 150 150 150 150 1 0 3 0 1 0 3 0 1 0 3 0 460 60 110 150 125 125 125 125 2 1 0 2 1 0 2 1 0 575 60 88 100 100 100 100 100 2 1 0 2 1 0 2 1 0 0060SC 200 60 261 400 300 300 300 300 300 400 300 400 300 400 230 60 243 400 300 300 300 300 250 350 250 350 250 350 380 60 145 200 175 175 175 175 1 0 3 0 1 0 3 0 1 ...

Page 31: ... 2 298 2 8 2 50 2 298 50 2 298 2 8 2 46 5 298 46 5 298 2 7 8 46 5 298 46 5 298 2 7 8 28 1 235 28 1 235 2 4 8 28 1 235 28 1 235 2 4 8 22 1 170 22 1 170 2 3 8 22 1 170 22 1 170 2 3 8 17 7 140 17 7 140 2 3 1 17 7 140 17 7 140 2 3 1 57 4 420 57 4 420 2 8 2 49 5 298 49 5 298 2 8 2 53 1 420 53 1 420 2 7 8 45 9 298 45 9 298 2 7 8 30 8 235 30 8 235 2 4 8 27 8 235 27 8 235 2 4 8 25 3 175 25 3 175 2 3 8 21 ...

Page 32: ...0 2 4 0 500 2 4 0 230 60 332 400 350 350 350 350 400 600 400 600 400 600 380 60 201 250 225 225 225 225 4 0 300 4 0 300 4 0 300 460 60 159 200 175 175 175 175 2 0 4 0 2 0 4 0 2 0 4 0 575 60 127 150 150 150 150 150 1 2 0 1 2 0 1 2 0 0086SC 200 60 376 600 400 400 400 400 500 2 4 0 500 2 4 0 500 2 4 0 230 60 349 400 400 400 400 400 500 2 4 0 500 2 4 0 500 2 4 0 380 60 207 250 225 225 225 225 4 0 300 ...

Page 33: ...8 0 298 48 0 298 48 0 298 2 7 8 29 0 235 29 0 235 29 0 235 2 4 8 29 0 235 29 0 235 29 0 235 2 4 8 22 9 170 22 9 170 22 9 170 2 3 8 22 9 170 22 9 170 22 9 170 2 3 8 18 3 140 18 3 140 18 3 140 2 3 1 18 3 140 18 3 140 18 3 140 2 3 1 58 9 420 58 9 420 58 9 420 2 8 2 50 5 298 50 5 298 50 5 298 2 8 2 54 5 420 54 5 420 54 5 420 2 7 8 46 8 298 46 8 298 46 8 298 2 7 8 31 6 235 31 6 235 31 6 235 2 4 8 28 3 ...

Page 34: ... with an electrical heater as standard 4 Operation below 25 F 3 89 C requires Optional Low Ambient Kit for operation to 0 F 17 8 C 5 Operation above 115 F 46 15 C requires Optional High Ambient Kit for operation to 125 F 51 7 C VOLTAGE LIMITATIONS The following voltage limitations are absolute and op eration beyond these limitations may cause serious dam age to the compressor TABLE 8 VOLTAGE LIMIT...

Page 35: ...YORK INTERNATIONAL FORM 150 63 NM1 35 This page is intentionally left blank 1 ...

Page 36: ... 3 2 2 Compressors per unit 2 2 2 2 3 4 4 Condenser Total Face Area ft2 47 2 47 2 66 1 66 1 66 1 128 0 128 0 Number of Rows 2 2 2 3 3 2 2 Fins per Inch 14 14 14 14 14 14 14 Condenser Fans Number of Fans total 2 2 2 2 2 4 4 Fan hp kw 2 1 4 2 1 4 2 1 4 2 1 4 2 1 4 2 1 4 2 1 4 Fan RPM 1140 1140 1140 1140 1140 1140 1140 Number of Blades 3 3 3 3 3 3 3 Total Condensing Unit CFM 16257 16257 23500 23500 2...

Page 37: ... 149 3 2 3 2 2 3 3 14 14 14 16 12 14 4 4 4 4 4 4 2 1 4 2 1 4 2 1 7 2 1 7 2 1 7 2 1 7 1140 1140 1140 1140 1140 1140 3 3 3 3 3 3 47360 46080 55253 55253 54550 53760 3358 3640 3932 4030 4259 4432 3745 4318 4459 4633 4937 5224 6 6 6 6 6 6 6 6 6 6 6 6 46 8 42 1 56 2 56 2 58 5 48 4 58 5 58 5 71 8 64 7 78 0 78 0 58 4 58 4 87 6 87 6 68 1 68 1 68 1 68 1 102 2 102 2 102 2 102 2 3 5 2 1 3 5 3 5 3 2 3 0 3 2 3...

Page 38: ... 11091 22351 22351 Operating Shipping Weight Aluminum Fin Coils kg 789 794 856 915 985 1454 1494 Copper Fin Coils kg 865 870 962 1051 1144 1630 1670 Holding Refrigerant Charge R22 Sys1 Sys2 kg 2 7 2 7 2 7 2 7 2 7 2 7 2 7 2 7 2 7 Operating Refrigerant Charge R22 Sys1 Sys2 kg 11 7 13 3 18 7 23 4 24 2 16 4 16 4 19 5 19 5 Pump Down Capacity R22 Sys1 Sys2 kg 19 6 19 6 27 4 41 1 41 1 26 5 26 5 26 5 26 5...

Page 39: ... 3 518 518 518 518 518 518 4 4 4 4 4 4 2 1 4 2 1 4 2 1 7 2 1 7 2 1 7 2 1 7 1140 1140 1140 1140 1140 1140 3 3 3 3 3 3 22351 21747 26076 26076 25744 25371 1523 1651 1783 1828 1932 2010 1699 1959 2023 2101 2239 2369 2 7 2 7 2 7 2 7 2 7 2 7 2 7 2 7 2 7 2 7 2 7 2 7 28 9 19 5 25 7 25 7 26 5 21 8 26 5 26 5 32 8 29 6 35 9 35 9 26 5 26 5 39 7 39 7 30 9 30 9 30 9 30 9 46 4 46 4 46 4 46 4 13 8 13 13 12 11 4 ...

Page 40: ...ety cutouts however the system designer must consider potential performance degradation Access to the unit control center assumes the unit is no higher than on spring isolators Recommended mini mum clearances Side to wall 6 rear to wall 6 control panel to end wall 4 0 top no obstructions allowed distance between adjacent units 10 No more than one adjacent wall may be higher than the unit 4 1 2 4 1...

Page 41: ...N POWER MULTIPLE POINT WITH TERMINAL BLOCKS TOP VIEW C G Y X 51 1 2 37 9 1 4 A POWER PANEL APPROX OPERATING WEIGHT DISTRIBUTION LB CONTROL PANEL 1 1 2 10 5 16 78 7 16 B C D 1 1 2 3 4 DIA MOUNTING HOLES TYP 1 3 8 O D SUCT CONN LIQUID STOP VALVE 7 8 O D LIQUID CONN 9 3 8 7 3 8 3 3 16 SIDE VIEW 105 1 8 80 7 16 2 3 X 3 RIGGING HOLES EACH SIDE SUCTION STOP VALVE 14 11 16 Z X A A 9 68 3 8 29 24 1 4 LD05...

Page 42: ...ty cutouts however the system designer must consider potential performance degradation Access to the unit control center assumes the unit is no higher than on spring isolators Recommended mini mum clearances Side to wall 6 rear to wall 6 control panel to end wall 4 0 top no obstructions allowed distance between adjacent units 10 No more than one adjacent wall may be higher than the unit VIEW B B C...

Page 43: ...N 80 7 16 LIQUID STOP VALVE 9 1 4 1 1 2 1 1 2 3 4 DIA MOUNTING HOLES TYP POWER MULTIPLE POINT WITH TERMINAL BLOCKS TOP VIEW Y X ORIGIN 37 51 1 2 10 5 16 78 7 16 A B C D POWER PANEL CONTROL PANEL APPROX OPERATING WEIGHT DISTRIBUTION LB MODEL WEIGHT DISTRIBUTION LBS CENTER OF GRAVITY in YCUL00 A B C D TOTAL X Y Z 26SC 434 441 434 441 1750 52 9 29 0 25 6 DIMENSIONS YCUL0026SC ENGLISH 1 LD05673 LD0567...

Page 44: ...y cutouts however the system designer must consider potential performance degradation Access to the unit control center assumes the unit is no higher than on spring isolators Recommended mini mum clearances Side to wall 6 rear to wall 6 control panel to end wall 4 0 top no obstructions allowed distance between adjacent units 10 No more than one adjacent wall may be higher than the unit LD05675 POW...

Page 45: ...37 ORIGIN Y X TOP VIEW POWER MULTIPLE POINT WITH TERMINAL BLOCKS 78 7 16 10 5 16 1 1 2 3 4 DIA MOUNTING HOLES TYP 1 1 2 POWER PANEL CONTROL PANEL APPROX OPERATING WEIGHT DISTRIBUTION LB A B C D SUCTION STOP VALVE 2 1 8 O D SUCT CONN LIQUID STOP VALVE 7 8 O D LIQUID CONN 10 15 16 5 15 16 3 1 4 2 3 X 3 RIGGING HOLES EACH SIDE 80 7 16 105 1 8 SIDE VIEW Z X 14 11 16 A A 87 3 4 9 29 25 3 4 LD05677 LD05...

Page 46: ...fety cutouts however the system designer must consider potential performance degradation Access to the unit control center assumes the unit is no higher than on spring isolators Recommended mini mum clearances Side to wall 6 rear to wall 6 control panel to end wall 4 0 top no obstructions allowed distance between adjacent units 10 No more than one adjacent wall may be higher than the unit POWER EN...

Page 47: ...RIGIN POWER MULTIPLE POINT WITH TERMINAL BLOCKS TOP VIEW 73 7 16 10 5 16 1 1 2 3 4 DIA MOUNTING HOLES TYP 1 1 2 51 1 2 37 9 1 4 X Y A B C D POWER PANEL CONTROL PANEL APPROX OPERATING WEIGHT DISTRIBUTION LB LD05681 SUCTION STOP VALVE 2 1 8 O D SUCT CONN LIQUID STOP VALVE 7 8 O D LIQUID CONN 11 4 3 4 3 1 4 105 1 8 80 7 16 SIDE VIEW 2 3 X 3 RIGGING HOLES EACH SIDE A 9 87 3 4 29 25 3 4 A 14 11 16 Z X ...

Page 48: ...fety cutouts however the system designer must consider potential performance degradation Access to the unit control center assumes the unit is no higher than on spring isolators Recommended mini mum clearances Side to wall 6 rear to wall 6 control panel to end wall 4 0 top no obstructions allowed distance between adjacent units 10 No more than one adjacent wall may be higher than the unit LD05683 ...

Page 49: ...2 3 4 DIA MOUNTING HOLES TYP 1 1 2 TOP VIEW POWER MULTIPLE POINT WITH TERMINAL BLOCKS Y X 73 7 16 ORIGIN 37 51 1 2 POWER PANEL CONTROL PANEL APPROX OPERATING WEIGHT DISTRIBUTION LB A B C D 10 5 16 A 87 3 4 9 29 26 3 4 14 11 16 Z X A 105 1 8 SIDE VIEW 3 1 4 5 15 16 11 7 8 O D LIQUID CONN LIQUID STOP VALVE 2 1 8 O D SUCT CONN SUCTION STOP VALVE 2 3 X 3 RIGGING HOLES EACH SIDE 80 7 16 LD05686 LD05685...

Page 50: ...formance YORK s unit controls will optimize operation without nuisance high pressure safety cutouts however the system designer must consider potential performance degradation Access to the unit control center assumes the unit is no higher than on spring isolators Recommended mini mum clearances Side to wall 6 rear to wall 6 control panel to end wall 4 0 top no obstructions allowed distance betwee...

Page 51: ...80 1 2 50 ORIGIN 9 3 4 99 1 2 1 1 2 3 4 DIA MOUNTING HOLES TYP CONTROL PANEL TOP VIEW APPROX OPERATING WEIGHT DISTRIBUTION LBS POWER MULTIPLE POINT WITH TERMINAL BLOCKS 1 1 2 A 89 7 8 9 2 1 16 29 33 13 16 24 1 4 A 7 3 16 2 3 x 3 RIGGING HOLES EACH SIDE 70 1 2 119 28 1 2 9 13 16 6 15 16 SIDE VIEW SYS 1 7 8 O D LIQ CONN SYS 1 2 SUCT STOP VALVES SYS 2 LIQ STOP VALVE W 7 8 LIQ CONN SYS 1 2 2 1 8 SUCT ...

Page 52: ...ial performance degradation Access to the unit control center assumes the unit is no higher than on spring isolators Recommended mini mum clearances Side to wall 6 rear to wall 6 control panel to end wall 4 0 top no obstructions allowed distance between adjacent units 10 No more than one adjacent wall may be higher than the unit LD05691 POWER ENTRY 2 2 1 2 2 1 1 2 CONDUIT K O s 5 1 2 CONDUIT K O S...

Page 53: ...1 2 1 1 2 99 1 2 TOP VIEW POWER MULTIPLE POINT WITH TERMINAL BLOCKS ORIGIN 9 3 4 CONTROL PANEL POWER PANEL 15 1 4 80 1 2 50 APPROX OPERATING WEIGHT DISTRIBUTION LB A A Z X 24 1 4 33 13 16 29 89 7 8 9 2 1 16 SYS 1 7 8 O D LIQ CONN SYS 1 2 SUCT STOP VALVES 7 3 16 2 3 x 3 RIGGING HOLES EACH SIDE 70 1 2 119 28 1 2 9 13 16 6 15 16 SYS 2 LIQ STOP VALVE W 7 8 LIQ CONN SYS 1 2 2 1 8 SUCT CONNS SYS 1 LIQ S...

Page 54: ...d performance YORK s unit controls will optimize operation without nuisance high pressure safety cutouts however the system designer must consider potential performance degradation Access to the unit control center assumes the unit is no higher than on spring isolators Recommended mini mum clearances Side to wall 6 rear to wall 6 control panel to end wall 4 0 top no obstructions allowed distance b...

Page 55: ...DIA MOUNTING HOLES TYP 1 1 2 80 1 2 50 ORIGIN 9 3 4 99 1 2 TOP VIEW POWER PANEL CONTROL PANEL APPROX OPERATING WEIGHT DISTRIBUTION LBS POWER MULTIPLE POINT WITH TERMINAL BLOCKS 89 7 8 9 2 1 16 29 33 13 16 24 1 4 SIDE VIEW 119 70 1 2 SYS 1 7 8 O D LIQ CONN SYS 1 2 SUCT STOP VALVES 7 3 16 2 3 x 3 RIGGING HOLES EACH SIDE 28 1 2 6 11 16 9 13 16 SYS 2 LIQ STOP VALVE W 7 8 LIQ CONN SYS 1 2 2 1 8 SUCT CO...

Page 56: ...erformance YORK s unit controls will optimize operation without nuisance high pressure safety cutouts however the system designer must consider potential performance degradation Access to the unit control center assumes the unit is no higher than on spring isolators Recommended mini mum clearances Side to wall 6 rear to wall 6 control panel to end wall 4 0 top no obstructions allowed distance betw...

Page 57: ...PPROX OPERATING WEIGHT DISTRIBUTION LB CONTROL PANEL 15 1 4 80 1 2 50 9 3 4 99 1 2 1 1 2 3 4 DIA MOUNTING HOLES TYP 1 1 2 TOP VIEW POWER MULTIPLE POINT WITH TERMINAL BLOCKS 89 7 8 9 2 1 16 29 33 13 16 24 1 4 2 3 x 3 RIGGING HOLES EACH SIDE 70 1 2 119 SYS 1 7 8 O D LIQ CONN SYS 1 2 SUCT STOP VALVES 27 3 16 9 13 16 6 15 16 SYS 2 LIQ STOP VALVE W 7 8 LIQ CONN SYS 1 2 2 1 8 SUCT CONNS SYS 1 LIQ STOP V...

Page 58: ...se minimum clearances indicated below resulting in unpredictable airflow patterns and possible diminished performance YORK s unit controls will optimize operation without nuisance high pressure safety cutouts however the system designer must consider potential performance degradation Access to the unit control center assumes the unit is no higher than on spring isolators Recommended mini mum clear...

Page 59: ... 91 50 ORIGIN 9 3 4 TOP VIEW POWER MULTIPLE POINT WITH TERMINAL BLOCKS 99 1 2 1 1 2 3 4 DIA MOUNTING HOLES TYP 1 1 2 POWER PANEL APPROX OPERATING WEIGHT DISTRIBUTION LB CONTROL PANEL SYS 1 2 LIQ STOP VALVES W 1 1 8 LIQ CONNS SYS 1 2 2 1 8 SUCT CONNS SYS 1 2 SUCT STOP VALVES 24 1 4 2 3 x 3 RIGGING HOLES EACH SIDE 70 1 2 3 5 16 SYS 1 3 3 16 SYS 2 7 7 8 SYS 1 11 9 16 SYS 2 119 SIDE VIEW 33 13 16 29 9...

Page 60: ...YORK s unit controls will optimize operation without nuisance high pressure safety cutouts however the system designer must consider potential performance degradation Access to the unit control center assumes the unit is no higher than on spring isolators Recommended mini mum clearances Side to wall 6 rear to wall 6 control panel to end wall 4 0 top no obstructions allowed distance between adjacen...

Page 61: ... 91 50 ORIGIN POWER MULITPLE POINT WITH TERMINAL BLOCKS TOP VIEW 99 1 2 9 3 4 1 1 2 1 1 2 3 4 DIA MOUNTING HOLES TYP POWER PANEL CONTROL PANEL APPROX OPERATING WEIGHT DISTRIBUTION LB 97 3 8 2 1 16 29 33 13 16 24 1 4 9 SYS 1 2 2 1 8 SUCT CONNS SYS 1 2 LIQ STOP VALVES W 1 1 8 LIQ CONNS SYS 1 2 SUCT STOP VALVES 2 3 x 3 RIGGING HOLES EACH SIDE 70 1 2 3 5 16 SYS 1 3 3 16 SYS 2 7 7 8 SYS 1 11 9 16 SYS 2...

Page 62: ... for winter operation or air circulation ensures rated performance reliable operation and ease of maintenance Site restrictions may compromise minimum clearances indicated below resulting in unpredictable airflow patterns and possible diminished performance YORK s unit controls will optimize operation without nuisance high pressure safety cutouts however the system designer must consider potential...

Page 63: ... 91 50 ORIGIN POWER PANEL CONTROL PANEL APPROX OPERATING WEIGHT DISTRIBUTION LBS 9 3 4 99 1 2 TOP VIEW POWER MULTIPLE POINT WITH TERMINAL BLOCKS 1 1 2 3 4 DIA MOUNTING HOLES TYP 1 1 2 SYS 1 2 LIQ STOP VALVES W 1 1 8 LIQ CONNS SYS 1 2 2 1 8 SUCT CONNS SYS 1 2 SUCT STOP VALVES 97 3 8 24 1 4 33 13 16 29 9 2 1 16 2 3 x 3 RIGGING HOLES EACH SIDE 70 1 2 3 3 16 SYS 1 3 1 4 SYS 2 6 13 16 SYS 1 11 9 16 SYS...

Page 64: ...YORK s unit controls will optimize operation without nuisance high pressure safety cutouts however the system designer must consider potential performance degradation Access to the unit control center assumes the unit is no higher than on spring isolators Recommended mini mum clearances Side to wall 6 rear to wall 6 control panel to end wall 4 0 top no obstructions allowed distance between adjacen...

Page 65: ...ER MULTIPLE POINT WITH TERMINAL BLOCKS TOP VIEW 1 1 2 3 4 DIA MOUNTING HOLES TYP 1 1 2 20 1 2 91 50 POWER PANEL CONTROL PANEL APPROX OPERATING WEIGHT DISTRIBUTION LBS ORIGIN 9 3 4 99 1 2 97 3 8 9 2 1 16 29 33 13 16 24 1 4 SYS 1 2 SUCT STOP VALVES SYS 1 2 2 5 8 SUCT CONNS SYS 1 2 LIQ STOP VALVES W 1 1 8 LIQ CONNS 2 3 x 3 RIGGING HOLES EACH SIDE 70 1 2 3 3 16 SYS 1 3 1 4 SYS 2 10 SYS 1 14 3 8 SYS 2 ...

Page 66: ...uts however the system designer must consider potential performance degradation Access to the unit control center assumes the unit is no higher than on spring isolators Recommended mini mum clearances Side to wall 2m rear to wall 2m control panel to end wall 1 2m top no obstructions allowed distance between adjacent units 3m No more than one adjacent wall may be higher than the unit All dimensions...

Page 67: ...PANEL 38 262 1992 B C D 38 19 DIA MOUNTING HOLES TYP MODEL WEIGHT DISTRIBUTION kg CENTER OF GRAVITY mm YCUL00 A B C D TOTAL X Y Z 16SC 196 199 196 199 789 1343 736 653 DIMENSIONS YCUL0016SC METRIC 1 LD05721 LD05722 35 O D SUCT CONN LIQUID STOP VALVE 22 O D LIQUID CONN 238 187 81 SIDE VIEW 2671 2043 2 76 X 76 RIGGING HOLES EACH SIDE SUCTION STOP VALVE 373 Z X A A 229 1737 737 616 ...

Page 68: ...uts however the system designer must consider potential performance degradation Access to the unit control center assumes the unit is no higher than on spring isolators Recommended mini mum clearances Side to wall 2m rear to wall 2m control panel to end wall 1 2m top no obstructions allowed distance between adjacent units 3m No more than one adjacent wall may be higher than the unit All dimensions...

Page 69: ...TRIC 1 235 38 38 19 DIA MOUNTING HOLES TYP POWER MULTIPLE POINT WITH TERMINAL BLOCKS TOP VIEW Y X ORIGIN 940 1308 262 1992 A B C D POWER PANEL CONTROL PANEL APPROX OPERATING WEIGHT DISTRIBUTION kg LD05725 A A 229 1737 737 616 373 Z X SIDE VIEW 2671 2 76 X 76 RIGGING HOLES EACH SIDE 133 81 238 22 O D LIQUID CONN SUCTION STOP VALVE 41 O D SUCT CONN 2043 LIQUID STOP VALVE LD05726 ...

Page 70: ...s however the system designer must consider potential performance degradation Access to the unit control center assumes the unit is no higher than on spring isolators Recommended mini mum clearances Side to wall 2m rear to wall 2m control panel to end wall 1 2m top no obstructions allowed distance between adjacent units 3m No more than one adjacent wall may be higher than the unit All dimensions a...

Page 71: ...TRIC 1 LD05729 235 1308 940 ORIGIN Y X TOP VIEW POWER MULTIPLE POINT WITH TERMINAL BLOCKS 1992 262 38 19 DIA MOUNTING HOLES TYP 38 POWER PANEL CONTROL PANEL APPROX OPERATING WEIGHT DISTRIBUTION kg A B C D SUCTION STOP VALVE 54 O D SUCT CONN LIQUID STOP VALVE 22 O D LIQUID CONN 278 151 83 2 76 X 76 RIGGING HOLES EACH SIDE 2043 2671 SIDE VIEW Z X 373 A A 2229 229 737 654 LD05730 ...

Page 72: ...uts however the system designer must consider potential performance degradation Access to the unit control center assumes the unit is no higher than on spring isolators Recommended mini mum clearances Side to wall 2m rear to wall 2m control panel to end wall 1 2m top no obstructions allowed distance between adjacent units 3m No more than one adjacent wall may be higher than the unit All dimensions...

Page 73: ...TRIC 1 LD05734 ORIGIN POWER MULTIPLE POINT WITH TERMINAL BLOCKS TOP VIEW 1992 262 38 19 DIA MOUNTING HOLES TYP 38 1308 940 235 X Y A B C D POWER PANEL CONTROL PANEL APPROX OPERATING WEIGHT DISTRIBUTION kg LD05733 SUCTION STOP VALVE 54 O D SUCT CONN LIQUID STOP VALVE 22 O D LIQUID CONN 279 121 83 2671 2043 SIDE VIEW 2 76 X 76 RIGGING HOLES EACH SIDE A 229 2229 737 654 A 373 Z X ...

Page 74: ...e YORK s unit controls will optimize operation without nuisance high pressure safety cutouts however the system designer must consider potential performance degradation Access to the unit control center assumes the unit is no higher than on spring isolators Recommended mini mum clearances Side to wall 2m rear to wall 2m control panel to end wall 1 2m top no obstructions allowed distance between ad...

Page 75: ...040SC METRIC 1 LD05737 235 38 19 DIA MOUNTING HOLES TYP 38 TOP VIEW POWER MULTIPLE POINT WITH TERMINAL BLOCKS Y X 1992 ORIGIN 940 1308 POWER PANEL CONTROL PANEL APPROX OPERATING WEIGHT DISTRIBUTION kg A B C D 262 A 2229 229 737 679 373 Z X A 2671 SIDE VIEW 83 151 279 22 O D LIQUID CONN LIQUID STOP VALVE 54 O D SUCT CONN SUCTION STOP VALVE 2 76 X 76 RIGGING HOLES EACH SIDE 2043 ...

Page 76: ...ble airflow patterns and possible diminished performance YORK s unit controls will optimize operation without nuisance high pressure safety cutouts however the system designer must consider potential performance degradation Access to the unit control center assumes the unit is no higher than on spring isolators Recommended mini mum clearances Side to wall 2m rear to wall 2m control panel to end wa...

Page 77: ...2 387 POWER PANEL 2045 1270 ORIGIN 248 2527 38 19 DIA MOUNTING HOLES TYP CONTROL PANEL TOP VIEW APPROX OPERATING WEIGHT DISTRIBUTION kg POWER MULTIPLE POINT WITH TERMINAL BLOCKS 38 A 225 229 52 737 859 616 A 183 2 76 x 76 RIGGING HOLES EACH SIDE 1791 2997 724 249 176 SIDE VIEW SYS 1 22 O D LIQ CONN SYS 1 2 SUCT STOP VALVES SYS 2 LIQ STOP VALVE W 22 LIQ CONN SYS 1 2 54 SUCT CONN SYS 1 LIQ STOP VALV...

Page 78: ...e airflow patterns and possible diminished performance YORK s unit controls will optimize operation without nuisance high pressure safety cutouts however the system designer must consider potential performance degradation Access to the unit control center assumes the unit is no higher than on spring isolators Recommended mini mum clearances Side to wall 2m rear to wall 2m control panel to end wall...

Page 79: ...DISTRIBUTION KG MODEL WEIGHT DISTRIBUTION kg CENTER OF GRAVITY mm YCUL00 A B C D TOTAL X Y Z 56SC 366 381 366 381 1494 1538 1022 856 DIMENSIONS YCUL0056SC METRIC 1 LD05745 LD05746 A A Z X 616 859 736 2283 229 52 SYS 1 22 O D LIQ CONN SYS 1 2 SUCT STOP VALVES 183 2 76 x 76 RIGGING HOLES EACH SIDE 1791 3023 724 249 176 SYS 2 LIQ STOP VALVE W 22 LIQ CONN SYS 1 2 54 SUCT CONNS SYS 1 LIQ STOP VALVE SID...

Page 80: ...e airflow patterns and possible diminished performance YORK s unit controls will optimize operation without nuisance high pressure safety cutouts however the system designer must consider potential performance degradation Access to the unit control center assumes the unit is no higher than on spring isolators Recommended mini mum clearances Side to wall 2m rear to wall 2m control panel to end wall...

Page 81: ...50 387 38 19 DIA MOUNTING HOLES TYP 38 2045 1270 ORIGIN 248 2527 TOP VIEW POWER PANEL CONTROL PANEL APPROX OPERATING WEIGHT DISTRIBUTION KGS POWER MULTIPLE POINT WITH TERMINAL BLOCKS 2283 229 52 737 859 616 SIDE VIEW 3023 1791 SYS 1 22 O D LIQ CONN SYS 1 2 SUCT STOP VALVES 183 2 76 x 76 RIGGING HOLES EACH SIDE 724 170 249 SYS 2 LIQ STOP VALVE W 22 LIQ CONN SYS 1 2 54 SUCT CONN SYS 1 LIQ STOP VALVE...

Page 82: ...able airflow patterns and possible diminished performance YORK s unit controls will optimize operation without nuisance high pressure safety cutouts however the system designer must consider potential performance degradation Access to the unit control center assumes the unit is no higher than on spring isolators Recommended mini mum clearances Side to wall 2m rear to wall 2m control panel to end w...

Page 83: ...CONN SYS 1 2 54SUCT CONNS SYS 1 LIQ STOP VALVE SIDE VIEW 149 MODEL WEIGHT DISTRIBUTION kg CENTER OF GRAVITY mm YCUL00 A B C D TOTAL X Y Z 66SC 400 425 400 425 1651 1550 1022 891 DIMENSIONS YCUL0066SC METRIC 1 LD05753 LD05754 POWER PANEL APPROX OPERATING WEIGHT DISTRIBUTION KG CONTROL PANEL 387 2048 1270 248 2527 38 19 DIA MOUNTING HOLES TYP 38 TOP VIEW POWER MULTIPLE POINT WITH TERMINAL BLOCKS ...

Page 84: ...lting in unpredictable airflow patterns and possible diminished performance YORK s unit controls will optimize operation without nuisance high pressure safety cutouts however the system designer must consider potential performance degradation Access to the unit control center assumes the unit is no higher than on spring isolators Recommended mini mum clearances Side to wall 2m rear to wall 2m cont...

Page 85: ...757 LD05758 521 2311 1270 ORIGIN 248 TOP VIEW POWER MULTIPLE POINT WITH TERMINAL BLOCKS 2527 38 19 DIA MOUNTING HOLES TYP 38 POWER PANEL APPROX OPERATING WEIGHT DISTRIBUTION KG CONTROL PANEL SYS 1 2 LIQ STOP VALVES W 29 LIQ CONNS SYS 1 2 54 SUCT CONNS SYS 1 2 SUCT STOP VALVES 616 2 76 x 76 RIGGING HOLES EACH SIDE 1791 84 SYS 1 81 SYS 2 200 SYS 1 294 SYS 2 3023 SIDE VIEW 859 737 2473 229 52 ...

Page 86: ...predictable airflow patterns and possible diminished performance YORK s unit controls will optimize operation without nuisance high pressure safety cutouts however the system designer must consider potential performance degradation Access to the unit control center assumes the unit is no higher than on spring isolators Recommended mini mum clearances Side to wall 2m rear to wall 2m control panel t...

Page 87: ...761 LD05762 521 2311 1270 ORIGIN POWER MULITPLE POINT WITH TERMINAL BLOCKS TOP VIEW 2527 248 38 38 19 DIA MOUNTING HOLES TYP POWER PANEL CONTROL PANEL APPROX OPERATING WEIGHT DISTRIBUTION KG 2473 52 737 859 616 229 SYS 1 2 54 SUCT CONNS SYS 1 2 LIQ STOP VALVES W 29 LIQ CONNS SYS 1 2 SUCT STOP VALVES 2 76 x 76 RIGGING HOLES EACH SIDE 1791 84 SYS 1 81 SYS 2 200 SYS 1 294 SYS 2 3023 SIDE VIEW ...

Page 88: ...predictable airflow patterns and possible diminished performance YORK s unit controls will optimize operation without nuisance high pressure safety cutouts however the system designer must consider potential performance degradation Access to the unit control center assumes the unit is no higher than on spring isolators Recommended mini mum clearances Side to wall 2m rear to wall 2m control panel t...

Page 89: ...65 LD05766 521 2311 1270 ORIGIN POWER PANEL CONTROL PANEL APPROX OPERATING WEIGHT DISTRIBUTION KGS 248 2527 TOP VIEW POWER MULTIPLE POINT WITH TERMINAL BLOCKS 38 19 DIA MOUNTING HOLES TYP 38 SYS 1 2 LIQ STOP VALVES W 29 LIQ CONNS SYS 1 2 54 SUCT CONNS SYS 1 2 SUCT STOP VALVES 2473 616 859 737 229 52 2 76 x 76 RIGGING HOLES EACH SIDE 1791 81 SYS 1 83 SYS 2 173 SYS 1 294 SYS 2 3023 SIDE VIEW ...

Page 90: ...predictable airflow patterns and possible diminished performance YORK s unit controls will optimize operation without nuisance high pressure safety cutouts however the system designer must consider potential performance degradation Access to the unit control center assumes the unit is no higher than on spring isolators Recommended mini mum clearances Side to wall 2m rear to wall 2m control panel t...

Page 91: ...69 LD05770 POWER MULTIPLE POINT WITH TERMINAL BLOCKS TOP VIEW 38 19 DIA MOUNTING HOLES TYP 38 521 2311 1270 POWER PANEL CONTROL PANEL APPROX OPERATING WEIGHT DISTRIBUTION KGS ORIGIN 248 2527 2473 229 52 737 859 616 SYS 1 2 SUCT STOP VALVES SYS 1 2 67 SUCT CONNS SYS 1 2 LIQ STOP VALVES W 29 LIQ CONNS 2 76 x 76 RIGGING HOLES EACH SIDE 1791 81 SYS 1 83 SYS 2 254 SYS 1 365 SYS 2 SIDE VIEW 3023 ...

Page 92: ...n damage G 2 Assure that all piping has been completed G 3 Visually check for refrigerant piping leaks G 4 Open suction line ball valve discharge line ball valve and liquid line valve for each system G 5 The compressor oil level should be maintained so that an oil level is visible in the sight glass The oil level can only be tested when the com pressor is running in stabilized conditions guar ante...

Page 93: ...preceding checks have been completed and the control panel has been programmed as required in the pre startup checklist the unit may be placed into operation G 1 Place the Unit Switch in the control panel to the ON position G 2 The first compressor will start and a flow of re frigerant will be noted in the sight glass After several minutes of operation the vapor in the sight glass will clear and t...

Page 94: ...e and the temperature corresponding to the suc tion pressure as shown in a standard pressure tempera ture chart Example Suction Temp 46 F minus Suction Press 60 PSIG converted to Temp 34 F Superheat 12 F When adjusting the expansion valve the adjusting screw should be turned not more than one turn at a time allow ing sufficient time approximately 15 minutes between adjustments for the system and t...

Page 95: ...never all systems shut down 4 Several seconds after the compressor starts that sys tems first condenser fan will be cycled on outdoor air temperature 25 F 3 89 C See the section on Operating Controls for details concerning con denser fan cycling 5 After 3 minutes of compressor run time the next compressor in sequence will start when a system has to load This compressor will be the one with the lea...

Page 96: ...function of tem perature or system suction pressure deviation from set point A Master ON Off switch is available to activate or de activate the unit Unit Controls 00065VIP MICROPROCESSOR BOARD The Microprocessor Board is the controller and deci sion maker in the control panel System inputs such as pressure transducers and temperature sensors are con nected directly to the Microprocessor Board The ...

Page 97: ...lay Messages may show characters indicating greater than or less than These characters indicate the actual values are greater than or less than the limit values which are being displayed KEYPAD The 12 button non tactile keypad allows the user to re trieve vital system parameters such as system pressures temperatures compressor running times and starts op tion information on the unit and system set...

Page 98: ...ing NO RUN PERM shows that the air proving switch or remote start stop contact wired in series with the air proving switch is open This message will only be dis played when the Control Mode is programmed for Dis charge Air Temperature Sys Switch Off indicates that the system switch under OPTIONS is turned off The system will not be allowed to run until the switch is turned back on These messages i...

Page 99: ...ing could be due to the load limit pwm input or an ISN controller could be sending a load limit command S Y S 1 A R T I M E R X X S S Y S 2 A R T I M E R X X S S Y S 1 C O M P S R U N X S Y S 2 C O M P S R U N X S Y S 1 A C T I M E R X X S S Y S 2 A C T I M E R X X S S Y S 1 D S C H L I M I T I N G S Y S 2 D S C H L I M I T I N G S Y S 1 Z O N E T H E R M O F F S Y S 2 Z O N E T H E R M O F F 3 Th...

Page 100: ...itch are opens at 23 PSIG 5 PSIG 1 59 barg 34 barg and closes at 35 PSIG 5 PSIG 2 62 barg 34 barg S Y S 1 H I G H D S C H P R E S S Y S 2 H I G H D S C H P R E S S Y S 1 L O W S U C T P R E S S S Y S 2 L O W S U C T P R E S S M A N U A L O V E R R I D E S Y S 1 P U M P I N G D O W N S Y S 2 P U M P I N G D O W N Unit Controls If MANUAL OVERRIDE mode is selected the STA TUS display will display thi...

Page 101: ...is not operated at voltages where malfunction of the mi croprocessor could result in system damage When the 115VAC to the micropanel drops below a certain level a unit fault is initiated to safely shut down the unit Restart is allowed after the unit is fully powered again and the anti recycle timers have finished counting down UNIT WARNING The following message is not a unit safety and will not be...

Page 102: ...Y MESSAGES General Messages Fault Messages System Safeties Unit Safeties Unit Switch Off Shutdown Remote Controlled Shutdown Daily Schedule Shutdown Flow Switch Remote Stop System X Switch Off System X No Cool Load System X Comps Run System X AR Timer System X Zone Thermostat Off System X AC Timer System X Disch Limiting System X Suct Limiting System X Load Limiting Manual Overide Status System X ...

Page 103: ... 3 The Display Print keys allow the user to retrieve sys tem and unit information that is useful for monitoring unit operation diagnosing potential problems trouble shooting and commissioning the chiller System and unit information unit options setpoints and scheduling can also be printed out with the use of a printer Both real time and history information are avail able OPER DATA KEY The OPER DAT...

Page 104: ... 8 S T E P S L E A D S Y S T E M I S S Y S T E M N U M B E R 2 L O A D T I M E R 5 8 S E C U N L O A D T I M E R 0 S E C S Y S X S T A R T S 1 X X X X X 2 X X X X X 3 X X X X X Unit Controls Only displayed when control mode programmed for Discharge Air Temperature This display of the load and unload timers indicate the time in seconds until the unit can load or unload Whether the systems loads or ...

Page 105: ...four message will appear sequentially first for system 1 then for system 2 The first message indicates the system and number of compressors that are being commanded on by the mi cro board The second message indicates the system run time in days hours minutes seconds Please note that this is not accumulated run time but pertains only to the current system cycle The third message indicates the syste...

Page 106: ...a Key Discharge Air Temperature Ambient Air Temperature System 1 Suction and Discharge Pressure System 1 Suction Temperature System 2 Suction and Discharge Pressure System 2 Suction Temperature System X Accumulated Run Times System X Accumulated Starts Load and Unload Timers Cooling Demand Steps Lead System Indicator Evaporator Pump Contact Status Remote Control Active System X Number of Compresso...

Page 107: ...E CONTROL MODE LEAVING LIQUID LEAD LAG CONTROL AUTOMATIC FAN CONTROL AMB DSCH PRESS PROGRAM VALUES DSCH PRESS CUTOUT 395 PSIG SUCT PRESS CUTOUT 44 PSIG LOW AMBIENT CUTOUT 25 0 DEGF ANTI RECYCLE TIME 600 SECS FAN CONTROL ON PRESS 230 PSIG FAN DIFF OFF PRESS 80 PSIG NUMBER OF COMPRESSORS 6 UNIT DATA DISCHARGE AIR TEMP 58 2 DEGF COOLING RANGE 55 0 5 0 DEGF AMBIENT AIR TEMP 74 8 DEGF LEAD SYSTEM SYS 2...

Page 108: ...he safety threshold to be exceeded The history printout is similar to the operational data printout shown in the previous section The differences are in the header and the schedule information The daily schedule is not printed in a history print One example history buffer printout is shown below The data part of the printout will be exactly the same as the operational data print so it is not repea...

Page 109: ... I T F A U L T L O W S U C T P R E S S S Y S X F A N S T A G E X X X A C T I V E R E M O T E C T R L X X X X S Y S X S P X X X X P S I G D P X X X X P S I G S Y S X R U N T I M E X X X X X X X X D H M S S Y S X N U M B E R O F C O M P S R U N N I N G X S E T P O I N T X X X F R A N G E F E V A P P U M P I S X X X E V A P H E A T E R I S X X X L E A D S Y S T E M I S S Y S T E M N U M B E R X A M B...

Page 110: ...re also used for pro gramming the control panel such as changing cooling setpoints setting the daily schedule changing safety setpoints unit options and setting the clock ENTRY KEYS ENTER ADV KEY The ENTER key must be pushed after any change is made to the cooling setpoints daily schedule safety setpoints unit options and the clock Pressing this key enters the new values into memory If the ENTER k...

Page 111: ...rol will be displayed for a few seconds and then the setpoint entry screen will be displayed Following are the four possible messages that can be displayed after pressing the COOLING SETPOINT key indicating the cooling mode This message indicates that the cooling setpoint is un der LOCAL control That is the cooling setpoint is con trolling to the locally programmed setpoint The mes sage also indic...

Page 112: ... 5 0 F R A N G E 5 0 F S Y S X S P 7 0 P S I G R A N G E 3 P S I G R E M O T E S U C T I O N P R E S S U R E C O N T R O L Unit Controls unlike the previous message it is now indicating that the control point is based on Suction Pressure This message indicates that the cooling setpoint is un der REMOTE control When under remote control the cooling setpoint will be determined by a remote device suc...

Page 113: ...eration is then repeated if necessary This process may be fol lowed until the hour minutes and meridian AM or M A X E M S P W M R E M O T E T E M P R E S E T 2 0 F PM of both the START and STOP points are set After changing the meridian of the stop time pressing the ENTER ADV key will advance the schedule to the next day Whenever the daily schedule is changed for Monday all the other days will cha...

Page 114: ...h located in the refrigerant circuit The system can restart when the discharge pres sure drops 40 PSIG 2 76 BARG below the cutout point If the optional discharge pressure transducer is not in stalled this programmable safety would not apply It should be noted that every system has a mechanical high pressure cutout that protects against excessive high dis charge pressure regardless of whether or no...

Page 115: ...3 24 The Fan Differ ential Off Pressure is designated as diff_press in the tables The TOTAL NUMBER OF COMPRESSORS are the amount of compressors in the chiller and determines the stages of cooling available Notice in Table 14 that the selection available will vary depending on whether the chiller is a single or dual refrigerant circuit This must be programmed correctly to assure proper chiller oper...

Page 116: ... Cutout Range Remote Setpoint Low Ambient Temp Cutout Range Display Only Anti Recycle EMS PWM Timer Remote Temperature Reset Setpoint Discharge Air Temp mode only Fan Control On Pressure Fan Differential Off Pressure Numbers of Compressors SETPOINTS KEYS TABLE 15 SETPOINTS QUICK REFERENCE LIST LD04297 Unit Controls OPER DATA QUICK REFERENCE LIST Table 15 provides a quick reference of the setpoints...

Page 117: ...n has been displayed the UP and DOWN arrow keys are then used to change that particular option After the option is changed the EN TER ADV key must be pressed to enter the data into memory Table 16 shows the programmable options Following are the displays in the order they appear Option 1 Language This indicates that the display will be viewed in English Option 2 System Switches two system units on...

Page 118: ...ption 4 Ambient Control Type The low ambient cutout is adjustable from 25 F to 60 F 3 9 C to 15 6 C or The low ambient cutout is programmable down to 0 F 17 8 C A low ambient kit MUST be installed for this option to be chosen Option 5 Local Remote Control Type When programmed for LOCAL an ISN or RCC con trol can be used to monitor only The micropanel will operate on locally programmed values and i...

Page 119: ...s mode the micro determines which system is as signed to the lead and lag A new lead lag assignment is made whenever all compressors shut down The mi cro will then assign the lead to the compressor with the shortest average run time Option 9 Condensed Fan Control Mode Condenser fans are controlled by discharge pressure only This mode may only be chosen when discharge pressure transducers are insta...

Page 120: ...AMMING QUICK REFERENCE LIST Unit Controls OPTIONS KEY press key to adv Display Language System Switches on off Unit Type chiller or condensing unit Ambient Control standard or low ambient Local or Remote Mode Unit Control Mode based on unit type Display Units english or metric Lead Lag Control Fan Control Mode Manual Overide Mode enabled or disabled LD04509 ...

Page 121: ...ge Air Temperature Control is the temperature the condensing unit will control to within the control range The setpoint High Limit is the Setpoint plus the Cooling Range The Setpoint Low Limit is the Setpoint minus the Cooling Range See Figure 5 If the Discharge Air Temperature is above the Setpoint High Limit the lead compressor on the lead system will be energized along with the liquid line sole...

Page 122: ...OTE 2 ON OFF OFF 4 ON ON OFF SEE NOTE 3 OFF OFF OFF 5 ON ON OFF ON OFF OFF 6 ON ON OFF ON ON OFF 7 ON ON ON ON ON OFF 8 ON ON ON ON ON ON TABLE 18 DISCHARGE AIR TEMPERATURE CONTROL FOR 4 COMPRESSORS 6 STEPS LEAD SYSTEM LAG SYSTEM STEP COMP 1 COMP 2 COMP 1 COMP 2 0 OFF OFF OFF OFF 1 ON HG OFF SEE NOTE 1 OFF OFF 2 ON OFF OFF OFF 3 ON OFF SEE NOTE 2 ON OFF 4 ON ON SEE NOTE 3 OFF OFF 5 ON ON ON OFF 6 ...

Page 123: ...enoid is turned off when the DAT SP CR 2 2 Step 3 is skipped when loading occurs 3 Step 4 is skipped when unloading occurs STEP can be viewed using the OPER DATA key and scrolling to COOLING DEMAND TABLE 20 DISCHARGE AIR TEMPERATURE CONTROL FOR 2 COMPRESSORS SINGLE SYSTEM 3 TABLE 19 DISCHARGE AIR TEMPERATURE CONTROL FOR 3 COMPRESSORS SINGLE SYSTEM STEP COMP 1 COMP 2 COMP 3 0 OFF OFF OFF 1 ON HG OF...

Page 124: ...on pressure falls below the Setpoint High Limit and greater than the Setpoint Low Limit loading and unloading do not occur This area of control is called the control range If the suction pressure falls below the Setpoint Low Limit unloading compressors cycling off occurs at a rate of 30 seconds per system The zone thermostat must be satisfied before the last compressor in the system cycles off eve...

Page 125: ...charge Pressure Only The condenser fan control by Ambient Temperature and Discharge Pressure is a feature that is integral to the standard software control If the optional discharge transducer is not installed the condenser fans will op erate based on outdoor ambient temperature only See Table 21 The condenser fan control by Discharge Pressure is a feature that can be selected if the discharge pre...

Page 126: ...ess are programmable un der the PROGRAM key TABLE 23 LOW AMBIENT CONDENSER FAN CONTROL AMBIENT TEMPERATURE AND DISCHARGE PRESSURE CONTROL FAN STAGE ON OFF FANS Stage 1 OAT 25 F 3 9 C OAT 20 F 6 7 C OR AND 1 REV DP ctrl_press DP ctrl_press diff_press Stage 2 OAT 45 F 3 9 C OAT 40 F OR AND 1 FWD DP ctrl_press 20 PSIG 1 38 Bars DP ctrl_press diff_press 20 PSIG 1 38 Bars Stage 3 OAT 65 F 18 3 C OAT 60...

Page 127: ...WM inputs The first stage of lim iting is either 66 or 50 depending on the number of compressors on the unit The second stage of limit ing is 33 and is only available on 3 and 6 compressor units Table 25 shows the load limiting permitted for the various number of compressors COMPRESSOR RUN STATUS Compressor run status is indicated by closure of con tacts at CTB2 terminals 25 to 26 for system 1 and...

Page 128: ...t Cooling Setpoint 12 8 C 2 8 C 15 6 C This can be viewed by pressing the Cooling Setpoints key twice The new value will be displayed as REM SETP 15 6 C BAS EMS TEMPERATURE RESET OPTION The Remote Reset Option allows the Control Center of the unit to reset the discharge air temperature setpoint using a 0 10 VDC input a 4 20 mA input or a con tact closure input The Temperature Reset circuit board c...

Page 129: ... Signal 12 mA English reset 8 mA x 10 F 5 F reset 16 setpoint 55 F 5 F 60 F Metric reset 8 mA x 5 6 C 2 8 C reset 16 setpoint 12 8 C 2 8n C 15 6 C Max Reset Value is the Max EMS PWM Remote Temp Reset setpoint values described in the programming section under Cooling Setpoints Programmable values are from 2 F to 40 F 1 11 C to 11 11 C If the Contact Closure input is used The connections are made to...

Page 130: ...Using the UP DOWN ARROW keys will turn the respective digital output on off Following is the order of digital outputs that will ap pear as the ENTER ADV key is pressed SYS 1 COMPRESSOR 1 SYS 1 LIQUID LINE SOLENOID VALVE SYS 1 COMPRESSOR 2 SYS 1 COMPRESSOR 3 SYS 1 HOT GAS BYPASS SOLENOID VALVE SYS 2 COMPRESSOR 1 SYS 2 LIQUID LINE SOLENOID VALVE SYS 2 COMPRESSOR 2 SYS 2 COMPRESSOR 3 SYS 1 FAN STAGE ...

Page 131: ...s This example indicates that the system 1 suction pres sure input is connected to plug 4 pin 10 J4 10 on the microboard It indicates that the voltage is 2 1 volts DC which corresponds to 81 PSIG suction pressure The digital inputs will display the input connection and ON OFF status such as This indicates that the flow switch remote start air proving switch input is connected to plug 9 pin 5 J9 5 ...

Page 132: ...OPTION J5 13 SYS 2 SUCTION TEMP SENSOR YCUL OPTION J5 14 SPARE J5 15 SPARE J6 7 AMBIENT AIR TEMPERATURE SENSOR J6 8 LEAVING CHILLED LIQUID TEMPERATURE SENSOR RETURN CHILLED LIQUID TEMPERATURE SENSOR OR J6 9 DISCHARGE AIR TEMP SENSOR YCUL ONLY J7 10 SYS 2 SUCT PRESS TRANSDUCER OR SYS 2 LOW PRESS SWITCH J7 11 SPARE J7 12 SYS 2 DISCHARGE PRESSURE TRANSDUCER OPTIONAL J8 5 SYS 1 GROUND FAULT CIRCUIT J8...

Page 133: ...YORK INTERNATIONAL FORM 150 63 NM1 133 FIG 13 MICROBOARD LAYOUT J4 J8 J6 J5 J7 J9 TB3 TB4 TB5 00071VIP TB1 TB2 4 CLK ON OFF JUMPER EPROM RTC CHIP ...

Page 134: ...is voltage is in reference to ground The unit case should be suffi cient as a reference point when measuring binary input voltages ANALOG INPUTS TEMPERATURE Refer to the unit wiring diagram Temperature inputs are connected to the microboard on plug J6 These ana log inputs represent varying DC signals corresponding to varying temperatures All voltages are in reference to the unit case ground Follow...

Page 135: ... 9795 0 34 2 95 9256 1 36 3 02 8750 2 38 3 08 8276 3 40 3 15 7830 4 42 3 21 7411 6 44 3 27 7017 7 46 3 33 6647 8 48 3 39 6298 9 50 3 45 5970 10 52 3 51 5661 11 54 3 56 5370 12 56 3 61 5096 13 58 3 67 4837 14 60 3 72 4593 16 62 3 76 4363 17 64 3 81 4145 18 66 3 86 3941 19 68 3 90 3747 20 70 3 94 3564 21 72 3 98 3392 22 74 4 02 3228 23 76 4 06 3074 24 78 4 10 2928 26 80 4 13 2790 27 4 Discharge Air ...

Page 136: ... 3 51 5661 11 54 3 56 5370 12 56 3 61 5096 13 58 3 67 4837 14 60 3 72 4593 16 62 3 76 4363 17 64 3 81 4145 18 66 3 86 3941 19 68 3 90 3747 20 70 3 94 3564 21 72 3 98 3392 22 74 4 02 3228 23 76 4 06 3074 24 78 4 10 2928 26 80 4 13 2790 27 Control Service and Troubleshooting Suction Temperature Sensor System 1 J5 7 5 VDC regulated supply to sensor J5 12 VDC input signal to the microboard See Table 3...

Page 137: ...when the LP switch is open and 200 PSIG 13 79 BARG when the LP switch is closed The discharge transducers have a range from 0 to 400 PSIG The output will be linear from 5 VDC to 4 5 VDC over the 400 PSIG 27 5 BARG range Table 32 shows the formula that can be used to verify the volt age output of the transducer All voltage reading are in reference to ground unit case V Pressure in PSIG x 01 5 or V ...

Page 138: ...ollowing are the microboard connections for the Low Pressure switch System 1 Low Pressure Switch J4 5 5 VDC regulated supply to LP switch J4 10 input signal to the microboard 0 VDC open switch 5 VDC closed switch J4 2 Drain shield connection 0 VDC System 2 Low Pressure Switch J7 5 5 VDC regulated supply to LP switch J7 10 input signal to the microboard 0 VDC open switch 5 VDC closed switch J7 2 Dr...

Page 139: ...amage may result After the ribbon cable is disconnected from microboard ohmmeter leads are connected to the pins representing the specific button to be tested After connecting the meter leads the button being checked is pressed and a reading of zero ohms should be observed After re leasing the button the resistance value should be infinite open circuit Pin 1 is usually identified by a stripe on th...

Page 140: ... 950915576 The cable to connect the printer can either be locally assembled from the parts listed or ordered directly from WEIGH TRONIX under part number 287 040018 FIG 15 PRINTER TO MICROBOARD ELECTRICAL CONNECTIONS Control Service and Troubleshooting LD05635 PARTS The following parts are required 1 WEIGH TRONIX model 1220 printer 2 2 25 5 7cm wide desk top calculator paper 3 25 ft 7 62m maximum ...

Page 141: ...oboard 5 Replace Microboard or Display board NOTE Contact YORK Service before Replacing circuit boards FLOW SWITCH REM 1 No air flow 1 Check air flow STOP NO RUN PERMISSIVE 2 Air flow switch improperly 2 Check that the air flow switch installed is installed according to manufacturer s instructions 3 Defective air flow switch 3 Replace air flow switch 4 Remote cycling device open 4 Check cycling de...

Page 142: ...ice section for pressure voltage formula 7 LLSV defective 7 Replace LLSV HIGH DISCHARGE 1 Condenser fans not operating 1 Check fan motor fuses PRESSURE FAULT or operating backwards and contactors Assure fan blows air upward 2 Too much refrigerant 2 Remove refrigerant 3 Air in refrigerant system 3 Evacuate and recharge system 4 Defective discharge 4 Replace discharge pressure pressure transducer tr...

Page 143: ...em Consult START Installation Manual to aid in understanding compres sor operation and capacity control 2 Defective discharge air temp 2 Compare the display with a sensor thermometer Should be within 2 degrees Refer to Service section for Dis charge Air temp voltage tbl 3 Contactor Overload failure 3 Replace defective part 4 Compressor failure 4 Diagnose cause of failure and replace LACK OF COOLIN...

Page 144: ... of the equipment owner to pro vide maintenance on the system IMPORTANT If system failure occurs due to improper maintenance during the warranty period YORK will not be liable for costs incurred to return the system to satisfactory operation The following is intended only as a guide and covers only the chiller unit components It does not cover other related system components which may or may not b...

Page 145: ...ill be sent Tables 37 38 show the data values and page listings for this unit ISN CONTROL TABLE 36 ISN RECEIVED DATA TABLE 37 ISN TRANSMITTED DATA ISN PAGE CONTROL DATA P03 SETPOINT P04 LOAD LIMIT STAGE 0 1 2 P05 COOLING RANGE DAT MODE ONLY P06 P07 START STOP COMMAND P08 P09 P10 HISTORY BUFFER REQUEST ISN PAGE TYPE DATA P11 ANALOG LEAVING CHILLED LIQUID TEMP P12 ANALOG RETURN CHILLED LIQUID TEMP P...

Page 146: ... 0 LOCAL 1 REMOTE P53 DIGITAL UNITS 0 IMPERIAL 1 SI P54 DIGITAL LEAD LAG CONTROL MODE 0 MANUAL 1 AUTO P55 DIGITAL P56 CODED SYS 1 OPERATIONAL CODE P57 CODED SYS 1 FAULT CODE P58 CODED SYS 2 OPERATIONAL CODE P59 CODED SYS 2 FAULT CODE P60 CODED SYS 1 COMP RUNNING ISN PAGE TYPE DATA P61 CODED SYS 1 COND FANS RUNNING P62 CODED SYS 2 COMP RUNNING P63 CODED SYS 2 COND FANS RUNNING P64 CODED P65 ANALOG ...

Page 147: ...ESSURE 8 NO RUN PERMISSIVE 8 HIGH MOTOR CURRENT 9 NO COOL LOAD 9 LLSV NOT ON 10 ANTI COINCIDENCE TIMER ACTIVE 10 LOW BATTERY WARNING 11 ANTI RECYCLE TIMER ACTIVE 11 HIGH OIL TEMPERATURE 12 MANUAL OVERRIDE 12 HIGH DISCHARGE TEMPERATURE 13 SUCTION LIMITING 13 IMPROPER PHASE ROTATION 14 DISCHARGE LIMITING 14 LOW MOTOR CURRENT MP HPCO 15 CURRENT LIMITING 15 MOTOR CURRENT UNBALANCED 16 LOAD LIMITING 16...

Page 148: ...YORK INTERNATIONAL 148 ELEMENTARY DIAGRAM YCUL0016 0036 FIG 16 ELEMENTARY DIAGRAM MODELS YCUL0016 YCUL0036 Elementary Diagrams ...

Page 149: ...YORK INTERNATIONAL FORM 150 63 NM1 149 FIG 16 CONTINUED ELEMENTARY DIAGRAM MODELS YCUL0016 YCUL0036 LD04355 ELEMENTARY DIAGRAM YCUL0016 0036 5 ...

Page 150: ...YORK INTERNATIONAL 150 LD04556 ELEMENTARY DIAGRAM YCUL0016 0036 Elementary Diagrams FIG 16 CONTINUED ELEMENTARY DIAGRAM MODELS YCUL0016 YCUL0036 ...

Page 151: ...YORK INTERNATIONAL FORM 150 63 NM1 151 This page is intentionally left blank 5 ...

Page 152: ...YORK INTERNATIONAL 152 FIG 17 ELEMENTARY DIAGRAM MODELYCUL0040 ELEMENTARY DIAGRAM YCUL0040 Elementary Diagrams ...

Page 153: ...YORK INTERNATIONAL FORM 150 63 NM1 153 FIG 17 CONTINUED ELEMENTARY DIAGRAM MODELYCUL0040 LD04356 ELEMENTARY DIAGRAM YCUL0040 5 ...

Page 154: ...YORK INTERNATIONAL 154 FIG 17 CONTINUED ELEMENTARY DIAGRAM MODEL YCUL0040 LD04557 ELEMENTARY DIAGRAM YCUL0040 Elementary Diagrams ...

Page 155: ...YORK INTERNATIONAL FORM 150 63 NM1 155 This page is intentionally left blank 5 ...

Page 156: ...YORK INTERNATIONAL 156 FIG 18 ELEMENTARY DIAGRAM MODELS YCUL0046 YCUL0066 ELEMENTARY DIAGRAM YCUL0046 0066 Elementary Diagrams ...

Page 157: ...YORK INTERNATIONAL FORM 150 63 NM1 157 FIG 18 CONTINUED ELEMENTARY DIAGRAM MODELS YCUL0046 YCUL0066 LD04357 ELEMENTARY DIAGRAM YCUL0046 0066 5 ...

Page 158: ...YORK INTERNATIONAL 158 FIG 18 CONTINUED ELEMENTARY DIAGRAM MODELS YCUL0046 YCUL0066 LD04558 ELEMENTARY DIAGRAM YCUL0046 0066 Elementary Diagrams ...

Page 159: ...YORK INTERNATIONAL FORM 150 63 NM1 159 This page is intentionally left blank 5 ...

Page 160: ...YORK INTERNATIONAL 160 FIG 19 ELEMENTARY DIAGRAM MODELS YCUL0076 YCUL0090 ELEMENTARY DIAGRAM YCUL0076 0090 Elementary Diagrams ...

Page 161: ...YORK INTERNATIONAL FORM 150 63 NM1 161 FIG 19 CONTINUED ELEMENTARY DIAGRAM MODELS YCUL0076 YCUL0090 LD04358 ELEMENTARY DIAGRAM YCUL0076 0090 5 ...

Page 162: ...YORK INTERNATIONAL 162 LD04559 ELEMENTARY DIAGRAM YCUL0076 0090 Elementary Diagrams FIG 19 CONTINUED ELEMENTARY DIAGRAM MODELS YCUL0076 YCUL0090 ...

Page 163: ...YORK INTERNATIONAL FORM 150 63 NM1 163 This page is intentionally left blank 5 ...

Page 164: ... 98 AEQM 98 AEQM 98 YCUL0066 AEQM 98 AEQM 98 AEQM 98 AEQM 98 YCUL0076 AEQM 1000 AEQM 1000 AEQM 1000 AEQM 1000 YCUL0080 AEQM 1000 AEQM 1000 AEQM 1000 AEQM 1000 YCUL0086 AEQM 1000 AEQM 1000 AEQM 1000 AEQM 1000 YCUL0090 AEQM 1000 AEQM 1000 AEQM 1000 AEQM 1000 SEISMIC WEIGHT DISTRIBUTION POINT SPRING LOCATION MODEL NO A B C D YCUL0016 CP 1 26 CP 1 26 CP 1 26 CP 1 26 YCUL0026 CP 1 26 CP 1 26 CP 1 26 CP...

Page 165: ...9 26 PURPLE AEQM 96 301055 96 BLACK CP 1 27 308439 27 ORANGE AEQM 97 301055 97 WHITE CP 1 28 308439 28 GREEN AEQM 98 301055 98 GRAY CP 1 31 308439 31 GRAY AEQM 1000 301060 1000 GREEN CP 2 26 308692 26 PURPLE AEQM 1300 301060 1300 YELLOW CP 2 27 308692 27 ORANGE AEQM 1600 301060 1600 GRAY ISOLATOR SPRING IDENTIFICATION TABLE MODEL NO A B C D YCUL0016 AEQM 96 AEQM 96 AEQM 96 AEQM 96 YCUL0026 AEQM 96...

Page 166: ...YORK INTERNATIONAL 166 ISOLATOR DIMENSIONS TYPE CP 1 AND CP 2 FIG 20 TYPE CP 1 FIG 21 TYPE CP 2 LD03839 Appendix 1 LD03840 ...

Page 167: ...EISMIC ISOLATORS MODEL A B C D E F G H J AEQM 97 7 5 4 2 A 7 A AEQM 98 7 5 4 2 A 7 A AEQM 99 7 5 4 2 A 7 A AEQM 1000 8 6 6 4 8 B AEQM 1300 8 6 6 4 8 B AEQM 1600 8 6 6 4 8 B AEQM 1625 8 6 6 4 8 B AEQM 1628 8 6 6 4 8 B ISOLATOR DIMENSIONS R SPRING SEISMIC ISOLATORS A ...

Page 168: ...ed bolt mountings to floor through slots 4 Set the machine or base on the mountings The weight of the machine will cause the upper hous ing of the mount to go down possibly resting on the lower housing 5 If clearance X is less than 1 4 on any mounting with wrench turn up one complete turn on the ad justing bolt of each mounting Repeat this proce dure until 1 4 clearance at X is obtained on one or ...

Page 169: ...ired to level all isolator base plates A A 1 4 maximum difference in eleva tion can be tolerated 4 Anchor all isolators to floor or subbase as required For installing on concrete VMC recommends HILTI type HSL heavy duty anchors or equal 5 Remove cap screw C and save Gently place ma chine or machine base on top of bolt B Install cap screw C but DO NOT tighten 6 The weight of the machine will cause ...

Page 170: ...YORK INTERNATIONAL 170 ...

Page 171: ... Corp 908 225 0606 NEVADA Las Vegas YORK International Corp 702 873 2200 NEW YORK Buffalo YORK International Corp 716 633 2172 New York YORK International Corp 212 843 1602 NORTH CAROLINA Charlotte YORK International Corp 704 598 0000 Greensboro YORK International Corp 336 299 9675 Raleigh YORK International Corp 919 829 1700 OHIO Cincinnati YORK International Corp 513 489 8871 Cleveland YORK Inte...

Page 172: ...ennsylvania USA 17405 1592 Subject to change without notice Printed in USA Copyright by York International Corporation 2000 ALL RIGHTS RESERVED Form 150 63 NM1 700 Supersedes 150 63 NM1 699 Tele 800 851 1001 www york com ...

Reviews: