background image

English

Appendix

SWR2311P-10G Owner’s Manual

35

* These signals are not used by the SWR2311P-10G.

This License Agreement (the “AGREEMENT”) is a legal agreement between you and Yamaha 
Corporation (“YAMAHA”) under which YAMAHA is providing the firmware of YAMAHA’s network 
products (the “PRODUCT”) and related software program, documentation and electronic files 
(collectively, the “SOFTWARE”).

YAMAHA grants you a personal non-exclusive license to use the SOFTWARE only for purposes of 
running it on the PRODUCT.

This AGREEMENT applies to the SOFTWARE which YAMAHA provides you and the installed copy 
thereof, subject to the provision of 1-1 herein, into the PRODUCT or personal computer owned by 
you.

1.

GRANT OF LICENSE:

1-1. YAMAHA grants you a personal non-exclusive license to install the SOFTWARE and use 

the SOFTWARE on the PRODUCT or other devices, including but not limited to the 
personal computer, which you own.

1-2. You shall not assign, sublicense, sell, rent, lease, loan, convey or otherwise transfer to any 

third party, upload to a website or a server computer to which specified or unspecified 
persons may access, or copy, duplicate, translate or convert to another programming 
language the SOFTWARE except as expressly provided herein. You shall not alter, modify, 
disassemble, decompile or otherwise reverse engineer the SOFTWARE and you also shall 
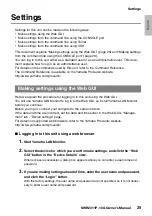
not have any third party to do so.

1-3. You shall not modify, remove or delete a copyright notice of YAMAHA contained in the 

SOFTWARE.

1-4. Except as expressly provided herein, no license or right, express or implied, is hereby 

conveyed or granted by YAMAHA to you for any intellectual property of YAMAHA.

2.

OWNERSHIP AND COPYRIGHT:

The SOFTWARE is protected under the copyright laws and owned by YAMAHA. You agree and 
acknowledge that YAMAHA transfers neither ownership interest nor intellectual property in the 
SOFTWARE to you under this AGREEMENT or otherwise.

RJ-45/DB-9 console cable pin configuration

Software license agreement

Console (RS-232C)

Signal

RTS
DTR
TxD
GND
GND
RxD
DSP*
CTS*

1
2
3
4
5
6
7
8

8
6

9

2
5

3
7
4
1

RJ-45

D-SUB 9

Summary of Contents for SWR2311P-10G

Page 1: ...WITCH SWR2311P 10G RU IT ES FR DE EN Owner s Manual Bedienungsanleitung Mode d emploi Manual de instrucciones Manuale di istruzioni Руководство пользователя English Deutsch Français Español Italiano Русский ...

Page 2: ...oisture does not operate normally or has been dropped PRÉCAUTIONS CONCER NANT LA SÉCURITÉ 1 Lire ces instructions 2 Conserver ces instructions 3 Tenir compte de tous les avertissements 4 Suivre toutes les instructions 5 Ne pas utiliser ce produit à proximité d eau 6 Nettoyer uniquement avec un chiffon propre et sec 7 Ne pas bloquer les orifices de ventilation Installer l appareil conformément aux ...

Page 3: ...erates uses radio fre quencies and if not installed and used according to the instructions found in the users manual may cause interference harmful to the operation of other electronic devices Compliance with FCC regulations does not guarantee that interference will not occur in all installations If this product is found to be the source of interference which can be determined by turning the produ...

Page 4: ...ly use the voltage specified as correct for the product The required voltage is printed on the name plate of the product Use only the supplied power cord plug If you intend to use the product in an area other than in the one you purchased the included power cord may not be compatible Please check with your Yamaha dealer Check the electric plug periodically and remove any dirt or dust which may hav...

Page 5: ... reach of children to keep them from putting their fingers into openings on the product and accidentally being injured There is a danger that children might swallow small parts This product is not suitable for use in locations where children are likely to be present Do not block the vents This product has ventilation holes at the top front rear sides to prevent the internal temperature from becomi...

Page 6: ...ng the product Handling caution Do not insert your fingers or hands in any gaps or openings on the product vents ports panel etc Do not rest your weight on the product or place heavy objects on it Do not look into the optical emitter when a separately sold SFP module SFP SWRG LX SFP SWRG SX is installed The separately sold SFP modules are class 1 laser devices They may emit laser beams invisible t...

Page 7: ...n could result in damage to the product Do not install the product in a location where magnetic fields are strong Otherwise it might cause the product to malfunction Do not connect any noise generating devices on the same power line as the product Failure to observe this precaution could result in a malfunction or damage to the product Do not locate any connected LAN cables close to the power cord...

Page 8: ...o website for the details of licensing article http www yamaha com proaudio Suitable for installation in Information Technology Rooms in accordance with Article 645 of the National Electrical Code and NFPA 75 The device can only be used in a fixed location such as a telecommunication centre a dedicated computer room When you install the device ensure that the protective earthing connection of the ...

Page 9: ... 20 Installation on a wall or ceiling 22 Settings 25 Making settings using the Web GUI 25 Making settings from the command line using the CONSOLE port 26 Connections 28 Initialization 31 Appendix 33 Hardware specifications 33 Dimensional diagram 34 RJ 45 DB 9 console cable pin configuration 35 Software license agreement 35 Index 38 Accessories Please ensure that you have all of the following acces...

Page 10: ... SWR rack mount accessory This is required when installing the unit in a 19 inch rack WK SWR wall mount accessory This is required when installing the unit on a wall or on a ceiling less than 2 meters high SFP SWRG LX or SFP SWRG SX SFP module This is required when connecting via 1000BASE LX or 1000BASE SX Yamaha LAN Monitor Yamaha LAN Monitor User Guide This is a Windows application used to monit...

Page 11: ... of this manual to have the unit repaired or inspected Abnormal temperature inside this unit The temperature inside this unit is abnormal Reconsider the environment in which this unit is installed and correctly install this unit so that its internal temperature is appropriate 2 mini USB CONSOLE port This is a mini USB port for making settings Use a USB cable to connect it to the USB port of a comp...

Page 12: ...nitial display mode is LINK ACT LINK ACT PoE VLAN STATUS OFF back to LINK ACT For details on the MODE button that switches modes and the MOD indicator refer to Switching the display mode page 16 For details on the port indicators in each selected mode refer to Port indicators page 17 7 LAN ports These ports can supply PoE and are compatible with 10BASE T 100BASE TX and 1000BASE T PoE supply is com...

Page 13: ...t number Doing so might cause a malfunction 9 Cooling vents External air is taken in through these cooling vents Warning Do not block the cooling vents or place objects near them Doing so could cause fire or malfunctions 0 Product label This lists the model name serial number and MAC address etc of this unit Top panel 0 9 MAC address Serial number ...

Page 14: ... These forcibly exhaust the heat that is generated inside the unit When a problem is detected the POWER indicator is lit orange Caution Do not block the fan vents or place objects near them Doing so could cause fire or malfunctions C Power supply inlet three pin connector C14 type Insert the included power supply cord here Connect it to an electrical outlet of the appro priate voltage for the unit...

Page 15: ...talled in a horizontal position If the unit is to be installed in a horizontal position attach the included legs as shown in the illustration E Rack mount accessory attachment holes Use these holes to attach the RK SWR rack mount accessory Refer to Installation in a rack page 20 for information on how to install the unit Bottom panel D F E F D Leg Leg Leg attachment guides ...

Page 16: ...te of the mode indicators Explanation 1 LINK ACT Upper Lit green Lower Unlit The left indicator of the LAN port or SFP port shows the link status and the right indicator shows the connection speed 2 PoE Upper Lit orange Lower Unlit Indicates the power supply sta tus of the LAN port 3 VLAN Upper Unlit Lower Lit green Indicates the VLAN ID specified for the LAN port or SPF port 4 STATUS Upper Unlit ...

Page 17: ...ndicator Left Indicator Right Indicator Right Indicator Right Indicator Right Indicator Left indicator Link status Right indicator Connection speed Unlit The link is lost unavailable Unlit Not connected Alternatively connected by 10BASE T Lit green A link is established available Lit orange Connected by 100BASE TX Flashing green Data is flowing Lit green Connected by 1000BASE T Left indicator Link...

Page 18: ... the unit forcibly enters STATUS mode Loop detected SFP optical input level abnormality detected PoE supply stoppage or receiving device error detected Left indicator Power supply status Unlit Not supplying power Lit green Supplying power Left indicator Right indicator VLAN ID Indicator assignment order Unlit Unlit No ID Lit green Unlit Lowest numbered VLAN ID 1 Lit orange Unlit The lit pattern is...

Page 19: ...rts and SFP ports Left indicator Right indicator Error information Unlit Unlit Normal Flashing orange Unlit A loop was detected The port has been blocked or shut down Lit orange Unlit A fault has occurred in the device receiving power and power is not being supplied Unlit Flashing orange Because the maximum total electrical power that this unit can supply has been exceeded power supply to this por...

Page 20: ...tilation in this space by installing a ventilation panel or leaving it open Open the rear panel of the rack place the rack 10cm about four inches away from the walls and ceiling to keep sufficient ventilation If you cannot open the rear panel of the rack install a commercially available forced ventilation device such as a fan kit If you install a fan kit closing the rear panel may work better for ...

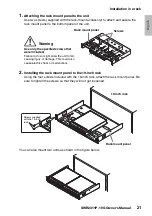
Page 21: ...h rack Using the four screws included with the 19 inch rack attach the rack mount panel Be sure to tighten the screws so that they will not get loosened You can also mount two units as shown in the figure below Rack mount panel Screws Warning Use only the specified screws that were included Failure to do so might allow the unit to fall causing injury or damage This could also cause electric shock ...

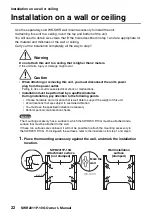
Page 22: ...e electrical shock or malfunctions Installation must be performed by a qualified installer During installation pay attention to the following points Choose hardware and a location that is well able to support the weight of this unit Avoid locations that are subject to sustained vibration You must use the specified installation accessory Perform periodic maintenance checks Notice The mounting acces...

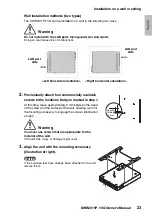
Page 23: ... marked in step 1 At this time leave approximately 2 mm between the head of the screw and the surface of the wall allowing room for the mounting accessory to engage the screws illustration at right Warning You must use screws that are appropriate for the material of the wall If the unit falls injury or damage might occur 3 Align the unit with the mounting accessory illustration at right Notice If ...

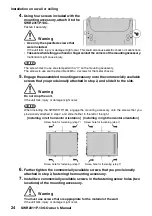
Page 24: ...u provisionally attached in step 2 and slide it to the side Warning Do not drop the unit If the unit falls injury or damage might occur Notice When installing the SWR2311P 10G engage the mounting accessory onto the screws that you provisionally attached in step 2 and slide it either to the left or the right 6 Further tighten the commercially available screws that you provisionally attached in step...

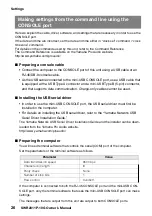
Page 25: ...cedure for logging in to this unit using the Web GUI You will use Yamaha LAN Monitor to log in to the Web GUI so install Yamaha LAN Monitor before you continue Before you log in connect your computer to the same network If the date and time are incorrect set the date and time either in the Web GUI s Manage ment tab Device settings page For details on supported web browsers refer to the Yamaha Pro ...

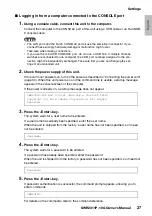
Page 26: ...he USB serial driver In order to use the mini USB CONSOLE port the USB serial driver must first be installed in the computer For details on installing the USB serial driver refer to the Yamaha Network USB Serial Driver Installation Guide The Yamaha Network USB Serial Driver Installation Guide and the installer can be down loaded from the Yamaha Pro Audio website http www yamaha com proaudio Prepar...

Page 27: ...er as described in Connecting the power cord page 30 When this unit powers on and the command line is usable a startup message appears in the console screen of the computer If the power is already on a startup message does not appear 3 Press the Enter key The system waits for a user name to be entered If a user name has already been specified enter the user name When the unit is shipped from the f...

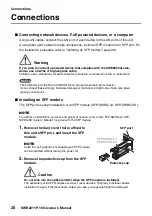
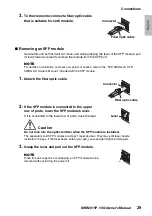
Page 28: ...ct these wrongly hardware damage or malfunction might occur Take care when making connections Installing an SFP module The SFP ports accept installation of an SFP module SFP SWRG LX SFP SWRG SX NOTE For details on installation removal and points of caution refer to the SFP SWRG LX SFP SWRG SX Owner s Manual included with the SFP module 1 Remove the dust cover that is affixed to this unit s SFP por...

Page 29: ...SFP module 1 Detach the fiber optic cable 2 If the SFP module is connected to the upper row of ports lower the SFP module s lever If it is connected to the lower row of ports raise the lever Caution Do not look into the optical emitter when the SFP module is installed The separately sold SFP modules are class 1 laser devices They may emit laser beams invisible to the eye If the laser beam enters y...

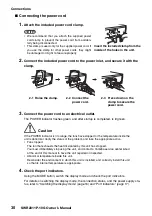
Page 30: ...l Verify the status of the problem and take the appropriate action Fan stopped The fan that exhausts the heat dissipated by this unit has stopped You must immediately stop using the unit and contact a Yamaha service center listed at the end of this manual to have the unit repaired or inspected Abnormal temperature inside this unit Reconsider the environment in which this unit is installed and corr...

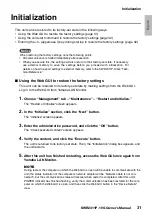
Page 31: ...from the Web GUI Log in to the Web GUI from Yamaha LAN Monitor 1 Choose Management tab Maintenance Restart and initialize The Restart or Initialize screen appears 2 In the Initialize section click the Next button The Initialize screen appears 3 Enter the administrative password and click the OK button The Check executed content screen appears 4 Verify the content and click the Execute button The u...

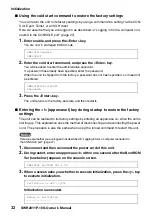
Page 32: ...o the factory set state and then restarts Entering the I uppercase I key during startup to restore the factory settings The unit can be restored to its factory settings by entering an uppercase I when the unit is starting up This explanation uses the method of disconnecting and reconnecting the power cord The procedure is also the same when using the reload command to restart this unit Notice Here...

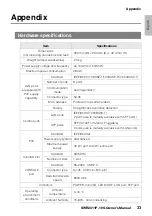
Page 33: ...ddress Printed on top surface label Polarity Straight cross automatic detection Combo ports LAN ports IEEE 802 3 1000BASE T 2 ports use is mutually exclusive with SPF ports SFP ports SFP Small Form factor Pluggable 2 ports use is mutually exclusive with LAN ports PoE Standard IEEE 802 3at Power supply system Alternative A Maximum power supply 30 W port 240 W entire unit microSD slot Standard SD SD...

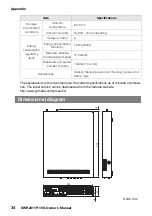
Page 34: ...ge environment conditions Ambient temperature 20 50 C Ambient humidity 10 90 non condensing Energy conservation regulatory items Category name A Energy consumption efficiency 1 2 W Gbit s Maximum effective communication speed 10 0 Gbit s Measured port speed number of ports 1 Gbit s 10 ports Accessories Owner s Manual power cord 3 prong power cord clamp legs Item Specifications Dimensional diagram ...

Page 35: ...ense sell rent lease loan convey or otherwise transfer to any third party upload to a website or a server computer to which specified or unspecified persons may access or copy duplicate translate or convert to another programming language the SOFTWARE except as expressly provided herein You shall not alter modify disassemble decompile or otherwise reverse engineer the SOFTWARE and you also shall n...

Page 36: ...R INCIDENTAL OR CONSEQUENTIAL DAMAGES SO THE ABOVE LIMITATION OR EXCLUSION MAY NOT APPLY TO YOU SOME STATES DO NOT ALLOW THE LIMITATION OR EXCLUSION OF LIABILITY FOR INCIDENTAL OR CONSEQUENTIAL DAMAGES SO THE ABOVE LIMITATION OR EXCLUSION MAY NOT APPLY TO YOU 5 3 YAMAHA YAMAHA S SUBSIDIARIES AND AFFILIATES THEIR DISTRIBUTORS AND DEALERS SHALL HAVE NO OBLIGATION TO INDEMNIFY YOU AGAINST ANY CLAIM O...

Page 37: ... the Software with only those rights set forth herein 9 ACKNOWLEDGMENT You agree that this AGREEMENT is the complete and exclusive statement of agreement between you and YAMAHA concerning the subject matter hereof and supersedes all proposals or prior agreements verbal or written and any other communications between you and the parties relating to the subject matter hereof NO amendment to this AGR...

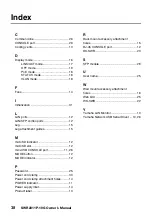
Page 38: ...ides 15 M microSD indicator 12 microSD slot 12 mini USB CONSOLE port 11 26 MODE button 12 MODE indicator 12 P Password 25 Power cord clamp 30 Power cord clamp attachment holes 14 POWER indicator 11 Power supply inlet 14 Product label 13 R Rack mount accessory attachment holes 15 RJ 45 CONSOLE port 12 RK SWR 20 S SFP module 28 U User name 25 W Wall mount accessory attachment holes 16 Web GUI 25 WK ...

Page 39: ...English SWR2311P 10G Owner s Manual 39 Memo ...

Page 40: ...220 SWR2311P 10G Owner s Manual ...

Page 41: ...renSiebitteIhre örtliche Stadt oder Gemeindeverwaltung Ihren Abfallentsorgungsdienst oder die Verkaufsstelle der Artikel Information für geschäftliche Anwender in der Europäischen Union Wenn Sie Elektrogeräte ausrangieren möchten kontaktieren Sie bitte Ihren Händler oder Zulieferer für weitere Informationen Entsorgungsinformation für Länder außerhalb der Europäischen Union Dieses Symbol gilt nur i...

Page 42: ...i si prega di contattare le autorità locali o il rivenditore e richiedere informazioni sulla corretta modalità di smaltimento weee_eu_it_02 Información para usuarios sobre la recogida y eliminación de los equipos antiguos Este símbolo en los productos embalajes y documentos anexos significa que los productos eléctricos y electrónicos no deben mezclarse con los desperdicios domésticos normales Para...

Page 43: ...e Tel 30 210 6686168 SWEDEN FINLAND ICELAND Yamaha Music Europe GmbH Germany filial Scandinavia JA Wettergrensgata 1 400 43 Göteborg Sweden Tel 46 31 89 34 00 DENMARK Yamaha Music Denmark Fillial of Yamaha Music Europe GmbH Tyskland Generatorvej 8C ST TH 2860 Søborg Denmark Tel 45 44 92 49 00 NORWAY Yamaha Music Europe GmbH Germany Norwegian Branch Grini Næringspark 1 1332 Østerås Norway Tel 47 67...

Page 44: ...Published 06 2018 IPES A0 2018 Yamaha Corporation Manual Development Group Yamaha Downloads https download yamaha com Yamaha Pro Audio global website https www yamaha com proaudio ZZ29740 ...

Reviews: