background image


5


Tutorial


Was the sound recorded correctly? If the sound is dis-
torted or cracked, adjust the gain control and try the 
recording once again. If the sound was recorded on 
the hard disk in a distorted condition, it will be impos-
sible to fix it later.
You should also pay close attention to the position of 
the mics. Changing the direction of the mics and their 
distance from the instrument makes an amazing 
amount of difference in the recorded sound. Since the 
AW2816 lets you re-record as many times as you like, 
try various mic settings until you are happy with the 
recorded sound you get. It is also useful to read maga-
zines and watch what other people do, but unless you 
are an experienced professional recording engineer, it 
is difficult to put up mics in the “perfect” location 
without some trial and error. We recommend that you 
refer to professional publications, and try various 
experiments with the AW2816.


Recording the sound of a rhythm 


machine


As an alternative to the preceding example, here’s 
how a rhythm section created on a rhythm machine 
with built-in sequencer functionality can be recorded 
on the AW2816. Although you could simply press the 
PLAY button of the rhythm machine at the same time 
you begin recording, nearly all rhythm machines 
these days support MTC or MIDI Clock, so let’s try 
synchronizing the AW2816 with your rhythm 
machine. In this example, we will use the AW2816 as 
the MTC or MIDI Clock master, and make the rhythm 
machine follow it.
First press [MIDI], and then [F1] to access the MIDI 
Setup 1 screen. Make sure that MTC SYNC is set to 
MASTER. Next, make sure that your rhythm machine 
is able to receive MTC or MIDI Clock messages and 
operate in synchronization. (On your rhythm 
machine, this may be a setting named SYNC, or 
something similar.) The settings and connections will 
differ depending on which type of message is used for 
synchronization.
If you are using MTC, use a MIDI cable to connect the 
AW2816’s MTC OUT connector to your rhythm 
machine’s MIDI IN connector (or its MTC IN connec-
tor, if there is on).
If you are using MIDI Clock, press [F2] to access the 
MIDI Setup 2 screen. Turn the MIDI CLK setting ON, 
set MIDI/HOST to MIDI, and set OUT/THRU to OUT. 
For each of these, move the cursor to the setting, and 
press [ENTER] to change the setting. Then use a MIDI 
cable to connect the AW2816’s MIDI OUT connector 
to the MIDI IN connector of your rhythm machine. If 
you are using MIDI Clock, you will also need to make 
tempo settings as explained below.
Next, change the settings on your rhythm machine so 
that it will operate in synchronization to MTC or MIDI 
Clock, and put the rhythm machine in a mode in 
which it will wait for synchronization messages to 
arrive. Now when you press the AW2816’s PLAY but-
ton, the rhythm machine should begin operating in 

synchronization. Did it work? In the case of MTC, a 
parameter called “Frame Rate” must also be set to the 
same setting on both devices, so refer to the 
AW2816’s “Owner’s Manual” and the manual of your 
rhythm machine, and check this setting as well.


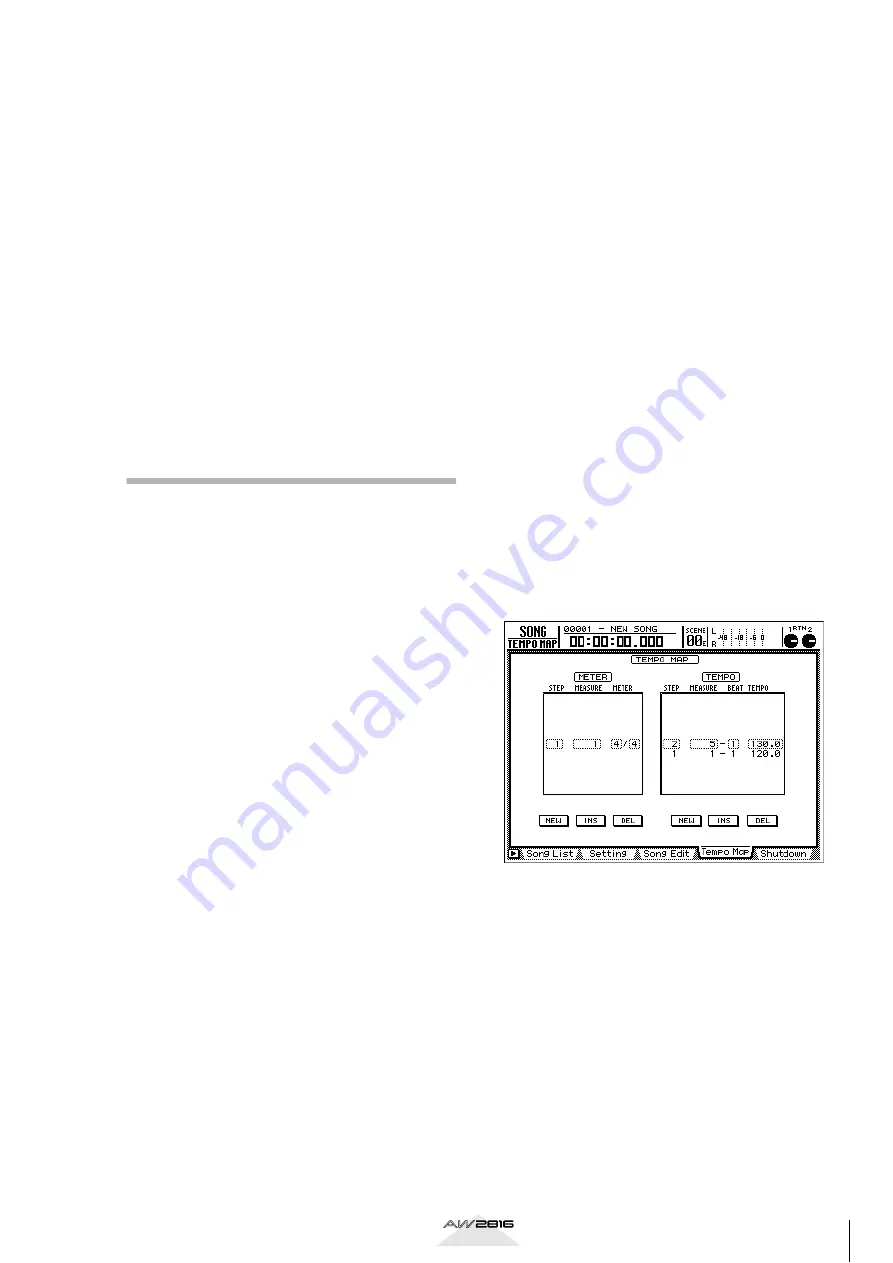
What is tempo data on the 
AW2816


On the AW2816, tempo data is maintained indepen-
dently for each song. When a new song is created, it 
will be set to a time signature of 4/4 and a tempo of 
120. If you want to change this, or if you want the 
time signature or tempo to change during the song, 
press [SONG] and then press [F4] to access the Tempo 
Map screen. of the two frames, the left one is the time 
signature (METER), and the right is the tempo 
(TEMPO). To try this out, move the cursor to NEW in 
the TEMPO area, and press [ENTER]. A second tempo 
data will be created. Now try changing the STEP 2 set-
tings MEASURE to 5, and TEMPO to 130.0. With these 
settings, the tempo will be at the STEP 1 value (120) 
for the first four measures, and will change to 130 at 
measure 5.
If your rhythm machine has only a connector that 
transmits MTC, or if you have already input detailed 
tempo data into your rhythm machine and it’s too 
much work to re-specify it for the AW2816, refer to 
the AW2816’s “Owner’s Manual” and set it to operate 
as a MTC slave.

Now that we have made the two devices operate in 
synchronization, we are ready to record. Connect the 
audio outputs of the rhythm to the inputs of the 
AW2816, make sure that the sound is being input cor-
rectly, and then record. You can preserve a wider 
range of mixdown options if you record separate 
sounds from your rhythm machine on separate tracks 
of the AW2816, so being mindful of the eventual 
structure of your song, do this if you will have enough 
recording tracks on the AW2816.

Summary of Contents for AW2816

Page 1: ...PROFESSIONAL AUDIO WORKSTATION PROFESSIONAL AUDIO WORKSTATION E Tutorial Tutorial...

Page 2: ...you already have experience using a digital mixing console or digital recorder operating the AW2816 will soon feel completely natural to you and you will quickly be amazed at the astounding amount of...

Page 3: ...c guitar 11 Adding the lead vocal 11 Adding the chorus 11 Listening to the rough mix 11 Saving the song 11 Saving the scene 11 Step 3 Assembling the mix for each part 12 Channels 1 2 Bass drum and sna...

Page 4: ...rding the bass at an early point in the process will clarify the chord pro gression of the song and will make it easier for you to perform overdubbing later Parts that contribute to the rhythmic feel...

Page 5: ...so adjust the fader and check whether sound is being input from each mic into the AW2816 You will be able to record with the best quality sound if the level is adjusted as high as possible without al...

Page 6: ...and set OUT THRU to OUT For each of these move the cursor to the setting and press ENTER to change the setting Then use a MIDI cable to connect the AW2816 s MIDI OUT connector to the MIDI IN connecto...

Page 7: ...of the screen slightly toward the right side For this example we will assume that you have selected 01 Press the STORE key of the SCENE MEMORY section You will be asked to input a name for the scene...

Page 8: ...orded it will be impossible to make any changes in that effect afterward In particular applying equal izer EQ or spatial type effects during recording may limit your freedom during mixdown In some cas...

Page 9: ...tray and load the CD 5 The demo song Can you feel it will appear in the on screen list Move the cursor to the RESTORE SONG area and press the ENTER key The RESTORE SONG but ton will change from DISAB...

Page 10: ...nt space Narrow and tight Distant Nearby Are there any instruments that share a similar fre quency range and might conflict with each other Distorted electric guitar and organ are good exam ples of th...

Page 11: ...l on The kick and snare are recorded on tracks 1 and 2 respectively Adding the drum overhead tracks Use the following procedure to pair the monitor chan nels 1 Hold down the channel 3 SEL key and pres...

Page 12: ...n to a section of the song where the lead vocal is heard together with the chorus and adjust the level of the chorus section Turn on channels 13 14 15 and raise the fader levels to a point where they...

Page 13: ...FTER PAN At this stage of the mixdown you need to hear the tracks with the EQ dynamics and other effects applied Normally when you use the Solo function to monitor you will hear only the dry sound of...

Page 14: ...Move the cursor to ON OFF and turn dynamics ON for the selected channel 4 Use the CURSOR keys and the DATA JOG dial to make the following dynamics set tings for the overhead mic channels Since channe...

Page 15: ...to make the following dynamics set tings DYNAMICS Comp Channel 6 Acoustic bass We will lower the LOW 35 Hz region by 7 5 dB to add warmth to the sound By lowering the L MID 111 Hz region by 2 5 dB we...

Page 16: ...DYNAMICS Expander Channel 7 Percussion For the percussion channel we will cut the 125 Hz region by 8 0 dB to reduce the weight of the low range making the sound a bit lighter In the dynamics section...

Page 17: ...ness EQ ATT 11 dB Type Compander Soft Channel 9 Piano Since this has an overall familiar tone we will leave it essentially unchanged A slight boost in the 500 Hz region will bring out the core of the...

Page 18: ...hard compander Type Compander Hard EQ ATT 7 dB Channel 11 Organ We will boost the mid range that adds a distinctive character to the organ sound DYNAMICS OFF EQ ATT 7 dB Threshold Ratio Out Gain Atta...

Page 19: ...te level and panning adjustments to create a good mix with the chorus 3 middle monaural of channel 15 So that it does not interfere with the lead vocal we will emphasize part of the mid range so that...

Page 20: ...der level as appropriate Since the level is also affected when you adjust EQ or dynamics you will find it necessary to adjust it as well Saving the song To save the song press the WORK NAVIGATE sectio...

Page 21: ...se Preset scene By recalling the preset scene number 04 STEP4 MIX you can hear the reverb and other settings that will be explained below By now you probably know how to recall a scene but if you are...

Page 22: ...in from applying reverb to the synthesizer Instead we will use Symphonic for effect 2 This effect is used mainly to add depth a sense of speed and a stereo feeling horizontal spread to synthesizer sou...

Page 23: ...ts and the reasons for the change Turn auto mix on and watch how the faders and channel ON keys change as the song progresses Use the following procedure to turn automix on 1 In the AUTOMATION section...

Page 24: ...empha size the backing in the lower register 4 Synth Approximately 1 30 into the song the fader will be turned ON Then at about 2 25 the fader will be lowered creating silence during the break At abo...

Page 25: ...ng back at someone else s home The ideal mastering environment is one with as little reverberation as possible and in which the recorded sound and effects are reproduced as faithfully as pos sible the...

Page 26: ...ding the song to the stereo track On the AW2816 you must first record the mixed song onto the stereo track and then write that stereo track to the CD Once you are satisfied with the master EQ and comp...

Page 27: ...and mixdown functions that we were not able to introduce in these pages We hope you will make full use of these capabilities and even develop tech niques that are not mentioned in the AW2816 s Owner s...

Page 28: ...otal of 28 channels includ ing the recorder playback and the outputs of the two effects Chase A state in which the AW2816 is receiving MTC see entry from an external device and running in syn chroniza...

Page 29: ...top and Record Monitor The headphones or speakers used to reproduce the sound that is output from the AW2816 Also used to refer to the act of listening to the playback from the headphones or speakers...

Page 30: ...eing performed each second If this number is higher a broader frequency range of sound can be captured as data Scene memory A function that collectively saves the parameter set tings of the AW2816 s m...

Page 31: ...YAMAHA CORPORATION V766850 R1 1 IP 32 Pro Audio Digital Musical Instrument Division P O Box 3 Hamamatsu 430 8651 Japan 01 08 3500 AP Printed in Japan...

Reviews: