background image


Recording on the AW2816


4


Tutorial


Recording sound from the mics 
onto the hard disk


When you have finished adjusting the input level, 
connect the input to the track on which it will be 
recorded. In the WORK NAVIGATE section, press the 
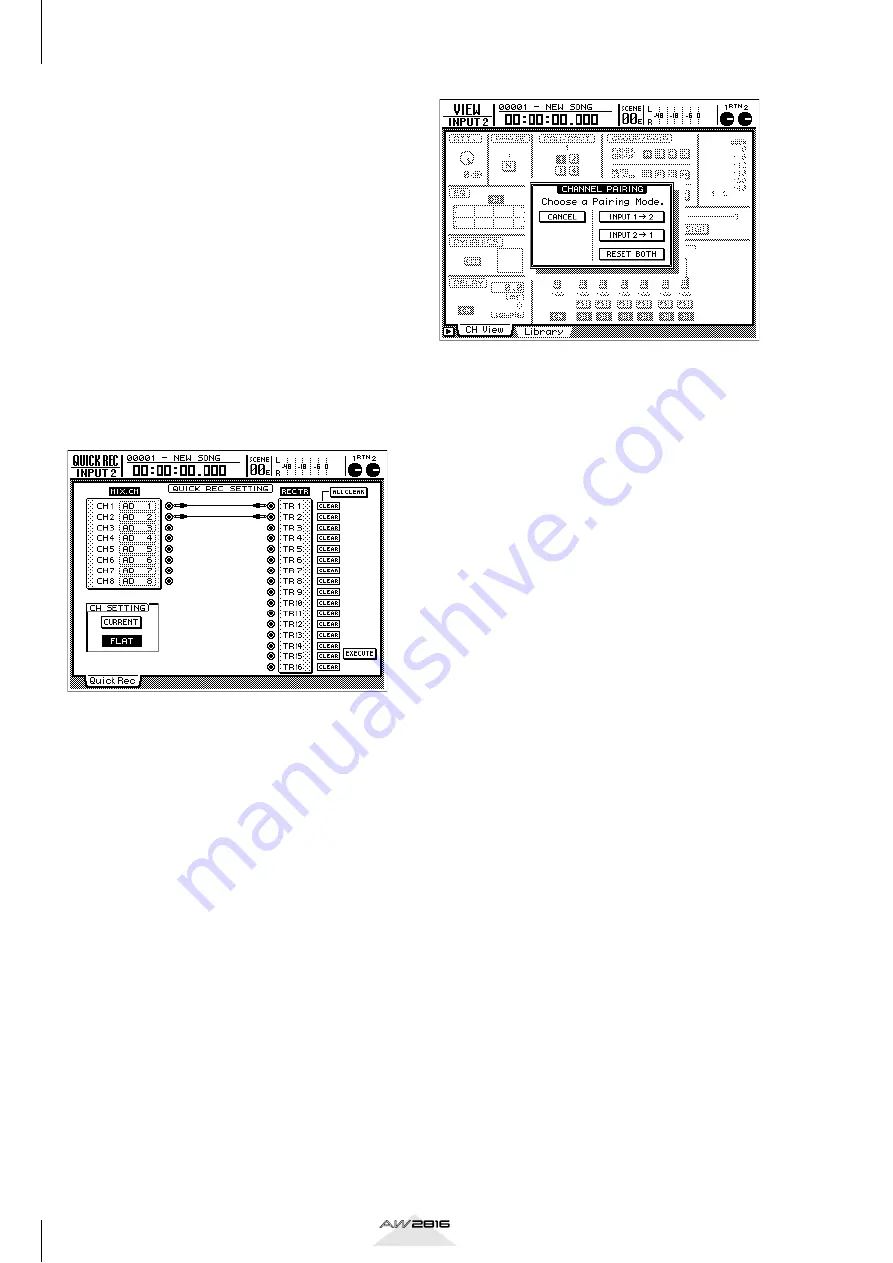
[QUICK REC] key. On the left side are the sounds 
being input to the AW2816, and on the right side are 
tracks 1–16 (a total of sixteen tracks) on which you 
can record. Try pressing [ENTER] on the circle for 
CH1 in the left. In the screen, a connection will be 
made between CH1 and TR1. In the same way, con-
nect CH2 and TR2. In the CH SETTING area, select 
[FLAT] to select the default settings when recording 
for the first time.
When you have completed these preparations, press 
[ENTER] on EXECUTE, located at the far right. You will 
be asked whether you are sure, so select OK. If the 
REC TRACK SELECT 1 and 2 indicators in the upper 
right of the AW2816 are blinking, you are ready.

Although you could record immediately, let’s pair the 
two inputs so that we can record in stereo.
In the MIXING LAYER section, press INPUT [1-8], and 
then press the channel 1 [SEL] key to make it light. 
Now in the MIXER section, press [VIEW], and then 
press [F1] to access the CH View screen. Use the 
[CURSOR] keys to move to the MONOx2 area beside 
PAIR, and press [ENTER]. You will be asked how you 
want to pair adjacent channels, so for this example, 
press [ENTER] on INPUT 1


2. This lets you simulta-

neously control the settings for the two inputs channel 
1 and 2. To try this out, move the fader of input chan-
nel 1 up and down. The fader of the adjacent channel 
should move with it.

Press the [ON] key located immediately above the 
input channel 1 fader, making it light. (At this time, 
the channel 2 [ON] key will also light if pairing has 
been enabled.) A volume meter will be displayed at 
the upper right of the CH View screen, so adjust the 
fader, and check whether sound is being input from 
each mic into the AW2816. You will be able to record 
with the best-quality sound if the level is adjusted as 
high as possible without allowing the OVER indicator 
in the meter to light when the loudest sounds are 
played. If you were able to adjust the gain control suc-
cessfully in the beginning of this process, a fader posi-
tion of approximately 0 dB should be just right.
Now we can just record. When you are ready to begin 
playing, hold down the [REC] key and press the 
[PLAY] key. When you are finished playing, press the 
[STOP] key.


Play back the recorded sound


Let’s listen to the sound that was recorded. If you used 
the two mics in stereo, press the MIXER section [PAN] 
key, and then press [F2] to open the Pan MONI 
screen. If you have just created the song (and not 
modified the settings), all sixteen tracks should be 
heard from the middle (CENTER). In the screen, move 
the cursor to the Pan control for track 1, and turn the 
[DATA/JOG] dial all the way to the left (L16). In the 
same way, set track 2 all the way to the right (R16). 
What if you recorded the right mic on track 1? If so, 
simply invert the left/right settings of the two tracks. 
However since the input channels and tracks are 
paired as 1-2, 3-4, ... etc., you should use the odd-
numbered channel to input the left sound.
After you have made Pan settings, press the 0 [RTZ] 
key of the keypad to return to the beginning of the 
song, and press the [PLAY] key to play back. If you do 
not hear sound, press the MIXING LAYER section 
RECORDER [1-8] key, make the [ON] key light for 
tracks 1 and 2 of the recorder, and make sure that the 
faders are raised. Also make sure that the red STEREO 
fader is raised and the PHONES control (if using head-
phones) or MONITOR OUT control (if using con-
nected monitor speakers) are not lowered all the way. 
If you still do not hear sound, it is possible that some 
mistake was made when recording, so try the proce-
dure described above once again, checking each step 
as you perform it.

Summary of Contents for AW2816

Page 1: ...PROFESSIONAL AUDIO WORKSTATION PROFESSIONAL AUDIO WORKSTATION E Tutorial Tutorial...

Page 2: ...you already have experience using a digital mixing console or digital recorder operating the AW2816 will soon feel completely natural to you and you will quickly be amazed at the astounding amount of...

Page 3: ...c guitar 11 Adding the lead vocal 11 Adding the chorus 11 Listening to the rough mix 11 Saving the song 11 Saving the scene 11 Step 3 Assembling the mix for each part 12 Channels 1 2 Bass drum and sna...

Page 4: ...rding the bass at an early point in the process will clarify the chord pro gression of the song and will make it easier for you to perform overdubbing later Parts that contribute to the rhythmic feel...

Page 5: ...so adjust the fader and check whether sound is being input from each mic into the AW2816 You will be able to record with the best quality sound if the level is adjusted as high as possible without al...

Page 6: ...and set OUT THRU to OUT For each of these move the cursor to the setting and press ENTER to change the setting Then use a MIDI cable to connect the AW2816 s MIDI OUT connector to the MIDI IN connecto...

Page 7: ...of the screen slightly toward the right side For this example we will assume that you have selected 01 Press the STORE key of the SCENE MEMORY section You will be asked to input a name for the scene...

Page 8: ...orded it will be impossible to make any changes in that effect afterward In particular applying equal izer EQ or spatial type effects during recording may limit your freedom during mixdown In some cas...

Page 9: ...tray and load the CD 5 The demo song Can you feel it will appear in the on screen list Move the cursor to the RESTORE SONG area and press the ENTER key The RESTORE SONG but ton will change from DISAB...

Page 10: ...nt space Narrow and tight Distant Nearby Are there any instruments that share a similar fre quency range and might conflict with each other Distorted electric guitar and organ are good exam ples of th...

Page 11: ...l on The kick and snare are recorded on tracks 1 and 2 respectively Adding the drum overhead tracks Use the following procedure to pair the monitor chan nels 1 Hold down the channel 3 SEL key and pres...

Page 12: ...n to a section of the song where the lead vocal is heard together with the chorus and adjust the level of the chorus section Turn on channels 13 14 15 and raise the fader levels to a point where they...

Page 13: ...FTER PAN At this stage of the mixdown you need to hear the tracks with the EQ dynamics and other effects applied Normally when you use the Solo function to monitor you will hear only the dry sound of...

Page 14: ...Move the cursor to ON OFF and turn dynamics ON for the selected channel 4 Use the CURSOR keys and the DATA JOG dial to make the following dynamics set tings for the overhead mic channels Since channe...

Page 15: ...to make the following dynamics set tings DYNAMICS Comp Channel 6 Acoustic bass We will lower the LOW 35 Hz region by 7 5 dB to add warmth to the sound By lowering the L MID 111 Hz region by 2 5 dB we...

Page 16: ...DYNAMICS Expander Channel 7 Percussion For the percussion channel we will cut the 125 Hz region by 8 0 dB to reduce the weight of the low range making the sound a bit lighter In the dynamics section...

Page 17: ...ness EQ ATT 11 dB Type Compander Soft Channel 9 Piano Since this has an overall familiar tone we will leave it essentially unchanged A slight boost in the 500 Hz region will bring out the core of the...

Page 18: ...hard compander Type Compander Hard EQ ATT 7 dB Channel 11 Organ We will boost the mid range that adds a distinctive character to the organ sound DYNAMICS OFF EQ ATT 7 dB Threshold Ratio Out Gain Atta...

Page 19: ...te level and panning adjustments to create a good mix with the chorus 3 middle monaural of channel 15 So that it does not interfere with the lead vocal we will emphasize part of the mid range so that...

Page 20: ...der level as appropriate Since the level is also affected when you adjust EQ or dynamics you will find it necessary to adjust it as well Saving the song To save the song press the WORK NAVIGATE sectio...

Page 21: ...se Preset scene By recalling the preset scene number 04 STEP4 MIX you can hear the reverb and other settings that will be explained below By now you probably know how to recall a scene but if you are...

Page 22: ...in from applying reverb to the synthesizer Instead we will use Symphonic for effect 2 This effect is used mainly to add depth a sense of speed and a stereo feeling horizontal spread to synthesizer sou...

Page 23: ...ts and the reasons for the change Turn auto mix on and watch how the faders and channel ON keys change as the song progresses Use the following procedure to turn automix on 1 In the AUTOMATION section...

Page 24: ...empha size the backing in the lower register 4 Synth Approximately 1 30 into the song the fader will be turned ON Then at about 2 25 the fader will be lowered creating silence during the break At abo...

Page 25: ...ng back at someone else s home The ideal mastering environment is one with as little reverberation as possible and in which the recorded sound and effects are reproduced as faithfully as pos sible the...

Page 26: ...ding the song to the stereo track On the AW2816 you must first record the mixed song onto the stereo track and then write that stereo track to the CD Once you are satisfied with the master EQ and comp...

Page 27: ...and mixdown functions that we were not able to introduce in these pages We hope you will make full use of these capabilities and even develop tech niques that are not mentioned in the AW2816 s Owner s...

Page 28: ...otal of 28 channels includ ing the recorder playback and the outputs of the two effects Chase A state in which the AW2816 is receiving MTC see entry from an external device and running in syn chroniza...

Page 29: ...top and Record Monitor The headphones or speakers used to reproduce the sound that is output from the AW2816 Also used to refer to the act of listening to the playback from the headphones or speakers...

Page 30: ...eing performed each second If this number is higher a broader frequency range of sound can be captured as data Scene memory A function that collectively saves the parameter set tings of the AW2816 s m...

Page 31: ...YAMAHA CORPORATION V766850 R1 1 IP 32 Pro Audio Digital Musical Instrument Division P O Box 3 Hamamatsu 430 8651 Japan 01 08 3500 AP Printed in Japan...

Reviews: