background image

-11-

F.
G.
H.
I.

C. 
D. 

E.

Tips for Printout Scaling(

):

If you find the dimension of the printout doesn't 
match the 3D model, you may adjust the scale of the 
X/Y axis. The setting will be stored in the software 
and applied to every print job sent afterwards.

Operation Flow

Click "Import" to import a .stl/.3ws/.3wn file to the virtual platform.
 Adjust the placement, angle and size of the object with "Move", "Rotate" and "Scale" buttons on the left as desired. Also add supports and brim for objects with 
overhangings or that have less contact with the platform.
Click "print" and setup printing preference based on the features of the prints, and click "Print" to slice and send the file for printing.

You may generate support automatically with XYZware_Nobel, and then add/delete the 

support structure based on your printing experience. Use both functions help to ensure the success 
of printing, and may decrease resin consumption and shorten printing time.

Once the support structures are setup, you can save the object in 

.3ws 

format. With this file format, 

you can re-adjust the support layout.

If the object is moved vertically or resized, the support structure will be reset. Please set 

up the supports again.

J.
K.

L.
M.
N.
O.

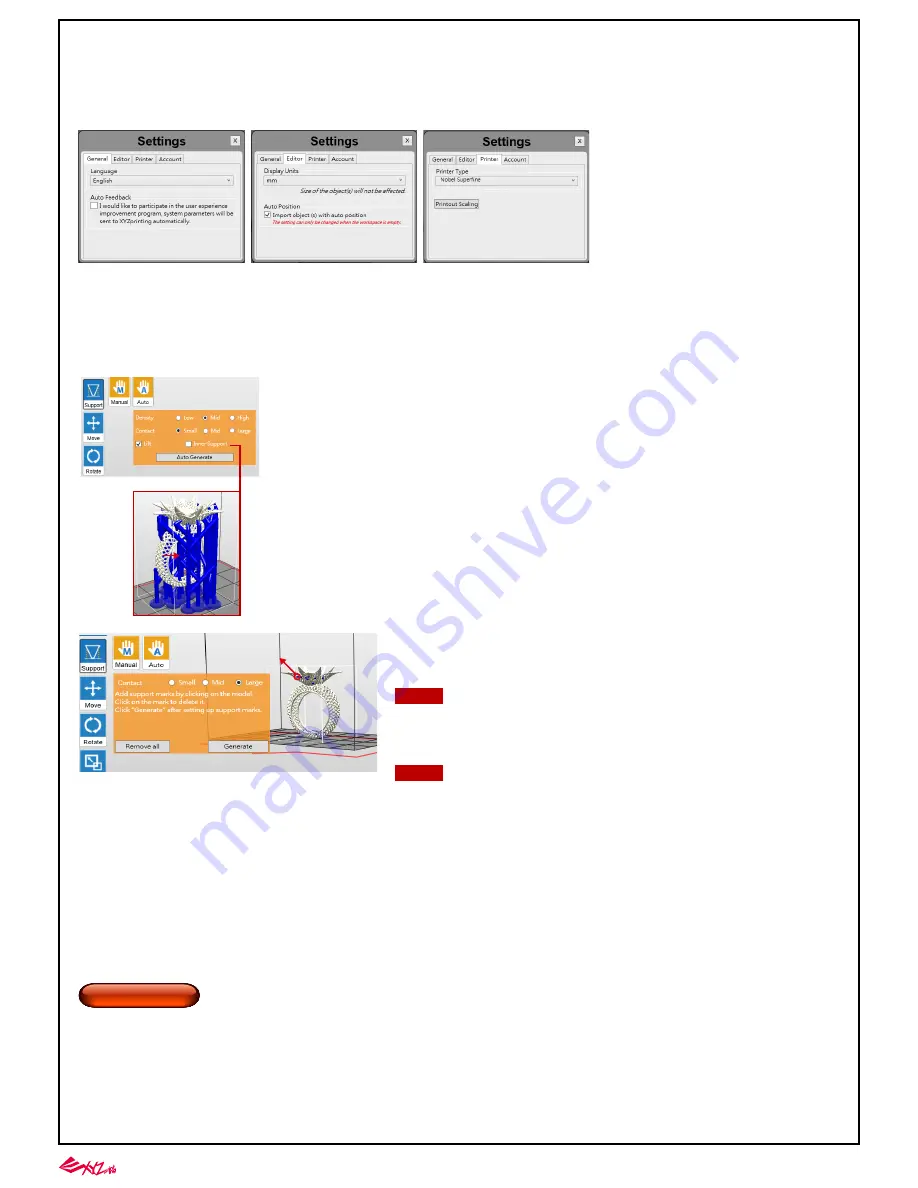
Manual editing: you may add or delete support structure based on the features of the print manually. 
To add support, simply select a proper size of the contact point and then click on the model at the 
overhangs. To delete support, just click on the support mark (the blue dot). After setting up support 
marks, click "Generate" to continue.

Move the object: move the object along the x, y, or z axis. You may also press and hold ALT key and drag the mouse to move the object horizontally.
Rotate the object: adjust the angle of the object around the x, y, or z axis. Flipping the object around to adjust the face on the platform may help to enhance printing 
performance. Increasing the contact area between the object and the platform may help to enhance printing quality and strength.
Resize the object: Scale the object as you desire. The adjustment to the object on the platform will not affect the size of your original file.
View info of the object: check the dimension and location of the object, so you can tell the size of the object easily.
Remove the object from the platform: select an object and click the option to delete it from the platform. Or you may press Delete key to remove the object.
View printer status.

Support auto generation: XYZware_Nobel is able to analyze the features of the model and add support structure to where 
necessary. Simply select a desired density 

 and contact 

, choose to "Lift" 

 the print and/or print without internal support 

, and press "Auto Generate" to preview the support structure.

 Density : Large overhangs will require more support structure. However, more support structure will take longer for printing.

 Contact : Thicker contact point will lead to higher strength but will take longer for printing.

 Lift : Lift the objects over the platform will ease the removal after printing. However, the support structure under the prints 

will take longer for printing.

 Inner Support : For objects with inner overhanging structure, XYZware_Nobel will add support to the parts. However the 

support inside may not be removed easily, you may consider printing without inner support.

Save as .stl or .3ws file: Save all objects on the platform to a single stl/3ws file. Any adjustment to the size or placement of the objects will apply to the file.
Setup printing preference and send the objects for printing: Once your device is connected to the printer, click "Print" to open printout setting window (options are the 
same as "Export" window). Set your printing preference based on the features of the objects and hit "Print" to proceed.
Setup interface language, printer type, display unit and etc.

Info/Software & firmware update: Apply printer firmware and XYZware_Nobel updates when prompt by the software for stable printing performance.
Zoom in/out: Zoom in or out the platform to view the details of objects.
Switch views: Switch views with a click to view objects from different angles.
Support structure: support structure is required under overhangs. It prevents the falling for gravity and the deforming due to the peeling force during printing, and 
increases adhesion of the model to the platform.

Note

Tip

Support mark

Summary of Contents for Nobel Superfine

Page 1: ...XYZprinting Nobel Superfine ENGLISH V3...

Page 2: ...trade names and trademarks are properties of their respective owners Important Safety Information Do not let children operate this device without adult supervision Moving parts may cause serious injur...

Page 3: ...material in the event of sending your unit back for repair Power Switch Platform Resin Tank LCM Operation Panel USB Disk Port Filling Tube The Nobel Superfine is shipped with the below parts and acce...

Page 4: ...formance Printing via WiFi Connection Install the Printing Software Printing Operations Connect the printer to your PC with the USB cable Printing via USB Cable Connection Once the WiFi connection is...

Page 5: ...The Settings menu alows you to adjust printer settings To pause printing To cancel printing To refill resin MOVE PLATFORM Activate the function when you need to move the platform manually Simply selec...

Page 6: ...d the instruction on inputing the password with the printer control panel Home Key Switch input mode Up and Down keys Select numerals alphabets or symbols Left and Right keys Moves to the previous or...

Page 7: ...e default language is English To switch to other language Select a language and press OK to change the setting PRINTER NAME You can change the printer name on the WiFi network with below steps RESTORE...

Page 8: ...lease go to XYZware_Nobel RESIN STATUS Resin Status provides the information on resin level see REMAINING and the capacity color and material of the resin Press OK to read the second page Resin Model...

Page 9: ...the 3D model into XYZware_Nobel select EXPORT to save in USB flash disk as 3wn file format and save the sliced file in the USB drive Plug the flash drive into the USB port on the front of the printer...

Page 10: ...phics RAM 4GB Hard disk space 300MB and more Recommended system requirement System RAM 8GB Graphics RAM OpenGL 2 1 compatible Hard disk space 300MB and more Minimum system requirement 32 bit operating...

Page 11: ...platform will not affect the size of your original file View info of the object check the dimension and location of the object so you can tell the size of the object easily Remove the object from the...

Page 12: ...ect the printer and the PC with the USB cable supplied in the package firstly and following the steps below WiFi connection can be set up on the printer directly or through XYZware_Nobel installed on...

Page 13: ...Printer Monitor in the lower right corner and then press My Printer Change the Printer Name Please follow the below steps to change the printer name in XYZware_Nobel Press Wireless Setting Rename the...

Page 14: ...in the counterclockwise direction and remove the resin tank Installation Reinstall the resin tank on its original position The MAX mark should be located on the left up side and turn the knobs of the...

Page 15: ...the resin tank with a sharp hard tool to avoid damaging the surface coating 2 Filter the resin after every print may ensure the stability of printing 3 Resin residing in the black filling tube may dri...

Page 16: ...ess lint free cloth If resin in tank is cured please replace the tank Spray alcohol on the tank and the Teflon surface and wait for around 1 minute Clear the surface of the tank gently with plastic sc...

Page 17: ...Support and Brim functions in the software Rotate For models of top heavy structure with less contact with the platform or with any larger solid layer please rotate the model to reduce the effect of p...

Page 18: ...ntration Washing with alcohol of higher concentration will result in higher cleaning efficiency Alcohol is not supplied with the printer 3 The cleanup time of print depends on of the complexity struct...

Page 19: ...3 Place the printer away from direct sunlight or UV lighting even if the lid is covered or resin in tank may cure and solidify Post Process Your Prints Remove Support Structure Use pliers or other to...

Page 20: ...S on the printer touch Z axis bottom sensor and see if the status of Z B switches from 0 to 1 If the value doesn t switch accordingly then the sensor is malfunctioning Then select UTILITIES MOVE PLATF...

Page 21: ...IFI module malfunctioned Suggestion Contact customer service center directly Error Code 100C Internal error Suggestion Contact customer service center directly Error Code 100A Z axis motor malfunction...

Page 22: ...bottle Error Code 2006 Unable to resolve the file Suggestion Slice the file again with XYZware_Nobel Be sure to set Printer Type as Nobel Superfine while slicing the file Error Code 2007 File too lar...

Reviews: