background image

P12

P12

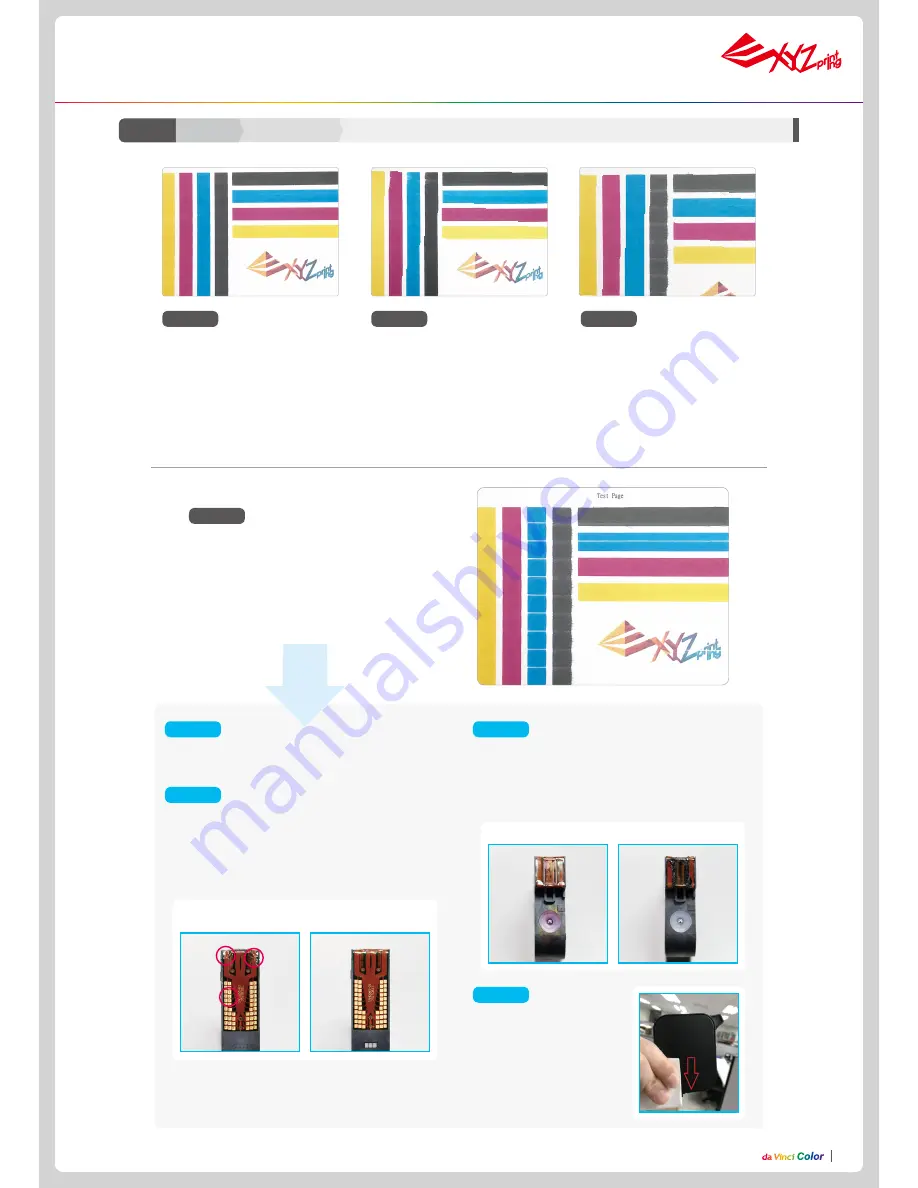
Please reinstall the cartridge and print the test page.
If problem not solved, please proceed with step 2.

Stept 1

Pic 3

Calibration Ink Cartridge Troubleshoot

C2-2

Ink

Check for any torn cable or damaged contacting pad 

in shown example.

If found torn cable, please change new cartridge
If found damaged contacting pad and also the pin in 

cartridge station was also damaged, contact support 

for replacement.

Check for possible clog ink head cartridge as exam

-

ple shown.
Please conduct cartridge cleaning process in Pg 10 

ink guidance paragraph.
If problem not solved, please proceed with step 4.

Using paper towel to cover 

the ink cartdrigde as shown in 

the picture 4 and downward. 

If the ink comes out, please 

print the test page
If not solved, please change 

the new ink cartridge.

Note : Please refer to our support website for 

latest ink cartridge cleaning procedure.
Please refer C2-1 for preparing the A4 test page.

Stept 2

Stept 3

Stept 4

Clean Ink Head

Clog/dirty Ink Head

Normal Cartridge

NG Cartridge

(Torn cable & pad)

Function Operation and Instructions 

Picture 3 show example of no good test page.
While line was shown horizontal and vertical 

color of bars.
Please conduct the below steps accordingly.

Pic 1

Pic 2

Pic 2-1

Picture 1 shows an example of 


normal test page.

Picture 2 show some slight color 

offset on 

horizontal part of test page.

It is under acceptance range. If the 

rprint of the test page gets worst, 

please proceed with the cleaning 

procedure.

Picture 2-1 shown some slighly 

black ink smudge on the horizon

-

tal & vertical part, it may happen 

to other color.
This is within accaptable range

Summary of Contents for da Vinci Super

Page 1: ...y In this manual users can learn more about the operating tips application skills and maintenance of the da Vinci Color 3D printer Please refer support http support xyzprinting com to download latest...

Page 2: ...om high temperature might occur The machine becomes hot during operation and thus run in high temperature Do not touch or replace parts when they are not cooled down After startup the parts in the mac...

Page 3: ...xterior 1 5 inch color touch panel 2 Auto feeding module 3 Print head 4 Print bed EZ removable rubber magnet 5 Filament spool holder 6 USB Port 7 USB Port WiFi dongle 8 Power switch 9 USB Port To PC 1...

Page 4: ...x 14 04 Temperature Machine operating temperature 15 30 C Cartridge storage temperature 15 35 C Filament storage temperature 0 38 C The following tools are intended for use under the guidance or guard...

Page 5: ...the foam under the print bed Remove the tape on the body 4 in total 4 Move the printer to a table or plat form Do not move the printer by yourself as it is heavy 1 Remove the plastic wrap and PP 2 Op...

Page 6: ...er end of the guide tube into the feed module and secure it tightly 12 Remove the cable tie and foam in front and back of the front door 9 Unpacking and Installation There is a sheet of PC film to rub...

Page 7: ...d to import files 3cp from a USB drive to the machine for printing without a com puter This includes the functions in Home Page 1 Settings of the Print Bed Print Head Filament and Ink Next page includ...

Page 8: ...and select Filament 4 Tap Filament 5 Tap Load 6 Confirm the operation 7 Insert the filament into the feed module it will be automatically loaded 8 Check if the temperature of the print head goes up to...

Page 9: ...nloaded automatically 6 The nozzle will be preheat and notify you when to insert filament into the feed module 7 The filament will be automatically loaded 5 When the unloading operation completes tap...

Page 10: ...o the paper towel displays two straight lines If so ink guidance is successfully completed Once ink guidance is done install the ink cartridge 4 Press the cartridge head against the paper towel to tra...

Page 11: ...plate on top 6 Check if the order of the ink color is K Black C Cyan M Magenta and Y Yellow from left to right Note Replacement of any ink cartridge please conduct inkjet calibration test Cartridge I...

Page 12: ...out please print the test page If not solved please change the new ink cartridge Note Please refer to our support website for latest ink cartridge cleaning procedure Please refer C2 1 for preparing th...

Page 13: ...and Instructions 2 Check that the print bed is clear 1 Tap Ink Calibration 5 After the printing is completed take out the calibration card 6 Horizontally and vertically find the box where the ink is t...

Page 14: ...head to the center of the print bed It is recommended that the space between the print head and the print bed just touch and the nozzle can move smoothly on the print bed D1 D2 D3 D10 D6 D4 D8 D5 D7 D...

Page 15: ...stallation sequence of new print head 1 Connect the bus 2 Press the white release button on the print head and assemble the print head and the mechanism After attaching the print head check to see tha...

Page 16: ...nect the printer to the computer and run the XYZmaker Check if the WiFi function is activated on the computer and connect to the access point PRINT Set printing parameters and quality If only a file c...

Page 17: ...Operation and Instructions D5 Language The da Vinci Color provides eight display languages including traditional and simplified Chinese English Japanese German Italian Spanish and French The language...

Page 18: ...he door will be locked 60 sec after the print ends the door will unlock The door will be unlocked when users tap Pause or Stop during printing The door will lock again when the door is closed and prin...

Page 19: ...First time printing Transfer files to be printed via the PC software XYZ Maker 2 Click on OPEN to select the model file to be printed from the folder You can adjust the object size printing position a...

Page 20: ...if not installed and used in accordance with the instructions may cause harmful interference to radio communications However there is no guarantee that interference will not occur in a particular inst...

Reviews: